1
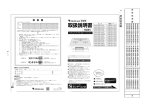
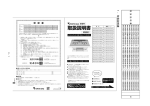
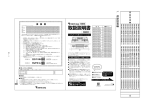
®
XD-V35 Digital Wireless
Pilot’s Handbook
Manuel de pilotage
Pilotenhandbuch
Pilotenhandboek
Manual del Piloto
取扱説明書
40-00-0335
also available @ www.line6.com/manuals
Rev B
Important Safety Instructions
C A UT I O N
RISK OF ELECTRIC
SHOCK DO NOT OPEN
WARNING : TO REDUCE THE RISK OF FIRE OR ELECTRIC SHOCK, DO NOT REMOVE SCREWS.
NO USER-SERVICEABLE PARTS INSIDE. REFER SERVICING TO QUALIFIED SERVICE PERSONNEL.
WARNING : TO REDUCE THE RISK OF FIRE OR ELECTRIC SHOCK, DO NOT EXPOSE THE
APPLIANCE TO RAIN OR MOISTURE.
CERTIFICATION
THIS DEVICE COMPLIES WITH PART 15 OF THE FCC RULES. OPERATION IS SUBJECT TO THE
FOLLOWING TWO CONDITIONS: (1) THIS DEVICE MAY NOT CAUSE HARMFUL INTERFERENCE,
AND (2) THIS DEVICE MUST ACCEPT ANY INTERFERENCE RECEIVED, INCLUDING INTERFERENCE THAT MAY CAUSE UNDESIRED OPERATION.
Warning: Changes or modifications not expressly approved in writing by Line 6 may void the users authority to
operate this equipment.
RF Exposure Statement: This transmitter must not be co-located or operated in conjunction with any other
antenna or transmitter.
Note: This equipment has been tested and found to comply with the limits for a Class B digital device, pursuant
to part 15 of the FCC Rules. These limits are designed to provide reasonable protection against harmful interference in a residential installation. This equipment generates, uses and can radiate radio frequency energy and, if
not installed and used in accordance with the instructions, may cause harmful interference to radio communications. However, there is no guarantee that interference will not occur in a particular installation. If this equipment
does cause harmful interference to radio or television reception, which can be determined by turning the equipment off and on, the user is encouraged to try to correct the interference by one or more of the following measures:
- Reorient or relocate the receiving antenna.
- Increase the separation between the equipment and receiver.
- Connect the equipment into an outlet on a circuit different from that to which the receiver is connected.
- Consult the dealer or an experienced radio/TV technician for help.
This Class B digital apparatus complies with Canadian ICES-003. This Category II radio communication device complies with Industry Canada Standard RSS-310. Cet appareil numerique de la classe B est conforme a la
norme NMB-003 du Canada. Ce dispositif de radiocommunication de catégorie II respecte la norme CNR-310
d’Industrie Canada
The FCC compliance sticker is attached to the THH06 battery compartment.
Remove the THH06 base by unscrewing counter clockwise to see this compliance sticker.
You should read these Important Safety Instructions.
Keep these instructions in a safe place
Before using your XD-V35 Digital Wireless System, carefully read the applicable items of these operating
instructions and the safety suggestions.
1. Obey all warnings in the XD-V35 manual.
2. Do not perform service operations beyond those described in the XD-V35 Manual. Service is required when
the apparatus has been damaged in any way, such as:
• liquid has been spilled or objects have fallen into the apparatus
• the unit has been exposed to rain or moisture
• the unit does not operate normally or changes in performance in a significant way
• the unit is dropped or the enclosure is damaged
3. Do not place near heat sources, such as radiators, heat registers, or appliances which produce heat.
4. Guard against objects or liquids entering the device. Do not use or place unit near water.
5. Do not step on cords. Do not place items on top of cords so that they are pinched or leaned on. Pay particular attention to the cord at the plug end and the point where it connects to the device.
6. Clean only with a damp cloth.
7. Only use attachments/accessories specified by the manufacturer.
8. Prolonged listening at high volume levels may cause irreparable hearing loss and/or damage. Always be sure
to practice “safe listening.”
TA-2009/1484
APPROVED
N222
20545/SDPPI/2011
3794
20543/SDPPI/2011
3794
(01)07899153000011
(01)07899153010271
Thank you for your purchase of the XD-V35 wireless microphone system. It is a high quality digital
wireless system, in a simple format that is virtually plug-and-play. With its fully digital transmission,
the system provides features and benefits that differ in some ways from previous generations of analog
wireless, but in most respects you use it just like other wireless systems. By understanding a few simple
concepts, you’ll be able to achieve superior audio quality, a secure and dropout-free signal, and the
ability to use multiple channels of wireless together without interference or other conflicts.
•Digital transmission in the 2.4 GHz band – license-free operation worldwide
•Avoids interference from high-power TV transmitters in the UHF bands
•Digital technology provides the audio response of a cable, without companding – 24-bit digital
converters, 118 dBA dynamic range, and 10 Hz – 20 kHz bandwidth
•System latency < 3.5 ms
•Proprietary two-frequency transmission promotes reliable, dropout-free performance
•Compatible with existing WiFi installations
•Fast setup: gain, squelch, or level adjustments not required
•6 channels that work together simultaneously
•275 foot (83 meter) range
•Transmitter life > 8 hours on two AA alkaline batteries
•Battery level and RF LED meters
•Table top receiver with internal antenna
•XLR and ¼" TRS output connectors
•Designed for compatibility with previous XD-V30 systems
Recommendations
for
Best Performance
•Maintain a clear line of sight between the transmitter and receiver’s internal antennas.
Typically the receiver should be placed at table top or higher level. Avoid placing the receiver
in the bottom of the rack or behind walls and obstructions.
•When transmitters are used at a greater distance, place receivers closer to them and use XLR
mic (or ¼") cables to connect to the audio system.
•Avoid placing the receiver in close proximity to RF generating equipment including computers,
wireless access points, in ear monitor transmitters and microwave ovens.
•Avoid blocking antennas in the transmitters. Do not “cup” the bottom of the handheld
transmitter. Avoid placing the bodypack transmitter in pockets.
Supplied Components
XD-V35 Receiver: receiver; 9V / 0.5A external universal power supply; user’s manual.
THH06 Handheld Microphone: transmitter; two (2) AA alkaline batteries; mic stand clip.
or
TBP06 Bodypack Transmitter: transmitter; two (2) AA alkaline batteries; unidirectional lavalier
microphone with windscreen and clip.
4
XD-V35 Digital Wireless Quick Setup
Receiver
1
2
3
trans
status
4
5
audio
2.4GHz DIGITAL
WIRELESS SYSTEM
XDpower
CHANNEL
UNBALANCED
OUT
BAL
OUT
RXT06
RECEIVER
+
9Vdc 200mA
6
7
8
1. 6-Position Channel Select Knob
2. Battery Level Indicator LEDs – Lights green, with all lit indicating full transmitter battery;
bottom LED turns red when 1 hour remains, and flashes red when less than 40 minutes remain.
3. Transmitter Signal Level Indicator LEDs – RF lights green to indicate transmitter signal strength/
quality; with transmitter off, red lights indicate interference on that channel.
4. Audio LED – Green when audio signal present.
5. Power LED – Blue when on.
6. Unbalanced 1/4-Inch Audio Output Connector
7. Balanced XLR Audio Output
8. 9VDC Power Input Connector – Plug the power supply cable into the receiver and AC power;
receiver will turn on. Turn the rotating Channel Select knob to the desired channel (must match
transmitter channel). Connect with an audio cable to a mixer or similar. The receiver is ready to
use.
Note: The receiver antenna is internal.
5
Bodypack Transmitter
3
1
2
6
4
5
1. Audio LED – Green when audio signal present
2. Battery Level LED – Blue with good level, red when low, flashing red when less than 40 minutes
remain
3. On / Off Slide Switch
4. Channel Select Slide Switch
5. Quarter-Inch (1/4”) TRS Input Connector
6. Battery Door Slide switch and hinged door. Open the battery door on the side of the bodypack
and insert two AA batteries. Slide the On/Off switch to turn on. Slide the Channel Select button
to select; match the channel number with the receiver channel. The transmitter is ready to use.
Note: The bodypack transmitter features a belt clip to secure it to a belt or other clothing.
6
SELECT
CHANNEL
Handheld Transmitter
AA BATTERY
1. Power Button – Press briefly to turn on; press and hold for two seconds to turn off
2. Channel Select Button – Channels 1 – 6
3. Channel LEDs – Lights blue to show current active transmission channel; Channel 6 LED
illuminates red when battery life is low, and blinks red when less than 40 minutes remain.
Unscrew the transmitter base and insert two AA batteries. Push the On button to turn on. Press
the Channel Select button to set the channel, indicated by LED position on display; match the
channel number with the receiver channel. The transmitter is ready to use.
XD-V35 Receiver Detailed Setup
The receiver is quite simple to set up. This section adds a few useful details.
•When used stand-alone, position the receiver on a surface that provides line of sight (or at
least near line of sight) with the location where the transmitters will be used. This will help
maximize the range.
•Connect the provided DC-1G power supply to the 9VDC 200mA connector on the rear
panel; to secure, press a loop of the cable through the cable holder located to the left of the
connector to prevent accidental disconnection. Plug the power supply into an available AC
outlet that provides voltage from 90 – 240 VAC at 50 or 60 Hz.
•The blue Power LED on the front panel will light and the receiver is on.
•Turn the Channel Select knob to point to channel 1 through 6. The channel number on the
receiver and its associated transmitter must match. When using multiple receivers, set each
one to a different channel number.
•With the associated transmitter turned on, you will see – depending on the distance between
the transmitter and receiver – all three or the bottom one or two RF LEDs lit green, on the
right side of the Trans Status window.
•Depending on the condition of the transmitter batteries, you will see all three or the bottom
one or two battery status LEDs lit green, on the left side of the Trans Status window. If the
battery level is low, the bottom LED will turn red, and it will flash red when 40 minutes or
less remain.
•When you speak or sing into the microphone, the green Audio LED will light.
•Connect to the audio system using the rear-panel Balanced XLR Audio Output or Unbalanced
1/4-Inch Audio Output. Note, the signal output from either of these connectors is mic level, and
7
the receiver has no gain or attenuation controls.
Do not use TRS connectors with the XDV35 Receiver as the Ring portion of the connector is used for firmware updates and may cause
computer generated noise in your audio outputs.
Note: When the associated transmitter is off, and moderate to strong interfering frequencies not coming
from a Line 6 transmitter are present on the selected receiver channel, one or more of the RF LEDs on
the right side of Trans Status will turn red. Higher levels of interference will light more red LEDs. Use
in high interference conditions will result in reduced range for the system. Either move the receiver
away from the source of the interference – such as a nearby WiFi modem or computer with a WiFi
transceiver – or select another channel not showing interference.
THH06 Handheld Transmitter Detailed Setup
•Twist the bottom section of the THH06 transmitter counterclockwise, unscrew, and remove
it. Lightly pull the battery cover tab down with a thumbnail, and open the cover by pulling
back; it is hinged at the base of the transmitter.
•Insert two AA batteries, noting the polarity markings shown in the battery compartment. Use
alkaline batteries, or rechargeable NiMH batteries in the 2400 – 2800 mAh range. Close the
battery cover and replace the bottom section of the transmitter.
•Press and briefly hold the left button below the Channel display to turn on. A small blue LED
will light above the currently selected channel.
•Press the right Select button to change to the next channel; the blue LED above the number
will light. Each press of the button will go to the next channel. The channel is selected
and active immediately. Note, the transmitter buttons are recessed to prevent accidental
activation, so press them down firmly below the recessed surface, until you feel a click.
•When the transmitter is on the same channel number as the receiver, the receiver Trans
Status LEDs will light green, and when you speak in the mic the receiver Audio LED will
light green.
Note: When the transmitter battery level is low, the LED over the number 6 on the display will light
red, and it will flash red when less than 40 minutes remain. Line 6 transmitter battery-life meters are
calibrated for use with alkaline batteries, so when NiMH rechargeable batteries are used the remaining
life will not be as accurate – however, the basic indication is to insert fresh batteries soon after the LED
shows red. Carbon-zinc batteries are not recommended.
TBP06 Beltpack Transmitter Detailed Setup
•With a thumbnail, slide down the latch on the battery door located on the right side of the
transmitter.
•Open the hinged door and insert two AA batteries, noting the polarity markings shown on
the top plate of the battery compartment. Use alkaline batteries, or rechargeable NiMH
batteries in the 2400 – 2800 mAh range. Close the battery cover and slide the latch up with
your thumbnail to lock.
•Slide the switch on the top of the transmitter to ON; the LED marked Batt (battery) will light
blue. Note, When the transmitter battery level is low, the Batt LED will light red, and it will
flash red when less than 40 minutes remain.
•On the face of the transmitter, the Channel select provides a metal slide switch to set a
channel from 1 to 6. Slide the metal button to the desired channel number; it has detents so
it will stop in the correct place. The channel is selected and active immediately.
•Connect the lavalier microphone to the 1/4” TRS (tip-ring-sleeve) jack on the bottom of the
transmitter. When you speak in the mic, the Audio LED will light.
•When the transmitter is on the same channel number as the receiver, the receiver Trans
8
Status LEDs will light green, and when you speak in the mic the receiver Audio LED will
light green.
Connecting
the
XD-V35 Receiver
The receiver features a balanced XLR and unbalanced (tip-sleeve) quarter-inch connector. To connect
to a mixing board or powered mixer, use a microphone cable between the receiver output and the
mixer’s mic-level input – in the same way as you would connect a wired microphone. The output of the
XD-V35 receiver is virtually identical to that of the microphone on the transmitter, or other standard
wired mic.
To connect to an instrument amplifier or other audio equipment with a quarter-inch connector such
as a signal processor or effects unit, use a 1/4” to 1/4” instrument cable. This output is also mic level.
Microphone Usage Tips
Try to maintain a constant distance and relationship between the user’s mouth and the microphone. In
live theatre this is often done by placing a small mic in the hairline toward the front side of the head or
right above the ear. With mic placement on the collar or shoulder area, changes in level can occur as
the user’s head turns; experiment with the location of the mic to minimize this effect. Mic placement in
the center of the chest can help with the level changes, but is farther from the voice and quite shielded
from the direct energy of the voice, so typically provides a hollow midrange or “chest” sound to the
voice.
The V35 Belt Pack transmitter includes a built in roll-off filter.
Walk-Testing the Performance Area
When first setting up a wireless system in a new location, it is good practice to position the receivers
where they will remain during the event, and then walk the entire performing area with the audio
system on and the transmitter active. Talk and listen for signal dropouts or other problems, and note
where they are with respect to your receiver placement.
If possible, reposition the receiver to obtain better coverage and improve or eliminate areas with lower
signal strength – by improving line-of-sight to the transmitter.
9
APPENDICES
Troubleshooting
Problem
Solution
No Audio
Transmitter off or battery out of power
Batteries put into transmitter out of polarity
Transmitter and receiver on different channels
Receiver off / unplugged or not connected
Can’t Turn Off Transmitter
Change Channels
Transmitter in locked mode (THH06 handheld only)
Loss of Signal
Dropouts
Shorter Range
Distance between transmitter and receiver is too great.
Other transmitting or RF devices are too close to the receivers.
Receiver not in line-of-sight with transmitter
Interference on channel – change channels
Another Line 6 transmitter is turned on and set to the same channel
Setting THH06 and TBP06 Transmitters to XD-V30 Compatibility Mode
The XD-V35 system ships set to the new dual frequency RF2 mode. To use an XD-V35 version
transmitter with an earlier generation XD-V30 receiver (RF1 mode), you must change the transmitter
from RF2 mode to RF1 mode. The method differs slightly between the handheld and beltpack.
THH06 Handheld Transmitter
•Turn the transmitter off.
•Press and hold the channel SELECT button.
•While holding the SELECT button, press and hold the power ON button.
•The blue LED over channel 1 will flash three times to indicate that the transmitter is in the
RF1 mode.
•To revert to the RF2 mode, repeat the above steps; the blue LED over channel 2 will flash
three times when the transmitter is in this mode.
TBP06 Beltpack Transmitter
•With transmitter off, set the Channel Select slide switch to channel 6.
•Turn on the transmitter.
•Wait for the blue LED to flash followed by a green LED flash.
•Immediately slide the Channel Select switch completely left to channel 1.
•Quickly slide the Channel Select switch completely right to channel 6.
•This process must be completed within three seconds of turning on the transmitter.
•The blue LED will flash once to indicate that the transmitter is now in the RF1 transmission
mode. To revert to RF2 transmission mode, repeat the above steps; the blue LED will flash
twice when the transmitter is in this mode.
10
XD-V35 Digital Wireless System Specifications
System
Frequency Band
2.4GHz ISM Band
Compatible Channels
6
Spatial Diversity with Digital Buffering
Yes
Frequency Diversity
Yes (2 Frequencies per channel)
Compander-Free Design
Yes
Frequency Response THD %
10 Hz (-0.5 dB) - 20kHz (-2.5 dB)
0.03% typical
System Latency
< 3.5 ms (audio input to output)
Operating Temp Range
0 – 50 degrees C
Range
up to 275 feet (83 meters)
Actual range will depend on nearby RF interference sources including line of sight
obstacles
Receiver
RF Signal Strength Indicator
Battery Level Indicator
3-Segment LED
3-Segment LED
Audio Presence LED
Yes
Squelch & Pad adjustments
None required
Receiver Antennas
Internal
Receiver Format
Table Top
Receiver Power Requirements
9Vdc 200mA
Output Impedance
XLR: 150 Ohms
Balanced / 1/4”: 1 kOhm Unbalanced
95 dBm
Sensitivity Image Rejection
56 dB
Transmitters
Transmitter RF Output Power
10 mW
Battery Life
8 hours
Batteries
2 x AA Alkaline
Battery Level Display
Low Battery LED
Dynamic Range
THH06 Handheld
TBP06 Beltpack
>115 dB
>118 dB
TBP06 Maximum Audio Input Level
6.5 Vpp
TBP06 Beltpack Input Impedance
1.3 M Ohms
TBP06 Beltpack Supplied Bias Voltage
5 VDC
Pinout To TBP06 Beltpack 1/4” TRS Connector
•Tip = Signal
•Ring = Bias Voltage, 5 VDC
•Sleeve = Ground
11