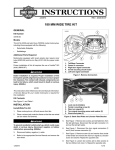
1
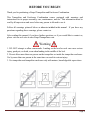
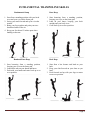
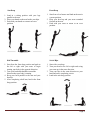
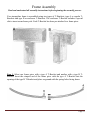
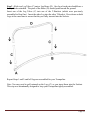
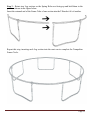
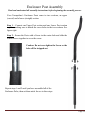
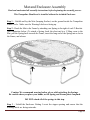
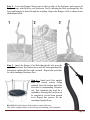
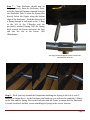
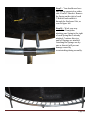
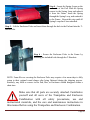
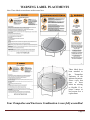
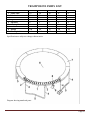
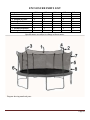
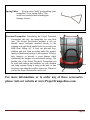
Trampoline and Enclosure User Manual For all round Propel Trampoline Models Assembly, Installation, Care, Maintenance, and Use Instructions WARNING READ THESE MATERIALS PRIOR TO ASSEMBLING AND USING THIS TRAMPOLINE AND ENCLOSURE. Failure to assemble and use this Trampoline and Enclosure Combination as specified in this manual will automatically void the warranty. Do Not return this product to the store. Instead, please visit our website at www.PropelTrampolines.com where you will find our current contact information. Our friendly customer service staff can help you with any problems or questions that may arise during the assembly, installation, use, maintenance, or obtainment of replacement parts for your Trampoline. This Trampoline and included Safety Enclosure meets or exceeds all 2011 standards of the American Society for Testing and Materials. WARNING Read all assembly, installation, care, maintenance, and use instructions in this manual prior to assembling and using this Trampoline and Enclosure. Please save this manual for future reference and check our website for the latest manual revisions. LIABILITY DISCLAIMER: While every attempt is made to embody the highest degree of protection in all equipment, we cannot guarantee freedom from injury. The user assumes all risk of injury due to use, assembly, or transportation. All merchandise is sold on this condition, which no representative of the company can waive or change. Warning This Trampoline and Enclosure Combination is intended to be used by only one person at a time, weighing not more than 300 lbs. (15 foot), 275 lbs. (14 foot), 250 lbs. (12 foot), 225 lbs. (10 foot), or 200 lbs. (8 foot). Page 2 TABLE OF CONTENTS BEFORE YOU BEGIN - 4 INSTRUCTIONAL MATERIAL AND RULES FOR USE - 5 OVERVIEW OF TRAMPOLINE AND ENCLOSURE COMBINATION USE - 6 INSTRUCTIONAL PROGRAM AND MODEL LESSONS - 7 FUNDAMENTAL TRAMPOLINE SKILLS - 8 ASSEMBLY INSTRUCTIONS - 10 FRAME ASSEMBLY - 11 ENCLOSURE POST ASSEMBLY - 14 MAT AND ENCLOSURE ASSEMBLY - 15 SAFETY PAD ASSEMBLY - 19 WARNING LABEL PLACEMENT - 21 ANCHOR KIT INSTALLATION - 22 MOVING THE TRAMPOLINE - 23 DISASSEMBLY - 23 CARE AND MAINTENANCE - 23 TRAMPOLINE PARTS LIST - 25 ENCLOSURE PARTS LIST - 26 ORDERING REPLACEMENT PARTS - 27 AVAILABLE ACCESSORIES - 28 MY TRAMPOLINE INFORMATION - 30 LIMITEDWARRANTY- 31 WARRANTY REGISTRATION - 32 WARNINGS - 1, 2, 4, 5, 10, 21, & 22 Page 3 BEFORE YOU BEGIN Thank you for purchasing a Propel Trampoline and Enclosure Combination. This Trampoline and Enclosure Combination comes equipped with warnings and instructions for its proper assembly, care, maintenance, and use. This information must be read by all supervisors and users before any person is allowed to use it. Follow all warnings pictured below or otherwise included in this manual. If you have any questions regarding these warnings, please contact us. After reading this manual, if you have further questions, or if you would like to contact us, please visit our web site at www.PropelTrampolines.com. Warning 1. DO NOT attempt or allow somersaults. Landing on the head or neck can cause serious injury, paralysis, or death, even when landing in the middle of the bed. 2. Do not allow more than one person on the trampoline or inside the trampoline enclosure. Use by more than one person at the same time can result in serious injury. 3. Use trampoline and trampoline enclosure only with mature, knowledgeable supervision. Page 4 INSTRUCTIONAL MATERIAL AND RULES FOR USE Warning 1. DO NOT attempt or allow somersaults. Landing on the head or neck can cause serious injury, paralysis, or death, even when landing in the middle of the bed. 2. Do not allow more than one person on the trampoline. Use by more than one person at the same time can result in serious injuries. 3. Use trampoline only with mature, knowledgeable supervision. 4. Trampolines over 20 in. (51 cm) tall are not recommended for use by children under 6 years of age. 5. Inspect the trampoline and trampoline enclosure before each use. Make sure the barrier and the enclosure support (frame) and frame padding is correctly and securely positioned. Replace any worn, defective, or missing parts. 6. Users may become entangled in or strangled by loose cords or in gaps between trampoline and enclosure. 7. Keep enclosure tightly fastened to the trampoline in accordance with the manufacturer’s instructions. Failure to properly assemble and maintain a tight, secure trampoline/ enclosure boundary may result in serious injury, strangulation, or death. 8. Do not attempt to jump over the barrier. 9. Do not attempt to crawl under the barrier. 10. Do not intentionally rebound off the barrier. 11. Do not hang from, kick, cut, or climb on the barrier. 12. Wear clothing free of drawstrings, hooks, loops, or anything that could get caught while using the trampoline/enclosure and result in entanglement or strangulation, or both. 13. Do not attach anything to the barrier that is not a manufacturer-approved accessory or part of the enclosure system. 14. Enter and exit the enclosure only at the enclosure door or barrier opening designated for that purpose. 15. Climb on and off the trampoline. It is a dangerous practice to jump from the trampoline to the floor or ground when dismounting, or to jump onto the trampoline when mounting. Do not use the trampoline as a springboard to other objects. 16. Stop bounce by flexing knees as feet come in contact with the trampoline bed. Learn this skill before attempting others. 17. Learn fundamental bounces and body positions thoroughly before trying more advanced skills. A variety of trampoline activities can be carried out by performing the basic fundamentals in various series and combinations, performing one fundamental after another, with or without feet bounces between them. 18. Avoid bouncing too high. Stay low until bounce control and repeated landing in the center of the trampoline can be accomplished. Control is more important than height. 19. While keeping the head erect, focus eyes on the trampoline toward the perimeter. This will help control bounce. 20. Avoid bouncing when tired. Keep turns short. 21. Properly secure the trampoline when not in use. Protect it against unauthorized use. If a trampoline ladder is used, the supervisor should remove it from the trampoline when leaving the area to prevent unsupervised access by children under 6 years of age. 22. Keep objects away which could interfere with the performer. Maintain a clear area around the trampoline. 23. Do not use the trampoline while under the influence of alcohol or drugs. 24. For additional information concerning the trampoline equipment, contact the manufacturer. 25. For information concerning skill training, contact a certified trampoline instructor. 26. Bounce only when the surface of the bed is dry. Wind or air movement should be calm to gentle. The trampoline must not be used in gusty or severe winds. 27. Read all instructions before using the trampoline and trampoline enclosure. Warnings and instructions for the care, maintenance, and use of this trampoline and trampoline enclosure are included to promote safe, enjoyable use of this equipment. Page 5 OVERVIEW OF TRAMPOLINE AND ENCLOSURE COMBINATION USE The first practice sessions of your new Trampoline and Enclosure Combination use should focus on learning fundamental body positions and practicing the eight basic jumps (see pages 8-9). During this learning period, jumpers should practice these basic techniques and perfect them. Braking, or checking the jump, should be taught first and stressed as a safety measure. Jumpers should break their jump whenever they start to lose their balance or control. Do this by flexing the knees sharply upon landing and absorbing the upward thrust of the mat. This allows the jumper to stop suddenly and avoid losing control. With any Trampoline use, the takeoff and landing points of a good, controlled jump are at the same place. A skill is considered learned only when a jumper is able to perform it correctly time after time. Jumpers should never go on to more advanced jumps until they can perform all eight basic jumps correctly each time. User should read and understand rules. Supervisor should be sure that these rules are always properly followed: 1. Appropriate clothing should be worn, and could consist of a T-shirt and shorts. However, beginning jumpers may wish to wear loose-fitting, protective clothing such as a longsleeved shirt and long pants, until correct landing techniques are mastered. This will reduce the chance of Mat (Jumping Surface) burns from improper landings on elbows and knees. 2. Jumpers should wear regulation gymnastic shoes or heavy socks, or they may jump barefoot. Street shoes or tennis shoes should not be worn when using the Trampoline and Enclosure Combination as they cause excessive wear on the Trampoline mat. Additionally, street shoes will introduce foreign materials to the jumping surface, causing it to wear prematurely. 3. Jumpers should never practice alone and unsupervised. 4. Only one person should be inside the Trampoline and Enclosure at a time. 5. Uncontrolled jumping should not be permitted under any circumstances. All skills should be learned at moderate jumping heights. Control, rather than height, should be emphasized. 6. Due to the Enclosure, the only way to exit the Trampoline is to climb through the door and off the Trampoline. Use caution when exiting from the Trampoline to the ground surface. Page 6 INSTRUCTIONAL PROGRAM AND MODEL LESSONS The following lessons are examples of an instructional program. They should follow a complete discussion and demonstration of body mechanics between the supervisor and the student(s). See pages 8 and 9 for descriptions of basic jumping skills. Lesson 1 1. Mounting and dismounting (entering and exiting the Enclosure)—Demonstration and practice of proper techniques. 2. Fundamental jump—Demonstration and practice. 3. Braking (stopping the jump)—Demonstration and practice. Braking on command. 4. Hand and knee drop—Demonstration and practice, stressing four-point landing and alignment. Lesson 2 1. Review and practice all skills previously learned. 2. Knee drop—Half twist to the right, to the left, to the feet, and then to the knees. 3. Seat drop—Half twist to the feet. Seat drop, knee drop, hand and knee drop, repeat. Lesson 3 1. Review and practice all skills previously learned. 2. Front drop—To save time and avoid mat (bed) burns, all students should be requested to assume the front drop position on the floor while the instructor checks for faults. 3. Suggested progression: from hand and knee jump, the body is extended for the landing in the front drop position, and the rebound is made to the feet. 4. Practice routine—Hand and knee drop, front drop, feet, seat drop, half twist to feet. Lesson 4 1. Review and practice all skills previously learned. 2. Back drop—Demonstration, emphasizing the forward thrust of the hips by arching the body as one leg is brought forward from the standing (not jumping) position, and the drop to the back with the chin held forward to the chest and eyes forward on the frame pad. Supervising this skill is most important. Demonstration of back drop with low jump and practice of both techniques. Lesson 5 1. Review and practice all skills previously learned, encouraging original routines based on them. 2. Half turntable—Start from the front drop position and push to the left or right with the hands. Turn the head and shoulders in the same direction. Keep the back parallel to the mat and the head up. After completing a half turn, land in the front drop position. Lesson 6 1. Review and practice all skills previously learned. 2. Swivel hips—Suggested progression: seat drop, feet, half twist, repeat; seat drop, half twist to feet, repeat; seat drop, half twist to seat drop. 3. Half turntable Page 7 FUNDAMENTAL TRAMPOLINE SKILLS Fundamental Jump 1. Start from a standing position with your head erect and your eyes on the frame pad. 2. Swing your arms forward and up in a circular motion. 3. Bring your feet together and point your toes downward while in the air. 4. Keep your feet about 15 inches apart when landing on the mat. Hand and Knee Drop 1. Start bouncing from a standing position, keeping your eyes on the frame pad. 2. Land on the mat on your hands and knees. 3. Push with your hands and come back up to an erect position. Knee Drop 1. Start bouncing from a standing position, keeping your eyes on the frame pad. 2. Land on your knees, keeping your back straight and your body erect. 3. Come back up to an erect position. Back Drop 1. Start from a low bounce and land on your back. 2. Keep your chin forward on your chest as you land. 3. Kick forward and up with your legs to return to an erect position. Page 8 Seat Drop 1. Land in a sitting position with your legs parallel to the mat. 2. Place your hands on the mat beside your hips. 3. Push with your hands to return to an erect position. Half Turntable 1. Start from the front drop position and push to the left or right with your arms to begin turning your body in the opposite direction. 2. Turn your head and shoulders toward the direction that your body is turning. 4. Keep your back parallel to the mat and your head up. 5. After completing a half turn, land in the front drop position. Front Drop 1. Start from a low bounce and land on the mat in a prone position. 2. Keep your head up and your arms extended forward on the mat. 3. Push with your arms to return to an erect position. Swivel Hips 1. Start with a seat drop. 2. Turn your head to the left or right and swing your arms up in the same direction. 3. Turn your hips in the same direction as your head and arms, completing a twist. 4. Land in the seat drop position. Page 9 ASSEMBLY INSTRUCTIONS WARNINGS Adequate overhead clearance is essential. A minimum of 24 ft from ground level is recommended. Provide clearance for wires, tree limbs, and other possible hazards. Lateral clearance is essential. Place the trampoline and trampoline enclosure away from walls, structures, fences, and other play areas. Maintain a clear space on all sides of the trampoline and trampoline enclosure. Place the trampoline and trampoline enclosure on a level surface before use. Use the trampoline and trampoline enclosure in a well-lit area. Artificial illumination may be required for indoor or shady areas. Secure the trampoline and trampoline enclosure against unauthorized and unsupervised use. Remove any obstructions from beneath the trampoline and trampoline enclosure. The trampoline enclosure is only to be used as an enclosure for a trampoline of a size for which the enclosure is designed. The owner and supervisors of the trampoline and trampoline enclosure are responsible to make all users aware of practices specified in the use instructions. The trampoline and enclosure combination should not be installed or used on concrete, asphalt, or other similarly hard surfaces. Using your trampoline and enclosure combination in such locations can increase the likelihood of injury when entering or exiting your trampoline. IMPORTANT ASSEMBLY INFORMATION You will need a Phillips screw driver (not included), and an adjustable wrench (not included) to assemble this Trampoline and Enclosure Combination. Assembly requires two adults. Wear gloves to protect your hands from pinch points during assembly. To extend the life of your product, a thin film of oil has been applied to all metal parts. Therefore, you should wear clothing and gloves, during assembly, which will not be damaged by any slight oil residue or stain. When product is completely assembled, all metal parts with oil film will be covered. Page 10 Frame Assembly Read and understand all assembly instructions before beginning the assembly process. Your trampoline frame is assembled using two types of T-Brackets; type A or regular TBrackets and type B or enclosure T-Brackets. The enclosure T-Bracket includes a special slot to insert an enclosure pole. Each T-Bracket has been pre-attached to a frame piece. Step 1- Select one frame piece with a type A T-Bracket and another with a type B TBracket. Insert the crimped end of the frame piece with the type A T-Bracket into the opening of the type B T-Bracket and place on ground with the spring holes facing down. Page 11 Step 2 - Slide two Leg Tubes (C) onto a Leg Brace (D). One leg of each pair should have a Safety Sticker attached. The peak of the Brace (D) should point toward the ground. Insert one of the Leg Tubes (C) into one of the T-Brackets (which were previously assembled in Step One). Insert the other Leg into the other T-Bracket. Press down on both Legs at the same time to ensure that they are fully inserted into the Sockets. Repeat Steps 1 and 2 until all Legs are assembled for your Trampoline. Note: You may need to pull outward on the Legs (C) as you insert them into the Sockets. This step was intentionally designed to keep your Trampoline tightly assembled. Page 12 Step 3 – Rotate two Leg sections so the Spring Holes are facing up and hold them in the positions shown in the figure below. Insert the crimped end of the Frame Tube of one section into the T-Bracket (A) of another. Repeat this step, inserting each Leg section into the next one to complete the Trampoline Frame Circle. Page 13 Enclosure Post Assembly Read and understand all assembly instructions before beginning the assembly process. Your Trampoline’s Enclosure Posts come in two sections, an upper (curved) and a lower (straight) section. Step 1 – Connect one Upper Post section and one Lower Post section together, making sure to match the screw holes in the two sections. See figure right. Step 2 – Secure the Posts with a Screw in the center hole and slide the Foam Sleeves together to cover the screw. Caution: Do not over-tighten the Screw or the hole will be stripped out. Repeat steps 1 and 2 until you have assembled all of the Enclosure Poles, then set them aside for use in later steps. Page 14 Mat and Enclosure Assembly Read and understand all assembly instructions before beginning the assembly process. This Trampoline Should not be installed without the included Enclosure. Step 1 – Unfold and lay the Mat (Jumping Surface) on the ground inside the Trampoline Frame Circle. Make sure the Warning Labels are facing up. Step 2 – Hook the Mat to the Frame by attaching one Spring to the right of each T-Bracket. (See illustration below.) To attach a Spring, hook the short end to a V-Ring sewn to the Mat, pull the Spring back towards the Frame, insert the long end of the Spring into a slot in the Frame, and release. Caution: We recommend wearing leather gloves while attaching the Springs. Be careful where you place your hands, as the Spring and Frame joints can pinch. DO NOT attach all of the springs in this step. Step 3 – Unfold the Enclosure Netting. Locate the zipper opening and ensure that the warning labels are facing outwards. Page 15 Step 4 – Locate the Bungee Straps sewn to the top edge of the Enclosure and connect all Bungee Loops with Bolts to your Enclosure Net by inserting the Bolt up through the Net Loop and bringing it down through the resulting Loop in the Bungee Cord, as shown in the illustrations below. Step 5 – Insert the Bungee Cord Bolt through the hole near the top of the Enclosure Post and secure it with the corresponding Nut. Adequately tighten the Nut with a wrench. Repeat this procedure for each remaining Enclosure Post. Step 6 – Stand each Post upright with the curved section facing outward. Insert the bottom end of the Post into its corresponding T-Bracket slot. This eliminates the need for a stepladder, allowing the Enclosure to be completely erected from ground level. Repeat this process for the remaining Upright Posts. DO NOT Bolt the Enclosure Posts in place as part of this step. This will be completed later, as the last step in assembling your Trampoline. Page 16 Step 7 – Your Enclosure should now be hanging loosely from the Enclosure Poles, with the Zippered Opening centered between two Enclosure Poles. Locate the Spring Slot directly below the Zipper along the bottom edge of the Enclosure. Feed the short end of a Spring through it and attach to the V-Ring to the left of the T-Bracket and the previously attached Spring. Pull the Spring back towards the Frame and insert the long end into the slot in the Frame. (See illustrations.) One spring attached through the enclosure and the other attached directly to the mat Step 8 – Work your way around the Trampoline attaching one Spring to the left of each TBracket, as shown above. As the Enclosure can bunch up, you will need to count the V-Rings on the Mat, and the Spring Slots in the Enclosure and the Frame, to ensure that the Enclosure is evenly stretched, and that you are attaching the Spring in the correct location. Page 17 Step 9 – You should now have one Spring connected on either side of each T-Bracket. Remove the Spring on the right of each T-Bracket and reattach it through the Enclosure Slot, as seen in figure left. Step 10 – Work your way around the Trampoline attaching one Spring to the right of each Spring that is already attached. Continue this step until all Springs are attached. Attaching the Springs one-byone as directed will prevent damage caused by overstretching during assembly. Page 18 Safety Pad Assembly Read and understand all assembly instructions before beginning the assembly process. Step 1 – Lift the Enclosure Poles out of the T-Bracket slots and lean them forward so they are resting on the Mat. Step 2 – Unfold the Safety Pad so it is resting on the Frame and Springs. Step 3 – Rotate the Pad so that the logo sits approximately in front of the zipper and the holes in the Pad align with the Enclosure Pole slots on the T-Brackets. Note: Securely attaching and positioning the Frame Padding is essential to the safety of your Trampoline. Check to ensure the Frame Pad is correctly positioned before each use. The Frame Pad should be positioned so that it covers the entire Spring and Frame area. See figure right. Page 19 Step 4 –Locate the Spring Loops on the underside of the Pad. Find the Spring nearest to the Spring Loop and unhook it from the Frame. Insert the Spring through the Spring Loop, and reattach it to the Frame. Repeat this step until all Spring Loops have been attached. Step 5 – Lift the Enclosure Poles and insert them through the hole in the Pad and into the TBracket slot. Step 6 – Secure the Enclosure Poles to the Frame by attaching the included bolts through the T-Brackets. NOTE: Foam Sleeves covering the Enclosure Poles may require a few warm days to fully return to their original round shapes after being flattened during the shipping process. Similarly, any folds or creases in the Pad, Mat, or Enclosure should disappear within a short time. Make sure that all parts are securely attached. Familiarize yourself and all users of the Trampoline and Enclosure Combination with all safety precautions, use and instructional materials, and the care and maintenance instructions in this manual before using the Trampoline and Enclosure Combination. Page 20 WARNING LABEL PLACEMENTS Note: These labels are not shown at their actual size. These labels have been attached to the Trampoline Enclosure in the indicated locations. Please verify that none of these labels are missing or illegible. If so, please contact us and request free a replacement. Your Trampoline and Enclosure Combination is now fully assembled. Page 21 StormRider Trampoline Anchor Kit Trampolines, especially those with an Enclosure, can be blow around and severely damaged by wind. It is highly recommended that you secure your Trampoline against wind. Some Trampoline models include one of our StormRider Anchor Kits; if so, please follow the instructions on this page to install it correctly. More information about this Anchor Kit and a selection of other accessories may be found on page 28. Anchor Kits may also be purchased at www.PropelTrampolines.com. Step 1- Evenly space the stakes around the perimeter of your trampoline. Step 2- Using a rubber mallet, pound each stake at a 45 degree angle into the ground until it is flush with ground level. Step 3- Secure the Straps to the Frame of the Trampoline by looping the Strap over the Frame and following back through the Ladder Locks, then looping back up though the lower Ladder Lock. See illustrations below. NOTE: To ensure the effectiveness of your Anchor Kit, keep Straps tight at all times. This completes the installation of your StormRider Anchor Kit. Warning; The installation and use of an Anchor Kit does not guarantee that your Trampoline will not be damaged by wind or other severe weather. Many factors, such as soil types, influence the effectiveness of this product. If using this product in sandy or loose soil or in a high wind area, it is recommended you purchase and use two Anchor Kits, as well as take other precautions including disassembling Trampoline during times of severe weather. Using an Anchor Kit is not an insurance policy, and will not add additional warranty benefits to your Trampoline. Propel Trampolines, including its retailers and affiliates, will not be held responsible for damages to persons or property as a result of the failure of this product. Page 22 MOVING THE TRAMPOLINE AND ENCLOSURE COBINATION If the Trampoline and Enclosure Combination needs to be moved, it must be done by a minimum of two (preferably four) adults. Keep the Trampoline horizontal, and lifted slightly. If necessary, it can be taken apart for moving. DISASSEMBLY To disassemble (take apart) the Trampoline and Enclosure Combination, follow the Trampoline and Enclosure Combination assembly steps in reverse order. Do not attempt to disassemble any Trampoline Frame parts before the Springs and Mat have been completely removed. Use gloves to protect your hands from pinch points while taking the Trampoline and Enclosure apart. CARE AND MAINTENANCE CARE Do not allow pets on or within the Trampoline and Enclosure Combination, as their claws may damage the Frame Pad or snag and pull the Mat material or Enclosure netting. This Trampoline and Enclosure Combination is intended to be used by only one person at a time, weighing not more than 300 lbs. (15 foot), 275 lbs. (14 foot), 250 lbs. (12 foot), 225 lbs. (10 foot), or 200 lbs. (8 foot). The user should be either barefoot, wearing socks, or wearing gymnastic shoes. Street shoes or tennis shoes should not be used with this Trampoline and Enclosure Combination. The user should remove all objects from his/ her person that may cause injury or damage to the Mat or to themselves. Heavy, sharp, or pointed hard objects should never touch the Mat or be allowed within or around the Trampoline and Enclosure Combination. Snow or ice should not be allowed to build up on the mat as this can overstretch the springs and cause damage to the mat. Page 23 MAINTENANCE Your Trampoline and Enclosure Combination was manufactured using the highest quality materials. It was crafted to provide you and your family with years of enjoyment and exercise. Proper maintenance and care will help to prolong the life of the Trampoline and Enclosure Combination and reduce the possibility of injury. The following guidelines should always be followed. 1. If you live in a snowy region or experience long periods of non-use, you should remove your Pad, Mat, and Enclosure and store them in a dry area. This can add years to the life of these parts. 2. Inspect the trampoline and trampoline enclosure before each use and replace any worn, defective, or missing parts. The following conditions could represent potential hazards: (1) Missing, improperly positioned, or insecurely attached barrier or enclosure support system (frame) padding and pole caps or frame padding, (2) Punctures, frays, tears, or holes worn in the barrier or support system (frame) padding or in the bed or frame padding, (3) Deterioration in the stitching or fabric of the bed or frame padding or in the barrier or support system (frame) padding, (4) Ruptured springs, (5) A bent or broken frame or enclosure support system (frame), (6) A sagging barrier or bed, or (7) Sharp protrusions on the frame or suspension system. If any of these conditions exist, the Trampoline and Enclosure Combination should be taken apart, or otherwise protected against use, until the condition is repaired. Page 24 TRAMPOLINE PARTS LIST 1. 2. 3. 4. 5. 6. 7. 8. 9. Frame Tube T-Bracket A T-Bracket B Leg Tube Leg Brace Jumping Mat Pad Springs Warning Labels 15-Foot 12 6 6 12 6 1 1 108 1 Set 14-Foot 10 5 5 10 5 1 1 90 1 Set 12-Foot 10 5 5 10 5 1 1 70 1 Set 10-Foot 8 4 4 8 4 1 1 56 1 Set 8-Foot 8 4 4 8 4 1 1 48 1 Set Specifications are subject to change without notice. Diagram showing numbered parts. Page 25 ENCLOSURE PARTS LIST 1. 2. 3. 4. 5. Enclosure Net Foam Sleeves Bungees w/ Bolts Bungee Bolt Nuts Post Screws 6. Frame Nuts & Bolts 7. Curved Post Section 8. Straight Post Section 15 -Foot 1 12 6 6 6 6 6 6 14-Foot 1 10 5 5 5 5 5 5 12-Foot 1 10 5 5 5 5 5 5 10-Foot 1 8 4 4 4 4 4 4 8-Foot 1 8 4 4 4 4 4 4 Specifications are subject to change without notice. Diagram showing numbered parts. Page 26 REPLACEMENT PARTS To order replacement parts, please visit our website at www.PropelTrampolines.com. There you may use our Interactive Replacement Part Finder to find replacement parts for your Trampoline. Please be nearby your Trampoline when using this tool as you will need to answer questions regarding specific parts of your Trampoline. Page 27 AVAILABLE ACCESSORIES Anchor KitDo you like to see your trampoline fly? Neither do we. That's why we carry the "StormRider" Trampoline Anchor Kit. Our Stormrider Anchor kit includes three galvanized steel stakes which connect to your trampoline via high-strength straps. When used correctly, an Anchor Kit can help reduce the risk of costly wind damage to your trampoline. Weather Cover- From the scorching summer heat to the freezing winter snow and rain the Propel Trampolines Weather Cover can help protect your Trampoline. Made from a weather resistant woven poly material it can be used in all 4 seasons, making it the perfect product to protect and help extend the life of your Trampoline. Ladder- The Propel Trampolines Ladder provides a step-bystep method for accessing your trampoline. A Trampoline Ladder can help prevent injuries sustained by jumping on or off the Trampoline. Page 28 Spring PullerNeed an extra "hand" in assembling your trampoline? Try a Spring Puller! This useful tool can help make attaching the Springs a breeze. Preschool Trampoline- Introducing the Propel Preschool Trampoline, the safe, fun trampoline for your little ones. The Propel Preschooler includes a soft yet durable safety enclosure attached directly to the jumping mat with thick padded poles to prevent your child from falling off. A base net prevents toys, children and pets from accessing under the jumper. Instead of hard metal springs, it incorporates 30 heavy duty bungees to provide a great bounce while eliminating the dangers of conventional springs. The healthy fun of the Propel Preschool Trampoline can be used both indoors and outdoors so your children can jump anytime. Bring it along to the park, or into the play room when the weather turns sour. Wherever you are the Propel Preschooler can be too! For more information, or to order any of these accessories please visit our website at www.PropelTrampolines.com. Page 29 MY TRAMPOLINE INFORMATION In the event you need to contact Customer Service, such as to ask questions, order replacement parts, or file a warranty claim you will be asked to provide some basic information about your Trampoline. By writing this information in the spaces below and keeping this Manual in an accessible location you can help expedite this process. Staple or otherwise affix dated sales receipt here. If it is necessary to file a warranty claim you will be asked to provide a copy of it for proof of date of purchase. __ __ The following information can be found printed on the end of the box in which your Trampoline came. Model or Item number:______________________________________________ MF Code:________________________________________________________ Manufacturing Facility:_____________________________________________ L Page 30 LIMITED WARRANTY PROPEL warrants its Trampoline products to be free from defects in material and workmanship under normal use and service conditions. The galvanized steel Trampoline Frame and Springs are warranted for one (1) year from the date of purchase. All other parts are warranted for ninety (90) days from the date of purchase. All warranty coverage extends only to the original retail purchaser from the original date of purchase. Our obligation under this Warranty is limited to replacing or repairing, at our discretion, the product at one of our authorized service centers. All products for which a warranty claim is made must be received by us at one of our authorized service centers, freight prepaid, and accompanied by proof of purchase. All returns must be pre-authorized. This Warranty does not extend to any product, or damage to a product, that is caused by or attributable to freight damage, abuse, misuse, improper or abnormal usage, act of God, storm damage, installation or use of accessories, or repairs not performed by our authorized service center, or to products used for commercial or rental purposes. No other Warranty, expressed or implied, beyond that specifically set forth above is authorized. Propel is not responsible or liable for indirect, special, or consequential damages arising out of, or in connection with, the use or performance of this product, or other damages with respect to any economic loss, loss of property, loss of revenue or profits, loss of enjoyment or use, cost of removal, installation, or other consequential damages. In the United States of America, some states do not allow the exclusion or limitation of incidental or consequential damages. Accordingly, the above limitation may not apply to you. The warranty extended hereunder is in lieu of all other warranties, and any implied warranty of merchantability or fitness for a particular purpose is limited in its scope and duration to the terms set forth herein. In the United States of America some states do not allow limitations on how long an implied warranty lasts. Accordingly, the above limitation may not apply to you. This warranty gives you specific legal rights. You may also have other rights which vary from state to state in the United States of America. Page 31 Warranty Registration Don’t forget to register your Trampoline by visiting www.PropelTrampolines.com/warranty. Registering your Trampoline entitles you to receive all warranty benefits, along with important news and announcements regarding your new Trampoline. You may also register your Trampoline by mailing a copy of your sales receipt along with your name, address, phone number and the model number of your Trampoline to: Propel Trampolines Warranty Department 41 East 400 North #324 Logan, UT 84321 www.propeltrampolines.com v3.8 - © 2012 Propel Trampolines - Printed in China Page 32