1
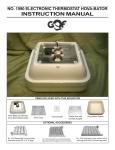
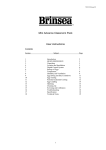
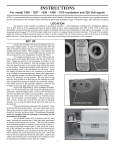
THOROUGHLY BEFORE USE
READ INSTRUCTIONS
INCUBATOR & ACCESSORY INSTRUCTION MANUAL
Model 10200
Circulated Air Incubator
Features fully-installed Circulated Air Fan Kit to help
keep temperature uniform inside the incubator.
Features two 4” x 8” viewing windows. Comes
complete with thermometer, solid state thermostat,
and built-in moisture rings in the base of the incubator. Approximate capacity without automatic egg
turner is 46 chicken eggs, 118 quail eggs, 90 pheasant eggs, 40 turkey or duck eggs. Follow the same
operating instructions as the Model 9200 except
where noted.
Model 7200
Circulated Air Fan Kit
Converts the Model 9200 Still Air Incubator
to a circulated air incubator. Helps improve
hatch conditions by circulating a constant
flow of warm air. (sold separately)
Model 9200
Still Air Incubator
Model 6300
Automatic Egg Turner
Features two 4” x 8” viewing windows. Comes
complete with thermometer, solid state thermostat,
and built-in moisture rings in the base of the
incubator. Approximate capacity without automatic
egg turner is 46 chicken eggs, 118 quail eggs, 90
pheasant eggs, 40 turkey or duck eggs.
10200 Circulated Air Incubator
9200 Still Air Incubator
6300 Automatic Egg Turner
7200 Circulated Air Fan Kit
6302 Quail Rails Kit
For chicken, quail, pheasant, turkey, and duck eggs
For chicken, quail, pheasant, turkey, and duck eggs
For chicken, quail and pheasant eggs
For chicken, quail, pheasant, turkey, and duck eggs
For quail and and other small eggs
Features motorized egg turner with six large egg
racks holding up to seven eggs each. Safely turns
eggs to prevent the yoke from settling to one side
and to exercise the embryo. This eliminates turning
the eggs by hand which is the most demanding and
time consuming part of egg incubation. Fits models
9200 and 10200 Incubators. Turkey and duck eggs
will not fit in the Automatic Egg Turner. (sold separately)
Model 6302
Quail Egg Trays Kit
Replaces standard egg rails with rails specifically designed to hold up to 120 quail or
other small eggs. (sold separately)
How An Incubator Works
The function of an incubator is to bring normal room temperature up to a desired temperature for hatching eggs. If your room temperature is constant and free of drafts, your
Little Giant incubator will need very few adjustments once regulated. If your room temperature fluctuates more than a few degrees your incubator will need
periodic adjustments. Be sure to monitor your incubator regularly.
Consult with your library, local hatchery, or the internet for hatching guidelines specific to the type of eggs you plan to incubate.
WARNING
• This product must be used with a Ground Fault Circuit Interrupter (GFCI) protected outlet.
• DO NOT connect the product to an outlet with extension cords.
• DO NOT expose the product’s electrical parts to water.
How to Use Your Little Giant Incubator & Accessories
Note: Due to different hatching requirements, it is recommended that you hatch only one species of egg per hatch. For example, it is
not recommended that you attempt to hatch chicken and quail eggs at the same time in the same incubator.
Please refer to your local library or the World Wide Web for additional hatching information.
Step 1: Choosing The Proper Location For Your Incubator
Install your incubator in a room that has a stable temperature. Avoid
setting your incubator in drafty areas like near a window or on a porch.
Avoid direct sunlight. The ideal room temperature is 70°F.
The model 10200 Circulated Air Incubator and the model 9200 Still
Air Incubator outfitted with a Circulated Air Fan Kit (sold separately)
can operate in room temperatures between 60°F- 80°F. The Still Air
Incubator without a Circulated Air Fan Kit can operate in a room temperatures between 65°F and 72°F.
6200
Cord Exit Slot
6300
Cord Exit Slot
Step 2: Installation and Set Up
Unpack your incubator. The top half should be
complete with windows, element, thermostat,
indicator light, and power cord. Place the wire
screen in the incubator bottom. Line up the cord
exit slot in the top half with the slot in the
bottom half. This notch is used for the
power cord when using the Automatic
Egg Turner.
The model 6300 Automatic Egg Turner is sold separately and fits either
incubator. Six Large Egg Trays are included with the Automatic Egg
Turner. The Automatic Egg Turner makes one complete cycle (30
degrees side to side) every 4 hours.
IMPORTANT: DO NOT MOVE THE EGG TRAYS BY HAND. The
egg turner moves very slowly. It takes (4 hours to complete a 30 degree
side to side cycle. This movement may not be detected by the naked eye.
Unpack the Automatic Egg Turner from the box; holding it over the
incubator, line up the power cord exiting the motor with the side of the
incubator bottom that has a notch molded in it. Place the automatic egg
turner in the incubator so it fits flat on all four corners over the wire
mesh floor. Plug the cord into a surge protector. Plug the surge protector into a 110 volt GFCI protected outlet. On 240/400 volt model,
attach plug required by country standards.
Please calibrate the thermometer with one known to be accurate.
Screen
IMPORTANT: If you have a model 9200 or
Figure A
10200 incubator without a model 6300 power
cord exit slot (see Figure A) you must add one. Use a screw driver or
similar shaped object, lay it across the edge of the incubator and press
down to form a slot in the location shown.
Install Circulated Air Fan Kit if purchased separately
(see separate instructions included with Fan Kit).
The Circulated Air Fan Kit converts the model 9200 Still Air Incubator
to a Circulated Air Incubator. The fan kit helps keep the temperature
uniform throughout the incubator. The fan circulates the air. It does not
regulate the temperature.
Step 3:Incubator Regulation
Before beginning a hatch, you need to regulate the incubator temperature. Turn the control knob fully clockwise. The red indicator light will
come on and the element will begin to heat. Watch the thermometer as
the incubator heats up. As soon as it registers to the temperature recommended for the species you are hatching, turn the control knob slowly.
Adjust the control knob counter clockwise to decrease heat and clockwise to increase heat until you have it regulated to hold at the desired
temperature. The red indicator light may flicker off and on during this
process. This is normal and indicates that the incubator is adjusting to
changes in both internal and external air temperatures.
Run the incubator for 6-8 hours. At the end of this time, make sure the
desired temperature was maintained. If so, you are ready to incubate!
Step 4: Humidity Control and Ventilation
Fill the moisture rings in the bottom of the incubator with water. Water
will help keep eggs naturally moist. Check moisture rings daily, adding
lukewarm water as needed. If the room where your incubator is placed
has good natural moisture content, add water less frequently than if your
climate or room conditions are dry.
Good ventilation is important in the hatching process. Air exchange is
needed during embryo development and should be increased as chicks
start to hatch.
Remove one of the red plastic vent plugs on the top of the incubator.
One is located between the two windows toward the front of the incubator, closest to the power cord. The second is located at the opposite end
of the incubator, furthest from the power cord.
If your incubator has a fan kit, evaporation may occur at a more rapid
rate. If so, you will need to add water more frequently.
Step 5: Maintain Sanitary
Conditions
aligned with the appropriate slot before setting the
top in place and pluging in the Automatic egg turner. You can now view the temperature readings thru
the window
IMPORTANT: The model 9200 and 10200 incubators were previously supplied with a thermometer
that was attached to a metal bracket, you must use
the new thermometer supplied with the Automatic
Egg Turner. The new thermometer supplied with the Automatic Egg
Turner is mounted to a permanent clear plastic holder and is placed flat
on top of the eggs.
If you do not have an Automatic Egg Turner:
Using a lead pencil, lightly place a small "x" on one side of each egg,
and an "o" on the other side. (Do not use pen or markers as they may
contaminate the eggshell.) This mark will help you identify when eggs
have been turned.
Consult your local library,
local hatchery, or the World Wide Web
for information and tips on
successful hatching.
Embryos are extremely susceptible to disease from bacteria. Hand perspiration or
other foreign materials block the pores of
the shells and can permeate the egg, resulting in bacterial growth.
Always wash hands with anti-bacterial soap before handling eggs. Avoid
excess handling of eggs. Avoid breathing on eggs, particularly if you
have a cold or are ill. Eggs should be held in a cool location between 50
- 55°F until you are ready to incubate. Do not refrigerate.
Step 6: Mark and Set the Eggs
If using the Automatic Egg Turner:
Set eggs in the turner with the small end down. Do not put goose or other
large eggs in the turner. They are too large for the egg cups and may
come in contact with the heating element or fall out of the cups. Do not
place an egg in the hole closest to the motor. Do not over load the
Automatic Egg Turner. You will note that with the Automatic Egg Turner,
the eggs sit up higher and are closer to the heating element.
Place the Thermometer with the permanently attached plastic holder so
that it lays flat on the top of the eggs, to assure the temperature reading is
taken at the top of the eggs. Line the notches in the top half of the incubator with the notches in the bottom half; make sure the power cord is
Place the eggs in the incubator so that
they lay sideways on the wire screen. Do
not overcrowd eggs.
Place the Thermometer with the permanently attached plastic holder so that it
lays flat on the top of the eggs. Warm air
rises and the thermometer should be read
at the top of the eggs. Set the top of the
incubator in place, and if necessary, move the thermometer so you can
view the temperature readings thru either window.
Allow at least 2-3 hours for the eggs to warm up to the temperature of
the incubator. Do not adjust the control knob during this time. Do not
open the incubator the first day after the eggs are set.
Step 7: Turning The Eggs
Turn the eggs at least 2-3x per day, every day at the same time. Avoid
shocking and jarring the eggs. Eggs can be rotated by removing a few
from the center of the incubator and rolling the rest toward the center.
Using the palm of your hand, gently roll the eggs until they have been
turned. Continue to turn eggs until 3 days prior to total incubation
and hatching time.
If using the Automatic Egg Turner, discontinue use 3 days prior to total
incubation and hatching time (see Step 9 Hatching Time and Temperature
chart). Unplug the turner and remove it from the incubator. Carefully
place eggs on the wire screen.
Miller Manufacturing Company • 1450 West 13th St. • Glencoe, MN 55336 • Customer Service 800-260-0888 • FAX 952-846-2301www.miller-m
fg.com
•
Fertility Testing
White, clear-shelled Eggs
Phase 1
Phase 2
Dark-shelled Eggs
3rd or 4th day of incubation 7th or 8th day of incubation
14th day of incubation
14th day of incubation
It is critical that you stop turning/rotating eggs 3 days prior to incubation.
The chicks are positioning themselves for hatching.
Step 8: Test Egg Fertility
Fertility testing is done to make sure that embryos are developing properly and to test that humidity conditions are acceptable. Fertility testing
should be conducted at two different times:
Testing is done by candling all eggs in the incubator. A candler can be
made using a shoe box or can. Make a hole with a diameter of about
25% the size of the egg (about the size of a quarter) in the top of the box
or can. Set the egg on this hole. Now place a strong light source (a
mechanics trouble light or flashlight will do) under the box or can. Light
will pass through the hole, into the egg, so that it is illuminated.
• If you observe a cloudy spot or mass, then
a live, growing embryo is present.
• If the contents of the egg allow light to pass
through it uniformly, then it can be assumed the
egg is not fertile. Remove it from the incubator.
Some of the embryos that looked healthy during your first fertility test
may have weakened and died by the second fertility test. These eggs and
any eggs that show signs of blood spots should be removed from the
incubator.
Step 9: Hatching Eggs
When you have 3 days remaining until hatch, stop turning the eggs.
If you have an automatic turner, unplug it, and remove it from the
incubator. Carefully place eggs on the wire screen.
Remove both red vent plugs from the top of the incubator
to increase ventilation.
Increase the humidity level (see step 4). This allows the chick to rotate
freely while breaking the shell during hatching.
Do not open incubator except to remove chicks. Chicks can be removed
from the incubator when they are completely dry. Some chicks may
hatch late, so continue to run the incubator for a few extra days beyond
the normal hatch period.
Bird
Chicken
Bobwhite Quail
Cortunix Quail
Pheasant
Chukar
Turkey
Duck
Goose
Guinea
*Estimated Days
for Hatching
21
23
17-18
23-28
23-24
28
28
28-34
28
Hatching
Temperature (°F)
99.5
99.5
99.9
99.5
99.5
99
99.5
99
99.5
*For more information on incubating, consult your local library or the World Wide Web.
Step 10: Post Hatch
When chicks are removed from the incubator, they must have a place that
is warm and dry. Please consult your library, internet, or local
hatchery for information on brooding, feeding, and watering.
After all chicks have been removed from the incubator, rinse the
bottom with anti-bacterial soap. Do not scrub, as this will cause
damage to the incubator.
The Automatic Egg Turner base and trays can be washed in a dishwasher
after the egg turner has been properly disassembled (see below).
Lift Motor
Washing the Automatic Egg Turner
Disassembly:
Place complete Automatic Egg Turner on
a flat surface. Slide power cord horizontally to remove from notch in base.
Loosen two screws connecting the motor
to base and remove. Slide motor upward,
releasing the white plastic lever from Tbracket of connecting rod.
Turn connecting rod so offset arms rest in
a horizontal position and egg trays are
vertical. Lift offset arm to release connecting rod from notches.
Lift individual egg trays by offset arms
while still in a horizontal position from
offset arm notch in base and pull slightly
to release the pin from the corresponding
hole in the base. Repeat with all six trays
until you are left with an empty base.
Remove
Cord
Remove
Screws
Rotate
Trays
Place egg trays and base in dishwasher,
run and dry.
(continued)
Washing the Automatic Egg Turner
(continued)
shaped end of the connecting rod should align with the motor location.
Assembly:
Select one of the six egg trays and attach the position cover to the egg tray location
nearest the offset arm end by inserting the circular pins on the position cover into the
aligning holes on the egg tray (large egg trays only). Once in place, press cover
firmly into holes.
Attach egg tray with cover to the motor end of the base. The motor location is recognizable by the two holes in the extended plastic end. Holding the egg tray vertical,
with the offset arm in a horizontal position, insert the round pin on the end of the
tray into the corresponding hole in the base. With the egg tray still vertical, rotate the
egg tray downwards so the offset arm end pivot slides into the corresponding notch
in the base. Repeat with remaining five egg trays until all six are aligned with the
base.
Once all egg trays are in the base, keep all egg trays vertical and offset
arms in a horizontal position. Bring the connecting rod into position by
holding it parallel to the base and slightly above the offset arms. The T-
Lower the connecting rod so each egg tray offset arm slips into place into
the corresponding notch in the connecting rod.
Carefully rotate the six egg trays while holding the offset arms in the
notches in the base and connecting rod until all offset arms are in a vertical position and the egg trays are level. Place a flat object on the level egg
trays to retain position for motor installation.
Slide the white plastic lever on the side reverse of the power cord on the
motor down into the T-shaped bracket at the end of the connecting rod.
When in place, the two holes at the base of the motor should align directly with the two holes in the projecting plastic of the base. Insert two
screws through the frame and tighten into holes in motor flange to secure.
Line up the power cord exiting the motor with the side of base that has a
notch molded in it. Find the larger groove in power cord and slide into the
notch in the base.
Troubleshooting Tips For Incubator Use
Problem
Indicator light not coming On
Uncover
Is unit plugged in?
Is there power to this outlet?
Are you using a surge protector?
Possible Reasons
Erratic power source
Indicator light flickering
This is normal.
The unit is adjusting to temperature
changes or variations
Loss of power
Is unit plugged in?
Are you using a surge protector?
Erratic power source or loose wire
Incubator not heating to 100°F
Is room temperature between 65º and 72º?
Is the ambient temperature consistent?
Is the unit located near any drafts?
Room may be too cold or drafty
Incubator drying out
Did you add water to rings?
How much?
Add a wet sponge?
Room is excessively dry
Temperature & humidity are too low during hatch
Replace the vent plug(s)
The 9200 and 10200 Incubators are intended for general poultry hobbyists and are not recommended for professional or commercial use or for the incubation of exotic birds.
MILLER MFG. CO. WARRANTY Miller Mfg. Co. products are warranted to the original purchaser to be free from defects in material and workmanship under normal use
and service. Miller’s obligation under this Warranty shall be limited to the repair or exchanges of any part or parts, which may thus prove defective under normal use and service within 30 days from the date of shipment by Miller to the original purchaser, and which Miller examination shall disclose to its satisfaction to be thus defective. Purchaser
must deliver any part or parts to Miller Manufacturing Company, 1450 West 13th Street, Glencoe, MN 55336, for examination.
DISCLAIMER: DUE TO THE NUMEROUS FACTORS RELATING TO THE HATCHING OF EGGS, MILLER MFG. CO. MAKES NO WARRANTY WHATSOEVER
IN RESPECT TO THE NUMBER OF EGGS THAT WILL BE HATCHED USING THE #10200 CIRCULATED AIR INCUBATOR, #9200 STILL AIR INCUBATOR, OR
THE #6300 AUTOMATIC EGG TURNER.
THIS WARRANTY IS EXPRESSLY IN LIEU OF ALL OTHER WARRANTIES EXPRESS OR IMPLIED INCLUDING THE WARRANTIES OF MERCHANTABILITY
AND FITNESS FOR USE AND ALL OTHER OBLIGATIONS OR LIABILITIES ON OUR PART. WE NEITHER ASSUME NOR AUTHORIZE ANY OTHER PERSON
TO ASSUME FOR US, ANY OTHER LIABILITY IN CONNECTION WITH THE SALE OF MILLER PRODUCTS OR ANY PART THEREOF WHICH HAS BEEN
SUBJECT TO ACCIDENT, NEGLIGENCE, ALTERATION, ABUSE OR MISUSE. WE MAKE NO WARRANTY WHATSOEVER IN RESPECT TO ACCESSORIES
OR PARTS NOT SUPPLIED BY US.
THE MODEL 9200 AND 10200 INCUBATORS ARE INTENDED FOR GENERAL POULTRY HOBBYISTS AND ARE NOT RECOMMENDED FOR
PROFESSIONAL OR COMMERCIAL USE OR FOR THE INCUBATION OF EXOTIC BIRDS.
DISCLAIMER: DUE TO THE NUMEROUS FACTORS RELATING TO THE HATCHING OF EGGS, MILLER MFG. CO. MAKES NO WARRANTY
WHATSOEVER IN RESPECT TO THE NUMBER OF EGGS THAT WILL BE HATCHED USING THE MODEL 10200 CIRCULATED AIR INCUBATOR, MODEL 9200 STILL AIR INCUBATOR, OR THE MODEL 6300 AUTOMATIC EGG TURNER
CONSULT WITH YOUR LIBRARY, LOCAL HATCHERY, OR THE INTERNET FOR HATCHING GUIDELINES SPECIFIC TO THE
TYPE OF EGGS YOU PLAN TO INCUBATE.
One source for hatching information can be found at: www.msstate.edu/dept/poultry/hatch.htm
Miller Manufacturing Company • 1450 West 13th Street • Glencoe, MN 55336
Customer Service 800-260-0888 • FAX 952-846-2301 • www.miller-m fg.com
920006 Rev 5 5/07