1
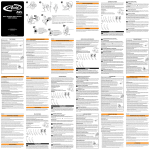
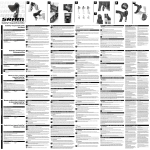
ENGLISH
Congratulations! You have selected the PushLocTM
remote fork lockout system. Now with one quick motion
you can lock or unlock your RockShox fork. PushLoc
is equipped to accommodate a number of different
mounting positions in order to allow you to precisely
customize your own installation. Just follow these easy
directions and you’ll be ready to go in minutes.
wa r n i n g
BE SURE TO FOLLOW ALL MANUFACTURER’S
GUIDELINES FOR SERVICING AND INSTALLING
THE COMPONENTS OF YOUR BICYCLE. IMPROPERLY INSTALLED COMPONENTS CAN
RESULT IN SERIOUS AND/OR FATAL INJURY. WE ALWAYS RECOMMEND YOU HAVE YOUR
COMPONENTS SERVICED AND INSTALLED BY
A QUALIFIED BICYCLE MECHANIC.
PUSHLOC
INSTRUCTIONS
Kit Contents:
• PushLoc body with vertical mount clamp, cable and left attached
horizontal
housing
(A) • Horizontal mount clamp (B)
• MatchmakerTM knuckle (C)
• Right-hand lever (D)
left vertical
left vertical
left horizontal
left horizontal
left vertical
A
D
MM Knuckle
RockShox PushLoc is only compatible with RockShox
forks with remote lockout capability using Turnkey or
Motion Control damper systems. If you are not sure
if yours is one of them, please consult your favorite
dealer where RockShox is sold.
3
4
Prepare PushLoc clamp for handlebar.
For vertical orientation:
You’re in luck! PushLoc comes ready to install
vertically. Proceed to step 4.
Mount PushLoc to handlebar.
For vertical or horizontal orientation:
Simply unscrew the clamp bolt, wrap the clamp around
the bar (inboard from the shifter), and replace the
clamp bolt. Torque to: 2.8-3.4Nm (25-30 in-lb).
PushLoc can be installed in a number of different
configurations, so experiment a little before you
commit to the way that you are going to install.
Considerations include: • Cable clearance.
• Easy, but not accidental access to the lever (you don’t want to accidentally bump it). • Positioning so PushLoc lever has a full range of movement without hitting anything.
INSTallation
1
2
For horizontal orientation:
Remove the vertical mount clamp that is installed
on your PushLoc by unscrewing the bolt all the way.
Now, install the horizontal mount clamp making sure
to install the washers in the right order (see diagram).
Don’t tighten the bolt all the way yet. You’ll want to
adjust the angle once it’s on the bar.
Secure bicycle into work stand, and remove old remote lockout.
MM Knuckle
MM Knuckle
Use these diagrams to make sure you have the right
lever installed on your PushLoc.
With the PushLoc lever in the unlocked position, route cable to fork and trim housing to right length
using sharp cable cutters. PushLoc comes with housing
at the appropriate length for the average installation, so
you may not end up needing to cut it at all.
Note: Make sure you mount the Matchmaker on the
correct side, or it will not operate correctly.
• Safety Glasses
• 4, 3, 2.5 and 2mm hex wrenches
• Adjustable torque wrench: 2.8-10Nm
(25-90 in-lb) range
• Cable cutters
Test remote PushLoc lockout function. Push lever a few times to lock and unlock the fork.
Press fork down and test function after each. Adjust
cable tension if necessary. Finally, double check to
make sure all the mounting bolts are tight.
Way to go! You’re ready to ride!
3
Senkrechte Ausrichtung:
Glück gehabt! Das PushLoc-System ist standardmäßig
senkrecht ausgerichtet. Fahren Sie mit Schritt 4 fort.
5
4
Waagerechte Ausrichtung:
Entfernen Sie die senkrechte Montageklemme von
Ihrem PushLoc-System, indem Sie die Klemmschraube
vollständig herausdrehen. Bringen Sie nun die
waagerechte Montageklemme an, und achten Sie
dabei darauf, die Unterlegscheiben in der richtigen
Reihenfolge anzubringen (siehe Zeichnung). Ziehen
Sie die Schraube noch nicht vollständig fest.
Möglicherweise möchten Sie den Winkel nach der
Montage auf dem Lenker noch anpassen.
Montieren Sie das PushLoc-System am Lenker.
Senkrechte oder waagerechte Ausrichtung:
Lösen Sie einfach die Klemmschraube, setzen Sie
die Klemme auf den Lenker auf (innenseitig vom
Schalthebel), und ersetzen Sie die Klemmschraube.
Anziehen mit: 2,8 bis 3,4Nm.
Montage mit Matchmaker:
Schrauben Sie die entsprechende (rechte oder linke) Matchmaker-Gehäuseschraube vollständig heraus.
Nehmen Sie die Zylinder-Unterlegscheibe ab, und
ersetzen Sie sie durch die Matchmaker-Befestigung.
Richten Sie den Schalthebel auf den erforderlichen
Winkel aus, und ziehen Sie die Schraube fest.
Anziehen mit: 2,8 bis 3,4Nm.
Passen Sie die Position des PushLoc-Systems wie gewünscht an, und ziehen Sie die Schraube
der Matchmaker-Befestigung fest. Anziehen mit: 2,8
bis 3,4Nm.
For Matchmaker mount:
Remove the vertical mount clamp that is installed
on your PushLoc by unscrewing the bolt all the way.
Now, replace the clamp with the Matchmaker knuckle
bracket making sure to install the washers in the right
order (see diagram). Don’t tighten the bolt all the way
yet. You’ll want to adjust the angle once it’s on the bar.
Note: PushLoc is designed for vertical orientation
when it is mounted to a Matchmaker.
Herzlichen Glückwunsch! Sie haben sich für das
PushLocTM-Fernbedienungssystem entschieden. Sie
können nun mit einem Handgriff Ihre RockShox-Gabel
sperren oder entsperren. Das PushLoc-System kann
an verschiedenen Positionen montiert werden, sodass
Sie es ganz nach Ihren Vorlieben platzieren können.
Befolgen Sie einfach die nachstehende Anleitung, um
den Hebel in wenigen Minuten zu montieren.
Hinweis: Drehen Sie die Lenker in beide Richtungen
bis zum Anschlag, bevor Sie den Zug an der Gabel
befestigen. So können Sie sicherstellen, dass der
Zug die Lenkerbewegung nicht beeinträchtigt. Ziehen
Sie den Zug durch die Zughülle und die Öffnung
der Zugaufnahme am Gabelkopf. Schieben Sie die
Zughüllen-Endkappen in die Aufnahmen am Hebel und
am Gabelkopf. Wickeln Sie den Zug fest um die Spule,
und führen Sei ihn unter der Zugeinstellschraube
hindurch. Ziehen Sie die Zugeinstellschraube mit
left vertical
einem 2-mm-Inbusschlüssel an, um den Zug
zu
befestigen (Ziehen Sie die Schraube fest, bis der
Zug straff ist). Kürzen Sie den Überstand des Zugs
auf einige Zentimeter, und bringen Sie eine der
beiliegenden Quetschhülsen an.
FRANÇAIS
Prüfen Sie die Fernbedienungs-PushLoc-
Sperrfunktion. Betätigen Sie den Hebel einige
Male, um die Gabel zu sperren und wieder zu
entsperren. Drücken Sie die Gabel nach unten, und
überprüfen Sie die Funktion nach jedem Schritt.
Stellen Sie die Spannung des Zugs nötigenfalls
nach. Vergewissern Sie sich abschließend, dass alle
Montageschrauben fest angezogen sind.
7
Das war’s. Jetzt kann die Fahrt losgehen!
AVERTISSEMENT
ASSUREZ-VOUS DE RESPECTER TOUTES LES
RECOMMANDATIONS
DU
FABRICANT
CONCERNANT L’ENTRETIEN ET L’INSTALLATION
DE
COMPOSANTS
SUR
LE
VÉLO.
UNE I N S TA L L AT I O N I N C O R R E C T E D E S
COMPOSANTS PEUT PROVOQUER DES
BLESSURES SÉRIEUSES OU MÊME LA MORT.
NOUS RECOMMANDONS TOUJOURS QUE VOUS
FASSIEZ INSTALLER ET ENTRETENIR LES
ACC E S S O I R E S PA R U N MÉCANICIEN
VÉLO QUALIFIÉ.
CONTENU DU KIT :
• Corps du
système PushLoc, auquel sont attachés un left horizontal
collier de montage vertical, le câble et sa gaine (A) • Collier de montage horizontal (B)
• Joint d’articulation MatchmakerTM (C)
• Levier main droite (D)
left vertical
A
C
left horizontal
left horizontal
left vertical
B
D
MM Knuckle
AVANT L’INSTALLATION :
Il est possible d’installer le système PushLoc de diverses
manières, aussi nous vous conseillons d’expérimenter
avec les différentes possibilités avant de finaliser votre
installation. Veuillez noter les points suivants : • Dégagement du câble.
• Accès facile au levier, mais pas trop (il ne faut pas risquer de le déplacer par accident). • Positionnement offrant une course complète du levier PushLoc sans interférence avec d’autre composants.
Côté gauche Côté gauche Côté droit
vertical
horizontal vertical Côté droit
horizontal
1
2
Assurez-vous que le vélo est bien bloqué
dans le trépied et déposez le système de verrouillage existant.
Préparez le levier PushLoc.
• Si vous installez le système PushLoc en position
standard (verticalement sur le côté gauche) ou si
vous allez l’installer horizontalement sur la droite,
vous pouvez passer à l’étape 3. • Si vous voulez l’installer à gauche horizontalement
ou à droite verticalement, il vous faut utiliser l’autre
levier PushLoc. Pour ce faire, dévissez les boulons
du levier des deux côtés, déposez le levier en faisant
attention et remplacez-le par l’autre levier. Assurezvous que le levier en position « déverrouillée » se
trouve bien exactement comme illustré dans le
diagramme ci-dessous. Installez alors et serrez les
boulons du levier (serrez au couple 0,7Nm).
OUTILS NÉCESSAIRES :
• Lunettes de sécurité
• Clés Allen de 4, 3, 2,5 et 2mm
• Clé dynamométrique réglable dans une plage de
2,8 à 10Nm • Coupe-câble
left horizontal
left horizontal
B
C
D
MM Knuckle
MM Knuckle
MM Knuckle
El sistema RockShox PushLoc sólo es compatible con
horquillas RockShox equipadas con la función de bloqueo
remoto que utilicen los sistemas de amortiguación
Turnkey o Motion Control. Si no está seguro de si su
horquilla lleva uno de estos sistemas, consulte con el
distribuidor donde adquirió su horquilla RockShox.
ANTES DE LA INSTALACIÓN:
La horquilla PushLoc puede instalarse en varias
configuraciones distintas, por lo que conviene que
experimente un poco antes de elegir la definitiva.
Tenga en cuenta los siguientes criterios: • Que el cable tenga holgura suficiente.
• Que la maneta quede en un punto de acceso fácil, pero no accidental (procure que no pueda accionarla de un golpe sin querer). • Que la maneta del sistema PushLoc se coloque en un punto donde tenga un recorrido completo sin tocar con nada.
INSTALACIÓN
1
2
Fije la bicicleta al banco de trabajo y desmonte el sistema anterior de bloqueo remoto.
Prepare la maneta del sistema PushLoc.
• Si va a instalar el sistema PushLoc en su posición
normal (verticalmente por el lado izquierdo), o si va a
instalarlo en horizontal en el lado derecho, ya puede
continuar con el paso 3.
• Si desea instalarlo en horizontal en el lado izquierdo
o en vertical en el derecho, necesitará instalar
la otra maneta PushLoc. Para ello, desenrosque
los tornillos de la maneta por los dos lados, tire
con cuidado de la maneta haciendo palanca para
extraerla, y sustitúyala por la otra maneta. Asegúrese
de que cuando la maneta esté en la posición
“desbloqueada” quede exactamente como indica el
diagrama siguiente, y después instale y apriete los
tornillos de la maneta (con un par de: 0,7Nm).
HERRAMIENTAS NECESARIAS:
• Gafas de seguridad
• Llaves hexagonales de 4, 3, 2,5 y 2mm
• Llave dinamométrica ajustable: Escala de 2,8-10Nm
• Pelacables
Utilice estos diagramas para comprobar si ha instalado
la maneta correcta en su sistema PushLoc. 3
Prepare la abrazadera PushLoc para el manillar.
Para orientación vertical:
¡Ha tenido suerte! El sistema PushLoc viene de fábrica
ya preparado para instalarlo en vertical. Continúe con
el paso 4.
5
4
Montaje del sistema PushLoc en el manillar.
Para orientación vertical u horizontal:
Simplemente desenrosque el tornillo de la abrazadera,
colóquela abrazando la barra del manillar (hacia dentro
con respecto a la palanca de cambio) y vuelva a colocar
el tornillo de la abrazadera. Par de apriete: 2,8-3,4Nm.
Para montaje Matchmaker:
Desenrosque del todo el tornillo correspondiente
(derecho o izquierdo) del cuerpo Matchmaker, extraiga
la arandela cilíndrica inferior y coloque en su lugar la
escuadra acodada Matchmaker. Ajuste el ángulo de
la palanca de cambio y apriete el tornillo del cuerpo
Matchmaker. Par de apriete: 2,8-3,4Nm.
Para montaje Matchmaker:
Retire la abrazadera de montaje en vertical que viene
instalada en su sistema PushLoc desenroscando del
todo el tornillo. A continuación, sustituya la abrazadera
por la escuadra acodada Matchmaker, asegurándose
de instalar las arandelas en el orden correcto (ver
diagrama). No apriete del todo el tornillo todavía. Tendrá
que ajustar el ángulo una vez colocado en el manillar.
ITALIANO
Pour une installation horizontale :
Déposez le collier de montage vertical installé sur
le système PushLoc en dévissant complètement
le boulon. Ensuite, installez le collier de montage
horizontal en veillant à bien monter les rondelles dans
le bon ordre (voir le diagramme). Ne vissez pas les
boulons à fond pour le moment. Il vous faudra ajuster
l’angle une fois le système installé sur le guidon.
6
Assurez-vous que le levier du système PushLoc est bien en position déverrouillée, guidez le câble
jusqu’à la fourche et coupez la gaine à la longueur
appropriée avec un coupe-câble bien aiguisé. Le système
PushLoc est fourni avec une gaine découpée à une
longueur appropriée pour une installation standard : il
se peut donc que vous n’ayez pas à la couper.
Remarque : Tournez le guidon à fond des deux côtés
avant d’attacher le câble à la fourche pour vous assurer
left vertical
que le câble ne gêne pas lors du mouvement.
Faites
passer le câble dans la gaine et dans l’arrêt de gaine
sur la tête de fourche. Coincez les embouts de gaine
dans l’arrêt de gaine du levier et dans celui de la tête
de fourche. Enroulez et tirez le câble pour qu’il soit
bien serré sur la bobine et coincé sous la vis du
serre-câble. Serrez la vis du serre-câble avec une clé
Allen de 2mm pour bloquer le câble (serrez jusqu’à
ce qu’il soit juste bloqué). Coupez le câble en trop et
ajoutez un embout de câble.
Avec un adaptateur Matchmaker :
Dévissez entièrement le boulon approprié du corps
du système Matchmaker (droit ou gauche) et déposez
la rondelle cylindre inférieure et remplacez-la par le
joint d’articulation Matchmaker. Ajustez l’angle de la
commande du dérailleur et serrez le boulon du corps du
système Matchmaker. Serrez à un couple de : 2,8 à 3,4Nm.
Remarque : Veillez à bien installer le système
Matchmaker du bon côté, sinon il ne fonctionnera
pas correctement.
Ajustez la position de la commande PushLoc à votre goût et serrez le boulon du joint d’articulation
du système Matchmaker. Serrez à un couple de : 2,8 à
3,4Nm.
7
CONTENUTO DEL KIT:
• Corpo PushLoc con morsetto di montaggio verticale, horizontal
cavo eleftalloggiamento
collegati (A) • Morsetto di montaggio orizzontale (B)
• Articolazione MatchmakerTM (C)
• Leva destra (D)
left vertical
left horizontal
left horizontal
left vertical
A
B
C
D
MM Knuckle
MM Knuckle
MM Knuckle
STRUMENTI NECESSARI:
• Occhiali di protezione
• Chiavi esagonali da 4, 3, 2,5 e 2 mm
• Chiave regolabile: intervallo 2,8-10Nm
• Tagliacavi
Con la maneta PushLoc en posición de desbloqueo, lleve el cable hasta la horquilla y pele
la vaina del cable a la longitud adecuada, utilizando un
pelacables afilado. PushLoc viene con una vaina con
la longitud adecuada para una instalación típica, por lo
que quizás no necesite cortar nada.
Compruebe el funcionamiento del bloqueo remoto PushLoc: Presione la maneta varias veces
para bloquear y desbloquear la horquilla. Presione la
horquilla hacia abajo y compruebe su funcionamiento
después de cada paso. Ajuste la tensión del cable si es
necesario. Por último, compruebe detenidamente que
todos los tornillos de montaje estén bien apretados.
7
¡Adelante! Ya puede empezar a utilizar la bicicleta.
IMPORTANTE:
RockShox PushLoc è compatibile solo con forcelle
RockShox con capacità di blocco remoto utilizzando
i sistemi di smorzamento Turnkey o di controllo del
movimento. Se non si è sicuri che il proprio sia uno
di essi, consultare il rivenditore preferito presso cui
RockShox è venduto.
PRIMA DELL’INSTALLAZIONE:
PushLoc può essere installato in numerose configurazioni
diverse, quindi sperimentare un po’ prima di scegliere
la modalità di installazione. Tra i fattori da prendere in
considerazione: • Spazio libero del cavo.
• Accesso facile, ma non accidentale, alla leva (per evitare di urtarla accidentalmente). • Posizionamento in modo tale che la leva PushLoc abbia una gamma completa di movimenti senza urtare nulla.
INSTALLAZIONE
1
2
Fissare la bicicletta nel cavalletto di lavoro e rimuovere il precedente blocco remoto.
Preparare la leva PushLoc.
• Se si intende installare il PushLoc nella sua posizione
standard (verticalmente sul lato sinistro), oppure se
si intende installarlo orizzontalmente sul lato destro,
si è pronti a procedere al passaggio 3. • Se si desidera che si trovi orizzontalmente sul lato
sinistro o verticalmente sul lato destro, è necessario
installare l’altra leva PushLoc. A tal fine, svitare
i bulloni della leva su entrambi i lati, spostare
delicatamente la leva fino a rimuoverla e sostituirla
con l’altra leva. Accertarsi che la leva nella posizione
“sbloccata” sia esattamente come il diagramma
seguente, quindi installare e serrare i bulloni della
leva (serrare a: 0,7Nm).
Testez le verrouillage de PushLoc : Poussez le levier à plusieurs reprises pour verrouiller et
déverrouiller la fourche. Enfoncez la fourche et testez
le fonctionnement pour chaque position. Ajustez la
tension du câble si nécessaire. Finalement, vérifiez
que tous les boulons sont bien serrés. Vous avez fini ! Votre vélo est prêt.
ACCERTARSI DI SEGUIRE TUTTE LE INDICAZIONI
DEL PRODUTTORE PER LA MANUTENZIONE
E L’INSTALLAZIONE DEI COMPONENTI DELLA
BICICLETTA. L’INSTALLAZIONE ERRATA DEI
COMPONENTI PUÒ COMPORTARE LESIONI
GRAVI E/O FATALI. CONSIGLIAMO SEMPRE
DI RICHIEDERE CHE LA MANUTENZIONE E
L’INSTALLAZIONE SIANO ESEGUITE DA UN
MECCANICO PER BICICLETTE QUALIFICATO.
6
Ajuste la posición del sistema PushLoc a sus
preferencias y apriete el tornillo de la escuadra acodada Matchmaker. Par de apriete: 2,8-3.4Nm.
Nota: Antes de acoplar el cable a la horquilla, gire
el manillar del todo en ambas direcciones, para
asegurarse de que no impide ningún movimiento. Tire
del cable dentro de su vaina y a través del orificio de
tope del cable de la corona. Inserte las férulas de la
vaina en el tope del cable del lado de la maneta y del
de la corona. Tire del cable y enróllelo en el carrete
por debajo del tornillo de ajuste del cable. Apriete bien
el tornillo de ajuste del cable con una llave Allen de
2mm para sujetar el cable. Corte el cable sobrante y
termínelo con un capuchón en el extremo del cable.
Para orientación horizontal:
Extraiga la abrazadera de montaje en vertical que viene
instalada en su sistema PushLoc, desenroscando
completamente el tornillo. A continuación, instale la
abrazadera de montaje horizontal, asegurándose de
instalar las arandelas en el orden correcto (ver diagrama).
No apriete del todo el tornillo todavía. Una vez colocado
en el manillar, tendrá que ajustar el ángulo.
AT T E N Z I O N E
Montez la commande PushLoc sur le guidon.
Pour une installation verticale ou horizontale :
Dévissez simplement le boulon du collier, placez le
collier sur le guidon (à l’intérieur de la commande du
dérailleur) et replacez le boulon du collier. Serrez à un
couple de : 2,8 à 3,4Nm.
Linke Seite Linke Seite Rechte Seite Rechte Seite
waagerecht
waagerecht senkrecht senkrecht
Lado izquierdo Lado izquierdo Lado derecho Lado derecho
en horizontal en vertical en vertical
en horizontal
Congratulazioni! È stato selezionato il sistema
di blocco remoto della forcella PushLocTM. Ora è
possibile bloccare o sbloccare la forcella RockShox
con un movimento rapido. PushLoc è realizzato in
maniera da adattarsi a diverse posizioni di montaggio
per consentire di personalizzare precisamente la
propria installazione. È sufficiente seguire queste
semplici indicazioni e si sarà pronti in pochi minuti.
Remarque : Le système PushLoc a été conçu pour
une installation verticale quand il est monté sur un
adaptateur Matchmaker.
5
Überprüfen Sie anhand der Zeichnungen, dass Sie den
richtigen Hebel für Ihr PushLoc-System montiert haben.
Nota: El sistema PushLoc está diseñado para instalarse
con orientación vertical cuando se monta sobre un
sistema Matchmaker.
4
Pour une installation avec un adaptateur Matchmaker :
Déposez le collier de montage vertical installé sur le
système PushLoc en dévissant complètement le boulon.
Ensuite, remplacez le collier par le joint d’articulation
Matchmaker en veillant à bien monter les rondelles
dans le bon ordre (voir le diagramme). Ne vissez pas
• Augenschutz
• Inbusschlüssel 2mm, 2,5mm, 3mm und 4mm
• Drehmomentschlüssel: Einstellbereich 2,8 bis 10Nm
• Spezialzange für Züge
Nota: Asegúrese de montar el Matchmaker por el lado
correcto, pues de lo contrario no funcionará bien.
Préparez le collier du système PushLoc pour
le guidon.
Pour une installation verticale :
Vous avez fini. Le système PushLoc est configuré
pour une installation verticale en sortie d’usine.
Passez à l’étape 4.
MM Knuckle
MM Knuckle
Vérifiez avec ces diagrammes que vous avez bien
installé le levier correct avec votre système PushLoc.
• Cuerpo del sistema PushLoc con abrazadera de montaje
left horizontal
en vertical,
con el cable y su vaina conectados (A) • Abrazadera de montaje en horizontal (B)
• Escuadra acodada MatchmakerTM (C)
• Maneta para el lado derecho (D)
IMPORTANTE:
3
INSTALLATION
CONTENIDO DEL KIT:
left vertical
• Wenn Sie den Hebel waagerecht auf der linken
oder senkrecht auf der rechten Seite anbringen
möchten, müssen Sie den anderen PushLocHebel verwenden. Lösen Sie zu diesem Zweck die
Hebelschrauben auf beiden Seiten, entfernen Sie
den Hebel vorsichtig, und ersetzen Sie ihn durch
den anderen Hebel. Stellen Sie sicher, dass der
Hebel in der „entsperrten“ Position exakt wie in
der nachstehenden Zeichnung ausgerichtet ist.
Montieren Sie anschließend die Hebelschrauben,
und ziehen Sie sie fest (Drehmoment: 0,7Nm).
ERFORDERLICHES WERKZEUG:
Die RockShox PushLoc-Fernbedienung eignet
sich ausschließlich für RockShox-Gabeln mit
fernbedienbarer Sperrfunktion, die mit dem Turnkeyoder Motion Control-Dämpfersystem ausgestattet sind.
Wenn Sie sich nicht sicher sind, ob dies auf Ihre Gabel
zutrifft, wenden Sie sich an Ihren RockShox-Händler.
le boulon à fond pour le moment. Il vous faudra ajuster
l’angle une fois le système installé sur le guidon.
IMPORTANT :
Le système RockShox PushLoc est compatible
uniquement aux fourches RockShox qui disposent du
système de verrouillage à distance avec les systèmes
d’amortisseur interne Turnkey ou Motion Control. Si
vous n’êtes pas sûr de ce dont est équipé votre vélo,
veuillez consulter votre revendeur RockShox préféré.
ASEGÚRESE
DE
SEGUIR
TODAS
LAS
RECOMENDACIONES DEL FABRICANTE ACERCA
DE LA INSTALACIÓN Y EL MANTENIMIENTO DE
LOS COMPONENTES DE SU BICICLETA. UNOS
COMPONENTES MAL INSTALADOS PUEDEN
PROVOCAR LESIONES GRAVES O INCLUSO
MORTALES. LE RECOMENDAMOS QUE CONFÍE
SIEMPRE A UN MECÁNICO DE BICICLETAS
CUALIFICADO CUALQUIER OPERACIÓN DE
INSTALACIÓN O MANTENIMIENTO DE SUS
COMPONENTES.
Hinweis: Das PushLoc-System wird bei der Montage
mit Matchmaker senkrecht ausgerichtet.
Félicitations ! Vous avez sélectionné le système de
verrouillage de la fourche à distance PushLocTM.
Maintenant, vous pouvez verrouiller ou déverrouiller
votre fourche RockShox avec un minimum d’effort.
PushLoc a été étudié pour permettre un montage en
diverses positions pour vous laisser personnaliser
votre installation à votre guise. Suivez ces instructions
simples et vous serez prêt à attaquer les sentiers en
quelques minutes.
AT E N C I Ó N
A
Montage mit Matchmaker:
Entfernen Sie die Klemmung für die senkrechte
Montage von Ihrem PushLoc-System, indem Sie die
Klemmschraube vollständig herausdrehen. Ersetzen
Sie nun die Klemmung durch die MatchmakerBefestigung, und achten Sie dabei darauf, die
Unterlegscheiben in der richtigen Reihenfolge
anzubringen (siehe Zeichnung). Ziehen Sie die
Schraube noch nicht vollständig fest. Möglicherweise
möchten Sie den Winkel nach der Montage auf dem
Lenker noch anpassen.
ESPAÑOL
¡Enhorabuena! Ha elegido el sistema de bloqueo remoto
de la horquilla PushLocTM. Ahora podrá bloquear o
desbloquear su horquilla RockShox rápidamente en un
solo movimiento. El sistema PushLoc viene equipado
para adaptarse a distintas posiciones de montaje, para
que pueda personalizar a su gusto su propia instalación.
Sólo tiene que aplicar estas sencillas instrucciones y
en pocos minutos estará listo para circular.
left vertical
Legen Sie den PushLoc-Hebel bereit.
WICHTIG:
Adjust PushLoc position to suit your personal
preference and tighten the MatchMaker knuckle
bracket bolt. Torque to: 2.8-3.4Nm (25-30 in-lb).
6
Bringen Sie den PushLoc-Hebel in die entsperrte
Position, führen Sie den Zug zur Gabel, und
kürzen Sie die Zughülle mithilfe einer Spezialzange auf
die richtige Länge. Die Zughülle des PushLoc-Systems
ist bei Lieferung auf eine durchschnittliche Länge
zugeschnitten, sodass Sie sie möglicherweise nicht
kürzen müssen.
MM Knuckle
MM Knuckle
GERMAN
Right side
horizontal
Hinweis: Achten Sie darauf, die MatchmakerKlemmung auf der richtigen Seite zu montieren, da sie
andernfalls möglicherweise nicht richtig funktioniert.
Bereiten Sie die PushLoc-Klemmung für den Lenker vor.
MM Knuckle
Befestigen Sie das Fahrrad in einem Montageständer, und nehmen Sie die vorhandene Fernbedienung ab.
• Wenn Sie den PushLoc-Hebel in der
Standardposition (senkrecht auf der linken Seite)
oder waagerecht auf der rechten. Seite montieren
möchten, können Sie mit Schritt 3 fortfahren.
5
Right side
vertical
D
MONTAGE
B
A
C
• Zugspiel.
• Einen einfachen Zugriff auf den Hebel gewährleisten,
ohne dass dieser jedoch versehentlich ausgelöst
werden kann.
• Den PushLoc-Hebel so platzieren, dass er sich frei
bewegen lässt, ohne an andere Komponenten zu
stoßen.
2
left horizontal
left horizontal
left vertical
Der PushLoc-Hebel kann an verschiedenen
Positionen montiert werden, sodass Sie ein wenig
herumprobieren sollten, bevor Sie mit der Montage
beginnen. Bedenken Sie Folgendes: 1
7
Left side
Left side
horizontal vertical
LIEFERUMFANG:
A
Tools Needed:
Please read the
safety information inside
95-4015-009-000, Rev B
© SRAM Corporation, 2006
BEFOLGEN SIE ALLE HINWEISE DES
HERSTELLERS ZUR
WA RT U N G
UND
INSTALLATION DER KOMPONENTEN IHRES
FAHRRADS. DIE FEHLERHAFTE INSTALLATION
VON KOMPONENTEN KANN ZUR SCHWEREN
UND/ODER TÖDLICHEN VERLETZUNGEN
FÜHREN. ES WIRD EMPFOHLEN, KOMPONENTEN
STETS VON EINEM QUALIFIZIERTEN
ZWEIRADMECHANIKER
WARTEN
UND
INSTALLIEREN ZU LASSEN.
left vertical
VOR DER MONTAGE:
ACHTUNG
• PushLoc-Körper mit montierter senkrechter left horizontal
Montageklemmung,
Zug und Zughülle (A) • Horizontale Montageklemmung (B)
• MatchmakerTM-Befestigung (C)
• Hebel für rechte Seite (D)
left vertical
For Matchmaker mount:
Unscrew the appropriate (right or left) Matchmaker
body bolt all the way and remove the bottom cylinder
washer and place the Matchmaker knuckle bracket in
it’s place. Adjust the angle of the shifter and tighten the
Matchmaker body bolt. Torque to: 2.8-3.4Nm (25-30
in-lb).
Prepare PushLoc lever.
• If you are going to install the PushLoc in its standard
position (vertically on the left side), or if you are going
to install it horizontally on the right side, then you are
ready to proceed to step 3.
6
Note: Turn the bars all the way both directions before
you attach the cable to the fork, to make sure the
cable doesn’t impede any movement. Pull the cable
through the cable housing and the cable stop hole on
the crown. Slide the housing ferrules into lever cable
stop and crown cable stop. Wrap and pull cable tightly
around spool and under cable set-screw. Tighten
cable-set screw with a 2mm hex wrench to secure
cable (tighten until snug). Cut excess cable and finish
with a cable end cap.
Prior to installation:
• If you would like it on the left side horizontal or right
side vertical, then you will need to install the other
PushLoc lever. To do so, unscrew the lever bolts on
both sides, gently pry the lever off, and replace it with
the other lever. Make sure the lever in the “unlocked”
position is exactly like the diagram below, and then
install and tighten the lever bolts (torque to: .7 Nm or
6.2 in-lb).
B
C
Important:
Utilizzare questi diagrammi per accertarsi che sul
PushLoc sia installata la leva corretta.
Orizzontale Verticale sul Verticale sul Orizzontale
sul lato sinistro lato sinistro lato destro
sul lato destro
3
Preparare il morsetto PushLoc per il manubrio.
Per l’orientamento verticale:
Bene! PushLoc è pronto per essere installato
verticalmente. Passare al punto 4.
Per l’orientamento orizzontale:
Rimuovere il morsetto di montaggio verticale che
è installato sul PushLoc svitando completamente
il bullone. Ora installare il morsetto di montaggio
orizzontale accertandosi di installare le rondelle
nell’ordine corretto (vedere il diagramma). Non serrare
ancora completamente il bullone. Sarà bene regolare
l’angolo una volta che sia sul manubrio.
7
Testare il funzionamento del blocco remoto PushLoc. Spingere la leva qualche volta
per bloccare e sbloccare la forcella. Premere la
forcella verso il basso e testare il funzionamento
dopo ciascuna fase. Regolare la tensione del cavo
se necessario. Infine, controllare nuovamente per
verificare che tutti i bulloni di montaggio siano saldi.
Per il montaggio di Matchmaker:
Rimuovere il morsetto di montaggio verticale che
è installato sul PushLoc svitando completamente il
bullone. Ora sostituire il morsetto con la mensola
dell’articolazione Matchmaker, accertandosi di
installare le rondelle nell’ordine corretto (vedere il
diagramma). Non serrare ancora completamente il
bullone. Sarà bene regolare l’angolo una volta che
sia sul manubrio.
NEDERLANDS
5
Montare PushLoc sul manubrio.
Per l’orientamento verticale o orizzontale:
È sufficiente svitare il bullone del morsetto, avvolgere
il morsetto attorno al manubrio (all’interno rispetto al
cambio) e sostituire il bullone del morsetto. Serrare a:
2,8-3,4Nm.
Regolare la posizione del PushLoc per adattarla
alle proprie preferenze personali e serrare il
bullone della mensola dell’articolazione Matchmaker.
Serrare a: 2,8-3,4Nm.
Gefeliciteerd! U hebt het PushLocTM
afstandsblokkeringssyteem voor de voorvork gekozen.
Nu kunt u met één snelle beweging uw RockShox
voorvork blokkeren of onblokkeren. PushLoc kan in
een aantal verschillende bevestigingsposities gebruikt
worden om u in staat te stellen uw eigen installatie
precies aan uw wensen aan te passen. Volg deze
eenvoudige aanwijzingen en u bent binnen een paar
minuten klaar om te gaan.
6
Con la leva PushLoc nella posizione sbloccata, dirigere il cavo verso la forcella
e tagliare l’alloggiamento alla lunghezza corretta
utilizzando tagliacavi affilati. PushLoc è fornito
con l’alloggiamento alla lunghezza appropriata per
l’installazione media, quindi potrebbe anche non
essere necessario tagliarlo.
Nota: Ruotare il manubrio completamente in entrambe
le direzioni prima di fissare il cavo alla forcella, per
accertarsi che il cavo non impedisca alcun movimento.
Spingere il cavo attraverso l’alloggiamento del cavo
e il foro fermacavi sulla corona. Fare scivolare le
fascette dell’alloggiamento nel fermacavi della leva e
nel fermacavi della corona. Avvolgere e tirare il cavo
saldamente attorno alla bobina e sotto la vite di fermo
del cavo. Serrare la vite di fermo del cavo con una
chiave esagonale da 2mm per fissare il cavo (serrare
fino a quando non sia saldo). Tagliare il cavo in
eccesso e finire con un tappo per l’estremità del cavo.
WAARSCHUWING
PORTUGUÊS
AV I S O
CERTIFIQUE-SE DE QUE SEGUIU TODAS AS
INDICAÇÕES DO FABRICANTE PARA MANUTENÇÃO
E INSTALAÇÃO DE PEÇAS NA BICICLETA.
COMPONENTES
I N C O R R E C TA M E N T E
INSTALADOS PODEM PROVOCAR DANOS SÉRIOS
OU FATAIS. É SEMPRE RECOMENDÁVEL
QUE A MANUTENÇÃO E INSTALAÇÃO DOS
COMPONENTES SEJA FEITA POR UM MECÂNICO
DE BICICLETAS CREDENCIADO.
CONTEÚDO DO CONJUNTO:
• Corpo do PushLoc, com braçadeira de montagem left horizontal
vertical,
cabo e bainha acoplados (A) • Braçadeira de montagem horizontal (B)
• Fixação do MatchmakerTM (C)
• Manípulo da direita (D)
left vertical
left horizontal
left horizontal
left vertical
A
B
C
D
MM Knuckle
FERRAMENTAS NECESSÁRIAS:
• Óculos de protecção
• Chaves sextavadas de 4, 3, 2,5 e 2mm
• Chave de roquete: variação de 2,8-10Nm
• Alicate de corte
MM Knuckle
MM Knuckle
BENODIGD GEREEDSCHAP:
• Als u het aan de linkerkant horizontaal of rechterkant
verticaal wilt installeren, dan moet u de andere
PushLoc-hendel installeren. Om dat te doen draait
u de hendelbouten aan beide kanten los, verwijder
de hendel voorzichtig en vervang deze door de
andere hendel. Zorg dat de hendel in de “open”
positie precies is zoals het diagram hieronder, en
installeer vervolgens de hendelbouten en draai ze
vast (aandraaien tot: 0,7Nm).
Voor Matchmaker bevestiging:
Schroef de juiste (rechter of linker) Matchmaker
hoofdbout helemaal los en verwijder de onderste
cilindersluitring en zet de Matchmaker scharnierbeugel
ervoor in de plaats. Pas de hoek van de versnelling
aan en draai de Matchmaker hoofdbout aan. Draai aan
tot: 2,8-3,4Nm.
• Veiligheidsbril
• 4, 3, 2,5 en 2mm inbussleutels
• Afstelbare torsiesleutel: bereik 2,8-10Nm
• Kabelkniptang
BELANGRIJK:
RockShox PushLoc is alleen combineerbaar met
RockShox voorvorken die de mogelijkheid hebben
voor afstandsblokkering via Turnkey of Motion Control
dempingssystemen. Als u er niet zeker van bent of u
een dergelijke vork hebt, raadpleeg dan uw favoriete
dealer waar RockShox verkocht wordt.
PushLoc kan in een aantal verschillende configuraties
geïnstalleerd worden, dus experimenteer een beetje
voordat u besluit hoe u gaat installeren. Overwegingen
zijn onder meer: • Kabelspeling.
• Makkelijke, maar niet toevallige toegang tot de hendel (u wilt vermijden dat u per ongeluk tegen de hendel aanbotst). • Plaatsing zodat de PushLoc-hendel volledige bewegingsruimte heeft zonder iets te raken.
Gebruik deze diagrammen om te zorgen dat u de
juiste hendel hebt geïnstalleerd op uw PushLoc.
Linkerkant
Linkerkant
horizontaal verticaal Rechterkant Rechterkant
verticaal
horizontaal
Maak de PushLoc-klem klaar voor het stuur.
Voor verticale oriëntatie:
U boft! PushLoc is klaar om verticaal geïnstalleerd te
worden. Ga door naar stap 4.
3
Voor Matchmaker bevestiging:
Verwijder de verticale bevestigingsklem die op uw
PushLoc geïnstalleerd is door de bout volledig los te
draaien. Vervang de klem nu door de Matchmaker
scharnierbeugel, waarbij u erop moet letten om de
sluitringen in de juiste volgorde te installeren (zie
diagram). Draai de bout nog niet volledig vast. U
moet de hoek nog afstellen nadat het op het stuur
bevestigd is.
• PushLoc hoofddeel met verticale bevestigingsklem, kabel en omhulsel eraan vast (A) • Horizontale bevestigingsklem (B)
• MatchmakerTM scharnier (C)
• Rechterhendel (D)
left horizontal
left horizontal
left vertical
A
B
Installatie
1
2
Plaats de fiets stevig in de fietswerkbok, en verwijder de oude afstandsblokkering.
Maak de PushLoc-hendel klaar.
• Als u de PushLoc in zijn standaardpositie gaat
installeren (verticaal aan de linkerkant), of als u het
horizontaal gaat installeren aan de rechterkant, dan
bent u klaar om met stap 3 verder te gaan.
ANTES DE COMEÇAR:
O PushLoc pode ser instalado com várias configurações,
pelo que deve fazer algumas experiências antes de
assentar na que vai instalar. Factores a ter em conta: • Folga do cabo.
• Acesso fácil, mas não acidental, ao manípulo (não se pretende que toque nele involuntariamente). • O posicionamento do manípulo do PushLoc tem de se
movimentar em toda a extensão sem bater em nada.
INSTALAÇÃO
1
2
Prenda a bicicleta no suporte e retire o antigo sistema de bloqueio remoto.
Prepare o manípulo do PushLoc.
• Se for instalar o PushLoc na posição padronizada
(verticalmente, do lado esquerdo) ou horizontalmente
do lado direito, salte para o passo 3.
• Se pretender pô-lo horizontalmente do lado esquerdo
ou verticalmente do lado direito, vai ter de instalar o
outro manípulo do PushLoc. Para tal, desaparafuse o
manípulo de ambos os lados, retire cuidadosamente
o manípulo e substitua-o pelo outro. Certifique-se
de que o manípulo, na posição “desbloqueada”,
tem exactamente o aspecto do diagrama abaixo;
instale-o e aperte os parafusos do manípulo (apertar
até: 0,7Nm).
Horizontal, Vertical,
do lado
do lado
esquerdo esquerdo Vertical, do
lado direito
Horizontal,
do lado
direito
3
Prepare o PushLoc para instalação no guiador.
Para orientação vertical:
Está com sorte! O PushLoc vem preparado para ser
instalado verticalmente. Salte para o passo 4.
Voor horizontale oriëntatie:
Verwijder de verticale bevestigingsklem die op uw
PushLoc geïnstalleerd is door de bout volledig los te
draaien. Installeer nu de horizontale bevestigingsklem,
waarbij u erop moet letten om de sluitringen in de
juiste volgorde te installeren (zie diagram). Draai
de bout nog niet volledig vast. U moet de hoek nog
afstellen nadat het op het stuur bevestigd is.
5
4
Bevestig Pushloc op het stuur
Voor verticale of horizontale oriëntatie:
Schroef de klembout simpelweg los, wikkel de klem
om het stuur (binnen de versnelling), en vervang de
klembout. Draai aan tot: 2,8-3,4Nm.
Para montagem com Matchmaker:
Retire a braçadeira de montagem vertical que vem
instalada no PushLoc, desatarraxando por completo
o parafuso. Agora, substitua a braçadeira pela fixação
do Matchmaker, certificando-se de que coloca as
anilhas pela ordem correcta (ver diagrama). Não
aperte ainda completamente o parafuso. Vai precisar
de ajustar o ângulo, depois de instalado no guiador.
Nota: O PushLoc foi concebido para ter orientação
vertical, quando montado com Matchmaker.
5
Para orientação horizontal:
Retire a braçadeira de montagem vertical que vem
instalada no PushLoc, desatarraxando por completo
o parafuso. Agora, instale a braçadeira de montagem
horizontal, certificando-se de que coloca as juntas
pela ordem correcta (ver diagrama). Não aperte ainda
o parafuso completamente. Vai precisar de ajustar o
ângulo, depois de instalado no guiador.
4
Monte o PushLoc no guiador.
Em orientação vertical ou horizontal:
Basta desatarraxar o parafuso da braçadeira,
envolver a braçadeira contra o guiador (por dentro
das mudanças) e substituir o parafuso da braçadeira.
Apertar até: 2,8-3,4Nm.
Utilize estes diagramas para se certificar de que
instala o manípulo correcto no PushLoc.
Nota: Certifique-se de que monta o Matchmaker do
lado correcto, caso contrário não vai funcionar bem.
left vertical
left horizontal
left vertical
left horizontal
left horizontal
left vertical
A
B
C
D
MM Knuckle
MM Knuckle
MM Knuckle
Ajuste a posição do PushLoc de acordo com as
suas preferências e aperte o parafuso da fixação
do Matchmaker. Apertar até: 2,8-3,4Nm.
6
Com o manípulo do PushLoc na posição de desbloqueado, encaminhe o cabo pela forqueta
e apare o comprimento da bainha, utilizando um
alicate de corte. O PushLoc traz uma bainha com
comprimento adequado a uma instalação left
média,
pelo
vertical
que é provável que não precise de fazer corte nenhum.
Note: Rode o guiador para ambos os lados antes de
prender o cabo à forqueta, para garantir que não trava
qualquer movimento. Passe o cabo pela bainha e
através do olhal de prisão do cabo, na coroa. Passe os
remates da bainha através dos terminais do manípulo
e da coroa. Puxe e prenda o cabo com força em torno
do regulador e por baixo do parafuso de fixação do
cabo. Aperte o parafuso com uma chave sextavada
de 2mm, de modo a segurar o cabo (aperte até ficar
justo). Corte o excesso de cabo e remate com uma
protecção de terminal.
Para montagem com Matchmaker:
Desatarraxe completamente o parafuso central do
Matchmaker que importa (direito ou esquerdo) e
retire a anilha abobadada inferior; coloque a fixação
do Matchmaker no seu lugar. Ajuste o ângulo do
manípulo das mudanças e aperte o parafuso central
do Matchmaker. Apertar até: 2,8-3,4Nm.
Test de PushLoc afstandsblokkeringsfunctie. Druk een paar keer op de hendel om de voorvork
te blokkeren en onblokkeren. Druk de voorvork naar
beneden en test het functioneren na elke stap. Pas
de kabelspanning aan waar nodig. Tot slot, controleer
nog een keer om te zorgen dat alle bevestigingsbouten
goed vast zitten.
7
Goed gedaan! U bent klaar om te rijden!
MM Knuckle
MM Knuckle
O PushLoc da RockShox só é compatível com
forquetas RockShox com capacidade de bloqueio
remoto, através dos sistemas de amortecimento com
controlo de movimento ou de bloqueio Turnkey. Se
não tiver a certeza de ter algum deles, consulte o seu
fornecedor habitual de produtos RockShox.
Opmerking: PushLoc is ontworpen voor verticale
oriëntatie als het bevestigd is op een Matchmaker.
IMPORTANTE:
Opmerking: Draai het stuur helemaal beide kanten op
voordat u de kabel aan de voorvork bevestigt, om te
zorgen dat de kabel geen beweging verhindert. Trek
de kabel door het kabelomhulsel en het kabelstopgat
op de kroon. Schuif de metalen dop van het omhulsel
binnen de hendelkabelstop en de kroonkabelstop.
Wikkel en trek de kabel strak om de spoel en onder
de kabelstelschroef. Draai de kabelstelschroef vast
met een zeskantige steeksleutel van 2mm om de
kabel stevig te bevestigen (aandraaien tot het strak
zit). Snijd overtollige kabel af en sluit af met een
kabeleinddop.
Opmerking: Zorg dat u de Matchmaker aan de juiste
kant bevestigt, anders zal het niet goed werken.
KIT INHOUD:
Nota: Accertarsi di montare il Matchmaker sul lato
corretto, altrimenti non funzionerà correttamente.
Parabéns! Seleccionou o sistema de bloqueio remoto
de forquetas PushLocTM . Agora, com um movimento
rápido, pode bloquear ou desbloquear a sua forqueta
RockShox. O PushLoc está preparado para se adaptar
a diferentes posições de montagem, a fim de permitir
grande personalização da instalação. Basta seguir
estas instruções simples e estará pronto a arrancar
em poucos minutos.
MM Knuckle
VOOR INSTALLATIE:
ZORG DAT U ALLE AANWIJZINGEN VAN DE
FABRIKANT VOOR HET ONDERHOUD EN DE
INSTALLATIE VAN DE ONDERDELEN VAN UW
FIETS OPVOLGT. ONJUIST GEÏNSTALLEERDE
ONDERDELEN KUNNEN LEIDEN TOT ERNSTIGE
OF FATALE VERWONDINGEN. WE RADEN
ALTIJD AAN OM UW ONDERDELEN TE LATEN
ONDERHOUDEN EN INSTALLEREN DOOR EEN
ERKENDE FIETSMONTEUR.
left vertical
Per il montaggio di Matchmaker:
Svitare completamente il bullone appropriato (destro
o sinistro) del corpo Matchmaker e rimuovere la
rondella a cilindro inferiore e collocare la mensola
dell’articolazione Matchmaker nella sua posizione.
Regolare l’angolo del cambio e serrare il bullone del
corpo Matchmaker. Serrare a: 2,8-3,4Nm.
D
Fatto! La bicicletta è pronta!
Nota: PushLoc è progettato per l’orientamento
verticale quando è montato su un Matchmaker.
4
C
Teste o funcionamento do bloqueio remoto PushLoc. Aperte o manípulo várias vezes, para bloquear e
desbloquear a forqueta. Empurre a forqueta para baixo
e teste o funcionamento a cada vez. Afine a tensão do
cabo, se necessário. Por fim, volte a verificar o aperto
de todos os parafusos de montagem, por precaução.
7
E já está! Pronto a rolar!
left horizontal
left vertical
left horizontal
left horizontal
left vertical
A
B
C
D
MM Knuckle
MM Knuckle
MM Knuckle
6
Pas de PushLoc positie aan naar uw voorkeur en draai de bout van de Matchmaker scharnierbeugel vast. Draai aan tot: 2,8-3,4Nm.
Met de PushLoc-hendel in de open positie, leid de kabel naar de voorvork en knip het omhulsel
tot de juiste lengte met een scherpe kabelkniptang.
PushLoc heeft omhulsel op de juiste lengte voor de
gemiddelde installatie, dus misschien hoeft u het niet
eens te knippen.