1
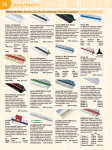
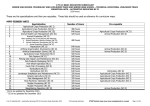
AL
RI
TE
MA
Chapter 1
11 Finding the Perfect
Perch
GH
TE
D
Room to Sew
15 A Cut Above
14 No One Likes Bad
Press
17 Tools for Good
Measure
CO
PY
RI
12 The Sewing Machine
15 Sharp Shooters:
The Cutting Tools
Whether sewing is new to you or not, one of the greatest
challenges in home sewing is finding the right space
and stocking it. If you’re just beginning, it’s likely
that you will amass over time gadgets, tools, and a
fabric stash with each new project that you tackle. To
get you started, I will discuss the sewing must-haves
or basic items that you will need and how to create a
functional and enjoyable sewing space.
Well, Look at You!
Pull Up a Chair
If you are one of the lucky ones who have an entire
room in your house dedicated to your sewing, first be
very thankful. Right after that, think about your space.
You’ll need three main centers of function—a place to
do your folding and cutting (a roomy table or counter),
a place to do your pressing (an ironing board), and a
spot to do your sewing (the sewing machine area). This
trio is best arranged in a “U” formation, whether you
have a small or very spacious room.
I’ve sewn in every type of environment that I’ve
listed so far, and am still learning what works best.
I’ve had a mere closet, and I’ve had an 1,800-squarefoot studio/boutique. In all instances, I’ve enjoyed the
process of making the most of it, and it has always
involved using some found furniture or storage.
Setting your sewing machine on a standard-height
dining table and sitting yourself in a standard-height
dining chair will put you too low to sew comfortably.
You don’t want to be reaching up to sew, nor do you
want to be reaching down. Neither of these options is
good for the back, neck, or shoulders. It’s also not good
for your project results!
For a test to see if your chair-and-table setup is
ideal, you could try the following: put your machine
on the table and sit in the chair right up to it; with
your upper arms relaxed down to your sides, raise up
your forearms so that they are bending at a perfect
perpendicular angle toward the machine; then flex
back your wrists a bit so that your hands can rest
comfortably on the extension table or near the needle
Finding the Perfect Perch
Finding the Perfect Perch
Do you have a 500-square-foot studio? Great! You only
have a spare bedroom? Perfect! What did you say, a
mere corner in the laundry room? Oooo, cozy! Just the
dusty floor of a coat closet? That’ll do; get the broom
and let’s get to work!
Whether it’s the sewing table, the chair, the shelves,
the cutting table, or whatever else you’re on the hunt
for, repurposing old garage sale or estate sale furniture
into something useful can be very rewarding. It just
takes a little creativity and brainpower to take the place
of the dollars you would otherwise spend on all-new
pieces. Talk to people you know who sew, and ask what
setup works for them and why. It can sometimes take
professionals years to get their sewing space the way
they want it. Like any designing in your home, it is not
an overnight process, but a personal journey to a place
you may end up liking best of all.
11
plate (which is the flat part of the
machine where your fabric runs
across). If you have to hunch up
your shoulders to do this, or are
raising your elbows up quite a bit,
you are most likely sitting too low.
Find a suitable chair, like a rolling,
adjustable office chair, and be the
high-and-mighty seamstress you
always wanted to be.
Creative Control Station
For those of you that have a corner in a room where
you can leave your sewing setup intact around the
clock, you can think of your space as a workstation.
You would likely want to employ some space-saving
measures within your workstation and have most
everything you need during your sewing time within
arm’s reach. There are countless all-in-one sewing-table
arrangements in the marketplace in a range of prices,
much like computer stations, that are ideal for this
situation. Many of these sewing stations have folding
table extensions for cutting your fabrics, and shelves or
drawers underneath for storing supplies.
This may seem obvious but, if you take the plunge
and buy a sewing center, sit at it first! There are poorly
designed sewing tables out there that barely leave room
for your legs when you are sitting at the machine. You’ll
never sit dead-center in front of a sewing machine;
you’ll sit center-left in front of the needle of the sewing
machine. So test it in the store and make sure that
you are comfortable and you have enough leg room.
Because of this, I wouldn’t recommend buying a sewing
center or sewing cabinet online or from a catalog,
unless they can guarantee returns.
Chapter 1: Room to Sew
12
See What I Mean?
Natural sunlight is a glorious and perfect (and free)
light in which to sew, as well as to do your pinning and
cutting. That doesn’t mean that you can sew only during
the day. Pfiff! You may be burning the midnight oil, but
one little ceiling fixture won’t do. This is true for either
nighttime or daytime sewing.
A lighting expert would suggest that you have
at least 150 watts of incandescent or 40 watts of
fluorescent light for all the tasks in your sewing projects.
This should be shaded light, not bare bulbs shining in
your eyes. Try to situate the lighting around your sewing
machine area so that it’s not casting shadows where
you are working. If you have the table or the floor space
nearby, an adjustable arm lamp is a good way to get the
light situated just where you need it.
There are all types of special sewing lights available,
but it’s not a must. If you have special needs concerning
your vision, absolutely make that a priority and get
the advice of your eye doctor as well. Especially for
hand sewing, there are many light and magnifier
combinations on the market to make your sewing time
more comfortable on the eyes. Some lights will help you
see color more accurately when you are matching cloth
to thread as well.
Color Me Happy
Talking about light also means talking about color.
Yes, indeed. Lighter shades on the walls will be more
reflective and provide more surrounding light. The
same applies to every last surface of the whole room.
The floor will be more reflective if it’s wood or some
other slick surface, rather than carpet, especially a lightcolored, slick surface.
The color of your sewing space is as personal
a decision as the fancy fabrics you choose for your
sewing projects. Most of all, it needs to make you
happy. If there is any spot in the house that you want to
get a little kooky-creative with, this is the place to play.
If you are set on a deep wall color, perhaps apply it to
only one wall and not the wall by your sewing machine.
The Sewing Machine
Choosing a sewing machine is a very weighted decision
for some, but not something that should be a drag or
difficult. My first machine was 30 years old by the time
it was all mine, and I made countless things on that old
faithful friend. I’ve sewn on all kinds of machines from
several different manufacturers. Everyone has a different
opinion about what brand to go with or how many bells
and whistles should be ringing and singing when you
sew. You should think of the perfect machine as being
an extension of you. The best machine for you is the one
that keeps you inspired to try new things but doesn’t
overwhelm you. Therefore, making this decision is a
completely personal one, which is why I am not endorsing
any particular sewing machine in this book. But let’s chat
about some things to consider before you purchase one.
Bobbin’ Around a Sewing Machine
Ask Yourself This
If you’ve never sewn before or are very new to sewing,
it’s helpful to have a handle on the general layout of
a basic machine before you start shopping for your
own or test-driving them. Every machine will vary to
a certain degree. If you’ve just bought a machine, it
should come with a detailed user’s manual. Never buy
one without it. Below is a general image guide to a
machine, followed by a list and description of its parts.
Keep in mind that some of the settings shown as a knob
on this diagram may be adjusted through an LCD screen
on a computerized machine.
You should begin your sewing machine hunt by asking
yourself some questions. It might be a good idea to
write your answers to these questions to help you
formulate what you’ll be looking for.
10
7
11
8
14
9
3
2 4
5
6
12
1
13
15
16
Power switch
9
Thread guide
2
Presser foot
10 Spool pin
3
Presser foot lifter
11 Bobbin winder
4
Throat plate
12 Balance wheel
5
Feed dogs
6
Needle
13 Stitch length
regulator
7
Thread take-up
8
Upper tension
regulator
14 Stitch width regulator
15 Bobbin case/bobbin
16 Foot control
A lifetime of sewing will most likely involve more than
one machine. So if you can make a healthy investment,
stitch quality and user-friendliness are hallmarks
of what to look for. A great machine should last for
decades.
What kind of items will I be making? Quilting,
garments, or both?
•
What kind of fabrics do I want to sew with?
•
What is my budget?
•
How often will I use the machine?
•
Do I want to start a home-based sewing business?
•
Am I a beginner, experienced, or expert
seamstress?
•
Will I need/want to upgrade as I become more
experienced?
Shop It
Just like bringing home any other type of technology or
appliance, it’s always good to read consumer reviews.
If your friends and family sew, ask them what they sew
on, and then do an online search on those models. Or
ask to try out a friend’s machine before you take the
plunge yourself. Many sewing magazines offer product
reviews in an annual issue or on the magazine’s Web
site when the new models debut.
Like everything else, you’ll have several choices of
machines for sale online, in fabric stores, in department
stores, and through local dealers. Of all these choices,
I can’t really advise buying a machine online, unless
you’ve already had a chance to test-sew with the exact
same model. Even so, every machine is unique, just like
a car, and they all have personalities, even when you’re
buying high-end.
The single most important rule I would offer about
buying any sewing machine, no matter how much
you spend, is sew on it as much as you can before
buying it. You must love the way it sews or at least be
comfortable with how it feels, even if it’s a lower-end
model. Call ahead and find out a non-busy time to visit
the store or dealer. Bring in your own fabric scraps,
thread, trims, and anything else you want to cart into
the store. If they say you can’t use your own materials
or that you can sew on it only for a minute or two,
then that should be your last verbal exchange on your
The Sewing Machine
1
•
13
way out the door. Let the salesperson show you every
feature possible, even the buttonhole feature. Then do
not be afraid to try everything out yourself. Twice.
Going in for the Buy
The machine is obviously going to be the biggest
single investment in your sewing world. So while you
shouldn’t stress over it, you shouldn’t take it lightly,
either, especially if you are spending more than a few
hundred dollars. If you are spending less than that, you
may consider buying a used machine from a dealer,
especially if it comes with a locally based warranty or
trade-in value. It isn’t a bad way to get started. There is
nothing wrong with spending only $100 on a brand-new
machine at your local discount store—just don’t expect
much. It may be the perfect thing to get you started on
simple projects, but your skill level will eventually exceed
what it can do for you in terms of stitch quality and
dependability. The opposite would also be true. It may
be foolish to have a payment plan for an $8,000 machine
that completely exceeds your skill level and needs.
If you are shy and don’t feel like you know how
to negotiate well, take an experienced sewing friend
with you, to help out. In fact, take this book with you.
There are advantages to going to a local dealer, such as
having access to a repair shop or a chance to upgrade
later, classes on your new machine or on learning how
to expand your equipment attachments, meeting other
people who love sewing, and having an actual face to
talk to when something goes wrong. Your machine
should always come with at least basic manufacturer’s
warranty, but it’s up to you whether you feel more
comfortable purchasing additional warranties.
No One Likes Bad Press
Chapter 1: Room to Sew
14
When you’re sewing that snazzy stuff, you should
be using an iron just about as much as you use your
sewing machine, possibly even more. Every single line
of stitching that you make should be pressed at one
point, and usually before the item is even finished. So,
you need to consider setting up a place for pressing
near your sewing area. If you don’t already own an iron
and ironing board that you’re happy with, you may
want to add these items to your shopping list.
Note: Before you press, always test a little unused
corner of your fabric first, for the right heat and process.
The Iron
Who loves to iron? No hands raised? Agreed. Well, you
actually don’t have to iron while you sew. However, you do
have to press while you sew. There is a difference. Pressing
is less dragging across the fabric and more, well, pressing,
and almost always with steam. The tools for this task are
pretty much the same, though. The iron is one item where
you may want to be really picky about what you choose.
First and foremost, it has to be a steam iron, and
an anti-drip system is a very good feature. You will
sometimes want a dry setting too, so be sure your new
iron has both options. Auto-off is a must-have feature,
although you should always unplug your iron when you
are not using it. Your mother said so. Choosing your
iron from a fabric store, whether online or actually in
the shop, comes highly recommended by this author.
Ask questions, too! Most of those sweet folks at the
fabric store have years of sewing experience and are
more than happy to offer advice on their favorites.
One hundred dollars will likely buy you the best iron
you’ve ever had, but there is quality to be had at even $40
or so. Pressing is the one process, besides your sewing,
that has the most impact on the outcome of your sewing
project. This cannot be stressed (or pressed) enough!
The Ironing Board
If you’re in the market for a new board, you can pay a
lot or a little, but do invest based on your enthusiasm
for your new hobby, because it should last forever. Go
ahead and open it up in the store, if you can, to get a
feel for it. Make sure it doesn’t wobble, and it’s a bonus
if it has an adjustable height setting. A nice wide board
is really beneficial, especially for ironing quilts and
other large items.
If you are battling for floor space, some boards drop
down from the wall, out of a cabinet, or from a closet
door. Wall-mount hooks are also a good temporary
storage option if you want the board out of sight when
you are not using it.
An alternative to an ironing board is an ironing
blanket or ironing pad. This nifty little portable roll-up
or fold-up pad lets you turn a cutting table, countertop,
or bed into a usable pressing surface. If you are using
an ironing board to press a large item, however, pull the
board up next to a large table or bed where your quilt
(or whatever your project may be) can spread across it
without ending up on the floor.
Other Pressing Matters
These next goodies are not considered pressing (as in
mandatory); they are for pressing.
•
A pressing cloth is a way to protect your fabric
from the effects of the iron as you press during
sewing. As long as your heat settings are correct for
the particular fabric, pressing the wrong side of the
fabric might not be necessary. When you press the
right side of the fabric, however, you should use a
pressing cloth in order to avoid the heat or pressure
from the iron negatively affecting the fabric.
•
A soleplate cover is another product altogether,
but a pretty clever one. It acts like a pressing
cloth, but it slips over your iron so that you can
easily see what you’re working on. It allows you
to iron over things like buttons and zippers, and
is perfect for pressing delicate fabrics.
•
A seam roll is a long, firmly stuffed cylinder
that you can insert underneath long, straight
seams and into narrow areas like a sleeve. Having
your seam resting on a cylinder-shaped seam
roll rather than a flat surface allows you to press
only the very center of the seam, right where the
fabric is stitched together, and not on the entire
seam and seam allowance.
A Cut Above
A good cutting surface at the appropriate height makes
all the difference in how accurately your fabric is cut,
and whether or not your back is aching at the end of
use whichever is more comfortable. If you’re teaching
your children to sew, just keep a sturdy footstool nearby
so they can see what you’re working on.
If the size of the tabletop is at least as big as a card
table, it’s usable. Two card tables pushed together are even
better, and pretty economical. Not tall enough? Slide some
cinder blocks underneath each leg to raise the height.
Bigger is better in the case of the cutting table, but there
are some tricks to working on a smaller table. Use a chair
or two chairs, side by side, at the end of your table, facing
in, to hold your bolt or roll of fabric when you are dealing
with a lot of yardage. This way, the bolt or roll of fabric
isn’t sliding off as you try to cut, and the backs of the
chairs are keeping the fabric from landing on the floor.
Sharp Shooters:
The Cutting Tools
A cutting tool is another personal thing where one size
does not fit all. We each get comfortable with the familiar,
or what works for us.
Scissors
You really need only two pairs of scissors: a pair of quality
shears for cutting fabrics, and a pair of smaller scissors
for snipping threads at the machine, or beside you as you
hand-sew. My favorite studio tool by far is my tiny pair
of scissors. You should always keep the little ones on a
long ribbon around your neck when you’re sewing, since
they’re little and easily misplaced (or is that just me?).
Scissors are definitely another item where quality
really does matter. What you spend now will save you
later, and with good care and occasional sharpening,
Sharp Shooters: The Cutting Tools
•
A pressing ham is
a very firmly packed,
contoured, fabriccovered form that
looks pretty much
like the shape of a
whole ham. Over
its entire surface,
there are a multitude of angles and curves that,
depending on how you position it, will help when
you are pressing curved seams. You simply let the
ham rest on the board and lay your seam over the
part of the ham form that best fits the shape of
your curved seam, and press.
the day. The floor is certainly practical, but it’s no fun
to sweep before you put your fresh fabrics on the floor.
(Sewing is what you do instead of house-cleaning, silly.)
If one item in your cutting-sewing-pressing process
had to be located elsewhere, it could be the cutting table.
Your first step really should be cutting out all your pieces,
anyway. This opens up the possibility to use any table in
the house. In fact, the table that eventually becomes your
sewing table could first serve as your cutting table.
In general, the height of your cutting table should be
about kitchen-counter or kitchen-island height (about 36
inches), and not kitchen-table height (about 30 inches).
If you are very petite, this height might put your cutting
surface too high for reaching all the way across, so do
15
they can last you a very long time. In the manufacturing
process, scissors are made in one of two ways: they are
either forged or stamped. You’ll want to get a pair that
is forged because they will be much more durable, and
of course, they’re also pricier. Refer to the concise but
practical list below for scissor types and their common
uses. This is hardly comprehensive, but for the projects
in this book and endless others, it’s a good start.
Whatever you choose, take care of your scissors.
Dropping them will not only knick your floor and put your
feet in danger, but it can also knick the tips of the blades.
In some cases, the alignment of the scissors could get
knocked out of whack. Save the not-so-good scissors for
cutting up things like paper patterns, sequins, plastic, or
other non-fabric items in your sewing studio. Reserve your
best scissors for the fabrics. If you have two scissors that
look alike, tie a small strip of fabric through the sewing
scissors’ handle as a reminder for yourself and everyone
else in the house that they are for fabric only.
Appliqué scissors or duckbilled
scissors have a curved shape on one
blade that makes cutting a single layer of
fabric easier in appliqué.
Chapter 1: Room to Sew
16
Electric scissors are battery operated.
They are a good option for those with
hand problems or for someone who needs
scissors that are ergonomically designed
for comfort.
Pinking scissors or shears are by far the
best candidate for the third pair of scissors
(in addition to dressmaker shears and small
scissors or clippers). The zigzag cut is an
irresistibly cute and decorative edge used in
many crafting applications. Your cut fabric will
resist fraying with this type of edge.
Rotary Cutters
The rotary cutter is a different breed of blade altogether.
It comes in a large size for all cutting such as your dress
patterns and patchwork, or a small size for trimming
and smaller craft projects. Using a rotary cutter can give
a nice razor-sharp and accurate cut on several layers of
fabric with one cut. However, deciding between this and
using scissors really just comes down to preference and
familiarity. Rotary cutters are not horribly expensive,
and, unlike having to keep scissors sharp, you would
just replace the disposable blade when it gets dull.
Even if you are comfortable with your scissors, I’d
encourage you to give rotary cutting a try. You may
find that you like to use scissors for some cutting and
a rotary cutter for other cutting. You will probably be
amazed at the ease with which it cuts through fabric the
first time you use one. They are great if you are doing
piece work or are making one pattern several times. I
Thread nips or clippers are a small
clipper, rather than a standard scissor.
They are either spring-loaded or have a
hairpin curve of metal as the handle.
Embroidery scissors are small,
lightweight, and a perfect choice for that
petite pair to clip threads as you hand-sew
or machine-sew. They are usually only 3 or
4 inches in blade length. Watch the points
on these, as they are nice and sharp!
Dressmaking shears are the most
common type of scissor used in sewing and
are available in 6-inch lengths all the way
up to 12-inch lengths—a 7- or 8-inch length
is comfortable for most home sewers. Look
for shears that have a bent handle, so that
the bottom blade will lie flat against your
cutting surface.
Heavy fabric scissors or tailor’s
shears are good for cutting through
denim, canvas, or multiple layers of
fabric. This is where you may want to go
with longer blades, like 10 or 12 inches.
Silhouette embroidery scissors or iris scissors
are very small and lightweight, with long handles and
short, sharp little blades. They are perfect for fine
handiwork.
use a rotary cutter for all my quilt cutting and longer
cuts on garments, and I save the scissor cutting for
inner corners and other picky stuff.
Cutting Mats
Using a rotary cutter most definitely requires the use of a
cutting mat. Any other surface would become damaged
with rotary cuts, and you would need to toss the blade
in the trash almost immediately because it would quickly
dull. Most people (including me) prefer to purchase a selfhealing cutting mat. This mat is different from the hard
mats that you would use with an X-Acto blade.
Getting a mat that is at least 18 x 24 inches is
advisable. Anything smaller would have you constantly
checking under the fabric to see if you’ve gone off the mat.
Putting two smaller mats together is okay, except that
you will undoubtedly always have a few fibers of fabric
that didn’t get cut because the fabric was pushed into the
crease of the two mats when you made the cut. Having one
large mat can help you avoid the annoying task of going
back to snip those few fibers that you missed.
The bonus of a self-healing cutting mat is its
measuring grid, which is so helpful when you are trying
to cut a perfect right angle. Believe it or not, though,
you should double-check the measurement marks on
your mat against a trusty ruler before you rely on them
as a definitive guide. In fact, when you are shopping
for mats, it wouldn’t hurt to have your best ruler on
hand to check the measurements for accuracy before
you make a purchase. There is sometimes the smallest
bit of play in the thick lines of the mat that can get a
project, like small-piece quilting, into trouble because
the measurements need to be so precise.
Tools for Good Measure
A tape measure is an
essential tool in your
beginner kit. I’m not
talking about the hefty
metal retractable one in the garage toolbox, either. You
need the sewing sort, which is a flexible ribbon of either
sturdy fabric or plastic with linear units of measure,
preferably metric and imperial (inches) measurements
on both sides. You’ll want to get a good-quality version
that doesn’t stretch out with a little wear and tear. The
basic measuring tape is either 36 inches long (1 yard)
or 60 inches long (5 feet). A simple 60-inch tape should
meet most of your needs. I like to store mine hanging
over a hook (or around my neck) rather than rolled up, to
prevent curling.
The tape measure is generally what you use when
you are measuring for sewing a garment, or anything
else that’s not flat. This is precisely why it’s flexible.
Yardstick
A yardstick is a yardstick, no matter what anyone
says. Wooden, metal, it doesn’t matter. Although the
metal ones can be prone to bending (i.e., rowdy boys
having jousting practice). What they are intended for
is measuring anything up to 3 feet, which also just
happens to be a yard, or 36 inches.
Sewing Gauge
A sewing
gauge is
a 6-inch
ruler with
a sliding
marker that you can move to your desired
measurement. To hem a skirt all the way around, you
would set the sliding part of the sewing gauge at your
desired mark and hold the end of the ruler (the 0-inch
end) at the bottom edge of the fabric, and turn up the
hem at the mark all the way around. It’s much quicker
this way because you can get a quick visual read of that
sliding perpendicular mark, instead of checking the little
hairline measurement with every stop around the hem.
It’s also great for measuring and marking tucks and
pleats, and for spacing out buttons and buttonholes. I
think of this as my go-to gauge for all small measuring
needs that require consistency.
Tools for Good Measure
Inching closer toward the goal of a blissful life of
sewing, you will find yourself needing to measure
things. All kinds of things need to be measured: fabric
width and length, arms, legs, busts (yowza!), waists
(no!), hips (forget it), hems, seams, windows, dogs,
kids, you name it! It all needs to be measured, generally
by the yard (3⁄4 yard, 1⁄2 yard, 1⁄4 yard), fat quarters (see
page 37), inches (5⁄8 inch, 1⁄2 inch, 3⁄8 inch, 1⁄4 inch), and
perhaps centimeters every now and then. Whew! The
following is an overview of some tools that you can use
for measuring yourself and your environment.
Tape Measure
17