1
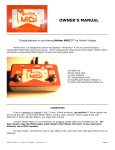
OWNER’S MANUAL Congratulations on purchasing Molten MIDI B™ by Molten Voltage Molten MIDI B is designed to control the Digitech™ Bass Whammy™. When configured for Whammy & Clock output, Molten MIDI B also sends corresponding MIDI Program Change and Song Select data. (A) MIDI Port (B) DC Power Jack (C) LED Indicator (D) Tempo/Select Knob (E) Tap/Program Button (Button 1) (F) Start Stop Step Button (Button 2) CONNECTING Plug in a separate or isolated 9 volt, 2.1mm, 100mA minimum, tip negative DC Power supply into the DC IN jack (B). If you power Molten MIDI B using a "daisy chained" power supply along with distortion or other high gain effects, you might hear clicking. Connect Molten MIDI B to your Whammy by plugging a MIDI cable into the MIDI jack (A). For best results, keep the MIDI output cable length under fifteen (15) feet. If you need more distance, use a MIDI repeater. For best results, use Whammy first in your effects chain, and never after high gain devices such as distortion. Molten MIDI B - Owner’s Manual - version 1.0 page 1 Molten MIDI B may be daisy chained to your Whammy via any other MIDI device with a MIDI Thru jack that re-transmits an exact copy of the data received at its MIDI In jack: Molten MIDI B > MIDI In > MIDI Thru > Whammy For more information on configuring your MIDI device to pass MIDI information thru to the Whammy, consult the manual for that device. PLAYBACK Molten MIDI B sends MIDI signals to the Whammy, and can change both the Setting (e.g. Octave Up) and the “virtual” position of the expression pedal. Whammy will stay in that "virtual" position unless you move the expression pedal, which will then override the "virtual" position. Molten MIDI B stores nineteen (19) user Programs at a time. Programs are selected using the Controls, as described below. Molten MIDI B comes pre-programmed with nineteen Programs to get you started. *** You MUST Set Whammy to “heel up, toe down” (pedal all the way forward) when using Step or Loop type programs to minimize Whammy tracking errors. *** There are five different Program types: 1) Loop Portamento Loop Portamento programs cycle through sequences of “virtual” expression pedal positions at the chosen Duration using a single Base Setting. “Portamento” means you will hear Whammy slide from one step to the next as if you are moving the expression pedal, rather than jumping. * Note that portamento will automatically turn off and will not be heard if the playback speed is higher than the Portamento Rate will allow. 2) Loop, No Portamento Loop, No Portamento programs cycle through sequences of “virtual” expression pedal positions at the chosen Duration using a single Base Setting. As Molten MIDI B changes to a new “virtual” position, you will NOT hear Whammy “slide” to the new position. Instead, Whammy will “jump” from one “virtual” position to another (although the Bass Whammy has a bit of portamento built in to every interval change). 3) Step Portamento Step Portamento programs step through sequences of “virtual” expression pedal positions each time you press Button 2 [Start/Stop/Step]. As Whammy changes to a new “virtual” position, you will hear it “slide” up or down to the new position, as if you are moving the expression pedal. 4) Step, No Portamento Step, No Portamento programs step through sequences of “virtual” expression pedal positions each time you press Button 2 [Start/Stop/Step]. As Whammy changes to a new “virtual” position, you will NOT hear it “slide” to the new position. Instead, Whammy will “jump” from one “virtual” position to another (although the Bass Whammy has a bit of portamento built in to every interval change). Molten MIDI B - Owner’s Manual - version 1.0 page 2 5) Different Settings Different Settings programs step sequentially through the selected Whammy settings each time you press Button 2 [Start/Stop/Step]. When using this type of Program, Molten MIDI B does not change the “virtual” position of the expression pedal. Instead, Molten MIDI will continue to use the previous position (whether “virtual” or not). This allows you to set the expression pedal to “toe down” and jump your solo up or down an octave or two with the touch of a button! There are two different Output Types: 1) Whammy Only (no MIDI Clock, Program Change, or Song Select information is sent) 2) Whammy & Clock (MIDI Clock information is sent in time with the Loop sequence. MIDI Program Change and Song Select information is sent each time a program is selected, as discussed below) Controls TAP/PGM [Button 1] The TAP/Program button (E) performs a number of functions. Tap Tempo While a Loop Program is playing, Button 1 can change the playback Duration. Set the Duration by tapping Button 1 twice (or any even number of taps). The time between the last two taps always corresponds to the length of time the entire sequence plays. Molten MIDI B changes the Duration “on the fly” without pausing the loop. In the Whammy Only mode, the new tempo starts right after the second tap. In Whammy & Clock mode, the new tempo starts when Molten MIDI B reaches the beginning of the sequence to keep everything synchronized. Program Select If no Loop program is running, pressing Button 1 puts Molten MIDI B into Program Select. In this Mode, the effect is turned off, and the “Shallow” and “Deep” detune LEDs flash along with the LED indicating the current Program. Program 1 is indicated by the top left (Octave Down/Up Harmony) LED. Program 2, the next LED down, and so on through 9. Program 10 is indicated by the lower right (Dive Bomb) LED. Program 11, by the next LED up, and so on through Program 19 (2 Octaves Up). Each subsequent press of Button 1 advances Molten MIDI B to the next Program. The Program is engaged by pressing Button 2 (discussed below). Because entering Program Select turns the effect off, Button 1 can also be used as an effect bypass switch when no Loop is running. Molten MIDI B - Owner’s Manual - version 1.0 page 3 START STOP STEP [Button 2] When a Loop Program is selected, alternate presses of Button 2 (F) start or stop playback of the sequence. Each time a Loop is stopped, it resets to the first step in the sequence. When a Step program is selected, pressing Button 2 advances Molten MIDI B to the next step in the sequence. If you press Button 1, Molten MIDI B will switch to Program Select which will bypass the effect. If you press Button 2 again, the Step program will start over at the first step in the sequence. When a Different Settings program is selected, pressing Button 2 advances Molten MIDI B to the next Whammy setting in the sequence. If you press Button 1, Molten MIDI B will switch to Program Select which will bypass the effect. If you press Button 2 again, the Different Settings program will start over at the first Whammy setting in the sequence. TEMPO/SELECT [Knob] Program Select If no Loop program is running, turning the Tempo/Select Knob (D) will put Molten MIDI B into Program Select. In this Mode, the effect is turned off, and the “Shallow” and “Deep” detune LEDs flash along with the LED indicating the current program. Rotating the Knob cycles Molten MIDI B through the nineteen programs. The desired program is engaged by pressing Button 2. Tempo Control While a Loop program is playing, the Knob can change the playback duration “on the fly”. The duration range is approximately 0.25 to 13 seconds. In the Whammy Only mode, the adjusted tempo is heard right away. In Whammy & Clock mode, the adjusted tempo is heard when Molten MIDI B reaches the beginning of the sequence to keep everything synchronized. LED Indicator Molten MIDI B uses a two-color Red/Yellow LED (C) to indicate status and playback tempo. When in Program Select, the LED glows solid red. When in Step or Different Settings mode, the LED glows solid yellow. Whammy Only When playing a Loop program in Whammy Only mode, the LED flashes Red at the beginning of the sequence. When paused, the LED flashes Yellow at the beginning of the sequence. Whammy & Clock When playing a Loop program in Whammy & Clock mode, the LED flashes Red at the beginning of the sequence. Molten MIDI B - Owner’s Manual - version 1.0 page 4 If the sequence is 2-4 steps, the LED only flashes Red. If the sequence is 5-8 steps, the LED flashes Red at the beginning of the sequence, then Yellow halfway through the sequence. If the sequence is 9-16 steps, the LED flashes Red at the beginning of the sequence, then Yellow ¼, ½ and ¾ of the way through the sequence. Note that if you use an odd number of steps in a sequence (anything other than 4, 8, or 16), the flashing will not correspond to the steps in the sequence, but instead to the MIDI Clock quarter note output, as discussed below. When paused, the Red flash is replaced with Yellow. During the Programming mode, the LED flashes as discussed below. MIDI OUTPUT The channel on which Molten MIDI B sends Whammy MIDI data is 15. Channel 16 is reserved for non-Whammy Program Change information. The default output setting for Molten MIDI B is Whammy Only. If you want to use the Whammy & Clock mode, you must change the mode as described in the next section. If you connect Molten MIDI B directly to your Whammy and use Whammy Only mode, you won’t have to change anything unless your Whammy has been changed from its stock MIDI receive setting of “OMNI”. To find out what MIDI Channel your Whammy is set to, DISCONNECT MOLTEN MIDI B, then hold down the Whammy’s button as you plug in the power (with your amp off!) and see what LED flashes. The “5th Up > Octave Up” LED indicates “OMNI”, which means your Whammy will receive MIDI data on all MIDI channels. If you need to change the MIDI channel, rotate the Whammy knob until the “5th Down > 5th Up” (Channel 15) LED is flashing, then press the Whammy button again. Be careful not to move the expression pedal while you do this or you will need to re-calibrate your Whammy, as described in its User’s Guide. Whammy & Clock mode Because the default Output Type is Whammy Only, you will need to switch to Whammy & Clock mode to send MIDI Clock, MIDI Start, MIDI Stop, Program (Patch) Change, and Song Select information along with the Whammy data. To change the mode, follow this procedure: When powering Molten MIDI B on, hold down only Button 2. The LED will light red if Whammy Only mode, and yellow if Whammy & Clock mode. While holding Button 2, press Button 1 to toggle between the two modes. When you have selected the desired mode, release Button 2. When using Whammy & Clock mode, you MUST set your Whammy to MIDI channel 15. To find out what MIDI Channel your Whammy is set to, DISCONNECT MOLTEN MIDI B, then hold down the Whammy’s button as you plug in the power (with your amp off!) and see what LED flashes. The “5th Up > Octave Up” LED indicates “OMNI”, which means your Whammy will receive MIDI data on all MIDI channels. Rotate the Whammy knob until the “5th Down > 5th Up” (Channel 15) LED is flashing, then press the Whammy button again. Be careful not to move the expression pedal while you do this or you will need to re-calibrate your Whammy, as described in its User’s Guide. In Whammy & Clock mode, Molten MIDI B simultaneously outputs Whammy and MIDI Clock data allowing you to synchronize your Loop programs to drum machines, sequencers, and other effects that use MIDI Clock data. Molten MIDI B - Owner’s Manual - version 1.0 page 5 Molten MIDI B outputs MIDI Clock data in time with the sequence while a Loop program is playing. ⇒ If the sequence is 2-4 steps, Molten MIDI B will send quarter-note MIDI Clock data once (1x) per sequence. ⇒ If the sequence is 5-8 steps, Molten MIDI B will send quarter-note MIDI Clock data twice (2x) per sequence. ⇒ If the sequence is 9-16 steps, Molten MIDI B will send quarter-note MIDI Clock data four times (4x) per sequence. As you can see, the same sequence Duration will result in different MIDI Clock tempos depending on the length of the Sequence. The tap timing also changes: with 2-4 steps - the tap time is equal to the quarter-note MIDI Clock output; with 5-8 steps, the tap time is half the speed of the quarter-note MIDI Clock output (the clock is 2x as fast as you tap); and with 9-16 steps, the tap time is ¼ the speed of the quarter-note MIDI Clock output (the clock is 4x as fast as you tap). Note that if you use an odd number of steps in a sequence (anything other than 4, 8, or 16), the sequence steps may not correspond to the MIDI Clock output, however, everything will always line up at the beginning of the Looping sequence. * MIDI devices cannot receive MIDI Clock information past a certain tempo. This tempo can easily be exceeded with a short duration and a 16-step sequence, so be sure to adjust your Duration accordingly. Molten MIDI B’s quarter-note output tempo, in beats per minute (bpm), can be calculated using the following equation: (60/Duration) * Number Of Steps = bpm Consult your device’s User’s Guide for more information, and download our Tempo Calculator at: http://www.moltenvoltage.com/downloads/Molten_MIDI_2_-_Tempo_Calculator.xls (requires Microsoft Excel) If you want to send just MIDI Clock information without any effect, select a Loop, No Portamento type Program with 4 Steps, and choose Octave Up as the Base Setting and set each Step (1-4) to Unison. The Duration you select will then be equivalent to the MIDI quarter note Duration. In Whammy & Clock mode, MIDI Program (Patch) Change and Song Select information are sent whenever Molten MIDI B is in Program Select and the Whammy program changes. Many MIDI devices both respond to, and display this information. The MIDI values for both Program Change and Song Select will always correspond to the value of the Whammy program, allowing you to synchronize your MIDI devices. Note that the literal MIDI value sent will be 0-18, however most MIDI devices will display these values as 1-19. Consult your particular device’s manual for more information. * MIDI Program (Patch) data is always sent on Channel 16 - which is always separate from the Whammy MIDI channel. If you want your MIDI device to receive this data, it must be set to receive Program data on MIDI Input Channel 16 and not OMNI. Consult your device’s User’s Guide for more information. MIDI Clock and MIDI Song Select information are types of MIDI System data that are not sent on any particular channel. Consult your device’s User’s Guide for more information on enabling and disabling its ability to receive and re-transmit such data. Molten MIDI B - Owner’s Manual - version 1.0 page 6 PROGRAMMING It is strongly recommended that you read this section thoroughly before programming Molten MIDI B. A supplemental video demonstration of Programming for Molten MIDI B can be viewed on this page: http://www.moltenvoltage.com/molten_midi_5.html How to Program In either of the Whammy modes, Molten MIDI B can be programmed using the following steps: 1) Stop any Loop that is playing 2) Keep Molten MIDI B connected the Whammy 3) Press and hold Button 1 4) While holding Button 1, press Button 2 twice and hold it down. Release Button 1 BEFORE releasing Button 2. The effect will turn off and the Whammy’s “Shallow” LED will flash along with the LED indicating the currently-selected Program. If in Whammy & Clock mode, Molten MIDI B will also send MIDI Program Change values on Channel 16 along with corresponding Song Select data. 5) Rotate the Knob (D) to select the Program to overwrite. Press Button 2 to lock in your selection.* 6) The Whammy LEDs will then light up in a circular pattern, indicating that it is time to select the Program Type. Rotate the Knob briefly and LET GO to advance to the next Program Type. Repeat this procedure until the desired Program Type is indicated. The following flashing patterns are used to indicate the Program Types: Loop Portamento ~ LEDs light up in a circular pattern Loop, No Portamento ~ LEDs in a circular pattern, skipping every other one Step Portamento ~ LEDs go up and down the left side Step, No Portamento ~ LEDs go up and down the left side, skipping every other one Different Settings ~ LEDs go in a circle, lighting every 5th one Press Button 2 to lock in your selection.* 7a) Loop or Step Program If a Loop or Step program is selected, the “Deep” LED will flash along with the LED corresponding to the Base Setting for the sequence (e.g. 2 Octaves Up). Turning the Knob will cycle Molten MIDI B through the various Base Settings (excluding Shallow and Deep detune). When the desired Base Setting is indicated, press Button 2 to lock it in.* The effect will then turn on, with the expression pedal “virtually” set to the “toe up, heel down” position. Molten MIDI B - Owner’s Manual - version 1.0 page 7 Rotating the Knob adjusts the “virtual” position of the expression pedal using a chromatic scale. Playing a note on your instrument will allow you to hear the shifted pitch. When the desired pitch is selected, press Button 2 to add that pitch to the sequence. The “Shallow” and “Deep” LEDs will briefly flash to let you know you have written that step of the sequence. Repeat this procedure until you have programmed the entire sequence (up to 16 steps).** When you have programmed all the steps you want, press Button 1.*** > Loop program ONLY Molten MIDI B will then begin playing back the sequence at a base Duration of 0.5 seconds for 2-4 steps, 1 second for 5-8 steps, and 2 seconds for 9-16 steps. If in Whammy & Clock mode, Molten MIDI B will also send MIDI Clock data, as described above. Use the Tempo Knob (D) to adjust the Duration of the sequence. Once you have obtained the desired duration, press Button 2. The “Shallow” and “Deep” LEDs will flash, along with the LED corresponding to the Program number, to let you know the new Program was successfully written. Molten MIDI B will exit Programming mode and the new Program will begin playing. > Step program ONLY The “Shallow” and “Deep” LEDs will then flash, along with the LED corresponding to the Program number, to let you know the new Program was successfully written. Molten MIDI B will exit Programming mode and Whammy will go to the first step of the new Program. 7b) Different Settings program If a Different Settings program is selected, the effect will then turn on. Turning the Knob will cycle Molten MIDI B through the various Whammy Settings, including one extra setting where the effect is off [look for the “Effect” LED to turn off while the “Shallow” LED is on]. Program the each setting by pressing Button 2 (up to 16 steps).** The “Shallow” and “Deep” LEDs will quickly flash along with the LED of the selected Setting to indicate that Setting has been added to the sequence.*** Select the next Setting by turning the Knob, and program it by pressing Button 2 again. When you have programmed all the Settings you want, press Button 1 to write the new Program. The “Shallow” and “Deep” LEDs will flash, along with the LED corresponding to the Program number, to let you know the new Program was successfully written. Molten MIDI B will exit Programming mode and Whammy will be set to the first Setting of the new Program. * Pressing Button 1 at this point allows you to escape the Programming routine. Escape is indicated by the Whammy flashing down the right side LEDs twice, then all the LEDs in a circle. After escaping, the effect will be off and Whammy will enter Program Select, flashing the currently selected Program. The previous Program is restored following an Escape. ** Note that any given Program is limited to a maximum of 16 steps. If you program a 16th step, Molten MIDI B will automatically begin playing the sequence back immediately after the 16th step has been programmed if its a Loop program, or will automatically write the new Program if its a Step or Different Settings program. Molten MIDI B - Owner’s Manual - version 1.0 page 8 *** If less than 2 steps have been programmed and Button 1 is pressed, you will escape the Programming routine. Escape is indicated by the Whammy flashing down the right side LEDs twice, then all the LEDs in a circle. After escaping, the effect will be off and Whammy will enter Program Select, flashing the currently selected Program. The previous Program is restored following an Escape. PROGRAMMING TIPS If you want a single setting on a “Step” type program, just choose Step Portamento and make a 2 step program that uses the same Step Value for each step. If you want a single Whammy setting on a “Different Settings” type program, just make a 2 step program that uses the same Step Value setting for each step. If you want to just send the MIDI Clock information without any effect while in Whammy & Clock mode, just use Loop, No Portamento with 4 Steps, and choose Octave Up as the Base Setting and set each Step (1-4) to Unison. The Duration you select will then be equivalent to the MIDI Quarter Note Duration. You can also make a sequence faster compared to the MIDI Clock by repeating the same step. In other words, a Sequence of 8 Steps with the same Step Value on every set of 2 steps (1, 2...3, 4...5, 6...7, 8) will run twice as fast as that same sequence programmed using only 4 steps (1, 2, 3, 4). This is because the MIDI Clock output tempo changes relative to the number of steps, as discussed above. In addition, you can always program your drum machine or other MIDI device at some multiple of the Molten MIDI B tempo. If you like things really weird, when playing back a loop, you can manually switch the knob on the Whammy to any other setting and make some pretty kooky sounds. Note that stopping and restarting the Loop will reset the Whammy to its regular setting for that Program. Molten MIDI B - Owner’s Manual - version 1.0 page 9 STOCK PRESET PROGRAMS Molten MIDI B comes stock with the following programs: 1) Loop, No Portamento | Base Setting ~ Octave Down/Octave Up Harmony | 16 Steps Octave Down > Octave Down > Octave Down > Octave Down > Octave Down > Octave Down > Octave Down > Octave Down > Octave Up > 5th Up > 6th Up > Unison > 3rd Up > 3rd Up > Unison > Unison 2) Loop, No Portamento | Base Setting ~ Octave Down | 8 Steps Octave Down > Octave Down > Unison > Octave Down > Octave Down > Unison > 4th, Octave Down > Flat 7th, Octave Down 3) Loop Portamento | Base Setting ~ Octave Down | 8 Steps Octave Down > Octave Down > Unison > Unison > Unison > Maj.7th, Octave Down > Flat 7th, Octave Down > 6th, Octave Down 4) Loop, No Portamento | Base Setting ~ Octave Up | 16 Steps Unison > Unison > Unison > Unison > Flat 5th Up > 5th Up > 4th Up > Flat 7th Up > Unison > Unison > Unison > Unison > Flat 7th Up > 5th Up > Flat 5th Up > 4th Up 5) Loop Portamento | Base Setting ~ Octave Up | 4 Steps Unison > 6th Up > Unison > Flat 7th Up 6) Loop, No Portamento | Base Setting ~ Octave Down/Octave Up Harmony | 4 Steps Unison > Octave Down > Unison > 5th Up 7) Step Portamento | Base Setting ~ Octave Up | 4 Steps Unison > 5th Up > Unison > Flat 7th Up 8) Step, No Portamento | Base Setting ~ 2nd Down | 2 Steps Unison > Maj. 7th, Octave Down (-1 half step) 9) Step Portamento | Base Setting ~Octave Down/Octave Up Harmony | 2 Steps 5th Up > Octave Up 10) Loop, No Portamento | Base Setting ~ Octave Down/Octave Up Harmony | 4 Steps Octave Up > Unison > Maj. 7th, Octave Down > Unison 11) Loop Portamento | Base Setting ~ Octave Down | 8 Steps Flat 7th, Octave Down > Unison > 6th, Octave Down > Unison > Flat 7th Octave Down > Unison > 6th, Octave Down > 6th Octave Down Molten MIDI B - Owner’s Manual - version 1.0 page 10 12) Loop, No Portamento | Base Setting ~ 2 Octaves Up | 16 Steps Unison > Unison > Octave Up > 2 Octaves Up > Unison > Unison > Octave Up > Flat 7th Up > Unison > Unison > Octave Up > Octave + Maj. 7th Up > Unison > Unison > Octave Up > Octave + Flat 2nd Up 13) Loop, No Portamento | Base Setting ~ Octave Down/Octave Up Harmony | 16 Steps Octave Up > Octave Up > Octave Up > Unison > Octave Down > Octave Down > Octave Down > Unison > Unison > Unison > Unison > Octave Down > Unison > Octave Down > Octave Up > Octave Up 14) Different Settings | 2 Steps | Effect Off Shallow > Shallow 15) Different Settings | 2 Steps | Effect On Octave Up > Octave Down 16) Different Settings | 9 Steps | Effect Off Octave Up/2 Octaves Up Harmony > Octave Up/10th Up Harmony > Octave Down/Octave Up Harmony > Octave Down/4th Down Harmony > 5th Up/Octave Up Harmony > 5th Up/6th Up Harmony > 5th Down/5th Up Harmony > 4th Down/5th Up Harmony > 4th Down/3rd Up Harmony 17) Different Settings | 10 Steps | Effect Off 2 Octaves Up > Octave Up > 5th Up > 4th Up > 2nd Up > 2nd Down > 4th Down > 5th Down > Octave Down > Dive Bomb 18) Different Settings | 9 Steps | Effect On Octave Up/2 Octaves Up Harmony > Octave Up/10th Up Harmony > Octave Down/Octave Up Harmony > Octave Down/4th Down Harmony > 5th Up/Octave Up Harmony > 5th Up/6th Up Harmony > 5th Down/5th Up Harmony > 4th Down/5th Up Harmony > 4th Down/3rd Up Harmony 19) Different Settings | 10 Steps | Effect On 2 Octaves Up > Octave Up > 5th Up > 4th Up > 2nd Up > 2nd Down > 4th Down > 5th Down > Octave Down > Dive Bomb Molten MIDI B - Owner’s Manual - version 1.0 page 11 TROUBLESHOOTING Problem Molten MIDI B will not turn on. Solution Plug in 9 volt DC, 2,1mm Tip Negative Power Supply. Clicking or Noise Use a separate or isolated Power Supply for Molten MIDI B Use Whammy first in your chain, and never following high gain devices such as distortion. Whammy tracking problems * Set Whammy to “heel up, toe down” (treadle all the way forward) when using Step or Loop type programs to minimize Whammy tracking errors. Pickup signal strength can also affect Whammy tracking. Always turn the volume all the way up on your guitar. Single coils pickups also have more issues than humbuckers. If you hear glitches, the issue is with the Whammy rather than with Molten MIDI B. In our experience, single notes track much more consistently than chords. Letting strings sustain can also create glitches. As the string loses its energy, its signal strength rapidly decreases and glitches may appear. Portamento loops are the most susceptible to glitches. If the tracking gets way off, mute the strings then play again. Whammy not receiving data sent Thru another MIDI device If Molten MIDI B is connected to Whammy thru another MIDI device (by connecting Molten MIDI B to that device’s MIDI IN, and Whammy to that device’s MIDI THRU), that device must be able to, and configured to, re-transmit MIDI all data, exactly as it is received at it’s MIDI IN port. Problem MIDI device is not receiving MIDI Clock Solution Put Molten MIDI B into Whammy & Clock mode as described above. Make sure the other MIDI device is configured to receive MIDI Clock. Consult the User’s Guide for that device. Start a Loop type program. MIDI device not receiving MIDI Program Change messages Put Molten MIDI B into Whammy & Clock mode as described above. Whammy not flashing Make sure Whammy is set to receive MIDI on the same channel (15) as Molten MIDI B is sending it. Please refer to the MIDI OUTPUT section, above. MIDI stops playing Check Power Supply connection. Set your MIDI device to receive MIDI Program Change messages on Channel 16. Replace MIDI cable with one under 10 feet. General Guidelines For best results, use Whammy first in your effects chain, and never after high gain devices such as distortion. Keep MIDI cables as short as possible. Long cables cause errors. If you need more length, consider using a MIDI repeater. If you are daisy chaining devices, the total cable length must be considered, as some MIDI devices do not amplify the signal. Molten MIDI B - Owner’s Manual - version 1.0 page 12 Warranty Molten Voltage is proud of its products and warrants this unit for a period of two (2) years from the date of purchase to be free from defects in materials and workmanship under normal use and service, as long as the unit is used with an approved power supply, and consistent with these instructions. Contact [email protected] regarding repairs. Any user repair attempts void the warranty. PROOF OF PURCHASE IS REQUIRED FOR WARRANTY REPAIRS. © 2014, Molten Voltage™. All Rights Reserved. Digitech and Bass Whammy are trademarks of the Harmon Music Group Inc., Microsoft and Excel are trademarks of Microsoft Corporation. Neither of those companies or trademarks are in any way related to Molten Voltage. Molten MIDI B - Owner’s Manual - version 1.0 page 13