1
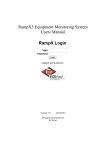
Glove Lock QCP
Photo: Anders Salesjö, Lysekil
User Manual
www.sitech.se
www.sitech.se
Glove Lock QCP – User Manual
Important information
We want to congratulate you on your purchase of the Glove Lock QCP, a Dry Glove
system developed and manufactured by SI TECH in Sweden. By reading this manual
you are only some simple steps away from diving it. The Glove Lock QCP is an
easy to mount, easy to use Dry Glove System, designed to perform – no matter
the diving environment. This complete package include components that will fit
your needs undepending the choice of Dry Gloves.
• The different Spanner Rings included in the package allows use of
a great variety of seals and gloves. The different Spanner Rings are
color coded which indicates various thickness. You simply choose
the thickness best fitted for your choice of seals and gloves.
• Always dive the Glove Lock QCP system with seals installed.
Suit Ring
Components
Benefits
The system itself consists of eight
components per arm:
• Suit Rings
• Glove Rings
• O-rings
• Red, green, blue, yellow and black
Spanner Rings
•
•
•
•
•
•
Connects on Quick Cuff*.
User friendly.
Self supported.
Accomodating all hands.
Fits to most common Dry Gloves.
Sturdy construction.
Fitting alternatives
• Glove Lock QCP Suit Ring clamped onto fixed seal.
• Glove Lock QCP Suit Ring mounted on top of the Quick Cuff
attachment platform.
*Quick Cuff is a Modular Quick Change Solution designed to simplify change of broken or torn
wrist seals on drysuits.
1. Suit Ring: No alignment needed,
360° swiveling connection.
2. Lock and Release Ring: made of rubber for
maximum grip, protects the O-ring
from mud and debris.
3. Glove Ring.
4. Concealed O-ring.
1
4
2
3
This manual does not address the topic of gluing/attaching the Wrist Ring of the
Quick Cuff to your drysuit. Please visit: www.trockireparaturen.de for information.
Photo: Jonas Andersson, Lysekil
Glove Ring
www.sitech.se
GLOVE LOCK QCP SUIT RING
1a. Fitting into suit
QUICK CUFF 1b. Fitting onto Quick Cuff
The Quick Cuff system is a Modular Quick Change Solution for rapid change
of broken or torn seals. It was developed and launched years before the
Glove Lock QCP. The Glove Lock QCP however was designed so that the
user of Quick Cuff could benefit from it when choosing the Glove Lock QCP.
For illustrative reasons we are using a yellow Wrist Ring. ( This is not an available product!)
1a.1 Find appropriate Spanner Ring and move
it forward through the arm of the suit towards
the latex seal.
1a.2 Position the Spanner Ring so that the
system does not affect your wrist movement
when diving.
IMPORTANT: Make sure that the soft rounded edge of the Spanner Ring heads forward so that the sharp edge
of the opposite side does not damage the seal.
1b.1 Located on the inside of the Suit Ring of
the Glove Lock QCP, there is an edge that will
act as fixation point for the soft Wrist Ring of
the Quick Cuff System.
1a.3 Press the Suit Ring evenly onto the seal so that the seal tightens in between
the rings. Check for creases on the seal as creases may cause leakage.
1a.4 Test the strength of attachment by pulling
the arm of the suit and the Suit Ring in the
opposite direction. If the Suit Ring falls off,
change the Spanner Ring to a thicker one.
1b.2 Squeeze the soft Wrist Ring and insert it
into the Suit Ring of the Glove Lock QCP.
Expand the Wrist Ring fully and arrange so
that the edges of the rings come together.
1b.3 The last steps of the mounting process
is same as with a regular Quick Cuff System.
It only differs by the fact that you need to
choose the black Spanner Ring that comes
with the Glove Lock QCP kit instead of the
Spanner Ring delivered with the
Quick Cuff kit.
Always check for ceases, dirt
or damaged surfaces before mounting
and use of the equipment!
Spanner Ring, black
www.sitech.se
2. Attach glove
3. Donning
Equalization Tube
2.1 Start by finding appropriate Spanner
Ring. When pressing the Spanner Ring and
glove into the Glove Ring they shall slide without use of excessive force.
2.4 Press the glove with Spanner Ring
evenly into the Glove Ring.
2.5 Check for creases on the glove as
creases may cause leakage.
2.2 Place the Spanner Ring on the inside of
the glove, make sure to find proper position for optimized length of the glove.
2.3 Fold the glove shaft inwards over the Spanner Ring (latex gloves can be fitted and folded the opposite way).
2.6 Test the strength of attachment by
pulling Glove Ring and Glove in the
opposite direction. If the assembly does
not hold together, please change the
Spanner Ring to a thicker one.
After you have conducted a testdive you may trim the excess material on the glove shaft
for optimized function, comfort and visual appearance.
3.1 Put your hand through the seal and fit the
Equalization Tube between seal and wrist.
Make sure the Equalization Tube reaches
all the way through the seal.
Bayonet
3.2 Join the rings together (make sure that
the O-ring and sealing surface [5.3] are
properly cleaned and lubricated).
3.3 When the Glove Ring and the Suit
Ring has been joined together just turn the
Lock and Release Ring as the image displays.
Turn the Lock and Release Ring until it stops.
When this procedure has been made properly
you should only be able to see part of the
edge of the bayonet (as displayed in the
right section of the image box).
4. Doffing
4.1 Turn the Lock and Release ring in opposite direction compared to the donning procedure.
Turn until the Glove Ring and the Assembly Ring are separated. Tip! Keep glove on when
doffing second ring. The glove provide a higher friction against the rubber ring.
These are suggested instructions only
Whatever method chosen, be certain the wrist seal, be it latex or silicone, is properly treated.
Always make a leakage and stress test on your drysuit seals before diving.
Troubleshooting
Maintenance and Storage
• If high resistance occurs, disassemble and lubricate with SI TECH Lube Stick.
• If the rings are misaligned, disassemble and don again.
• Sand and debris caught up by lubricant on Glove Ring and/or Suit Ring may cause
leakage if not removed. Remove O-ring and make sure the O-ring groove and adjoining
surface on Suit Ring is clean before replacing the O-ring.
•
•
•
•
To change or to clean and lubricate the O-ring, follow these simple steps:
Press the Lock and Release Ring backwards
with your thumbs until you can access the
O-ring. NOTE: Do not use excessive force as
that might break the rings.
When Lock and Release Ring is trapped in its
backward position, you will be able to pinch
the O-ring and pick it out of its groove.
NOTE: Do not use any sharp tools as they
may damage the O-ring.
Lubrication
IMPORTANT:
• Lubricate the O-rings.
• Avoid any lubricant on seals.
• Clean by disassemble and rinsing all
parts thoroughly in fresh water.
• Dry before assembly.
For best performance; lubricate the surface
marked with red. Use SI TECH Lube Stick.
After every dive you should check for damage or debris and clean the system with fresh water.
Before every dive you may do the same check depending on how you store the system.
The O-ring seal and its groove is especially important to check for dirt.
Store the rings apart in a debris free enviroment.
www.sitech.se
Our products have
been trusted by divers
for more than 40 years
Spare Parts
Item no.
60523 60539 60538 60537 60536 60535 80197 60540 60233 60524 timaladyk.se
Item
Suit Ring
Glove Ring with Rubber Ring and O-ring
Spanner Ring, red: For extremely thin fabrics
Spanner Ring, green: For thin fabrics
Spanner Ring, blue: For medium fabrics
Spanner Ring, yellow: For thick fabrics
O-ring
Lube Stick
Pressure Equalization Tube
Spanner Ring, black: For attachment to Quick Cuff
SI TECH is a Swedish company focusing on manufacturing and
marketing of components for protective suits such as; drysuits,
rescue suits and garments designed for diverse hostile
environments. SI TECH is rooted in the diving industry which
is still the company’s core market. The company was founded
in 1971 by the diving pioneer Stig Insulán.
Core products
Modular Quick Change Solutions, Drysuit Valves, Drysuit seals,
Dry Glove Systems, Gas Inflation Systems and special
compoents for military purposes
Inhouse capabilities
Development and production is made in-house at our facilities in
Brastad, Sweden. Inhouse competencies include: CAD construction, Injection Molding, CNC Machining, EMD Machining,
Assembly, Sales and Marketing, Logistics and Administration.
Our team of engineers, sales and marketing personell have
close co-operation with the distributors and end-users of our products.
SI TECH AB | Glove Lock QCP manual | Version: 2.0 | February 6, 2013
www.trockireparaturen.de
www.sitech.se