Download User's manual - CPS Partnership Ltd
Transcript
User’s manual
Pre-dive buoyancy check
Recommendations for diving with SI TECH valves
Translations of this manual are available on www.sitech.se
(”gas” is used in this manual as a general term for various mixes of gases)
13
1
11
5
10
6
12
7
2
3
8
4
9
Diving with a drysuit takes knowledge and practice
Inside a drysuit, gas is used for two purposes:
• To insulate from heat and cold
• To control the buoyancy
It takes practice to learn how to control the flow of gas within the drysuit. The
material in your undergarments and the fit of your drysuit can add unexpected buoyancy if the gas within the drysuit is obstructed from rapidly
reaching the exhaust valve. Basic understanding of how changes in pressure
can affect the characteristics of your equipment is essential for your ability
to use your drysuit and equipment in the best and safest way. This can be
learned by studying the physics of diving.
Buoyancy compensation with weights wearing your full equipment.
1a. Select undergarment considering the water temperature and adjust your
weight belt accordingly. Start practicing in shallow water, with all your
gear. Open the exhaust valve completely (counter clockwise to full –) for
minimum gas volume in the suit, deflate the BC completely while
breathing normally.
1b. Add or remove weights until you have neutral buoyancy and can hang
feet down, your body floating perpendicular to the water surface with the
crown of your head touching it. In this pose, with your arms horizontally in
front of your chest the exhaust valve should be at the highest point of the suit.
Add some weight to compensate for the calculated increase of buoyancy
and to allow a deco stop
2a. Calculate the weight of the gas that you expect to consume during the
dive. Compensate for the expected weight loss by adding the same
weight in lead to your weight belt. Adding some additional weight, say
2–3 lbs/1–1,5 kg, will allow you the option of a safety stop.
2b. Inflate your drysuit and adjust the exhaust valve clockwise (towards +)
until you’ve reached the state of neutral buoyancy.
2c. Start the descent by exhaling and elevate your elbow (or press the cover
of your exhaust valve) to decrease the amount of gas in your drysuit.
While descending, inflate gas to compensate the loss of buoyancy and to
avoid suit squeeze.
Post-dive buoyancy check
See if you are able to maintain neutral buoyancy at 9 feet/3meter with less
than 50 BAR/725 PSI in your tank(s).
How to calculate what increase in buoyancy that can be expected
at the end of the dive:
The importance of pre-dive buoyancy compensation
When using metric units, the service pressure (P1), the atmospheric pressure
(P2) and the tank volume (V1) will be known data. By using Boyle’s equation
to calculate the volume of the air in you tank(s) plus knowing the density of
air (D), you will be able to calculate the weight of the air (W).
Correct compensation with weights is highly important when diving with a
drysuit. Too much weight will make you feel uncomfortable and will add
unnecessary strain to your dive. Too little weight is very dangerous and can
be fatal as this may limit your ability to control the speed of your ascent and
the ability to make a safety/decompression stop.
If you are diving in the USA, the known data will be the volume of air in your
tank(s) (V2), and the service pressure (P1).
• Your buoyancy will increase while diving as you consume the gas through
breathing. If you feel that the deflation capacity of the exhaust valve is
insufficient, the reason may well be that you started the dive with not
enough weight.
• Changes made to your equipment or of the water’s salinity will affect your
buoyancy. Compensate your weight belt accordingly.
• Unexpected buoyancy and rapid ascent can be caused by any equipment
attached to you that can change in volume due to content of gas (i.e. BC or
certain suit materials). This is why SI TECH AB, like many educational
organizations, recommends the BC to normally be emptied of gas during
the dive.
Learn to master your drysuit
Practice on how your buoyancy will change when you roll, turn and toss. In
shallow water, test how to hover with your feet above your head. Don’t
forget to exhale if you start to ascend. (A strap around your ankles will
prevent boots and fins from slipping off.) To abort a feet first ascent; huddle
up by bending your knees and body in order to minimize your length and the
difference in pressure. With your arms and fins, rotate your body to right
position. When you’ve resumed normal position (head up, feet down), wait
a while to allow the excess gas to reach the exhaust valve.
Ex 1: A typical tank volume is 10 liters with a service pressure of 200 BAR. Boyle’s
equation will give the weight: W = (P1*V1)/P2*D = (200 b*10 l)/1 b* 1.29 g/l = 2580 g.
Add a max. of 1500 g for the option of a decompression stop.
Ex 2: A typical US tank will hold a volume of 80 CF air at a service pressure of 3000 PSI.
The weight of the air (W) is calculated like: W= V2*D = 80 CF*0,081 lbs/CF = 6.48 lbs.
Add a max. of 3 lbs for the option of a decompression stop. If you, for some reason,
need to know the volume of your tank(s), use Boyle’s equation: V1 = V2*P2/P1 = 80
CF*14.7 PS/3000 PSI = 0.392 CF = 677 CI
SI TECH Suit Inflation Hose with restricted flow
SI TECH suit inflation hoses supplied to drysuit manufacturers have a flow restriction
orifice to make it easier for less experienced
divers to determine their buoyancy. The flow
restriction will also reduce the loss of pressure
to the second stage in case the inflator valve
should get stuck open and it will minimize the
harm that a free-flowing hose can cause to
people and equipment.
If connected to a first stage with lower
intermediate pressure than 10 bar the flow
restricting orifice insert in the hose attachment nipple can be removed to
increase the flow.
Your guide to perfect buoyancy control:
SI TECH Inflator Valves – maintenance
The following is a description of a procedure that will help you obtain perfect
buoyancy control. It should be performed several times and in a comfortable
environment. The goal is a controlled ascent without effort, similar to taking
an escalator to the surface. Conditional for this experience is that:
• You are properly compensated with enough weights, so that there can be
enough gas in the suit to force the valve to deflate expanding gas.
• That the exhaust valve is properly set and located on the highest point.
Avoid exposing the inflator valve quick connector socket to water and sand.
Use the protective cap when the hose is not attached. Rinse the drysuit and
the inflator valve with fresh water after every dive. After rinsing, attach the
hose and blow the valve clean.
If the pushbutton becomes stiff, spray some silicone into the quick
connector socket and purge. Slide valve: Gently pry the moving activator
from the base to apply silicone.
SI TECH Exhaust valves – basic information
SI TECH exhaust valves are designed to provide two functions:
• The safety valve (There is no risk of an internal pressure that is
harmful to the diver as the exhaust valve can't be closed entirely)
• The adjustable overpressure valve
SI TECH exhaust valves are very sensitive to small variations in the
difference between internal and external pressure. The exhaust valve is
adjustable
between
10-200
mm
column
of
water
(100 -2000 Pa/ 0.0145-0.290 PSI) to provide buoyancy variation with the
inherent gas volume.
Adjusting the volume in the suit is hereby simplified and the dry suit
may be used as the only method of buoyancy control during normal
diving conditions (BC emptied of gas during the dive). This will also
support a controlled ascent (approximately15m/minute) provided the
diver’s buoyancy is correctly compensated and the valve is trimmed
properly.
Manual deflation: If the pressure setting of the valve is high (clockwise, to +),
press anywhere on the valve Lid to override this setting and to deflate
gas. However, the valve is normally operated by minor pressure changes.
Factors that need to be considered if the deflation capacity of the
exhaust valve seems inadequate are: the valve location on the suit, the
suit fit (too much volume above the shoulders could lead to a pocket of
gas being trapped above the valve), the permeability of the underwear
and insufficient weight compensation.
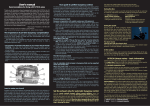
The clicking sound that can be heard when you turn the valve Cover (1)
makes it easy for you to fine tune the valve while diving.
The symbols + and – above the logo label on the lid indicates the effect.
– (minus) stands for reduced buoyancy
+ (plus) stands for increased buoyancy
Set the exhaust valve for automatic buoyancy control
You can remain neutrally buoyant without
manual deflation: when the exhaust valve is
correctly located (on the highest point of the
suit) and properly set and when you are
correctly compensated with weights. When
you adjust the setting by turning the valve
Cover (1), a clicking sound will help you
determine the fine tuning. When the valve is
properly set you will be able to fine tune the
gas volume in the suit further by rolling the body or by raising or lowering
the elbow.
The valve may need further fine tuning during the dive depending on
the duration of the dive and the suit material:
During the dive
There should be no gas in your BC during the dive. The BC is used only
as a back-up. Adjust the valve little by little by turning the valve’s cover.
For reduced buoyancy:
adjust counter clockwise
(towards –) = lower pressure
= less gas retained in the suit
For increased buoyancy:
adjust clockwise (towards +)
= higher pressure in the suit compared to ambient water pressure
= more gas retained in the suit
During the ascent
During ascent or while changing depths during the dive, you can adjust
the gas volume within the suit by rolling the body or by raising or lowering the elbow (provided the valve is properly set and you are correctly
weighted). When the exhaust valve is elevated, the water pressure will
decrease and the spring loaded Piston (5) will automatically open the
valve to deflate expanding gas.
For slower ascent: raise the arm (with the exhaust valve).
The internal suit pressure will increase compared to the ambient water
pressure = more gas deflated = decreased buoyancy.
At the surface
To maintain buoyancy and to preserve the insulating effects of the gas,
turn the valve clockwise (towards +) to maintain optimal pressure inside
the drysuit. Use your BC to help you float.
S I
SI TECH Exhaust Valves – maintenance
Warnings and recommendations
• After each dive, especially if water contains silt and sand, flush the
exhaust valve thoroughly with fresh water while turning the Cover/Lid
(1&12) back and forth.
• Have the valve checked/serviced once a year by a qualified technician.
• SI TECH exhaust valves are equipped with a Filter (9). The filter prevents
lint from your undergarments getting stuck in the check valve which
could cause the valve to leak. Remove the filter for rinsing only.
• Before donning your suit – check that the valves are properly fitted
into the drysuit Valve Port.
Warranty
End user´s warranty for SI TECH drysuit valves and suit inflation hoses is
good for 36 months from date of purchase (maximum 60 months from
date of manufacture).
The warranty covers material defects. We will repair the valve at no
cost or provide you with a new. Transport not included. Complaints and
questions about SI TECH valves and hoses, preferably made via
www.sitech.se, should be accompanied by information about the
products batch code, brand of drysuit, model, and serial # and proof of
purchase. SI TECH AB will provide further information about where to
send the product.
Limitations in warranty:
1. If damage is caused by incorrect use, faulty fitting to the drysuit,
external damage or caused by non diving related elements.
2. If damage is caused by degrading chemicals or if it has been exposed
to a temperature exceeding 80 ºC (176 ºF).
3. If non-competent repair is attempted. (Competent repair/service must
include function control with access to adequate test- and assembly
equipment.)
4. The warranty does not include elastic parts (i.e. O-rings, gaskets etc.)
VA LV E S
• A tightly fitting suit, belt or other equipment may restrict the flow of
gas within the suit causing reduced deflation capacity of the exhaust
valve. A loose fit is desirable, but the suit must not be too large, especially not over the shoulder area.
• Be sure that the neck seal is properly trimmed and folded for comfortable fit. A neck seal that is too tight can restrict the flow of blood from
(yes, from!) the brain. A neck seal that is too loose will allow gas to
leak out and cause a reduction of pressure within the suit that will
have a negative effect on the exhaust valve’s capacity to provide
automatic buoyancy control.
• Remember to squeeze the drysuit before entering the water feet first.
If not, you may risk the neck seal turning inside out.
• While diving, avoid inflating when your feet are above your head.
• Using yourself and your drysuit as a lift bag will put your life in danger.
For the same reason, never attach a lift bag to your drysuit or other
equipment.
• If you are unfamiliar to diving with a drysuit tell your dive buddy
and/or your dive master so that they will allow you time to getting
familiarized with the drysuit.
• Diving can be a potentially dangerous activity. Stressed divers can
make decisions that may be fatal. Dive within your limits, whether
they may be physical, mental or experience level. Get to know your
equipment and practice in a comfortable environment. Your personal
fitness, experience, knowledge and judgment are factors that will be
crucial for your ability to handle a crisis situation. Give up diving for
the day if you are not feeling well or if you do not feel comfortable with
the dive situation, your own ability or equipment. Always perform a
pre-dive check on all your diving equipment and correct any
malfunctions before diving. All diving is done at your own risk.
NOTE! Do not use the Cover/Lid (grey, 1&12) to tighten the valve.
Do not mix the exhaust and inflator Attachment Nuts (red) when re-fitting
the valves. Note that the exhaust valve’s nut (4) has a filter.
If the valve is impossible to detach, although using the appropriate tools
correctly, contact your dealer.
D R Y S U I T
• SI TECH AB recommends you to limit all compartments that can
contain gas and hereby cause problems controlling your buoyancy.
This means that the BC should normally not be used for buoyancy
control during the dive.
Thank you for choosing a drysuit equipped with valves from SI TECH,
the # 1 choice of educated divers. SI TECH valves are designed to meet
the highest standards of comfort and safety demanded by divers. This is
not a manual for drysuit diving. This is a supplement (and as such
subordinate) to the manual provided by the drysuit manufacturer. This
manual is based on our experience from manufacturing drysuit for more
than 30 years. It is my intention as designer to provide relevant background information so that you can achieve maximum comfort and
performance from your SI TECH valves. Primarily written for the
inexperienced drysuit diver, this manual will also enable more experienced divers to take their buoyancy control to new levels. We whish you
many pleasant dives.
Stig Insulán, President of SI TECH AB
Lysekil • Sweden
www.sitech.se
This manual covers the standard valves and hoses. Custom made valves and hoses
may differ in use and procedures. SI TECH reserves the right to incorporate modifications in the products without any notice. SI TECH reserves the right for misprints.
Design: Zebra Reklambyrå, Trollhättan • Photo: Göran Ehlmé, Aqua Graphics • Illustration: Per-Anders Nilsson • Print: Rydins Tryckeri • Copyright: SI TECH AB, 4th edition, October. 2007, #87012
SI TECH Valves – deattachment/attachment
• Prior to detachment from the suit and prior to re-attachment into the suit
valve port make sure that the exhaust valve Cover/Lid (1&12) is adjusted
clockwise to full stop (+) .
• Do not hold on the exhaust valve Cover/Lid (1&12) when detaching as
over tightening may destroy the valve! Attachment tools for grip enhancement are available.
• Hold the Protecting Ring (green, 2) in a firm grip. Turn the Attachment
Nut (red, 4) on the inside of the suit by hand until you feel that it is firmly tightened. The Anti Friction Washer (3) should always be used, between the Attachment Nut and the inside of the suit.
• If using attachment tool (item no. 18222), match the tool’s notches with
the barbs on the valves. Use the wider tool end on the Protecting Ring
(green). Use the narrow tool end on the yellow ring (inflator valves) and
attachment nuts (red).
T E C H
User´s guide to optimized
buoyancy control


