1
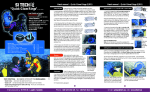
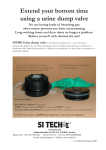
Quick Glove
User Manual
Photography: Jonas Wall
www.sitech.se
www.sitech.se
Quick Glove - User manual
1. Docking platforms
We want to congratulate you on the purchase of the Quick Glove, a Dry
Glove System developed and manufactured by SI TECH in Sweden.
Innovative docking platforms makes the Quick Glove extremely versatile.
Below you will find the platforms currently available.
Quick Glove is an easy to use, genuine Dry Glove solution. Through the modular system of docking
platforms, such as the Quick Clamp and Quick Cuff, you have the freedom to choose the solution
that fits your needs.
Docking Ring
Spanner Rings
• Quick Clamp - Docking system for latex seals fixed to the suit.
Quick Glove
(complete)
Components
The system itself consists of four components per arm:
• Connecting Rings
• Release Rings
• Black and blue Spanner Rings
• O-rings
Important information
Spanner Rings
Quick Clamp makes your drysuit compatible with the Quick Glove system. Attaches to the latex seals
of the drysuit without tools or glue. Comes with a variety of Spanner Rings suited for a variety of seals.
Benefits
• Easy donning and doffing.
• Opportunity to use a variety of Dry Gloves.
• Connects to the Quick Cuff and Quick Clamp
attachment platforms.
• Heavy duty components.
• Always dive the Quick Glove System with seals installed.
• The different Spanner Rings included in the package allows a variety of gloves to be fitted onto
the Quick Glove System. The different Spanner Rings are color coded which indicates various thickness. You simply choose the thickness best fitted for your the glove of your choice.
Wrist Ring
Stiff Ring
• Quick Cuff - Modular Quick Change Solution
Quick Cuff turns your drysuit into a modular platform able of carrying a variety of different seals as well as the possibility of changing a torn or broken seal in minutes without tools or glue. It is also fully compatible with the Quick Glove System and the Glove Lock QCP system.
Note that the Wrist Ring has to be glued onto the suit.
This manual does not address the topic of gluing/attaching the Wrist Ring of the
Quick Cuff to your drysuit. Please visit: www.sitech.se for information.
www.sitech.se
QUICK CLAMP QUICK CUFF 1a. Mounting
1b. Mounting seals
Spanner Ring
Docking Ring
Seal
1a.1 Position the Spanner Ring inside of the latex
seal. Thread the Docking Ring over the seal and
use both hands to press the Docking- and
Spanner Rings together. This assembly must not
be on top of the suit material (only clamp seal
between assembly).
1a.2 When you have found the correct Spanner
Ring it is of great importance that you press the
rings so that the surfaces will align perfectly,
360° around the contact surfaces of the rings.
This is to minimize risk of leakage and
fixation problems.
Stiff
Ring
1b.1 Carry the seal through the Stiff Ring and
invert the rear section of the seal to the outside
of the Stiff Ring. Position the rear end of the
seal as the illustration shows.
Seal position: The red, dotted line indicates
the final position of latex seals. The blue, dotted
line indicates the final position of silicone seals.
NOTE: The seal must be placed evenly around the
Stiff Ring – no bumps or gaps.
A tips for mounting of latex seals:
The latex seal can be secured with flexible tape
before insertion into the Wrist Ring, to prevent
the seal from sliding. Make sure the seal covers
the locking groove.
The red dotted line indicates the approximate
rear position of the Spanner Ring. This position
might differ a little bit depending on the thickness
of the latex seal.
1c. Attach to Wrist Ring
Cut out section of assembly shows
how the the components shall
be aligned when assembled correct.
A. Wrist Ring
B. Stiff Ring
C. Final position of latex seal (if used)
D. Safety flange of
silicone seal (if used)
NOTE: Seal must be
used at all times.
www.sitech.se
1c. Attach to Wrist Ring
2. Attach glove
1c.1 Initiate the assembling process by holding the seal as the left image shows. This is just
to align the rings and to ensure the seal stays in position for the first 2/3 of the travel length.
Hold the front end of the seal in a firm grip when pressing the seal assembly into the Wrist Ring.
Ensure that the inverted part of the seal does not slip from its position while being pressed into the
Wrist Ring. For the last part of the assembly you need to change grip and work as the right image
shows. Stretch the seal using the force direction of the arrow, at the same time you should
press the Stiff Ring into the assembly. Repeat this operation in several steps 360° around the
rings until the seal assembly reaches the bottom of the Wrist Ring.
2.1 When attaching gloves you will need the Quick
Glove assembly, Spanner Rings and a pair of Dry
Gloves. (Gloves are optional and are not included in
the different Quick Glove packages.) The Quick Glove
is delivered with blue and black Spanner Rings.
These have different thicknesses, so that you can
choose from different models of gloves.
2.2 Put the Spanner Ring inside of the glove.
Fold the glove collar and adjust it so that you
avoid wrinkles. Position the Spanner Ring according to the armlength of your drysuit with
the Quick Glove attachment platform mounted.
2.3 Put the Quick Glove assembly onto a flat
surface and press the Glove/Spanner Ring into
the Connecting Ring. Use even force around
the assembly and check for creases. Ensure that
the Spanner Ring aligns in height with the top
of the Connecting Ring.
2.4 Check the strength of the assembly by
pulling the glove away from the Rings. In the
case you are using the black Spanner Ring and
the assembly does not hold you can solve this
problem by using the blue Spanner Ring
which is thicker. In the case you are using
the blue Spanner Ring and the assembly does
not hold you can solve this problem by using
a thin layer of tape on the Spanner Ring.
1d. Detaching the Quick Cuff assembly
Press the back end of the Wrist
Ring with your index fingers
Press the flange area
of the Wrist Ring with
your thumbs
1d.1 If for some reason you need to remove the Stiff Ring and/or change seal; simply press the Wrist
Ring as hereby explained. The arrows in the illustration show the directional force needed to release
the assembly. Do not use sharp tools or similar for this procedure as you might damage both the
drysuit and the Wrist Ring.
www.sitech.se
3. Donning
In this manual we have choosed
to use illustrative cross sections
of the Quick Clamp attachment
platform to exemplify how to attach and detach the Quick Glove
system before and after the dive.
O-Ring
Connecting
Ring
Release
Ring
Quick Glove
(complete)
Example of
Docking Ring
Spanner Ring
with Seal
Spanner Ring and seal are deliberatly hidden for illustrative purposes.
The Quick Glove rings are connected by a thread which moves them laterally in opposite
direction of each other allowing detachment of the system. When attaching the system,
the Release Ring must be turned in to its distinct stop position on the leading edge of
the Connecting Ring. Note that the Release Ring is a release aid, not to be used for locking
or for attaching. When attaching the Quick Glove ring to the attachment platform it is of greatest
importance that you do this gently in several steps. Otherwise you might damage the O-ring or have
the O-ring pressed out of its groove. Make sure the O-ring is free from lubricant that may attract dirt.
3.1 Put your hand through the seal and fit
the Equalization Tube between seal and wrist.
Make sure the Equalization Tube reaches
all the way through the seal.
Equalization Tube
3.2 Put on the Quick Glove with glove and posi- 3.3 Press the system together step by step by
tion the Quick Glove so that the O-ring meets the applying gentle force on one side letting the
Stiff/Docking Ring of the attachment platform. O-ring travel inside of the attachment platform.
3.4 Change grip and apply force on the opposite 3.5 Apply force to press the system together
side of the ring so that the O-ring disappears bit by bit. Ensure that the Quick Glove asseminto the attachment platform.
bly has bottomed in the attachment platform.
4. Doffing
For detachment of the system you should rotate
the outer ring as displayed by the vertical arrow.
This will force the inner ring to travel out of the
attachment platform until completely released.
These are suggested instructions only
Whatever method chosen, be certain the wrist seal, be it latex or silicone, is properly treated.
Always make a leakage and stress test on your drysuit seals before diving.
www.sitech.se
SI TECH
INNOVATOR OF HIGH PERFORMANCE
DRYSUIT COMPONENTS
www.sitech.se
Troubleshooting
The Quick Glove has a user friendly design but needs to be handled properly to perform as intended.
Following explanations have been made using the Quick Clamp attachment platform. Some of the
problems explained can occur, as well as be solved in the same ways, when using the Quick Cuff
as an attachment platform.
1
Quick Glove when attached
properly into the Quick Clamp
attachment platform.
2
The Spanner Ring has
been pressed too far
into the docking ring.
3
The Release Ring of the
Quick Glove assembly is
positioned incorrectly.
4
The Quick Glove assembly has
been guided in wrong and
ended up in a tilted position.
Maintenance and Storage
Illustration no.1 is correct! The other examples are incorrect.
1 • The Release Ring of the Quick Glove assembly is threaded against its stop position on the
leading edge of the Connecting Ring.
• The Release Ring is in contact with the flange of the Quick Clamp.
• The Spanner Ring is positioned so that the Quick Glove assembly can use full travel length into
the Quick Clamp compartment.
2 This scenario prevents the Quick Glove assembly from reaching full travel length into the Quick Clamp
attachment platform. This will most likely cause instability that can lead to leakage and in worst
case cause the Quick Glove to be fully released and fall of.
3 This scenario will most likely cause instability that can lead to leakage and in worst case cause the
Quick Glove to be fully released and fall of.
4 This scenario will most likely cause instability that can lead to leakage and in worst case cause
the Quick Glove to be fully released and fall off.
In all cases when you notice that something is wrong, we recommend you to detach the Quick Glove
assembly from the docking ring. Solve the issue that caused the problem and attach the system again.
• Ensure that all components are clean and properly lubricated before diving the system.
• Disassemble and rinse all parts thoroughly in fresh water to remove sand and dirt.
• Make sure that the O-ring and the groove in the Connecting Ring is clean before re-fitting
the O-Ring. Note: O-rings must be changed if damaged or contaminated by silicone lubricants.
• Disassemble the system when stored for longer periods.
Spare Parts
Item no.
Item
Item no.
Item
Quick Glove
60231
60232
80185
61357-20
60211
60212
60233
Connecting Ring
Release Ring
O-Ring
Paraffin Wax
Spanner Ring, black: for thick fabrics
Spanner Ring, blue: for medium fabrics
Pressure Equalization Tube
Quick Cuff
60420
60200
Quick Clamp
60931
60214
60219
60212
Seals
61150
61130
61100
61090
61025
61026
Latex Seal, X-Small (wrist circumference 12,5-14 cm / 5,0-5,5”)
Latex Seal, Small (wrist circumference 13,5-16 cm / 5,4-6,4”)
Latex Seal, Medium (wrist circumference 15,5-18 cm / 6,2-7,4”)
Latex Seal, Large (wrist circumference 18-21 cm / 7,2-8,4”)
Silicone Seal, Standard (wrist circumference 13,2-17 cm / 5,2-6,7”)
Silicone Seal, Small (wrist circumference 10,6-15 cm / 4,2-5,9”)
Wrist Ring
Stiff Ring
Docking
Spanner
Spanner
Spanner
Ring
Ring, yellow: for thick fabrics
Ring, green: for thin fabrics
Ring, blue: for medium fabrics
www.sitech.se
Our products have
been trusted by divers
for more than 40 years
SI TECH is a Swedish company focusing on manufacturing and
marketing of components for protective suits such as; drysuits,
rescue suits and garments designed for diverse hostile
environments. SI TECH is rooted in the diving industry which
is still the company’s core market. The company was founded
in 1971 by the diving pioneer Stig Insulán.
Core products
Modular Quick Change Solutions, Drysuit Valves, Drysuit seals,
Dry Glove Systems, Gas Inflation Systems and special
compoents for military purposes
Inhouse capabilities
Development and production is made in-house at our facilities in
Brastad, Sweden. Inhouse competencies include: CAD construction, Injection Molding, CNC Machining, EMD Machining,
Assembly, Sales and Marketing, Logistics and Administration.
Our team of engineers, sales and marketing personell have
close co-operation with the distributors and end-users of our products.
Photography: www.optimaladyk.se
Core Market Areas
SI TECH AB | Quick Glove manual | Version: 2.0 | February 3, 2013
www.sitech.se