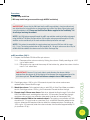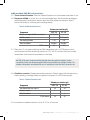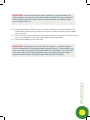
1
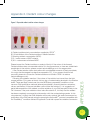
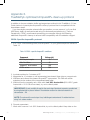
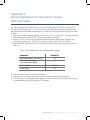
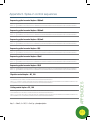
™ TrueMethyl™6 Kit User Guide For the base-specific detection and quantitation of 5-hydroxymethyl cytosine and 5-methylcytosine in DNA samples. Version 3.1 (July 2013) Table of Contents Kit Contents (oxBox1 and oxBox2).........................................2 Oxidation Solution Sensitivity..................................................3 Columns, Filters and Tubes.....................................................5 Shipping and Storage.............................................................6 Safety Information ..................................................................6 Additional Equipment and Reagents Required........................7 Principle and Procedure..........................................................8 Important Notes.....................................................................9 Protocols Workflow Overview and Timings...........................................10 Step 1: Spike-in Sequencing Controls..................................12 Step 2: Spike-in Digestion Control........................................13 Step 3: DNA Oxidation.........................................................14 Step 4: Bisulfite Conversion..................................................18 Step 5: Interrogate Digestion Control....................................21 Step 6: PCR Amplification ...................................................24 Appendices Appendix 1: Troubleshooting Guide......................................26 Appendix 2: Oxidant Colour Change....................................27 Appendix 3: TrueMethyl™ Optimised AmpureXP® Clean-up protocol............................................................28 Appendix 4: Recommendations for Low Inputs Masses (<200 ng)..........................................................30 Appendix 5: Spike-in Control Sequences..............................31 Kit Contents TrueMethyl™ 6 Kit oxBS reactions 6 BS-only reactions 6 TOTAL number of samples 6 Oxidation Workflow oxBox P/N: CEG5110 Oxidant Solution 10 μL 2 P/N: CEG1400 Denaturing Solution 1.0 mL 1 P/N: CEG1300 Ultra Pure Water 200 mL 1 P/N: CEG1910 BioRad® P6 Micro Bio-Spin Columns 6 1 P/N: CEG2300 Wash Tubes (2.0 mL) 6 1 P/N: CEG2010 Collection Tubes (1.5 mL) 6 1 3 aliquots 1 Bisulfite Workflow P/N: CEG1500 Bisulfite Reagent aliquot (4 rxn per aliquot) P/N: CEG2200 Bisulfite Diluent 30 mL 1 P/N: CEG2100 Bisulfite Additive 960 μL 1 P/N: CEG1110 Millipore® Amicon® Ultra 0.5 30 kDA Filter 12 1 P/N: CEG1210 Collection Tubes (2 mL) 24 1 P/N: CEG1700 Desulfonation Buffer 80 mL 1 P/N: CEG1800 Wash Buffer 80 mL 1 20 μL 2 PCR Workflow P/N: CEG5410 TrueMethyl™ DNA Polymerase P/N: CEG5210 5X TrueMethyl Buffer 150 μL 2 P/N: CEG5310 10 mM dNTP Mix 30 μL 2 Sequencing Spike-in Controls (8 ng/μL) 25 μL 2 ™ Spike-in Controls P/N: CEG5510 2 P/N: CEG5910 Digestion Control (5 ng/μL) 15 μL 2 P/N: CEG5710 Digestion Control FWD PCR Primer (100 uM) 45 μL 2 P/N: CEG5810 Digestion Control REV PCR Primer (100 uM) 45 μL 2 P/N: CEG5610 Cutting Control (20 ng/μL) 15 μL 2 www.cegx.co.uk | [email protected] | [email protected] Oxidation Solution Sensitivity CRITICAL: The Oxidant solution supplied in this kit is reactive with a range of compounds. We have harnessed this reactivity to allow the selective oxidation of 5hmC to 5fC using this reagent. However, the oxidant will react with other contaminating species in solution if present. Following the prescriptive instructions in this manual will allow the user to prepare samples ready for presentation to the oxidation reaction, minimising the likelihood of side reactions. Reaction of the oxidant with anything but DNA will decrease the active concentration of oxidant in solution and lead to the possibility of suboptimal conversion and also generate products that could inhibit downstream steps of the workflow (e.g. bisulfite conversion and PCR amplification). It is critical that the input DNA samples have been prepared with these sensitivities in mind. Below we have defined some guidelines that should be adhered to as far as practically possible. Solution sensitivities: Contaminating compounds in solution known to be incompatible with the working oxidant solution: • Alcohols (ethanol, isopropanol, phenol) • Alcohol-containing compounds (Tris, EB buffer, TE buffer, glycerol, surfactants) • Acidic solutions < pH 9.0 • Carbon dioxide Care should be taken to remove traces of such compounds from the DNA sample solutions prior to input into the TrueMethyl™ workflow. We include a buffer exchange step in our protocol but the effectiveness of this exchange is dependent on the type and concentration of contaminating species in solution. Samples should be: • Eluted from DNA purification method using ONLY Ultra Pure Water rather than EB or TE. • Adjusted to the correct pH (pH 8). • Preferably processed through AmpureXP® clean-up regardless of upstream extraction process. Taking care to evaporate all ethanol from the bead prior to elution. We have defined a compatible workflow, see Appendix 3. Environmental sensitivities: The oxidation stock solution and working oxidation solution have been shown to react when exposed to a limited number of compounds under specific environmental conditions. Care should be taken to acknowledge these sensitivities before removing the oxidant solution from its protective foil shipping bag; from the freezer in which it is stored; and before uncapping the tube. tHE kIT Contamination thresholds for a selection of commonly used molecular biology reagents are given in Table 1. 3 • Alcohol vapour. Exposure of the oxidant solution to alcohol vapour (e.g. after wiping down a bench with 70% ethanol prior to experimentation) can cause irreversible decomposition of the oxidant solution. If it is your practice to clean surfaces in this manner, we recommend doing so at least 2 hours in advance of opening or using the oxidant solution as a precaution. • Carbon dioxide. Exposure of the oxidant solution to high local concentrations of CO2 in the air (e.g. leaving a polystyrene shipping cooler containing dry ice on a bench in the vicinity or standing the oxidant solution loosely capped on dry ice) can cause irreversible decomposition of the oxidant solution. It is strongly advised not to open or use the oxidant solution near a source of carbon dioxide. Some -80 °C freezers are purged with CO2, for this reason we do not recommend storage of the oxidant solution or oxBox2 in a -80 °C freezer. Table 1. Oxidation reaction contamination thresholds Contaminant Threshold concentration* Ethanol < 50 mM Isopropanol < 50 mM Glycerol < 2.5 mM Phenol < 50 mM Acetonitrile up to 1 M Guanidine HCl < 50 mM EB buffer (10 mM Tris pH 8.0) ≤ 1X TE buffer (10 mM Tris 1 mM EDTA pH 8.0) ≤ 1X * Concentration in buffer prior to Biorad® MicroBio spin P6 buffer exchange 4 www.cegx.co.uk | [email protected] | [email protected] Columns, Filters and Tubes The TrueMethyl™ 6 Kit is supplied with a number of columns, filters and tubes (see Figure 1 as a guide). Please ensure the correct components are used in combination with each other as outlined in this document. Failure to do so will affect performance. Figure 1: Types of Columns, Filters and tubes used in this protocol BioRad® P6 Micro-Bio Spin WASH tube (2 mL) BioRad® P6 Micro-Bio Spin COLLECTION tube (1.5 mL) Amicon® Ultra 0.5 30kDa filter Amicon® Ultra 0.5 collection tube tHE kIT BioRad® P6 Micro-Bio Spin gel filtration column 5 Shipping and Storage The TrueMethyl™ 6 Kit is shipped as two separate boxes. • oxBox 1 is shipped at ambient temperature (15 – 25°C). • oxBox 2 is shipped frozen (-20 °C). IMPORTANT: The oxidant solution is sensitive to carbon dioxide exposure. Under no circumstance should the oxidant come into contact with CO2 or dry ice otherwise performance will be significantly impaired. The oxidant is shipped in oxBox 2 on frozen ice packs and not dry ice for this reason. Upon arrival: • The BioRad® MicroBio P6 acrylamide spin columns should be removed from oxBox 1 and stored in the fridge at 2-8°C. Short-term storage of these components at room temperature does not affect their performance. • oxBox 2 and its contents should be stored at -20°C. All other buffers and the bisulfite mix should be stored at room temperature and are stable for at least 6 months under these conditions. Dissolved Bisulfite Mix should be used immediately and then disposed of appropriately. Do not freeze the BioRad® P6 spin columns; they should only be stored in the fridge on receipt of the kit (2-8°C). Safety Information When working with chemicals, always wear a suitable lab coat, disposable gloves and protective goggles. For more information, please consult the appropriate material safety data sheets (MSDSs). These are available on request to CEGX™ technical support ([email protected]). The following risk and safety phrases apply to components of the TrueMethyl™ 6 Kit: Oxidant solution: Contains inorganic oxidizing agent (proprietary formulation): oxidant, irritant. Risk and safety phrases:* R8-36/37/38, S17/26/37/39 Contains sodium hydroxide: corrosive. Risk and safety phrases:* R35, S26-36/37/39-45 Bisulfite Mix: Contains sodium bisulfite: sensitizer, irritant. Risk and safety phrases:* R22-31-41, S13-2636/37/39-46 *R8: Contact with combustible material might cause fire, keep away from heat and sources of ignition; R20/21/22: Harmful 6 www.cegx.co.uk | [email protected] | [email protected] by inhalation, in contact with skin, and if swallowed; R22: Harmful if swallowed; R31: Contact with acids liberates toxic gas; R32: Contact with acids liberates very toxic gas; R35: Causes severe burns; R36/37/38: Irritating to eyes, respiratory system and skin; R36: Irritating to eyes; R41: Risk of serious damage to eyes; S13: Keep away from food, drink, and animal feeding stuffs; S17: Keep away from combustible material; S26: In case of contact with eyes, rinse immediately with plenty of water and seek medical advice; S36/37/39: Wear suitable protective clothing, gloves, and eye/face protection; S36: Wear suitable protective clothing; S45; In case of accident or if you feel unwell, seek medical advice immediately (show the label where possible); S46: If swallowed, seek medical advice immediately and show the container or label. Additional Equipment and Reagents Required In addition to reagents supplied in the TrueMethyl™ 6 Kit, you will require the use of the following equipment and consumables: • Pipettes and pipette tips. We recommend the use of pipette tips with aerosol barriers to prevent cross contamination. • 0.2 mL polypropylene PCR tubes. • 1.5 mL polypropylene microcentrifuge tubes. • 2.0 mL polypropylene microcentrifuge tubes. • Thermal cycler with heated lid. • Variable speed microcentrifuge suitable for use with 1.5 microcentrifuge tubes and ability to set the rotor speed in both RCF and RPM values to speeds of 14000k RPM. • Tube adapters for 0.2 mL thermal cycling tubes (e.g. www.labnetinternational.com, P/N: C1222). • Heat block, thermomixer or heated orbital incubator able to maintain temperatures at 37°C and 60°C and shake up to 1400 RPM (e.g. Eppendorf® Thermomixer Comfort). • Ice bucket. • Plastic microcentrifuge tube holder or rack. tHE kIT Optional Equipment and Reagents: • Extra 2 mL Amicon® Collection Tubes • Taq1 Restriction Endonuclease (e.g. NEB® P/N: R0149) • dNTPs for Interrogating the Digestion Control • DNA polymerase for interrogating the Digestion Control • NGS-specific PCR amplification primers • AmpureXP® beads (Beckmann Coulter P/N: A63881) • Magnetic separation rack (e.g. Invitrogen™ Dynamag-2 magnet P/N: 12321D) • HPLC grade acetonitrile 7 Principle and procedure The TrueMethyl™ 6 Kit contains the necessary reagents to perform the quantitative site‑specific oxidation, and conversion to uracil, of 5‑hydroxymethyl cytosine (5hmC) bases in a complex genomic sample as outlined initially in the Science paper of Booth et al (Quantitative Sequencing of 5-Methylcytosine and 5-Hydroxymethylcytosine at SingleBase Resolution. Booth M.J. et al. Science 336, 934 (2012)). It also provides a method to accurately quantify the true level of cytosine methylation (5mC). The complete TrueMethyl™ workflow is simple and intuitive and comprises three distinct procedures, namely: 1. DNA Oxidation 2. Bisulfite conversion 3. PCR amplification TrueMethyl™ workflow: DNA Oxidation The TrueMethyl™ 6 Kit uses a specially formulated oxidant solution that ensures quick, quantitative conversion of 5hmC bases under mild conditions (to its formyl derivative 5fC) and reliable recovery of oxidised material compatible with downstream processing (bisulfite conversion, PCR and Sequencing). TrueMethyl™ workflow: Bisulfite conversion In the presence of bisulfite, 5fC is deformylated and deaminated to uracil. The TrueMethyl™ 6 Kit employs the use of a bespoke bisulfite conversion kit, which comprises a series of simple steps: bisulfite-mediated conversion of unmethylated cytosines and formylated cytosines to uracil; buffer exchange via diafiltration; desulfonation of desalted DNA in the ultracentrifuge device; desulfonation clean-up and final buffer equilibration via diafiltration; and elution of the pure, converted DNA from the ultrafiltration device. TrueMethyl™ workflow: PCR amplification In order to prepare TrueMethyl™ libraries for sequencing, material recovered from the TrueMethyl™ workflow requires PCR amplification. The TrueMethyl™ 6 Kit employs the use of TrueMethyl™ DNA polymerase. This mutant polymerase has been engineered to be resistant to uracil stalling – a common phenomena that affects the activity of proof reading archaeal polymerases. Thus, TrueMethyl™ DNA Polymerase is ideally suited for use in the amplification of bisulfite-converted libraries. Workflow Controls The TrueMethyl™ Detection Kit contains two types of spike-in workflow controls: The Digestion Control is a control that allows qualitative assessment of conversion prior to committing your sample for sequencing or other analysis method. Provides a go/no-go decision point regarding whether conversion should be repeated. The Sequencing Control pool is a set of 6 control duplexes that are spiked into your genomic sample during NGS-library prep (prior to adapter ligation). Each duplex contains C, 5mC, 5hmC and 5fC bases at known positions and density and can be interrogated after sequencing to give a quantitative assessment of the efficiency of conversion. See Appendix 5 for control sequence information. 8 www.cegx.co.uk | [email protected] | [email protected] Important Notes Pre-oxidation DNA purification • The use of AmpureXP® beads or similar DNA precipitation methods to purify DNA during the workflow should be avoided. • The presence of residual ethanol in the oxidation reaction can lead to the formation of compounds that can inhibit oxidation and downstream reactions. • The use of washed gel-filtration spin columns supplied with the kit is strongly advised as the sole method to clean up the DNA prior to the oxidation reaction. • We acknowledge that it is likely that the input DNA will have been purified using AmpureXP® beads. If this is the case, all care needs to be taken to minimise the amount of EtOH in the final eluted DNA sample. We have provided an AmpureXP® protocol optimised for compatibility with the TrueMethyl™ workflow (Appendix 3). • The solvent used for the final elution from the beads must be performed in Ultra Pure Water. Typical elution buffers are Tris-based, the presence of Tris in the oxidation reaction will also cause oxidation to fail. tHE kIT Complete denaturation • The oxidation of 5hmC to 5fC by the CEGX™ oxidant is ssDNA specific. This means that incomplete denaturation will lead to poor conversion rates of 5hmC -> U. It is strongly recommended that care be taken when denaturing the DNA to ensure the input to the oxidation reaction is ssDNA. Denatured DNA should be prepared as described in this document and used immediately in the oxidation reaction. • It should be assumed that storage of “denatured” DNA for any appreciable amount of time will lead to significant and variable levels of re-annealing that will confound downstream analysis. • Specific care should be taken when experimenting with oxidation of short synthetic oligonucleotides or PCR products input into the TrueMethyl™ workflow. Incomplete denaturation will adversely affect the level of 5hmC conversion. For this type of experiment, we recommend spiking such synthetic oligos into a carrier DNA genomic background (e.g. salmon sperm DNA) at a level < 5% w/w to increase the fragment diversity to minimise the chance of re-annealing affecting conversion. 9 Protocols Workflow Overview and Timings Figure 2 below provides a schematic illustration of the TrueMethyl™ workflow. Figure 2. Workflow overview Spike-in SEQUENCING control DNA sample Adapted NGS library QUERYDIGESTIONCONTROL Amplify and Taq1 digest to evaluate conversion Spike-in DIGESTION control OXBS sample Buffer exchange BS sample Denature/ oxidize Bisulfite PCR Analyze TIMINGTotal (hands on) mins 1-2 days Platform dependent 15 (5) 60 (5) 480 (60) 45 (5) Platform dependent The overall TrueMethyl™ workflow takes less than a day, but due to the 8 hour bisulfite conversion step, we recommend you conduct this step overnight to make the most efficient use of your time. Timings given in the Table 2 below are approximate and should be used as an illustrative guide only. 10 www.cegx.co.uk | [email protected] | [email protected] Table 2 Process Step Details Starting sample* 1-5 μg 200 – 400 bp fragments Timing Spike-in CEGX™ Sequencing Controls (recommended) 3 % w/w NGS Sample Prep* Platform dependent Optional AmpureXP™ cleanup See Appendix 3 Spike-in CEGX™ Digestion Control (optional) 0.5% w/w Decide on input mass** 0.4 – 1.0 μg Sample buffer exchange Remove ethanol and traces of buffer from the DNA sample 15 min Denaturation Ensure sample is ssDNA 30 min Oxidation Oxidation of 5hmC to 5fC 30 min 1-2 days 10 min 5 min - Bisulfite Conversion Deamination of C and 5fC Bisulfite Workup Desulfonation and purification of converted DNA 60 min 8 hrs Interrogate Digestion Control (optional) Qualitative assessment of oxidation and bisulfite conversion. Provides sequencing go/no-go decision 20 hrs PCR Amplification Amplification of recovered template in preparation for sequencing experiment 30 min Analyze (e.g. sequence)* User and application specific Variable PROTOCOLS * Components and instruction required for these steps are not provided in the CEGX™ TrueMethyl™ 6 Kit. **Input mass of 400-1000ng is required for both the oxBS-seq and BS-seq halves of the TrueMethyl™ workflow. In order to analyse the processed samples in parallel, we recommend uniquely indexing each input NGS library. 11 Step 1: Spike-in CEGX™ Sequencing Controls CEGX™ supply a pool of 6 sequencing spike-in controls containing known numbers, positions and densities of 5mC, 5hmC and 5fC bases. These controls need to be adapted with the adapters complementary to the sequencing platform of choice. For this reason, these controls need to be added to the DNA sample during sample prep. Reagents and protocols for this sample preparation process are not included in the TrueMethyl™ kit. Sequences of the sequencing spike-in controls are provided in Appendix 5 of this user guide. IMPORTANT: The sequencing spike-in control duplexes are only 60bp in length. DO NOT PURIFY SAMPLES CONTAINING THESE CONTROLS USING AmpureXP® BEADS PRIOR TO ADAPTER LIGATION as the controls will be lost from the sample. They are blunt ended so do not require end repair. Depending on the platform on which you are sequencing your samples, you may need to A-tail the duplexes prior to adapter ligation. They must only be spiked into sample prior to adapter ligation in the NGS library prep at the A-tailing step. If your genomic sample requires end-repairing, perform this step and spike the sequencing spike-in controls into the end-repaired sample AFTER PURIFICATION. Procedure oxBS-seq workflow BS-seq workflow 1.1.Quantify the mass of your fragmented gDNA sample. CEGX™ recommends using the Qubit® assay for this purpose. 1.2.End repair the fragmented gDNA sample according to particular vendor instructions. Reagents and protocols for this process are not provided with the TrueMethyl™ 6 kit. 1.3.Quantify the mass of your purified, end-repaired gDNA sample. CEGX™ recommends using the Qubit® assay for this purpose. 1.4.Thaw out the Sequencing Control on ice. 1.5.Using the concentration of end-repaired sample calculated in step 1.3, determine the total mass of DNA in your sample. Calculate the mass of Sequencing spike-in control pool you should add to your sample. Aim for to spike in the controls at a level of 3% w/w. An example calculation is given below as a guide. Total mass of sample DNA = 1 μg Concentration of Sequencing spike-in Control = 8 ng/μL (6 control pool) Mass of Sequencing spike-in Control pool required = 3% w/w = 1 μg x 3% = 30 ng Volume of Sequencing spike-in Control pool (8 ng/μL) to add to your 1 μg sample = 3.8 μL 12 www.cegx.co.uk | [email protected] | [email protected] 1.6.Add the required volume of Sequencing spike-in Control pool to your end‑repaired gDNA sample. 1.7.Mix well by vortexing. Centrifuge briefly. 1.8.Take sample forward and complete the NGS library preparation (A-tailing, adapter ligation). Reagents and protocols for this process are not provided with the kit. 1.9.For the final elution step in the NGS library preparation, ensure to elute the DNA from your preferred purification method in Ultra Pure Water and NOT Tris-containing buffer (e.g. EB, TE etc.). Step 2: Spike-in CEGX™ Digestion Control Spike the CEGX™ Digestion Control into the NGS adapted sample BEFORE you start the oxBS-seq or BS-seq conversions. Procedure oxBS-seq workflow BS-seq workflow (processed through MOCK oxidation) 2.1.Quantify the mass of your adapted gDNA sample. CEGX™ recommends using the Qubit® assay for this purpose. 2.2. Thaw out the Digestion Control on ice. 2.3.Using the concentration of sample calculated in step 2.1, determine the total mass of DNA in your sample. Calculate the mass of Digestion Control you should add to your sample. Aim for to spike in the Digestion Control at a level of 0.5% w/w. An example calculation is given below as a guide. Total mass of sample DNA = 1 μg Mass of Digestion Control required = 0.5% w/w = 1 μg x 0.5% = 5 ng Volume of Digestion Control (5 ng/μL) to add to your sample = 1 μL 2.4.Add the required volume of Digestion Control to your sample. 2.5.Mix well by vortexing. Centrifuge briefly. 2.6.Take sample forward for processing through the TrueMethyl™ workflow. PROTOCOLS 13 Step 3: DNA Oxidation Important points before starting: • It is assumed the input sample for the oxidation reaction to be an NGS adapted (but not PCR amplified) library. Performing the oxidation and bisulfite conversion renders the DNA single stranded. Performing these reactions prior to library construction will result in a failure to adapt fragments. We recommend making the library prior to performing the TrueMethyl™ workflow. • If you intend to include the CEGX™ Sequencing spike-in controls into your sample, please note this must be done before NGS adaption otherwise they will not be represented in your sequence dataset. • The Oxidant Solution supplied in the TrueMethyl™ 6 Kit should be dark red in colour. Any other colour indicates degradation of the oxidant. Appendix 2 gives an example of what the functional Oxidant Solution should look like. If on receipt of the kit you notice that this solution is discoloured or has significant amounts of black insoluble precipitate, please do not use the solution and contact CEGX™ ([email protected]). • Dilution of the Oxidant Solution in the oxidation reaction will afford an orange/red solution. If the colour of the diluted oxidant turns any colour other than orange/red, then discard and repeat the dilution. • Only use the Ultra Pure Water supplied in the TrueMethyl™ 6 kit. Other water (e.g. RNAse-free water containing DEPC) can contain molecules that react with the oxidant. This should be avoided as this can cause the DNA oxidation to fail. • The BioRad® P6 Micro-Bio Polyacrylamide Spin columns are shipped in sodium azide and SSC buffer. It is essential to wash these columns, as outlined in the procedure, to remove these compounds prior to use in the workflow. • All centrifugation steps are quoted 1000 x g not RPM. For correct and efficient operation, preparation of filters and columns must be performed as described in this document. • Since RCF depends on the radius of the microcentrifuge rotor as well as speed (RPM), you will need to calculate the speed at which your microcentrifuge generates an RCF of 1000 x g (unless you are able to set the RCF directly on the microcentrifuge). • Use the following formula to convert RPM to RCF: Equation: RCF = 1.12*r*(speed/1000)2 Where RCF = centrifugal force (x g); r = rotor radius (mm); speed = rotor speed (RPM) Example calculation: 1000 g = 1.12*73mm*(speed/1000)2 = 81.76*(speed/1000)2 speed/1000 = √(1000/81.76) speed = 3500 RPM 14 www.cegx.co.uk | [email protected] | [email protected] Procedure oxBS-seq workflow BS-seq workflow (processed through MOCK oxidation) IMPORTANT: Ensure that the DNA input into the oxBS-seq workflow is free from ethanol and was eluted from the last purification or concentration step in Ultra Pure Water. Failure to do so will cause the oxidation to fail. Please use the Ultra Pure Water supplied in the TrueMethyl™ kit for all steps involving the oxidant. NOTE: Only DNA to be processed through the oxBS-seq workflow needs to be buffer exchanged using the BioRad® P6 Micro-Bio Spin column. DNA samples to be processed through the BS-only workflow can be used directly in the mock-oxidation without prior buffer exchange. NOTE: This protocol is compatible for sample whose input masses of DNA are with the range 0.4 – 1.0 μg. The starting concentration of DNA should be 20 - 50 ng/μL and no more than 20 μL of dsDNA should be added to the column used in the Buffer Exchange step. oxBS workflow ONLY: 3.1.Prepare the BioRad® P6 Micro-Bio spin column. 3.1.1. R esuspend the column matrix by flicking the column. Briefly centrifuge at 1000 x g to settle matrix. 3.1.2. R emove the top cap and then snap off the bottom tip, place the column into the new 2.0 mL wash tube. 3.2. Centrifuge column 1000 x g for 120 seconds to pack the column and remove residual buffer. Discard flow through. 3.3. Wash the column. To the packed column, add 500 μL Ultra Pure Water provided in the kit. Centrifuge column 1000 x g for 60 seconds. Discard the flow through. 3.4. Repeat step 3.3 three more times. Each time, discard the flow through. For the final Ultra Pure Water wash, centrifuge the column for 120 seconds. Discard flow through and place column into a new collection tube ready for elution of the sample DNA. 3.5. Add the sample DNA to the washed column. The starting concentration of DNA should be 20 - 50 ng/μL and no more than 20 μL of dsDNA should be added to the column, otherwise the sample will be too dilute for subsequent steps. Centrifuge at 1000 x g for 120 seconds, retain the column eluate, this should be approximately 22 μL (maximum 25 μL). PROTOCOLS IMPORTANT: Ensure a 2.0 mL wash tube is used, otherwise the volume of buffer displaced from the column will fill the tube too full and prevent the correct preparation of the spin column gel bed. This will lead to dilution or complete loss of DNA template. 15 oxBS workflow AND BS-only workflow: 3.5.Thaw Oxidant Solution. Take the Oxidant Solution out of the freezer and thaw on ice. 3.6.Denature dsDNA. In a new 0.2 mL microcentrifuge tube, add the buffer exchanged dsDNA sample, Denaturation Solution and Ultra Pure Water according to Table 3 below. Mix briefly by vortexing and centrifuge briefly. Table 3. dsDNA denaturation mix Volume per reaction (μL) Component Buffer exchanged dsDNA from step 3.4 dsDNA sample Denaturing Solution Ultra Pure Water TOTAL volume oxBS-seq BS-seq 22.75 (max) - - 22.75 (max) 1.25 1.25 Variable* Variable* 24 24 3.7.Place the 0.2 mL tube containing the DNA denaturing mix in a PCR thermocylcer and incubate the DNA denaturing solution at 37°C for 30 minutes. Place on ice after denaturation and proceed immediately to next step. Note: At this point, the denatured DNA should be taken forward to the oxidation reaction immediately. Do not store the denatured DNA before using the DNA in the oxidation reaction. The oxidation solution does not oxidise dsDNA, any re-annealing will affect the 5hmC conversion rate. 3.8. Oxidation reaction. Prepare the solutions shown in Table 4 below. Mix the reaction by briefly vortexing, centrifuge briefly and place the reactions in a PCR thermocycler. Table 4. Oxidation Reaction mixes Volume per reaction (μL) Component oxBS-seq BS-seq Denatured DNA from step 3.7 24 24 Oxidant solution 1 - Ultra Pure Water - 1 25 25 TOTAL volume 3.9.Incubate the oxidation reaction mix at 40 °C for 30 minutes. 16 www.cegx.co.uk | [email protected] | [email protected] IMPORTANT: The colour of the oxidation reaction is indicative of a successful oxidation. The solution should remain orange after the 30 minute incubation. Any other colour (green, brown/black) observed implies reaction of the oxidant with traces of other compounds in the oxidation solution (e.g. Tris, ethanol or DEPC etc.). 3.10. C entrifuge mixes at 14000 x g for 10 minutes to pellet any black precipitate. If the supernatant remains orange, there is an excess of oxidant remaining and oxidation has completed. 3.11. D ecant the supernatant and use in subsequent steps of the protocol. Take care not to carry any precipitate over as this could inhibit downstream steps. 3.12. Proceed immediately to the next step. PROTOCOLS IMPORTANT: If the solution turns any colour other than orange, it is a sign that the oxidation reaction is compromised. This may lead to incomplete conversion of hmC -> U and variability in your results. To avoid this, ensure only Ultra Pure Water provided with the TrueMethyl™ kit is used in steps containing the oxidant and consider re-purification of your sample taking all practicable steps to remove contaminants from the starting DNA sample solution (see Table 1 for details). 17 Step 4: Bisulfite Conversion Important points before starting: • Each aliquot of Bisulfite Reagent is sufficient for 4 conversion reactions (i.e. 2 oxBS-seq reactions plus 2 BS-seq reactions). • Perform all centrifugation steps at room temperature. • Dissolve the Bisulfite Reagent using the Bisulfite Diluent provided ONLY. Ensure that the Bisulfite Reagent is fully dissolved before using in the workflow. Do not dissolve the Bisulfite Reagent with Ultra Pure Water. This will result in an incorrect solution pH resulting in poor DNA recoveries. Procedure oxBS-seq workflow BS-seq workflow Bisulfite DNA conversion: 4.1.Prepare Bisulfite Reagent Solution. Dissolve the required number of Bisulfite Reagent aliquots by adding 700 μL Bisulfite Diluent to each aliquot. Incubate the solution at 60 °C for 15 minutes. Vortex until the Bisulfite Mix is completely dissolved. NOTE: Do not place the Bisulfite Reagent solution on ice. 4.2.Equilibrate the oxidised samples from step 3.12 to room temperature. 4.3.Bisulfite conversion reactions. Prepare the bisulfite conversion reaction mix in the same 0.2mL PCR tubes according to Table 5. Add each component in the order listed. Table 5. Bisulfite Conversion Reaction Mix Component Volume per reaction (μL) DNA solution (from step 3.11) 25 Bisulfite Reagent Solution 170 Bisulfite Additive 5 TOTAL volume 200 4.4.Close the PCR tubes and vortex the bisulfite conversion reaction mix thoroughly to mix. Briefly centrifuge tubes. 4.5.Place the 0.2 mL tube containing the Bisulfite Conversion Reaction Mix into a thermocycler. Perform the bisulfite DNA conversion using the thermal profile shown in Table 6. The complete cycle should take approximately 8 hours to complete. This step may be performed overnight if necessary. 18 www.cegx.co.uk | [email protected] | [email protected] Table 6. Bisulfite conversion thermal cycler conditions Step Denaturation Incubation Denaturation Incubation Denaturation Incubation Denaturation Incubation Denaturation Incubation Denaturation Incubation Hold Time Temperature 5 minutes 95 °C 20 minutes 60 °C 5 minutes 95 °C 40 minutes 60 °C 5 minutes 95 °C 165 minutes 60 °C 5 minutes 95 °C 20 minutes 60 °C 5 minutes 95 °C 40 minutes 60 °C 5 minutes 95 °C 165 minutes 60 °C Indefinite 20 °C Note: If using a thermal cycler that does not allow you to enter the reaction volume (200 μL), set the instrument to the largest volume setting available IMPORTANT: Since the bisulfite reaction is not overlaid with mineral oil, only thermal cyclers with heated lids are suitable for this procedure. Converted DNA can be left in the thermal cycler at 20 °C hold without any loss of performance. 4.8.Transfer the 500 μL total volume (190 μL sample plus 310 μL Desulfonation Buffer) to an Amicon® filter and place the Amicon® filter into a new Amicon® collection tube as shown in Figure 3 below. Figure 3. Using Amicon® filters to clean-up the bisulfite reactions Amicon® filter 1.5 mL Amicon® collection tube Add solution to Amicon® (500 uL max) Centrifuge 14000 xg 5 mins Retentate PROTOCOLS Clean-up of bisulfite converted DNA: 4.6.Centrifuge to pellet precipitates: Once the bisulfite conversion is complete, centrifuge the PCR tubes containing the bisulfite reactions at 14000 x g for 10 minutes. This will pellet any precipitated salts accumulated during the bisulfite incubation. Without disturbing the pellet, remove 190 μL of the supernatant and transfer to a new 1.5 mL microcentrifuge tube 4.7.Desulfonation: Add 310 μL Desulfonation Buffer to each sample. Mix the solutions by vortexing and then centrifuge briefly. Eluate 19 Note: Take care not to touch the filter with the pipette tip as this could damage the filter membrane and affect the diafiltration performance. 4.9.Place the filled Amicon® filter and collection tube in bench-top microcentrifuge. Centrifuge for 5 minutes at 14000 x g. Discard the eluate. 4.10.Add 450 μL of Desulfonation Buffer to the retentate of step 4.9. Centrifuge for 5 minutes at 14000 x g. Discard eluate. 4.11.Add 450 μL of Desulfonation Buffer to the retentate of step 4.10. Incubate for 5 minutes at RT. 4.12.Centrifuge for 5 minutes at 14000 x g. Discard eluate. 4.13.Wash: Add 450 μL of Wash Buffer to the retentate of step 4.12. Centrifuge for 5 minutes at 14000 x g. Discard eluate. 4.14.Add 450 μL of Wash Buffer to the retentate of step 4.13. Centrifuge for 5 minutes at 14000 x g. Discard eluate. 4.15.Add 450 μL of Wash Buffer to the retentate of step 4.14. Centrifuge for 10 minutes at 14000 x g. Discard eluate. 4.16.Collect: Invert the Amicon® filter into a new 1.5 mL Amicon® collection tube as shown in Figure 4. Figure 4. Recovery of final converted template from Amicon® filter Invert Amicon® (into new collection tube) Centrifuge 2000 xg 2 mins Retain final eluate 4.17.Collect the retentate by centrifuging the inverted Amicon® filter at 2000 x g for 2 minutes. 4.18.Retain the final eluate. This contains the bisulfite-converted sample. SAFE STOPPING POINT: If the purified DNA is to be stored up for 24 hours, we recommend storage at 2-8°C. For long term storage, freeze at -20°C. 20 www.cegx.co.uk | [email protected] | [email protected] Step 5: Interrogation of Digestion Control (Optional) Note: The TrueMethyl™ kit does not contain the Taq1 enzyme or DNA polymerase needed to interrogate this control. These components are user supplied. The Digestion Control template and PCR primers needed to amplify this control are included in the kit should you choose to use them. Overview The purpose of this section is to provide instructions on the interrogation of the digestion control in the TrueMethyl™ workflow. The digestion control allows the qualitative assessment of 5hmC oxidation and bisulfite conversion prior to committing samples to sequencing. The digestion control contains a Taq1 restriction site (5’TCGA3’). The cytosine within this motif in the digestion control is 5-hydroxymethycytosine. Complete conversion of this base to uracil during the TrueMethyl™ process will render the motif resistant to Taq1 digestion (see Table 7). The motif will digest following incomplete conversion or an oxBS-seq failure. Qualitative analysis by gel electrophoresis demonstrates the extent of conversion and provides a decision point (albeit qualitative) on whether the converted samples are suitable for sequencing or whether the oxidative bisulfite conversion should be repeated. Table 7: Querying the Digestion Control Complete Incomplete Fail Resulting Motifs (post PCR) Control digested oxBS-seq TTGA No BS-seq TCGA Yes oxBS-seq TTGA, TCGA Partial BS-seq TCGA Yes oxBS-seq TCGA Yes BS-seq TCGA Yes It is assumed that the Digestion Control has been spiked-into the sample as described in Step 2. PROTOCOLS Conversion 21 Procedure oxBS-seq workflow BS-seq workflow Amplification of the Digestion Control 5.1.Amplify out the processed Digestion Control from the template recovered from the TrueMethyl™ workflow (post bisulfite, pre-PCR). 5.2.Prepare the PCR reaction mix shown in Table 8. Table 8: Digestion Control PCR mix Volume (μL) Component Ultra Pure Water 39 10X polymerase buffer 5 10 mM dNTP mix (user supplied) 2 Digestion Control Fwd PCR primer Q3PB (100 uM) 0.5 Digestion Control Rev PCR primer Q8 (100 uM) 0.5 DNA (from step 4.17) 2 DNA polymerase (e.g. Agilent® Pfu Cx Turbo, user supplied) 5U TOTAL volume 50 5.3.Amplify according to the thermocycling conditions outlined in Table 9. Table 9: Digestion Control Thermocycling conditions Number Segment of cycles 1 2 3 1 40X 1 Temperature Duration 95 °C 120 s 95 °C 30 s 60 °C 30 s 72 °C 15 s 4 °C Forever 5.4.Clean-up the amplicons using PCR purification kit (e.g. Thermo Scientific GeneJet™, user supplied). 5.5.Determine concentration of the amplicon (e.g.Qubit®). 22 www.cegx.co.uk | [email protected] | [email protected] aq1 digestion of the Digestion Control amplicon T Treat the amplicon (100 bp) recovered from step 5.5 with Taq1. The extent of digestion correlates with the level of oxidation and bisulfite conversion achieved during the oxBS workflow. 5.6.Prepare the following digestion reaction mixes outlined in Table 10. Table 10: Taq1 digestion conditions Volume (μL) Component Digestion Control Digestion – ve Control Cutting Control 10X Taq1 buffer 2 2 2 Taq1 RE (20 U/ μL) 40U - 40U BSA 0.2 0.2 0.2 Processed Digestion Control amplicon DNA (10 ng/μL) 10 10 - Cutting Control DNA (20 ng/μL) - - 5 Ultra Pure Water 5.8 7.8 10.8 TOTAL volume 20 20 20 Digestion Control: Digestion of this control will allow qualitative determination of the extent of success of the oxidation and bisulfite conversion. Cutting Control: Digestion of the Cutting Control will act as a positive control for the Taq1 digestion, and be useful for comparison purposes when evaluating the extent of C -> U conversion in your Digestion Control. 5.7.Incubate Taq1 digestion mixes and controls for 18 hrs at 65 °C. 5.8.Denature samples at 80 °C for 20 minutes. 5.9.Run digestion mixes on 2% agarose gel or other gel electrophoresis system. 5.10.Based on the extent of Taq1 digestion observed (see Table 7), make a decision on whether to proceed and sequence the sample or to stop and repeat the oxBS conversion. If digested, the 100 bp Digestion Control will cut to yield two bands of approxiamtely 40 and 60 bp. PROTOCOLS Negative Control: Use a no-Taq1 digestion mix as a negative control. 23 Step 6: PCR Amplification In order to sequence the oxidised and bisulfite converted DNA, amplification must be performed to enrich for NGS adapted bisulfite converted DNA. Important points before starting: • Failure to centrifuge the reactions after bisulfite conversion (as described in step 4.6) will cause contaminants to be carried over into the PCR leading to suboptimal amplification. • Correct treatment of the sample (as described in step 4.6) allows up to a maximum of 10 μL of template to be added to a 50 μL PCR reaction. Procedure oxBS-seq workflow BS-seq workflow 6.1.Thaw reagents on ice (5X TrueMethyl™ polymerase buffer, 10 mM dNTPs, PCR primers). Mix by vortexing and centrifuge briefly. 6.2.Into a 0.2 mL PCR tube, prepare the mix outlined in Table 11. Note: Add the reagents in order. Before adding the TrueMethyl™ DNA polymerase, mix the solution by vortexing and then centrifuge. Add TrueMethyl™ DNA polymerase and mix by pipetting only. 6.3.Place the PCR reaction in a PCR thermal cycler and amplify the DNA using the thermal cycling regime outlined in Table 12. 6.4.PCR cleanup and quantification (NGS platform specific - follow appropriate protocol). 24 www.cegx.co.uk | [email protected] | [email protected] Table 11: PCR reaction composition Component Volume (μL) Ultra Pure Water 31.5 5X TrueMethyl™ polymerase Buffer 10 10 mM dNTP 1 PCR primers (10 uM)* 2 Bisulfite converted DNA from step 4.17 5 TrueMethyl DNA polymerase (2U/μL) 0.5 TOTAL volume 50 ™ *User supplied, NGS library specific Number Segment of cycles 1 1 2 15X 3 1 Temperature Duration 95 °C 120 s 95 °C 30 s 60 °C 20 s 72 °C 45 s 4 °C Forever NOTE: the number of PCR cycles can be lowered if desired, but this would require empirical verification and would be sample, concentration and application specific. The values above have been verified on a 400 ng input of a neutral GC sample into the TrueMethyl™ workflow. PROTOCOLS Table 12: Thermal cycling conditions for amplification of TrueMethyl™ treated DNA 25 Appendix 1. Troubleshooting Guide Below are outlined a list potential problems and suggested corrective actions that could affect samples processed through the TrueMethyl™ workflow. Please use this as a guide to troubleshoot any problems encountered. If for any reason none of the examples below adequately describe the issue observed, please contact [email protected] for additional technical support. Problem Oxidation goes green Low conversion rate Little or no PCR product for digestion control Reason Solution DNA sample contamination (see Table 1) Repeat experiment and make sure to go through the exact DNA purification procedure (see Appendix 3) DNA not denatured properly Ensure NaOH solution is correct and denaturation mix is vortexed. Consider mixing adapted library with non-adapted carrier DNA to minimise annealing Oxidation failed Ensure the oxidant has not precipitated and is red/ orange or that no precipitates are carried into downstream steps from the oxidation reaction Bisulfite failed The bisulfite incubation was not long enough or the bisulfite reagent was prepared incorrectly Gross loss of template Incorrect purification for either oxidation or bisulfite Digestion control spiked-in at too low a concentration Increase concentration of spike-in DNA polymerase not uracil tolerant Repeat amplification with uracil-tolerant DNA polymerase Use of incorrect columns for pre-oxidation buffer exchange. Little or no PCR product for whole genome library Gross loss of template Bisulfite solution incorrect pH. Ensure solution was prepared using Bisulfite Diluent and not Ultra Pure Water DNA polymerase not uracil tolerant 26 Incorrect purification post-bisulfite workflows. Ensure correct usage of Amicon® filters. Take care not to rupture the filter membrane. Repeat amplification with uracil-tolerant DNA polymerase www.cegx.co.uk | [email protected] | [email protected] Appendix 2. Oxidant colour changes Figure 5: Expected oxidant solution colour changes Please inspect the Oxidant solution on receipt of the kit. If the colour of the thawed Oxidant solution does not resemble solution A in the figure above, or there are visible black precipitates in the solution, please contact [email protected] for usage advice. If the Oxidant solution looks dark yellow with considerable amounts of black precipitate, it is a sign that the reagent has become exposed to CO2. If you suspect that this has occurred, please do not use the Oxidant solution and contact CEGX™ for advice ([email protected]). Following the oxidation reaction, if the colour of the solution has turned from the light orange (solution C) to green or black, this is a sign of contaminating alcohols in the reaction buffer. These are likely carried over from the NGS library preparation workflow or from common DNA purification methods (ethanol precipitation, phenol/chloroform extraction, column purification). If the post oxidation colour looks like solution D, it is suggestive of partial decomposition of the oxidant, and the oxidation of your DNA samples is likely to be OK. However, if the post oxidation colour looks like solution E, it is likely that the oxidant has been completely consumed by side reaction with the contaminating species. In this circumstance, it is likely that DNA oxidation will be sub-optimal. We would recommend repurification of the DNA sample using the prescriptive AmpureXP® protocol compatible with the TrueMethyl™ workflow outlined in Appendix 3 and then repeat the oxidative conversion. APPENDICES A) Oxidant solution stock concentration supplied by CEGX™. B) 10-fold dilution of the Oxidant solution in alkaline solution. C) Working oxidant concentration (WOC). D) 5:1 molar excess of WOC:ethanol. E) 20:1 molar excess of ethanol:WOC. 27 Appendix 3. TrueMethyl™ optimised AmpureXP® clean-up protocol In addition to the pre-oxidation buffer exchange steps outlined in this TrueMethyl™ 6 User Guide, below is a prescriptive AmpureXP® clean-up protocol that is compatible with the downstream steps. If you have legacy samples whose buffer composition you are unsure of, or if your final NGS library clean-up was performed using Si-membrane precipitation (e.g. Thermo® Genejet etc), CEGX™ recommends processing your samples through the following additional AmpureXP® cleanup to ensure buffer compatibility with the oxidation reagent. CEGX™ Specific AmpureXP® protocol: 1. In a 1.5 mL microcentrifuge tube, add AmpureXP® to your gDNA sample as outlined in Table 13: Table 13: CEGX™-specific AmpureXP® conditions Component NGS adapted sample Volume (μL) 20 Ultra Pure Water 30 AmpureXP® bead solution 100 TOTAL volume 200 2. Incubate solution for 5 minutes at RT. 3. M agnetize for 10 minutes or until supernatant has cleared. Keep tube on magnet rack. 4. W ithdraw and discard the cleared AmpureXP® supernatant. The DNA will remain adsorbed to the surface of the magnetized bead pellet. 5. W hilst still on the magnetic rack, wash with 1 mL 80% Acetonitrile (80% HPLC grade Acetonitrile + 20 % Ultra Pure water), try not to disturb pellet. IMPORTANT: Do not use 80% ethanol for the wash steps. Equivalent recoveries are obtained by using Acetonitrile in place of ethanol. The oxidation reaction can tolerate Acetonitrile to concentration ~1M. NOTE: The volume of the wash steps is key to diluting out contaminants. Do not deviate from using 1 mL volume washes. 6. D iscard supernatant. 7. W ash with a second 1 mL 80% Acetonitrile, try not to disturb pellet. Keep tube on the 28 www.cegx.co.uk | [email protected] | [email protected] APPENDICES magnetic rack. 8. R emove carriage return. Air-dry the washed AmpureXP® bead pellet. Do not worry if the pellet cracks. The important thing is to allow time for all of the Acetonitrile to evaporate. This should take no longer than 5 minutes. Acetonitrile is more volatile than ethanol. 9. T he AmpureXP® pellet should look cracked and completely dry. 10. W ith the tube still on the magnetic rack, add 20 uL ULTRA PURE WATER from the oxBS kit to elute the DNA from the beads. Remove the tube from the magnet and completely re-suspend the AmpureXP® pellet with the water solvent by pipetting. 11. Place the tube back on the magnetic rack and allow the AmpureXP® beads to pellet until the solution has cleared. 12. Remove and retain the supernatant. Use this eluate as the input to the TrueMethyl™ workflow. 29 Appendix 4. Recommendations for low inputs masses (200 ng or less) For input masses lower than 200 ng, we recommend spiking your library of interest into a carrier DNA background (~1 ug). This helps to minimise sample losses associated with sample transfer techniques and adsorption of DNA onto filter membranes and spin column matrices. 1. Start with an NGS adapted sample (<200 ng, e.g. 10 uL of 20 ng/uL). It is assumed that this sample contains the CEGX™ Sequencing spike-in controls. 2. Prepare 100 uL of a 200 ng/uL solution of salmon sperm gDNA (User supplied, e.g. Invitrogen Catalogue No. 15632-011). Make the dilution with Ultra Pure Water. 3. Spike the NGS adapted sample into the salmon sperm gDNA background as shown in Table 14: Table 14: Carrier DNA spike-in for low concentration samples Component Volume (μL) NGS adapted library (e.g. 20 ng/uL) 10 Carrier gDNA 200 ng/uL (e.g. salmon sperm gDNA) 5 Ultra Pure Water TOTAL volume to 20 uL 20 4. Vortex solution briefly to mix and centrifuge. 5. Process this mix through the oxBS-seq or BS-seq workflows as appropriate. 6. The final library can be specifically amplified from the carrier gDNA background by using the appropriate set of NGS-specific PCR primers. 30 www.cegx.co.uk | [email protected] | [email protected] Appendix 5. Spike-in control sequences Sequencing spike-in control duplex = SQ6hmC FWD:5’pTA5GATCA1GGCGAAT11GAT5GAATCAGT5AAGCG5TTTA1GAAGTG1GA5AGC1TTAG 3’ REV:5’p5TAAGG1TGT5GCACTT1GTAAAGCG1TTGA5TGATT5GAT1GGATTCG51GTGAT1GTA 3’ Sequencing spike-in control duplex = SQ3hmC FWD:5’pTA5GATCA5GGCGAAT51GAT5GAATC5TTGTAGCG5TTTA1GAAGTGCGA5AGC1TTAG 3’ REV:5’p5TAAGGCTGT5GCACTT1GTAAAGCG5TA5AAGGATT5GAT1GGATTCG51GTGAT5GTA 3’ Sequencing spike-in control duplex = SQ1hmC FWD:5’pTA5GATCA5GGCGAAT5CGAT5GAATCA5AGTGGCG5TTTA1GAAGTGCGA5AGC5TTAG 3’ REV:5’p5TAAGGCTGT5GCACTT5GTAAAGCG55A5TGTGATT5GAT1GGATTCG5CGTGAT5GTA 3’ Sequencing spike-in control duplex = SQC FWD:5’pTACGATCACGGCGAATCCGATCGAATC5AGAT5GCGCTTTACGAAGTGCGACAGCCTTAG 3’ REV:5’pCTAAGGCTGTCGCACTTCGTAAAGCGCGAT5TGGATTCGATCGGATTCGCCGTGATCGTA 3’ Sequencing spike-in control duplex = SQmC FWD:5’pTA5GAT5A5GG5GAAT55GAT5GAAT5TAG5TTG5G5TTTA5GAAGTG5GA5AG55TTAG 3’ REV:5’p5TAAGG5TGT5G5A5TT5GTAAAG5G5AAG5TAGATT5GAT5GGATT5G55GTGAT5GTA 3’ Sequencing spike-in control duplex = SQfC FWD:5’pTACGATCA3GGCGAATCCGATCGAATCGTTT5GGCGCTTTACGAAGTGCGACAGCCTTAG 3’ REV:5’pCTAAGGCTGT3GCACTTCGTAAAGCGC5GAAA5GATTCGATCGGATTCGCCGTGATCGTA 3’ FWD:5’5T5A5CCA5AAC5A5AAA5ATA5GATCA5GGCGAAT5CGAT1GAATCAGTT55GCG5TTT ACGAAGTGCGA5AGC5TTAGTGATGTGATGGGTGGTATGG 3’ REV:5’55ATAC5A5C5AT5ACAT5A5TAAGGCTGT5GCACTT5GTAAAGCG5GGAA5TGATTCGA TCGGATTCG5CGTGAT5GTATGTTTGTGGTTGTGGGTGAG 3’ Cutting control duplex = CC_100 FWD:5’pCTCACCCACAACCACAAACATACGATCACGGCGAATCCGATCGAATCAGTTCCGCGCTT TACGAAGTGCGACAGCCTTAGTGATGTGATGGGTGGTATGG 3’ REV:5’pCCATACCACCCATCACATCACTAAGGCTGTCGCACTTCGTAAAGCGCGGAACTGATTCG ATCGGATTCGCCGTGATCGTATGTTTGTGGTTGTGGGTGAG 3’ Key: 1 = 5hmC; 3 = 5fC; 5 = 5mC; p = phosphorylation APPENDICES Digestion control duplex = DC_100 31 Trademarks: TrueMethyl™, CEGX™ (Cambridge Epigenetix Limited); Millipore®, Amicon® (EMD Millipore Corporation); Bio-Rad®, Micro Bio-Spin® (Bio-Rad Laboratories, Inc.); Agencourt®, AMPure® (Beckman Coulter, Inc); Invitrogen™, Qubit® (Life Technologies Corporation), GeneJet™ (Thermo Scientific), QIAquick® (Qiagen), New England Biolabs (NEB®), Eppendorf®. Use of this product signifies the agreement of any customer, purchaser or user of the product (“Customer”) to the Terms and Conditions of Sale of Cambridge Epigenetix Limited available at http://www.cambridge-epigenetix.com/en_US/about-us/terms-conditions and upon request. Permitted Use: Cambridge Epigenetix Limited products are sold for use by Customer (and its employees, agents and contractors) for research or laboratory use only and are NOT to be used on humans or for clinical diagnostic or drug purposes. The appropriate regulatory agencies in the UK, USA and other countries have not approved the products for such purposes. Products must be used in line with the product Specification and Handbook and any other applicable manuals and written instructions provided and/or published by CEGX™. Customers are responsible for ensuring that their use of our products conforms to all applicable laws, regulations and government policies. Any use of products for diagnostic or therapeutic purposes, or any purchase of products for resale or distribution (alone or as a component), requires a separate grant of use from CEGX™. Prohibited Use: Customer (and its employees, agents and contractors) shall NOT dispose of the products, offer the products for resale, use the products to provide a commercial service in return for financial remuneration or otherwise distribute or transfer the products to any third party for any purpose, except as expressly set out in the Terms and Conditions of Sale. None of the products sold by CEGX™ are intended for human or animal consumption unless otherwise clearly stated, and are not for use in the preparation of medicine or food without prior approval. Cambridge Epigenetix www.cegx.co.uk [email protected] [email protected] © 2013 Cambridge Epigenetix Ltd