1
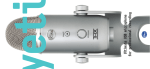
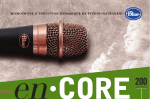
pro
for Professional Recording
Ultimate USB & XLR Microphone
et
3
desktop or studio,
the possibilities are endless.
Congratulations on your purchase of Yeti Pro, the first microphone to combine the exceptional detail of 192kHz/24
bit USB audio recording with the ability to output to traditional analog audio equipment. Yeti Pro is the ultimate
tool for creating amazing recordings, no matter what the sound source, environment, or destination. Yeti Pro
features Blue’s innovative triple capsule array, allowing for recording in stereo or your choice of three unique
patterns, including cardioid, omnidirectional, and bidirectional, giving you recording capabilities typically requiring
multiple microphones. The Yeti Pro can connect to any analog equipment with a phantom powered XLR connection,
or directly to your computer via USB, eliminating the need for any additional audio interface equipment.
For digital recording, Yeti Pro utilizes a high quality 192kHz/24-bit analog-to-digital converter to send
remarkable audio fidelity directly into your computer, while a built-in headphone amplifier provides for zerolatency monitoring. Simple controls for headphone volume, pattern selection, instantaneous mute, and microphone
gain are located directly on the microphone so you are always in control of your recording. Yeti Pro’s next generation
design provides incredibly low distortion, high fidelity, and balanced frequency response.
Getting to know your Yeti P RO
4
Triple Capsule Array • Three condenser capsules in an innovative configuration to enable great recordings in most
any situation.
Multiple pattern selection • You can quickly select from each of Yeti’s four pattern settings (stereo, cardioid,
omnidirectional, bidirectional) by simply rotating the pattern selector knob. See pages 21–26 for more details and
pattern suggestions.
Microphone gain • Use this knob to control the gain (sensitivity) of Yeti Pro’s microphone elements. When
recording in USB mode, begin recording with this knob centered. If you are experiencing digital distortion with a very
loud sound source, simply decrease the gain counterclockwise. If you desire higher sensitivity, simply increase the gain
by turning clockwise.
When recording using the analog outputs, we recommend the microphone gain on the Yeti Pro to be turned to zero, or
all the way counterclockwise. If more gain is desired you can rotate the knob clockwise to increase the microphone’s
5
sensitivity. However, in analog mode, Blue recommends making gain adjustments in your preamplifier or interface
equipment to minimize the chance of distortion.
Blue logo • The Blue logo indicates the front of the microphone.
Set screws • Turn each of these knobs clockwise to tighten and secure the microphone at the desired angle. To
remove the microphone from the included desk stand, simply unscrew both set screws entirely while supporting
the microphone with your hand. Carefully remove the Yeti Pro microphone by lifting directly up and out of the
desk stand.
Mute button/status light • Press this button to mute the output from the microphone. When the mute button is flashing,
the microphone is muted and no signal will be sent to the computer. To end microphone muting, simply press the button
again. The status light will illuminate solid during normal operation to indicate proper function.
NOTE: The mute button is not functional when using the Yeti Pro in analog mode.
7
6
NOTE: Headphone output and volume control is not functional when using the microphone
in analog mode due to the insufficient power provided by XLR interfaces.
Headphone volume control • Control the volume of Yeti Pro’s headphone output by adjusting the volume knob — no need
to click through software menus to find the right headphone volume. Yeti Pro’s headphone volume control is a digital volume
control, so most operating systems will remember the volume position from previous use.
Headphone output • Yeti Pro includes a standard 1/8" (3.5mm) headphone jack for monitoring and playback.
You can use Yeti Pro’s headphone output to monitor your microphone recording in real-time, without latency delays.
Or, use the Yeti Pro’s headphone amplifier to play back music, movies, or tracks from your computer with the
incredible fidelity and detail provided by Yeti Pro’s dedicated headphone amplifier and high quality digital-to-analog converter.
USB connection • Yeti Pro supports USB audio class 2.0. For proper function, Mac users need to install OS 10.6.4 or
higher, and Windows users will need to download the Yeti Pro driver from www.bluemic.com/yetipro. Yeti Pro connects to your
computer with one simple USB cable. Plug the mini USB (small connector) into the USB port
on Yeti Pro, and plug the other end into an available USB port on your computer. To perform at its best, Yeti Pro should
be plugged directly into a powered USB port, so avoid connecting through USB hubs or other USB multipliers.
5-Pin XLR Connector
• On the bottom of Yeti Pro, you will find a male 5-Pin XLR connector. Plug in the included Y-Cable
to connect Yeti Pro to a standard microphone preamplifier(s) via standard XLR connectors, or use your own 5 pin stereo XLR
cable to connect the Yeti Pro to a stereo preamplifier. Yeti Pro’s included y-cable outputs stereo audio via the left and right XLR
connectors when the mic is in stereo mode. When Yeti Pro is used in the other modes, the mono signal is cloned and output to
left and right XLR connectors.
NOTE: Yeti Pro is not capable of simultaneous analog and digital operation. To ensure
proper operation, only connect the digital (USB) or analog (XLR) connectors
at any given time. In the event Yeti Pro becomes unresponsive, simply unplug
all connections for 10 seconds and re-connect your Yeti Pro with the desired
output cable.
9
8
Standard thread mount • If you would like to mount your Yeti Pro to a standard microphone studio mount, remove Yeti Pro
from the included desk stand and thread the barrel into any standard threaded mount for maximum versatility.
2. Double click the “Yeti Pro USB 2.0 Driver.exe” file.
Getting Started with Yeti Pro (digital USB output)
3. Plug in your Yeti Pro microphone and follow the instructions in the installation wizard to install the Yeti Pro USB
2.0 Driver.
After unpacking your Yeti Pro, rotate the microphone 180 degrees so that the Blue logo and headphone volume control is
facing you. Tighten the set-screws on the left and right of the base after adjusting the microphone for your desired angle.
Connect the Yeti Pro to your computer with the supplied USB cable (avoid plugging Yeti Pro into USB hubs or multipliers — plug
directly into your computer for best performance). See below for installation instructions specific to your operating system:
1. Download the “Yeti Pro USB 2.0 Driver” from www.bluemic.com/yetipro to your computer’s hard drive.
After the Yeti Pro USB 2.0 driver has been successfully installed:
1. Plug the microphone into the USB port on your computer using the provided USB cable.
2. From the Start menu, select the “Control Panel”.
3. From the Control Panel, select the “Sound” icon.
Windows 7 and Windows Vista
Plug in your Yeti Pro Microphone using the provided USB cable, then visit www.bluemic.com/yetipro to download the
appropriate driver for Windows Vista or Windows 7.
4. Select the “Recording” tab. Select the “Yeti Pro Stereo Microphone” from the list.
From this screen, you’ll want to adjust the computer’s internal microphone gain (volume) settings. Select the “Properties”
button, then select the “Levels” tab. As a starting point, set the microphone fader at about 80% of full level. If you decide
10
you want to record something that is very loud, like a drum set, or a band practice, you will want to turn this setting down. If
you are recording something that may be quiet, like an interview with a person who speaks softly, you may want to turn this
setting up.
5. Select the “Playback” tab. Select the “Yeti Pro Stereo Microphone” from the list.
From this screen, you will also want to adjust the computer’s master volume. As a starting point, set the computer’s master
volume to 100%. Once you’ve selected the Yeti Pro as your output device, you can control headphone volume with volume knob
on the front of the Yeti Pro.
Also, from this screen, you will want to adjust the microphone monitoring volume. You can adjust this by moving the fader
labeled “microphone” to the left or to the right.*
*NOTE: The microphone monitoring volume is different than the microphone gain control. The microphone monitoring volume is the amount of sound from the
microphone that is sent to your main computer output. The microphone input volume is the control that determines the amount of sound output from the microphone
that goes into your computer. If the microphone input is distorting, the microphone input volume should be adjusted accordingly.
11
Quick notes on sampling rates:
The sampling rate refers to the resolution at which analog audio is converted into digital data by Yeti Pro’s analog-digital
converter. Higher sampling rates will ‘sample’ and convert the analog signal more often than a lower sampling rate over a
given period of time, more accurately capturing the original sound but creating proportionally more data to be captured by
the computer.
Yeti Pro is capable of sampling rates from 22kHz to 192kHz, allowing for more than four times the resolution of a typical CD
recording (44kHz). Sampling rates should be selected based on the capabilities of your system, the nature of the recording,
and the eventual output for your work. For instance, if your recordings are destined for a CD, you would prefer to record at an
even multiple of the final sampling rate (88.2kHz or 176.4kHz) while recordings that will be digitally compressed will generally
benefit from the highest rate possible. Furthermore, higher sampling rates are most beneficial in capturing the realism of high
frequency, rapid sounds (like cymbals) and enhancing the image of stereo recordings. Keep in mind that high sampling rates
combined with Yeti Pro’s stereo output can create very large data files very quickly, so keep an eye on your hard disk space
and work files.
12
Selecting the Sampling Rate and Bit Depth in Windows Vista and Windows 7
9. Select your desired sample rate from the “Default Format” pull down menu.**
For Output:
For Input:
1. Plug in your Yeti Pro Microphone.
2. Go to your computer’s control panel.
3. From the control panel, select the “Hardware & Sound” option.
4. From the “Hardware & Sound” menu, select the “Sound” icon.
5. From the “Sound” menu, select the “Recording” tab.
13
Important note for users of Skype
or other voice chat applications:
Blue does not recommend using
the Yeti Pro’s Headphone Output to
power external speakers. Doing so
could result in unpleasant feedback
and poor conversation quality. Blue
recommends driving any external
speakers with your computer’s
headphone or speaker-out port.
1. Plug in your Yeti Pro Microphone.
2. Go to your computer’s control panel.
3. From the control panel, select the “Hardware & Sound” option.
4. From the “Hardware & Sound” menu, select the “Sound” icon.
5. From the “Sound” menu, select the “Playback” tab.
6. Select the “Yeti Pro Stereo USB Microphone” from the list of input devices.
6. Select the “Yeti Pro Stereo USB Microphone” from the list of output devices.
7. Click on “Properties”.
7. Click on “Properties”.
8. Select the “Advanced” tab from the “Properties” window.
8. Select the “Advanced” tab from the “Properties” window.
14
9. Select your desired sample rate from the Default Format pull down menu**
**NOTE: Sample Rate settings must be the same for both input and output.
Windows XP
Plug in your Yeti Pro Microphone using the provided USB cable, then visit www.bluemic.com/yetipro to download the
appropriate driver for Windows Vista.
1. Download the “Yeti Pro USB 2.0 Driver” from www.bluemic.com/yetipro to your computer’s hard drive.
2. Double click the “Yeti Pro USB 2.0 Driver.exe” file.
3. Follow the instructions in the installation wizard to install the Yeti Pro USB 2.0 Driver.
After the Yeti Pro USB 2.0 driver has been successfully installed:
1. Plug the microphone into the USB port on your computer using the provided USB cable.
15
2. From the start menu, select the control panel.
3. From the control panel, select the “Sounds and Audio Devices” icon.
4. Select the “Audio” tab.
5. Select “Yeti Pro Stereo Microphone” from the “Sound Playback” pull-down menu.
6. Select the “Volume” button within the “Sound Playback” area.
From this screen, you will want to adjust the microphone monitoring volume.* If there is NOT a visible fader for microphone
output, select “Properties” from the “Options” menu. Make sure that the box labeled “Microphone,” within the “Show the
following volume controls” window, is checked.
*NOTE: The microphone monitoring volume is different than the microphone gain control. The microphone monitoring volume is the amount of sound from the
microphone that is sent to your main computer output. The microphone input volume is the control that determines the amount of sound from the microphone that goes
into your computer. If the microphone input is distorting, the microphone input volume should be adjusted accordingly.
16
From this screen, you will also want to adjust the computer’s Master Volume. As a starting point, set the computer’s master
volume to 100%. Once you’ve selected the Yeti Pro as your output device, you can control headphone volume with volume knob
on the front of the Yeti Pro.
7. Select “Yeti Pro Stereo Microphone” from the Sound Recording pull-down menu.
8. Select the Volume button within the Sound recording area.
From this screen, you’ll want to adjust the computer’s internal microphone gain (volume) settings. As a starting point, set the
microphone fader at about 80%. If you want to record something that is very loud, like a drums or a band practice, you’ll want
to turn this setting down. If you are recording something quiet, you may want to turn this setting up.
Selecting Sample Rates using Windows XP
Selecting samples rates in Windows XP is completely software dependent. Please reference the documentation included in
your recording software for information regarding sample rate selection. The default sample rate for Windows XP is 48 kHz.
17
Apple-Macintosh OSX (10.6.4 or higher)
1. Plug the microphone into your computer’s USB port using the provided USB cable.
2. From the main Apple menu, select the “System Preferences”.
3. Select the “Sound” icon.
4. Now select the Input tab and select “Yeti Pro Stereo Microphone.”
As a starting point, set the Input Volume to about 80%. If you decide you want to record something that is very loud, like a
drums or a band practice, you will want to turn this setting down. If you are recording something that may be quiet, like an
interview with a person who speaks softly, you may want to turn this setting up.
5. Select the output tab and select “Yeti Pro Stereo Microphone”.
6. From this screen, you will want to set the “Output Volume” to 100%. Once you’ve selected the Yeti as your output device,
you can control the headphone volume with the knob on the front of the Yeti Pro.
18
Now that your Yeti Pro is connected, verify that the microphone gain knob is centered, select your desired recording pattern,
and get ready to record.
Selecting Sample Rates on Apple-Macintosh
1. From the Applications menu, select “Utilities”.
2. From the Utilities menu, select “Audio MIDI Setup”.
3. From the Window pull down menu, select “Show Audio Window”.
4. Select ”Yeti Pro USB Microphone” from the column on the left side of the Audio Window.
5. Once you’ve selected “Yeti Pro USB Microphone” from the left side of the Audio Window, select the “Input” tab.
6. From the Input tab, you can select the desired sample rate and bit depth.
7. Select the Output tab, and select your desired output sample rate and bit depth.**
**NOTE: Sample Rate settings must be the same for both input and output.
19
Using Yeti Pro in Analog Mode
Not only can you plug your Yeti Pro directly into your computer to record high fidelity recordings, but you can also plug Yeti
Pro into a phantom power-capable microphone preamplifier and record as you would a standard microphone! To use Yeti Pro
in Analog Mode, you will need to plug the supplied Y-cable into the 5 pin connector at the bottom of the Yeti Pro microphone.
If you are going to use the Yeti Pro in Stereo, you will need two microphone preamplifiers (or a two channel preamp). As with
all other stereo recordings, using matched preamplifiers will provide the best results. The white XLR connector on the Y-cable
carries the left channel signal, and the red XLR connector on the Y-cable carries the right channel signal. If you are recording
in Cardioid, Omnidirectional, or Bidirectional, you’ll only need to plug in the white (left) XLR connector into a preamplifier (both
channels will output the same signal).
Once you’ve plugged the Yeti Pro into your microphone preamplifier(s), set the microphone gain on the microphone to zero.
Once you’re plugged into your preamplifier(s), you’ll want to control the gain with your microphone preamplifier(s) as opposed
to the gain on the Yeti Pro microphone.
recording
20
NOTE: The headphone volume control and instantaneous mute are digital controls and are,
therefore, not functional when using the Yeti Pro in analog mode. Blue recommends
monitoring your recording directly from your preamplifier of choice, for simple,
no-latency monitoring.
Please note that the Yeti Pro does not operate in digital and analog mode simultaneously. To ensure proper operation,
connect only the analog (XLR) or digital (USB) connections at any given time. If Yeti Pro becomes unresponsive, simply unplug all
connections for 10 seconds, and reconnect with your desired output connector.
Pattern
Mode
Pattern
Sound Source/
Setting Symbol
Direction
at
a
glance
21
Recording
Applications
vocals
ensemble choir
instruments
podcasts
voiceovers
vocals
STEREO
So What Can I Do with Yeti Pro?
In short, anything! Remember that there are no rules in recording — only guidelines. If it sounds good, then it is good!
On the following pages we’ve provided suggested uses and a description for each of the recording modes (patterns)
available and how you can use them to get great results, every time. If this all seems a bit much, just remember you
can always try a recording while switching through each of the recording modes to dial in your favorite sound.
modes
CARDIOID
instruments
recording
Pattern
Mode
modes
at
a
glance
Pattern
Sound Source/
Setting Symbol
Direction
22
Recording
Applications
conference calls
field recordings events/orchestras
OMNIDIRECTIONAL
interviews
BIDIRECTIONAL
instruments
vocal duets
Stereo
Description: The Stereo mode is great for capturing a realistic stereo
image. To start, point the microphone at the sound source that you want
to record (the “front” of the microphone is the side of the microphone
with the Blue Microphones Logo). Depending on the instrument and/
or sound that you want to achieve, place the grill of the microphone
anywhere from 2 inches to several feet in front of the sound source. By
centering the sound source, you will get equal amounts of signal in both
the left and right channels. If you want a little more of the signal in the
right channel, move the sound source a little to the right side of the mic
(as if one is behind the microphone), and if you want a little more of the
signal in the left channel, move the sound source to the left (as if you
are behind the microphone). Alternatively, you can record everything as
centered as possible, and easily adjust the position when you’re mixing
the recording. If you want the sound in the right or left channel only, you
should try using the cardioid, bidirectional or the omnidirectional setting,
and use your software to hard-pan the sound to the left or the right.
23
These charts are only a starting point for the sound provided. How the microphone reacts in a particular
application will differ greatly because of many variables, like room acoustics, distance from sound source
(proximity), tuning of instruments, mic cabling and other factors. For more tips on miking and recording
techniques, check out the Blue website.
C a r dioi d
24
O m ni di r e c t io n a l
25
Description: Omnidirectional means that the microphone picks up
sound equally from all directions. This setting is perfect for
recording a group of musicians all playing at the same time, recording
a conversation between multiple parties around a room, a conference
call, or any other situations where you want to capture the ambience
of “being there.” Because sound is picked up from all directions in this
mode, the orientation of the microphone isn’t crucial, but as a good
rule of thumb, start by orienting the front of the microphone at the
primary sound source you wish to record.
Description: Cardioid is the most commonly used mode and can be useful
in most any situation. If you are recording vocals, a podcast, or a voiceover,
cardioid is likely your best choice. When recording in cardioid, sound
directly in front of the microphone is picked up while the sound at the
rear and sides of the microphone is not picked up. Therefore, you will
want to arrange the source directly in front of the microphone. Cardioid
will deliver the most direct, rich sound, but will not offer as much airiness
or presence as the other recording modes.
These charts are only a starting point for the sound provided. How the microphone reacts in a particular
application will differ greatly because of many variables, like room acoustics, distance from sound source
(proximity), tuning of instruments, mic cabling and other factors. For more tips on miking and recording
techniques, check out the Blue website.
B i di r e c t io n a l
26
27
Specifications
Description: Bidirectional means that the microphone picks up
sound at the front and rear of the microphone, while the sounds
to the sides are “rejected”, or not picked up. The bidirectional setting
is very useful in achieving a nuanced, pleasant sound when
recording musical instruments, and is perfect for recording an
interview with two or more guests. By placing the microphone between
two or more subjects (front of microphone facing one source, rear of
microphone facing another), you can achieve a natural sound without
the complexity of using multiple microphones.
Microphone and performance
Power Required/Consumption: 5V 500mA (USB) /
48V DC phantom power (Analog)
Sample Rate: 22kHz to 192kHz
Bit Rate: 24bit
Capsules: 3 Blue-proprietary 14mm condenser capsules
Polar Patterns: Stereo, Cardioid, Bidirectional, Omnidirectional
Frequency Response: 20Hz – 20kHz
Sensitivity: 4.5mV/Pa (1 kHz)
Max SPL: 120dB (THD: 0.5% 1kHz)
Headphone Amplifier
These charts are only a starting point for the sound provided. How the microphone reacts in a particular
application will differ greatly because of many variables, like room acoustics, distance from sound source
(proximity), tuning of instruments, mic cabling and other factors. For more tips on miking and recording
techniques, check out the Blue website.
Impedance: >16 ohms
Power Output (RMS): 130mW
THD: 0.009%
Frequency Response: 15Hz – 22kHz
Signal to Noise: 114dB
Specifications
Dimensions (extended in stand): 4.72" (12cm) x
4.92"(12.5cm) x 11.61"(29.5cm)
Weight (microphone): 1.2lbs (.55kg)
Weight (stand): 2.2lbs (1kg)
Cable: 12" Y-Cable (1 stereo XLR and two monoaural XLR
connectors) and 9-foot shielded USB Cable
System Requirements
PC: Windows 7, Windows Vista, XP Home Edition or
XP Professional (all Windows systems require driver
installation prior to use)
USB 2.0 High Speed; 256 MB RAM (minimum)
Macintosh: Mac OSX (10.6.4 or higher)
USB 2.0 High Speed; 256 MB RAM (minimum)
Warranty
Blue Microphones warrants its hardware product against defects in materials and workmanship for a period of TWO (2) YEARS from the date of original
retail purchase, provided the purchase was made from an authorized Blue Microphones dealer. This warranty is void if the equipment is altered, misused,
mishandled, maladjusted, suffers excessive wear, or is serviced by any parties not authorized by Blue Microphones. The warranty does not include transportation costs incurred because of the need for service unless arranged for in advance. Blue Microphones reserves the right to make changes in design
and improve upon its products without obligation to install these improvements in any of its products previously manufactured. For warranty service or for
a copy of Blue’s Warranty Policy including a complete list of exclusions and limitations, contact Blue at 818-879-5200.
©2011 Blue Microphones. All Rights Reserved. Yeti Pro and Blue Oval Logo are registered trademarks of Blue Microphones. Macintosh is a registered
trademark of Apple, Inc., registered in the US and other countries. Windows, Windows 7, Windows Vista and Windows XP are registered trademarks of
Microsoft, Inc. Skype is a registered trademark of Skype Limited. All rights reserved.
In keeping with our policy of continued product improvement, Baltic Latvian Universal Electronics (BLUE) reserves the right to alter specifications without
prior notice.
Designed in U.S.A. Made in China.
www.bluemic.com