1
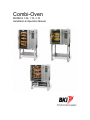
Combi-Oven
MODELS 1.06, 1.10, 2.10
Installation & Operation Manual
Warranty Information
LIMITED ONE YEAR WARRANTY
BKI (The "Company") warrants to the original purchaser that at time of shipment from the
Company factory, this equipment will be free from defect in materials and workmanship. Written
notice of a claim under this warranty must be received by the Company within ONE YEAR from
the date of installation, but no longer than ONE YEAR AND THREE MONTHS from date of
shipment from the factory. Defective conditions caused by abnormal use or misuse, lack of or
improper maintenance, damage by third parties, alterations by unauthorized personnel, acts of
God, failure to follow installation and/or operating instructions, or any other events beyond the
reasonable control of the Company will NOT be covered under this warranty. The obligation of
the Company under this warranty shall be limited to repairing or replacing (at the option of the
Company) any part, with the exception of lamps, fuses, and glass (which are not covered under
warranty), which is found defective in the reasonable opinion of the Company. Any part found
defective by the Company will be repaired or replaced without charge F.O.B. factory,
Simpsonville, South Carolina or F.O.B. authorized BKI Distributor. The Company and/or its
authorized representatives will assume the normal replacement labor expense for the defective
part for the period of the warranty as stated above, excluding travel and/or other expenses
incidental to the replacement of the defective part, where replacement work is performed during
standard business hours and not subject to overtime, holiday rates, and/or any additional fees. IN
NO EVENT SHALL THE COMPANY BE LIABLE FOR LOSS OF USE, LOSS OF REVENUE OR
LOSS OF PRODUCT OR PROFIT OR FOR INDIRECT OR CONSEQUENTIAL DAMAGES
INCLUDING BUT NOT LIMITED TO, FOOD SPOILAGE OR PRODUCT LOSS. WARRANTY
DOES NOT COVER GLASS BREAKAGE. THE ABOVE WARRANTY IS EXCLUSIVE AND ALL
OTHER WARRANTIES, EXPRESS OR IMPLIED, ARE EXCLUDED INCLUDING THE IMPLIED
WARRANTIES OF MERCHANTABILITY AND FITNESS FOR A PARTICULAR PURPOSE.
REPLACEMENT PARTS
Any appliance replacement part, with the exception of lamps, fuses, and glass, which proves to
be defective in material or workmanship within ninety (90) days of installation will be replaced
without charge F.O.B. Factory, Simpsonville, SC or F.O.B. authorized BKI Distributor. The user
shall have the responsibility and expense of removing and returning the defective part to the
Company as well as the cost of reinstalling the replacement or repaired part.
Combi-Oven
Table of Contents
Table of Contents
Table of Contents........................................................................................................................................ 1
Introduction ................................................................................................................................................. 2
Description ................................................................................................................................................ 2
Safety Precautions.................................................................................................................................... 3
Operation ..................................................................................................................................................... 4
General ..................................................................................................................................................... 4
CVC Controller Operation......................................................................................................................... 6
S Controller Operation ............................................................................................................................ 24
VS Controller Operation.......................................................................................................................... 32
Installation ................................................................................................................................................. 36
Unpacking the Oven ............................................................................................................................... 36
Positioning of oven ................................................................................................................................. 37
Water Connection ................................................................................................................................... 37
Exhaust ................................................................................................................................................... 38
Electrical Connection .............................................................................................................................. 38
Drain Connection .................................................................................................................................... 39
Adjusting Flaps ....................................................................................................................................... 40
Setting System Options for CVC Controller............................................................................................ 41
Setting System Options for S Controller................................................................................................. 42
Setting System Options for VS Controller .............................................................................................. 47
Initial Checks and Adjustments............................................................................................................... 49
Maintenance .............................................................................................................................................. 50
Scheduled Maintenance ......................................................................................................................... 50
Troubleshooting ...................................................................................................................................... 53
Replacement........................................................................................................................................... 57
1
Combi-Oven
Introduction
Introduction
We congratulate you on your new BKI Combi.
By the purchase of a BKI Combi, you now possess one of the market's leading oven products for
professional kitchens. All BKI Combis are currently subjected to intensive product development that
ensures that the products are always based on the latest technology as well as the most modern and
energy-saving techniques of preparation.
Moreover, the products from BKI are up-to-date with the latest development/technology as regards:
•
•
•
•
ERGONOMICS AND SAFETY
SIMPLE AND LOGICAL OPERATION
EASY-TO-OPERATE DESIGN
RELIABILITY AND SERVICE
To ensure our customers an optimum and reliable product, prior to dispatch, all BKI Combis have passed
through an extensive test programme in which all functions are subjected to a continuous and extreme
load.
Before use and to make the best use of the many facilities and advanced technique of the BKI Combi, it is
important that you are aware of working ranges and possibilities of application of the steamer. We thus
recommend you study the user's manual thoroughly before using the steamer. By this, you can - as a
user - make sure that you achieve optimum cooking results through appropriate and safe operation. By
going through the user's manual, you will save time
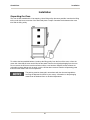
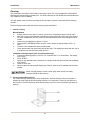
Description
Refer to illustration below for a description of the unit.
(A)
(B)
(C)
(D)
(E)
(F)
(G)
(H)
(I)
(J)
(K)
(L)
(M)
(N)
(O)
(P)
(Q)
(R)
2
Oven door
Operating panel
2-step safety handle
Rethermalize on High Speed only!
Plug for core temperature probe
Serial plate
Risk of fire - space oven a
minimum of 2 inches from the rear
and side wall
Drip tray
Ball valve for hand shower
Hot surface
Exhaust
Cover for electric parts
Hand shower
Core temperature probe
Drain
Risk of electric shock. Disconnect
power before servicing
Stand
Adjustment legs
Combi-Oven
Safety Precautions
Always follow recommended safety precautions listed in this manual. Below is the safety alert symbol.
When you see this symbol on your equipment, be alert to the potential for personal injury or property
damage.
Safety Signs and Messages
The following Safety signs and messages are placed in this manual to provide instructions and identify
specific areas where potential hazards exist and special precautions should be taken. Know and
understand the meaning of these instructions, signs, and messages. Damage to the equipment, death or
serious injury to you or other persons may result if these messages are not followed.
This message indicates an imminently hazardous situation which, if not avoided,
will result in death or serious injury.
This message indicates a potentially hazardous situation, which, if not avoided,
could result in death or serious injury.
This message indicates a potentially hazardous situation, which, if not avoided,
may result in minor or moderate injury. It may also be used to alert against
unsafe practices.
This message is used when special information, instructions or identification are
required relating to procedures, equipment, tools, capacities and other special
data.
Specific Precautions
Risk Of Electric Shock Disconnect Power Before Servicing
For Continued Protection Against Risk Of Fire And Electric Shock, Replace With
Fuses Of Same Rating
Rethermalize on High Speed only!
Hot surface can cause severe burns. Do not touch.
Replace Oven Halogen Lamps with 12V, 20W maximum
3
Combi-Oven
Operation
Operation
General
The combination of circulating hot air and steam is the basic principle in the modern combi steamer. The
BKI Combi is supplied with a high-powered fan motor ensuring an optimum circulation. This gives a
number of advantages when preparing different products.
To achieve the optimum use of the oven there are some plain general principles and working techniques
during the day's work that we recommend. If these general tips are followed, the result will in most cases
be better final products.
Pre-heating
One of the most important basic rules in using the modern oven is PREHEATING. Generally, the oven
should be pre-heated for ALL TASKS. Leaving out the pre-heating may cause a reduced end product and
extra long process time. To make the best of the properties of the oven, pre-heating should become a
natural routine in the day's work.
Pre-heating is particularly important at the start of the workday when the oven is cold.
We also recommend extra pre-heating when the oven has maximum loading or when preparing chilled
and frozen products.
In the above cases, we recommend that the oven is pre-heated for approx.10-15 min. in the desired
operating mode- perhaps at a temperature 86 - 104°F above the operating temperature (does not apply to
STEAMING and PROOFING).
For PREHEATING in other situations, see description under each operating mode.
Loading and unloading
After pre-heating, the oven is ready for loading with products. The products are to be placed in the
containers so that the air can circulate freely around them.
To achieve an optimum air circulation we recommend that you always start placing canteens or baking
sheets in the rack from the centre and then upwards and downwards by turns. Generally, canteens,
baking sheets etc. are to be regularly dispersed in the rack.
Avoid temperature decline!
When loading, we suggest that the oven door be open for the shortest possible time to avoid a major
temperature decline in the oven compartment.
Hot surface can cause severe burns. Do not touch.
After the preparation, the products are to be unloaded from the oven. You have to be cautious as the
oven compartment in most cases contains steam.
Safety
As an extra precaution, the oven door is provided with a specially designed 2-step safety handle which
ensures that the oven door cannot be opened in one movement. Upon activating the handle into the first
step, the oven will automatically switch off and an automatic motor brake suspends the fan. The oven
door should remain in this step for a few seconds and in doing so, much of the steam will escape the
oven compartment and thereby reduce the scalding risk of the staff. The oven door can then be re-
4
Combi-Oven
Operation
opened by activating the handle again and the products can be unloaded either by hand or with a trolley
for racks.
Applying air exhaust
The BKI Combi (with CVC or S controllers) has an open exhaust system. This means that the oven is
provided with a direct air exhaust that can be opened and closed automatically.
The air exhaust removes humidity and steam from the oven compartment quickly and efficiently. This
gives a dry heat in the oven compartment which may be used for browning and grilling steaks, omelet etc.
To obtain a crisp pastry the air exhaust is very useful in connection with baking. When baking dough
products, we recommend CONVECTION with open exhaust e.g. for the latter half of the baking process.
Manual humidity/steam pulsing
The BKI Combi with CVC or S controller has manual humidity steam pulsing capability.
By activating the appropriate key, the oven compartment is supplied with humidity/steam. This will go on
continuously as long as the key is activated.
The manual humidity pulsing is used for a quick admission of steam into the oven compartment
immediately after loading. The humidity pulsing can be applied for all operating modes.
As an example, when baking dough products in CONVECTION we recommend humidity pulsing for the
first approx. 10-15 seconds of the baking process. This gives a shiny and crisp surface to the baked
products.
As for roasting, the manual steam is very effective for closing the pores of the meat quickly and
effectively. This has the effect of keeping the humidity in the meat and the finished result becomes juicier.
Using the Fan
The BKI Combi with CVC or S controller has has fan speed selection capability.
The basic principle of the modern combi steamer is the circulating air and steam. In most working
processes, it is optimum that air and steam circulate at the highest possible speed - that is high fan
speed. However, in some processes a lower air circulation provides a better result. It is possible manually
to change between high and low fan speed with the appropriate key.
HIGH fan speed should - as a principal rule - be used for CONVECTION and COMBI STEAMING
modes.
When baking light products e.g. meringue and chou (cream puff) and when preparing omelette and
souffle you may use low speed. By this, you avoid that light baking products "blow off the sheet" or that
omelette/souffle batter has an uneven thickness.
LOW fan speed should - as a principal rule - be used for the PROVING mode that is a rather
sensitive preparation process.
Any time during the preparation, you can change between high and low fan speed.
5
Combi-Oven
Operation
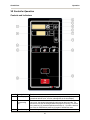
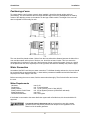
CVC Controller Operation
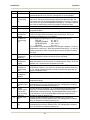
Controls and Indicators
Refer to the figure and table below for an explanation of controls and indicators.
6
Combi-Oven
Item #
1
Description
Time, Core
Temperature, Oven
Temperature and
Diagnostic
Message Display
Operation
Function
Time Display - Upon setting of time, display (1) will show the time
requested. The remaining period is indicated during programme
performance.
Core Temperature Display - In this display, the set core temperature is
indicated upon connection of core temperature control.
Oven Temperature Display - This display shows the set oven
compartment temperature. The light diode in the upper left corner (12)
is lit when the heating elements of the oven are connected.
Diagnostic Message Display - The Combi is supplied with an automatic
diagnostic system. When a defect occurs, a message will appear in the
bottom line of the display
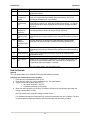
2
CONVECTION key
The CONVECTION operating mode is selected by pushing
key (2).
Automatically, the oven is set to start on the pre-selected values of this
mode. These pre-selected values can be changed according to wishes,
needs and experiences, see (14).
The values of time (11), oven temperature (12) and e.g. core
temperature (13) are adjusted. The speed of the fan motor (9) can also
be set and the exhaust opened/closed (8). You can now start the oven
by pressing key (16).
3
COMBI
STEAMING, low
key
The selection range of the oven compartment temperature is
68-482°F.
In this mode, it is possible to select low humidity pulsing.
Automatically, the oven is set to start on the pre-selected values of
COMBI STEAMING. These pre-selected values can be changed
according to wishes, needs and experiences. See key (14).
The values of time (11), oven temperature (12) and e.g. core
temperature (13) are adjusted. The speed of the fan motor (9) can also
be set and the exhaust opened/closed (8). You can then start the oven
by pushing key (14).
The selection range of the oven compartment temperature is
68-482°F.
7
Combi-Oven
Item #
4
Description
REHEATING key
Operation
Function
The REHEATING operating mode is selected by touching key (4).
The oven is automatically set to start on the pre-selected values of this
mode. These pre-selected values can be changed according to wishes,
needs and experiences. See key (14).
The values of time (11), oven temperature (12) and e.g. core
temperature are adjusted. In the same way, the speed of the fan motor
(9) can be set and the exhaust opened/closed (8).
You can now start the oven by pressing key (16).
5
COMBI
STEAMING,
medium key
The selection range of the oven compartment temperature is
230-320°F.
In this mode, it is possible to select medium humidity pulsing.
Automatically, the oven is set to start on the pre-selected values of
COMBI STEAMING. These pre-selected values can be changed
according to wishes, needs and experiences. See key (14).
The values of time (11), oven temperature (12) and e.g. core
temperature (13) are adjusted. The speed of the fan motor (9) can also
be set and the exhaust opened/closed (8). You can then start the oven
by pushing key (14).
6
COMBI
STEAMING, high
key
The selection range of the oven compartment temperature is
68-482°F.
In this mode, it is possible to select high humidity pulsing.
Automatically, the oven is set to start on the pre-selected values of
COMBI STEAMING. These pre-selected values can be changed
according to wishes, needs and experiences. See key (14).
The values of time (11), oven temperature (12) and e.g. core
temperature (13) are adjusted. The speed of the fan motor (9) can also
be set and the exhaust opened/closed (8). You can then start the oven
by pushing key (14).
7
PROOFING key
The selection range of the oven compartment temperature is
68-482°F.
The PROOFING operating mode is selected by touching key (7)
Automatically, the oven is set to start on the pre-selected values of this
mode. These pre-selected values can be changed according to wishes,
needs and experiences. See key (14).
The values of time (11) and oven temperature (12) are adjusted. In the
same way, the speed of the fan motor (9) is set and the exhaust
opened/closed (8).
You can now start the oven by pressing key (16).
The selection range of the oven compartment temperature is
68-104°F.
8
Combi-Oven
Item #
8
9
Description
Exhaust key
Fan Speed key
Operation
Function
By pressing key (8), you can open (the light diode is on) and close (the
light diode is off) the exhaust from the oven room.
The exhaust can be opened and closed any time during the
programme performance. Concerning use of open and closed exhaust
respectively, please refer to the tables and the paragraphs of the
individual cooking modes.
The fan of the oven can be set on two different rates of fan speed:
•
•
10
Numeric keys
11
Time Function key
HIGH (the upper light diode is lit)
LOW (the lower light diode is lit)
Normally, the fan speed is high but you can change it anytime during
the programme performance. Concerning use of high and low speed
respectively please refer to the tables of preparing various products
and the paragraphs of the individual cooking modes.
The required values for time, oven temperature and core temperature
are set with the keys (10).
The time requested is set by activating key (11) and display (1) will
flash. Now, the time can be set with the keys(10).The time range is 1
min. to 99 hours and 59min. After time setting, you push key (14)
again.
When the set time has run out the oven will automatically switch off
and an alarm will buzz.
12
Oven Temperature
Function key
The set time may be changed during the entire programme
performance.
The oven compartment temperature requested is set by touching key
(12) and display (1) will then start flashing. The oven compartment
temperature can now be set with the keys (10). After setting the oven
compartment temperature, push key (14) again.
The setting range of the oven compartment temperature:
CONVECTION
COMBISTEAMING
REHEATING
PROOFING
13
Probe Temperature
Function key
68-482°F
68-482°F
230 - 320°F
68-104°F
The selected oven compartment temperature may be changed any
time during programme performance.
When the core temperature control is on, the core temperature can be
adjusted by pushing key (13). Display (1) will then flash and the core
temperature can be set with the keys (10). After setting the value, push
key (14) again.
Automatically, the oven will switch off and an alarm will signal when the
set core temperature has been reached.
The setting range of the core temperature is 68 - 210°F.
9
Combi-Oven
Item #
14
15
Description
Receipt key
(Memory)
Memory Function
key (F1)
16
START/STOP key
17
ON/OFF key
18
Manual Humidity
Pulsing
Operation
Function
This key has two functions:
•
•
Storing settings in the memory function (see key (15))
Storing changes of pre-selected values of Operating
modes(2)-(7).
Beyond the permanent operating modes, the BKI Combi oven contains
a memory function, in which it is possible to store up to 199 extra
programmes.
You change from manual operation to memory function by pushing key
(15). To change between the 199 programmes you touch key (15) until
the number of programme required appears.
The programme performance is switched on and off by touching key
(16).
The oven is switched on and off by pushing key (17). All displays and
light diodes will light up for a moment indicating that all functions are
automatically tested before start.
The oven will always start up in manual operation and the
CONVECTION mode.
Pressing key (18), humidity/steam is added into the oven compartment
as long as the key is activated.
Features
Some of the features of the computer control:
•
•
•
•
•
•
•
•
4-line display; 2 lines are used for menu headings
Adjustable contrast and background light
Choice between small letters and capital letters
Display that always shows how many steps (max. 6) are contained in a menu and which step is
being performed at the moment.
Menu numbers that can be retrieved either by pressing the number directly via the F1 key or by
"rolling" forwards or backwards in the menus with the arrow keys (2 and 8).
Automatic cooling down to steaming temperature from, for instance, roasting temperature. At the
same time, the exhaust will open automatically.
Automatic control of
o Breaking of phase (fuses)
o Correct direction of rotation of fan motor
o All temperature sensors
o Inductive sensor
o Automatic emptying of steam generator at least once a day
If an error occurs, a message will show in the display. The control distinguishes between two
types of errors:
o Serious errors, ie the oven cannot start or it stops during operation
o Minor errors, ie the oven can still run.
10
Combi-Oven
•
Operation
With the function key F1, another 10 functions are available.
Press F1 once
(I) Retrieve menu number
(2) Store changed menu
(3) Correct menu text
Press F1 twice
(1) Store manual program
(2) Find vacant menu
(3) Delete menu/step
Press F1 3 times
(I) Retrieve original menu
(2) Contrast adjustment
(3) Choose language
(4) Change pre-set values
How to Operate
Start-Up
The oven always starts in the manual menu with the CONVECTION mode automatically selected.
Manual Operation
Pressing START/STOP activates this function. The pilot lamps change from red to green to indicate that
the function is active.
Changing operating mode, time, etc.
If another operating mode than CONVECTION is required, this must be selected before selecting time,
temperature, etc. If not, these settings will be deleted by the pre-selected values of the new operating
mode.
Before starting or during program performance, you can change time, temperature, core temperature,
exhaust and fan speed as you wish.
Time, temperature and core temperature is selected by pressing the function key in question, and the text
in the display will flash. Changes can now be made by pressing the keys. Confirm with ENTER-STEP.
The exhaust is open when the pilot lamp is on. High fan speed is indicated by the upper pilot lamp, low
fan speed by the lower pilot lamp.
Timer
The computer control can also operate as a timer (countdown). This is indicated by both pilot lamps being
off. Now all other functions but the time are disconnected. When the time runs out, an alarm will sound
and the oven will continue in the next step.
Extending a program
To extend a program by another step, press ENTER-STEP and the vacant step is ready for programming.
General Procedure
1. Choose one of the six operating modes as step I.
2. Adjust the values for time, temperature and core temperature, if necessary. Perhaps, change the
settings for fan and exhaust.
3. Proceed to the next step or start the oven program.
11
Combi-Oven
Operation
Programming
Retrieving a Menu
Press FI once and select the 1st line that reads "Retrieve menu number". Press the desired menu number
and conclude by pressing ENTER-STEP.
or
Press 2 (arrow upwards) and a new menu appears. If the key is kept activated, the menus roll forward - if
key 8 is activated, they roll backward.
NOTE: Use menu No 0 (between 199 and 1) only if you wish to run the oven manually.
Store changed menu
This function is used to store any changes that may have been made in one of the menus I - 199. A
program menu can be changed before, during or after its performance without affecting the original menu.
If you wish to store a change permanently, use the function "Store changed menu" as follows: Press F1
once, press 2 and conclude with ENTER-STEP.
Correct menu text
This function offers the possibility of constructing or changing a menu heading.
Press F1 once, press 3 and by means of the keys 2, 4, 6 and 8, you can "write" in the display.
Visualize a cylinder with letters and figures which can be rolled forwards and backwards by pressing keys
2 (forwards) and 8 (backwards).
With keys 4 and 6, the cursor can be moved to the right and to the left.
With the key "7", you can change between capital letters and small letters.
With the key "0", you can delete a character.
Conclude with ENTER-STEP.
Store manual program
This function is used to set up a new menu.
Enter your program into the MANUAL menu (No 0). Select the function "Store manual program" by
pressing F1 twice and pressing 1. The computer control will automatically stop at the first vacant menu.
Accept this menu or press the desired number followed by ENTER-STEP.
If there are no vacant menus, delete an existing one (see below).
When the menu number has been chosen, conclude by writing the menu text as described above
("Correct menu text") and pressing ENTER-STEP.
Find vacant menu
This function finds the first vacant menu. Press Fl twice, press 2 and the display shows a vacant menu
number. Conclude by pressing ENTER-STEP.
Delete menu/step
With this function, you delete either the last step or the entire menu. Push FI twice, press 3 and conclude
by pressing ENTER-STEP.
12
Combi-Oven
Operation
Retrieve original menu
With this function, you retrieve a copy of the original menus I - 199 which are pre-programmed in the
control. These original menus cannot be changed. Changes can only be made after entering into "Store
manual menu". Press F1 three times, press I and conclude by pressing ENTER-STEP.
Contrast adjustment
This function allows you to adjust background light and contrast in the display.
Press Fl three times, press 2 and the adjustment is made with keys 2 (lighter) and 8 (darker).
The background light is adjustable with keys 1 (lighter) and 8 (darker).
Conclude by pressing Fl.
Select language
Press F1 three times, press 3 and conclude by pressing ENTER-STEP.
Change pre-selected values
Every time one of the six operating modes (CONVECTION, COMBI, etc.) are selected, each will appear
with pre-selected values for temperature, time, maybe probe temperature, fan, and exhaust.
These values can be changed.
Select "Change preselected values" by pressing F1 three times and pressing 4. Enter the new/changed
values and conclude by pressing ENTER-STEP.
Using the Temperature Probe
To be able to use the many advantages/qualities of the modern combi oven to a full extent, as standard,
the Combi steamers from BKI are all equipped with digital core temperature control.
With the application of core temperature control and probe to match, the core temperature in the products
can be measured very exactly with which the optimum combination of time and temperature can be
obtained. In practice, this gives a reduced weight loss/shrinkage and makes uniform preparation possible
and thereby a high quality product.
Because of operation, cleaning and service, the probe is connected on the outside of the oven.
Operation
1. The oven is set on the operating mode required and time/manual time control, temperature etc.
are set. When set on manual time control, the oven will automatically switch off when the set core
temperature has been reached. If a time has been set at the same time as core temperature the
oven will switch off at the function to be reached first-time or core temperature.
2. The plug of the core temperature probe is inserted in the outlet on the front panel of the oven.
3. The probe is placed with the point in the middle of the thickest part of the product. The oven door
is closed and the door gasket will shut tight around the wire. Alternatively, the probe can with
advantage be placed in e.g. the joint at a separate worktable before placing it in the oven. Correct
placing of probe is herewith made simpler and easier and the risk of burn/scalding upon touching
of the hot oven is reduced considerably.
4. After pressing key (13), display (1) will flash and the core temperature required can be set with
keys (10). To accept the set core temperature, you press key (14) again. Automatically, the oven
will switch off when the set time is obtained.
13
Combi-Oven
Operation
Keeping warm function
As a special feature, the core temperature control includes a specific keeping warm function. When the
set core temperature is reached the heating elements will automatically be disconnected. The special
keeping warm function will hereafter see to the maintenance of the reached core temperature in the joint
by connecting the heating elements again when the core temperature drops by 35.6°F below the set
temperature. When the set core temperature is reached again, the core temperature is retained as long
as required.
Pre-heating
By application of core temperature control, the oven should be pre-heated in standard ways.
Application
Core temperature can with advantage be applied for:
•
•
•
•
•
Roasting incl. long-term roasting
Reheating
Steaming
Forced steaming
Preparation of sous-vide/Vacuum products
Long-term roasting
Long-term roasting in a BKI Combi is a gentle roasting process in which the used roasting temperatures
are often reduced by more than 50% compared to standard temperature. With considerably reduced
temperature and extended time, the meat becomes extra tender and juicy during this kind of roasting. The
shrinkage is also reduced considerably.
During long-term roasting e.g. below 212°F, it will often be unnecessary to add steam/humidity as the
evaporation has already been reduced to a minimum. To reduce evaporation further, if any, low fan speed
can be used with advantage.
Long-term roasting/ core temperature control
To be able to regulate/control and subsequently maintain the set core temperature, it is a great advantage
applying core temperature control during long-term roasting. This obtains optimum roasting every time.
Advantages
• Obtaining of optimum core temperature in the products.
• Uniform products from time to time - even for products of different sizes.
• Shrinkage is reduced considerably as each degree, which goes beyond the optimum core
temperature, means weight loss.
• Reduced energy consumption.
Suggestions and tips
• Probe to be placed in the middle of the thickest part of the product for measurement of the core
temperature.
• To obtain a uniform core temperature during simultaneous preparation of products of different
sizes the probe is first placed in the smallest product.
• In many cases, humidity/steam addition is not required during long-term roasting below 212°F.
• Low fan speed may be applied for long-term roasting to
14
Combi-Oven
Operation
Recommended values for core temperature control
Product
Level of
Preparation
Core
Temperature
Well-done
Under-done
Juicy
Pork
Ham
Ham
Boiled ham
Cured saddle. of pork
Cured saddle of pork, cold
Loin
Loin
Shank
Shoulder of pork
Rib
Baked ham
Under-done
Well-done
Well-done
Well-done
Well-done
Well-done
167°F
149-154°F
147-154°F
149-158°F
131-140°F
149-158°F
158-167°F
176-185°F
167°F
149°F
149-158°F
Beef
Fillet
Roast beef
Joint of beef
Boiled beef
Medium
Medium
Well-done
Well-done
131-140°F
131-140°F
185-194°F
176-185°F
Veal
Saddle of veal
Leg of veal
Shoulder of veal
Brisket of veal
Under-done
Well-done
Well-done
Well-done
149-158°F
167-176°F
167-176°F
167-172°F
Mutton
Saddle of Iamb
Saddle of Iamb
Under-done
Well-done
158-185°F
176°F
Lamb
Lamb
Well-done
174-185°F
Poultry
Chicken
Goose
Goose
Turkey, duck
185°F
167-176°F
194-197°F
176-185°F
Paste, pate etc.
Paste
Terrine
Foie gras (Pate de foie gras)
161-165°F
140-158°F
113°F
Fish
Salmon
Pike
Fish pate
131 °F
140°F
149°F
15
Combi-Oven
Operation
Convection Mode
In this operating mode the products are prepared in constantly circulating hot air. The high-powered fan
ensures an optimum air distribution in the oven compartment. An optimum transfer of calories/energy to
the products is obtained this way. The temperature can infinitely be set within a range of 68-482°F.
Manually, humidity can be added by activating key (18).
Operation
By activating key (17), the oven will automatically startup in CONVECTION mode with the pre-selected
values of time, temperature etc. If the oven is set on a different operating mode you choose
CONVECTION by activating key (2). Correction of the time required is made with key (11), adjustment
with keys (10) and end with (14). The temperature is corrected by touching key (12), then adjusted with
the keys (10) and ended with (14).
Pre-heating
Generally, the oven is pre-heated for approx. 5-10 minutes in CONVECTION mode. Concerning use of a
cold oven and maximum loading of oven compartment please refer to the paragraphs under the heading
of GENERAL.
Application
The CONVECTION mode can be applied for:
•
•
•
•
•
Roasting
Grilling
Baking
Gratinating
Breading
The mode can be applied alone or in combination with other modes. Below, you will find examples of
combination possibilities with other operating modes:
•
CONVENTION + COMBI STEAMING, low or medium + CONVENTION
The preparation is started in CONVECTION to close the pores on the surface of the joint. You
then change to COMBI STEAMING, low or medium, and by this the actual roasting process is
accomplished with minimum shrinkage. Finally, the joint is browned in CONVECTION to make
the surface crisp.
•
COMBISTEAMING, high + COMBI STEAMING, low or medium + CONVENTION
The initial steaming in COMBI STEAMING,high, closes the pores of the meat. You then roast in
COMBI STEAMING, low or, medium, and finally the joint is browned in CONVECTION. This
process is very common for e.g. joints that have to be juicy as well as crackled (e.g. roast pork).
Manual humidity pulsing
According to wishes/needs, injection steam can be added with key (18) e.g. to close the pores of the
meat or to make a crisp surface during baking.
Advantages
•
•
•
Shorter roasting time
Lower temperature
Even temperature in the entire oven compartment
As the circulating hot air yields a quicker and more efficient addition of calories the roasting time is
considerably reduced compared to the traditional baking or roasting ovens with e.g. bottom heat and top
heat. Generally, the preparation requires lower temperature and combined with the possibility of adding
steam the shrinkage loss is substantially reduced. The effective air distribution ensures that the maximum
16
Combi-Oven
Operation
variation of temperature in the oven compartment will be +/- 35.6°F. This gives relatively consistent
baking and roasting results without regard to placement of the products in the oven.
Suggestions and tips
•
Roasting time
The roasting time depends a lot on quality and size of the meat.
Roasting time per cm. meat thickness is 10-12 minutes.
For non-breaded joints, the roasting time is shorter than that of breaded joints.
When preparing frozen products, the roasting time will obviously be extended and the oven
should be pre-heated up to a higher temperature.
•
Roasting temperature
The larger the joint, the lower the temperature.
The longer the preparation time, the lower the temperature.
By using these two basic rules, the shrinkage is reduced and the finished joint becomes juicier.
Oil or fat (lard or the like) is to be added to the surface of dry meat.
•
Loading of oven
The air has to circulate freely around the products to reach an optimum roasting result. If the
products touch one another, the roasting time will be extended and the surfaces of contact will not
brown.
For e.g. very large joints, we recommend the use of containers and for small joints, the use of grill
trays is recommended as the air circulation around the products is better. By placing the meat on
a grill tray, the meat juice for gravy is intercepted in a container below the grill tray.
•
Baking
CONVECTION mode as well as COMBI STEAMING mode can be applied for baking. However,
the selection of mode depends on the type of batter to be baked.
The BKI Combi has built-in facilities which particularly gives the oven professional baking
qualities:
•
o
Manual humidity pulsing (l8) - The key is activated after loading the pre-heated oven
and yields the baking products a humid surface resulting in a crisp and golden crust.
o
Direct air exhaust (8) - The direct air exhaust removes surplus of humidity from the oven
compartment and provides crisper pastry.
o
2-speedfan (9) - The fan can be set on 2 different rates of fan speed. Generally, high fan
speed is applied for maximum air circulation. To minimize the air influence during proving
of dough products and during baking of light products low fan speed is used.
Baking sheets/trays
Generally and particularly for baking of batter products, e.g. Danish Pastry, baking sheets are
applied. For baking of certain types of breakfast rolls, perforated baking sheets are used. Trays
are suitable for pre-baked flutes/baguettes and toasting.
17
Combi-Oven
Operation
Combi Steaming (Low and Medium) Mode
The combi steaming mode is - as the name indicates - a mode offering all the preparation advantages
that a combination of hot air and steam can yield. The combination of a constantly circulating hot air and
steam surrounding the products from all sides makes a very intensive and effective preparation possible.
The most important advantages are short roasting - or baking time, optimum taste - and colour
development and reduced shrinkage during roasting.
The temperature can infinitely be set within the range of 68 -482°F.
In the combi steaming mode, the injection steam system is applied, which - in low and medium - is ideal
for roasting and baking. The steam is produced through nozzle-injected water to be dispersed over the
heating elements.
Variable humidity/steam pulsing
As certain types of products require varying steam quantities the combi steaming mode from BKI offers 3
different steam quantities. The 3 steps of steam pulsing are:
•
•
•
Low, key (3): Steam impulse every 12 sec.
Medium, key (5): Steam impulse every 5 sec.
High, key (6): Steam impulse every second.
Operation
COMBI STEAMING, low and medium, is selected with keys (3 and 5). The pre-selected values for time,
temperature etc. will appear. Correction of the time required is made by pressing key (11), adjustment
with keys (10) and end with key (14). The temperature is corrected with (12) and adjustment with (10).
Pre-heating
Generally, the oven is pre-heated for approx. 5-10 min. in COMBI STEAMING mode.
Concerning use of a cold oven and a maximum loading of the oven compartment, please refer to the
paragraph Pre-heating on page 4.
Application
COMBI STEAMING is applied for:
•
•
•
•
•
Roasting
Baking
Glazing
Gratinating
Reheating
Which one of the 3 humidity/steam settings to choose will to a large extent depend on type of product,
quality and extent of preparation. The best results are reached by experimenting with different products.
By this, you can leave your individual mark on the preparation.
Below, you will therefore only find some general lines.
Low humidity/steampulsing:
• Combi baking of e.g. buns
• Combi steaming of e.g. poultry
• Reheating (e.g. Cook & Chill)
• Glazing
• Gratinating
18
Combi-Oven
Operation
Medium humidity/steam pulsing:
• Combi roasting of e.g. beef
• Reheating of chilled and deep-frozen dishes (e.g. Cook & Chill)
• Glazing
• Gratinating
High humidity/steam pulsing.
• Steaming of vegetables and potatoes
• Reheating (e.g. Cook & Chill)
• Baking e.g. liver paste etc.
COMBI STEAMING mode can be applied alone or in combination with other operating modes. Below, you
will find examples of combination possibilities with other modes.
•
CONVENTION + COMBI STEAMING, low or medium + CONVENTION
The preparation is started in CONVECTION to close the pores on the surface ofthe joint. You
then change to COMBI STEAMING, low or medium, where the actual roasting process is
accomplished with minimum shrinkage. Finally, the joint is browned in CONVECTION, if
necessary with open air exhaust (8) to make the surface crisp.
•
COMBISTEAMING, high + COMBI STEAMING, low or medium + CONVENTION
The working process is initiated with steaming which closes the pores. You then change to
COMBI STEAMING, low or medium, where the actual roasting process is accomplished. Finally,
the joint is browned- as above- in CONVECTION, if necessary with open air exhaust (8) to make
the surface crisp.
•
COMBI STEAMING, high + CONVENTION + COMBI STEAMING, low or medium
When preparing stuffing dishes as e.g. pates and pastes we recommend initiating the preparation
gently with low temperature steaming. You then prepare the dish in CONVECTION and COMBI
STEAMING by turns. By this, a crisp - and not too dry - surface is obtained.
Long-term roasting
The COMBI STEAMING mode can with advantage be applied for long-term roasting (see the paragraph
of PROBE TEMPERATURE).
Advantages
• By an initial steaming of the joint with injection steam, the pores on the surface of the meat are
closed immediately and hereby proteins and meat juice are prevented from seeping out of the
meat.
•
The special construction of the oven compartment yields optimum heat distribution and ensures
hereby entirely uniform roasting and baking.
•
During combi roasting by use of the injection steam system, shrinkage loss is reduced by up to
50%.
•
The BKI Combi makes a variation in humidity/steam pulsing at 3 different levels - adjusted to the
individual product - possible.
•
As COMBI STEAMING adds humidity/steam during the roasting process the roasting result
becomes juicier and the surface crisper.
19
Combi-Oven
Operation
Suggestions and tips
• The roasting time depends a lot on the quality and the size of the meat. The roasting time per cm.
meat thickness is 10-12 minutes.
•
Deep-frozen products require extra time of preparation and the oven has to be pre-heated to a
higher temperature.
•
The joints should be placed so that air can circulate freely around them. If the joints touch one
another, the roasting time will be extended and the surfaces of contact will not brown.
•
For very large joints, the use of containers is recommended and for small joints, pork chops,
danish beef etc., we recommend use of grill trays.
•
By the use of grill trays, the meat juice for gravy is intercepted upon placing a container at the
bottom of the rack.
•
Use of core temperature control for large joints and long-term roasting produces more exact
control of the roasting process and security of a good and uniform quality of the end product.
•
Reheating of deep-frozen ready-prepared dished in COMBI STEAMING can be performed with
medium humidity/steam pulsing and at a temperature of approx. 266°F. This reduces the
reheating time considerably compared to reheating in CONVECTION mode. The products will
have no incrustation on the surface as they are prepared with steam.
Combi Steaming (High) Mode
Combi steaming, high, is - like low and medium – a combination of hot air and steam. In combi steaming,
high, 3, the injection steam system is applied, in which the steam is produced through nozzle-injected
water to be dispersed over the heating elements every second. This steam contains sufficient energy for
perfect steaming of e.g. potatoes, vegetables, fish etc.
When steaming in COMBI STEAMING, high, the temperature should normally be set at 221 °F
The temperature can infinitely be set within the range of 68 - 428°F
Operation
COMBI STEAMING, high, is selected by activating key (6). The pre-selected values of time, temperature
etc. will appear. Correction of the time required is made with key (11), adjustment with keys (10) and end
with (14). The temperature is corrected by touching key (12), then adjusted with (10). End by pressing
(14).
Pre-heating
Generally, the oven is pre-heated for approx. 5-10 minutes in COMBI STEAMING mode.
Concerning pre-heating of a cold oven and maximum loading of oven compartment, please refer to the
paragraph Pre-heating under the heading of GENERAL.
Application
The COMBI STEAMING, high, mode can be applied for:
•
•
•
•
•
Steaming
Blanching
Roasting
Pre-heating
Baking of e.g. liver paste etc.
20
Combi-Oven
Operation
COMBI STEAMING, high, can be applied alone or in combination with other modes. Below, you will find
examples of combination possibilities with other operating modes:
•
COMBISTEAMING, high + COMBI STEAMING, low or medium + CONVENTION
The working process is initiated with steaming in COMBI STEAMING, high, which closes the
pores. You then change to COMBI STEAMING, medium or low, where the actual roasting
process is accomplished. Finally, the joint is browned - as above - in CONVECTION, if necessary
with open air exhaust (8) to make the surface crisp. This preparation is very useful for e.g. roast
pork with crackling.
Advantages
• Shorter steaming time compared to traditional steaming in a pot.
•
The aroma and flavour additives of the products are retained to a far larger extent than steaming
in a pot.
•
The important vitamins and food substances are maintained in the product and in this way the
unique taste of the food stuffs are preserved.
•
The consistency/structure of the product is retained. At the same time, the vegetables in
particular maintain an appetizing and fresh colour which altogether make the end products more
delicious.
•
Different products can be prepared simultaneously, e.g. fish and vegetables, as flavour additives
are not transferred from one product to another during steaming.
Suggestions and tips
• During steaming in COMBISTEAMING, high, the temperature is to be set at 208°F.
•
When steaming tender vegetables e.g. broccoli, cauliflower, beans etc., we recommend low fan
speed. Please refer to table for preparation of vegetables.
•
Always use perforated containers for steaming wherever possible.
•
Deep-frozen vegetables taken directly from the freezer can be steamed without de-frosting. It is
important that the vegetables are not frozen together in a block.
•
Vegetables should only be steamed till they are crisp as they will continue to steam a period after
being removed from the oven.
Reheating Mode
Rethermalize on High Speed only!
As standard, the BKI Combis are provided with a special reheating mode for ready- and partly prepared
dishes - either as portions on plates or as courses on large dishes or in bowls.
To avoid drying of the products and condensed moisture on the plate/dish the reheating is performed with
a combination of steam and hot air. Via the electronically controlled reheating process, a gentle and
perfect preparation is obtained.
The temperature can infinitely be set within a range of 230 - 320°F.
21
Combi-Oven
Operation
Operation
REHEATING is selected by activating key (4) and the pre-selected values for time, temperature etc. will
appear. Correction of the required time is made by pushing key (11), adjustment with keys (10) and end
with key (14). The temperatures is adjusted by pressing key (12) and set with keys (10). End by pressing
(14)
Pre-heating
Generally, the oven is pre-heated for approx. 5-10 minutes in REHEATING mode with the required oven
compartment temperature. Concerning use of a cold oven and maximum loading of the oven
compartment, please refer to the paragraph Pre-heating on page 4.
Application
The regenerating mode is applied for non-condensated and gentle reheating of pre-prepared courses on
plates, platters or in a bowl.
For e.g. banquets, the different products can be prepared and dished up in good time before serving and
thereby make the preparation and the serving quicker and more efficient without reducing the quality.
Advantages
• Reheating is very gentle and with electronic control of steam pulsing adapted to the specific
demands which are made on reheating pre-prepared foodstuffs on plates. In this way, the end
result will be non-condensated and there will be no drying of the products.
• Quick, efficient and flexible serving of hot meals - for large banquets also.
• This working method makes it possible to prepare and complete much of the meals in good time
beforehand and reduce the working stress in the kitchen.
Suggestions and tips
Generally, concerning reheating it is difficult to state standard time and temperature for different
products/courses. Many elements may influence the end result e.g.:
•
•
•
•
•
Type of product and quality
Preparation extent of the products
Core temperature of the products
Number of plates, bowls and dishes in the oven
Loading height of plates, bowls and dishes
It is therefore important to make experiments with the individual products/courses and by this obtain a
relevant empirical basis. In practice, measuring of the core temperature with a core temperature probe
can be very useful. A correct serving temperature is of decisive importance to a good result.
•
•
•
•
•
The reheating time will typically be within the range of 5-8 minutes and the temperature typically
within the range of 266-284°F.
The larger the products, the longer time.
Uniform courses give the best result.
Do not place plates or bowls too close. The air has to circulate freely around the products.
By application of potatoes in courses, the best result is obtained with fried or roasted potatoes.
Rethermalize on High Speed only!
Proofing Mode
The BKl Combi is equipped with a specific proofing mode to ensure an optimum utilization of the
professional baking qualities of the oven. This means that the oven can be used as an actual proofer.
22
Combi-Oven
Operation
The proofing operating mode is applied for rising of all sorts of dough products e.g. white buns,
flutes/baguettes etc.
Proofing is a process changing the compact dough to a light and porous mass that is a condition to
achieve evenly proofed bread with pores of equal size all over the bread. Correctly proofed bread gives
the best baking result.
In the proofing mode from BKI, the electronics provide correctly adapted air humidity.
Depending on the type of bread, the optimum proofing temperature will be approx. 93-100°F. The
electronic temperature control in the BKI Combi ensures that the set temperature is maintained very
closely. This is especially important in PROOFING as the dough products are very sensitive to
fluctuations of temperature.
Operation
PROOFING is selected by pressing key (7) and the pre-selected values for time, temperature etc. will
then appear. Correction of the time required is made by pushing key (11), adjustment with keys (10) and
end with key (14). Wishes for correction of temperature, if any, are made by touching key (12), adjustment
with keys (10) and end with key (14).
Pre-heating
In PROOFING, the oven is pre-heated for approx. 5 minutes at the required proofing temperature.
PROOFING of dough bread can with advantage be undertaken as one of the first tasks in the day when
the oven is relatively cold. If the oven has already been applied at high temperatures for e.g. roasting the
heat is accumulated in the oven cabinet resulting in a extended time of cool in cooling down (93 -100°F).
Manual humidity/steam pulsing
Upon starting of proofing mode, the oven compartment will continuously be supplied with steam for the
first seconds. Generally, at the beginning of the proofing process dough products are to be supplied with
just as much extra humidity that they become "wet" in the surface. Alternatively, this can be controlled by
looking at the lowest half of the oven glass where humidity is to be produced at the same time whereupon
the correct amount of steam is present.
If no result is reached with the automatic extra steam addition at the beginning- as above-you can
manually add extra steam/ humidity by touching key (18).
Advantages
• Contrary to traditional proofing in a temperated oven, the BKI Combi proofing mode provides the
ideal conditions of correct rising of dough products through a carefully controlled temperature and
air humidity.
•
The baking result is considerably better and the bread becomes nice, easier to digest and with
optimum development of taste.
Suggestions and tips
• The dough should only be proofed approx. 80% before baking. If not, the dough will collapse a
little at the beginning of the baking.
•
The proofed dough is removed from the oven while this is pre-heated to baking temperature.
•
The dough is not to be exposed to cold draught or other shock treatment. Covering may be
recommended.
•
Avoid opening the oven door during the actual proofing process as this may have a negative
effect on temperature and air humidity.
23
Combi-Oven
Operation
S Controller Operation
Controls and Indicators
Refer to the figure and table below for an explanation of controls and indicators.
24
Combi-Oven
Item #
1
Description
Time Display
2
Time
Programming
key
3
4
Time Clear key
Up arrow key
5
Chamber
Temperature
Display
Temperature
Programming
key
6
7
8
9
10
11
12
13
14
15
Oven
Temperature
Check key
Core
Temperature
Display
Core
Temperature
Programming
key
Core
Temperature
ON/OFF
Down arrow key
Convection
operating mode
key
CombiSteaming (low,
medium and
high) operating
mode key
Reheat mode
key
Steam mode
key
Operation
Function
The time remaining is displayed, while the program is running. If any
operational defects occur, an error code appears in the time display.
The time can be set from 1 min. to 23 hours and 59 min. When the time
has run out, the steamer automatically stops and an alarm sounds. The
pre-set time can also be changed while the program is running. To set the
time, press key (2), press the up/down arrow keys (4, 11) until the desired
time value is reached then press key (2) again to enable this value.
Press this key to clear the current time value.
Use this key in combination with keys 2, 6, and 9 to increase time and
temperature values.
This display shows the pre-set temperature. The control lamp in the lefthand corner lights while the heating elements are active. See (7) for
checking of temperature in oven chamber.
The temperature range depends on the operating mode chosen:
HOT AIR
68 - 482 °F
COMBI STEAMING
68 - 482 °F
REGENERATING
230 - 320 °F
PROVING
68 - 104 °F
The temperature can be changed any time during the program. To set the
temperature, press key (6), press the up/down arrow keys (4, 11) until the
desired temperature value is reached then press key (6) again to enable
this value.
You can check the actual temperature any time by pressing (7). The
actual temperature is shown as long as the key is pushed.
When the core temperature is activated, this is indicated in the display.
When the steamer is off, the pre-set core temperature is shown; when the
steamer is on, the actual core temperature is shown.
The core temperature can be set between 68 and 210°F. To set the
temperature, press key (10), press key (9), press the up/down arrow keys
(4, 11) until the desired temperature value is reached then press key (9)
again to enable this value.
Activate and deactivate the core temperature by pressing (10).
Use this key in combination with keys 2, 6, and 9 to decrease time and
temperature values.
Activate the Convection operating mode by pressing (12). The oven is
automatically set to the pre-selected value. For changing the pre-setting,
see (18). Activate the mode by pressing (21).
This key allows you to choose 1 of 3 Combi-Steaming operating modes.
Press key 13 until the desired mode is reached. One illuminated LED
indicates the low mode selection. Two illuminated LEDs indicate medium
mode selection. Three illuminated LEDs indicate high mode selection.
Activate the mode by pressing (21).
Activate the Reheat operating mode by pressing (14). The oven is
automatically set to the pre-selected value. For changing the pre-setting,
see (18). Activate the mode by pressing (21).
Activate the Steam operating mode by pressing (15). The oven is
automatically set to the pre-selected value. For changing the pre-setting,
see (18). Activate the mode by pressing (21).
25
Combi-Oven
Item #
16
Description
Proofing mode
key
17
Programs keys
18
19
Storage key
Vent key
Operation
Function
Activate the Proofing operating mode by pressing (16). The oven is
automatically set to the pre-selected value. For changing the pre-setting,
see (18). Activate the mode by pressing (21).
Besides the operating modes, the oven contains a memory function that
offers the possibility of entering up to 10 programs, each holding up to 4
process steps. To change between the 10 programs, press key (17) until
the desired program number appears. Activate the program by pressing
(21).
This key stores operating mode changes and program changes.
Open the exhaust by pressing key (19).
Control lamp on = open / control lamp off = closed.
The exhaust can be opened and closed any time during the cooking
process.
The exhaust is used to remove humidity and steam from the oven
chamber leaving a dry heat which can be used for the browning and
grilling of roasts, omelet’s, etc.
20
Manual key
21
22
Start/Stop key
Fan key
23
Oven ON/OFF
key
24
Humidity
Pulsing key
The exhaust is also used to give a crispy surface to baked products. We
recommend that dough products be baked with the exhaust open during
the last part of the baking process.
This key indicates manual operation.
The control lamp in key (20) lights when the steamer is set to manual
operation. Key (20) is also used for alarm/door opening in the memory
function.
This key starts and stops Operating modes and Programs.
This key allows you to activate/deactivate the fan and choose the fans
speed. Press key (22) until the desired fan mode is reached. The upper
LED illuminates to indicate high-speed selection. The lower LED
illuminates to indicate low-speed selection.
Switch the unit on and off by pressing key (23). Before the unit starts, all
functions are automatically tested, and, consequently, all displays and
control lamps light up for approx. 2 seconds.
The unit always starts in the manual and Convection modes.
By activating key (24), humidity/steam is added to the oven chamber. The
humidity pulsing continues as long as the key is activated.
Manual humidity pulsing is used to add steam to the oven chamber at the
beginning of a program. Humidity pulsing can be used in all operating
modes.
When baking, for instance, dough products in the Convection mode, we
recommend that you add humidity during the first 10 or 15 seconds of the
baking process to ensure that the products have a crisp and golden
surface.
When roasting, manual steam injection is a very efficient way of closing
the pores of the meat thus ensuring that the meat retains its moisture and
stays juicy.
26
Combi-Oven
Operation
How to Operate
Start-Up
The oven always starts in the manual and CONVECTION mode automatically selected.
Setting of time, temperature in oven chamber and core temperature
1. Press the key of the desired function (12 – 16).
2. Press the key of time (2), of oven temperature (6) or of core temperature (9). The figure flashes.
3. Set the values with the arrow keys (4) (11).
• One push on the key = one unit
• Continuous pushing = quick setting
4. When the value has been set, the time, for instance, flashes for a few seconds, after which the
setting is automatically ‘locked’.
BUT: By pressing time again, the setting is locked at once.
For simultaneous setting of temperature (6), press the symbol while the time is flashing. The time
is ‘locked’ and the temperature flashes. Use the arrow keys and repeat the procedure.
The same applies to the setting of core temperature (9); however, this function should first be
activated with the ON/OFF key.
Changing pre-selected settings
1. Set the steamer at the desired operating mode (12) - (16).
2. Adjust the settings for time (2), oven chamber temperature (6) and perhaps core temperature (9).
Furthermore, the fan speed (22) can be set and the exhaust opened or closed (19).
3. Store the new setting by pressing key (18). Press the key until a short signal sounds (approx. 5
sec.).
Programming
Creating a program
1. First, press key (17) until the desired program number appears in the display.
2. Then press (18) and A appears.
3. Choose operating mode, for instance Convection or STEAM.
4. Set the time, temperature and perhaps the core temperature.
5. To continue to the next step, press key (18) again. B appears and you choose the operating
mode and set the time, temperature and perhaps the core temperature.
6. To continue to C, press key (18) again, and repeat the procedure.
7. When the program is complete wait till the program number appears flashing in the small display
(17) and store the program by pressing (18) for approx. 5 seconds. You will hear a beep, and the
flashing stops. Now the program has been “locked” and the only thing that remains to be done is
starting the oven by pressing key (21). When the program is “locked”, the small dot next to the
number will indicate, by flashing, how many steps have been entered.
Deleting a program
Delete the program by pressing key (17) until the program number to be deleted appears. Press key (18)
until the last step is shown - C, for instance. Press the key showing which operating mode is in use at the
moment (steaming, combi steaming or hot air). The display goes out for one or two seconds. Then press
key (18) to go to B and repeat the procedure. Then go to A.
Note: You should delete programs backwards
Timer function
To activate the timer, press in a vacant step. If an operating mode has been entered in the step, you can
delete it by pressing the key of this operating mode for one second. Set the time as usual. Thus, only the
time will be activated in this step – not the heat or the fan. This facility will typically be used in step A
when a postponed program start is required.
27
Combi-Oven
Operation
Alarm signal between steps
If the oven is required to give out a signal when a step is completed, press key (20) at the desired step.
The control lamp lights. An alarm signal is heard, and the steamer stops This is very useful if different
types of products are prepared in the oven at the same time and some are ready before others. This can
also be used as a preheating step before the products are placed in the oven. The oven automatically
continues to the next step when the door is closed; it is therefore not necessary to press key (21).
Return to manual operation
To return to manual operation, press (20) when the program number is shown in the display.
Using the Temperature Probe
Operation
1. Select the desired operating mode and set the time/manual time control, temperature, etc. When
set to manual time control, the steamer will automatically stop when the desired core temperature
is reached. If the time has been set at the same time as the core temperature, the steamer will
stop at whichever setting is reached first – time or core temperature.
2. Insert the core temperature probe in the outlet on the front panel.
3. Place the point of the core temperature probe in the middle of the thickest part of the product.
Close the door, the sealing will fit tightly round the wire.
4. Switch on the core temperature control by pressing the ON/OFF key (10). By pressing key (9),
the display will flash and the desired core temperature can be set with the arrows (4) and (11). To
accept the core temperature setting, press key (9) again. The steamer stops automatically when
the desired core temperature is reached.
Application
It is advantageous to use core temperature control for the following modes of preparation:
•
•
•
•
•
Roasting, incl. long-term roasting
Regenerating/reheating
Steaming
Forced steaming
Preparation of sous-vide/vacuum-packed products
Advantages of core temperature control
• As a special feature, the core temperature control of unit contains a keeping-warm function.
When the core temperature is reached, the heating elements are automatically disconnected. The
keeping-warm function will then maintain the core temperature in the product by activating the
heating elements when the core temperature drops to 35.6 °F below the core temperature set.
When the original core temperature is restored, the heating elements are disconnected. In this
way, the desired core temperature can be maintained as long as needed.
• Optimum core temperature in the products
• Uniform products every time – even for different sizes of product.
• Shrinkage is considerably reduced as every degree below the optimum core temperature means
that the product loses weight.
• Reduced energy consumption.
Long-term roasting
Long-term roasting in a BKI Combi unit is a particularly gentle roasting process during which the roasting
temperatures are often reduced by more than 50% as compared to normal roasting. Because of the lower
temperature and prolonged roasting time, the meat becomes particularly tender and juicy, and shrinkage
is considerably reduced. During long-term roasting – below 212 °F, for instance – it is often unnecessary
to add steam/humidity, as evaporation is already reduced to a minimum.
Long-term roasting / core temperature control
To be able to control/check and subsequently maintain the desired core temperature, it is of great
advantage to use core temperature control during long-term roasting. This will produce by far the best
result every time.
28
Combi-Oven
Operation
Convection Mode
Use
The Convection operating mode can be used for:
•
•
•
•
•
Roasting
Grilling
Baking
Gratinating
Roasting of breaded products
Advantages of circulating hot air:
•
•
•
Shorter roasting time
Lower temperature
Even temperature in the entire oven chamber
The circulating hot air gives a faster and more efficient supply of heat and reduces the roasting/baking
time considerably as compared to traditional roasting and baking ovens. The larger the roast, the lower
the temperature. ) If you apply these two rules of The longer the cooking time, the lesser the shrinkage )
thumb, the roast becomes juicier.
In general, all individual products (pieces of chicken, steak, etc.) require preheating at a higher
temperature and roasting (baking) with the exhaust open.
Direct exhaust (8)
The direct exhaust removes surplus humidity from the oven chamber and gives crispier products.
Open the exhaust during the second half of the baking/roasting time.
2 fan speeds (9)
The steamer has two different fan speeds. Usually, high fan speed is used for maximum
circulation of air. Low fan speed is used to minimize the effect of the air during the proving and
baking of light products.
Combi-Steaming Mode
Use
COMBI STEAMING is used for:
•
•
•
•
•
•
Roasting
Steaming
Baking
Glazing
Gratinating
Reheating (for instance, ‘cook & chill’)
Which humidity to choose depends very much on the type, quality and level of preparation of the product.
The best results are achieved by trial and error. This allows you to leave your mark on the preparation.
For the most common tasks, for instance baking of liver paste and roasting of large roasts, haunches,
fillets and saddles, use low or middle humidity pulsing. For braising, use high humidity pulsing.
Economy steaming program
High humidity pulsing is very suitable as an economy-steaming program for the steaming of small
portions of, for instance, vegetables and potatoes requiring considerably less energy than STEAMING.
Use a temperature of 208°F and high humidity pulsing.
29
Combi-Oven
Operation
Advantages of COMBI STEAMING
•
•
•
•
If the roast is steamed with injection steam at the start, the pores will close immediately
preventing the meat juice from disappearing.
In COMBI STEAMING, the shrinkage is reduced by up to 30 – 35%.
Ideal for long-term roasting
Deep-frozen, ready-prepared dishes can be reheated in COMBI STEAMING at approx. 266 °F
using medium humidity/steam pulsing. This reduces the heating time considerably as compared
to reheating in the HOT AIR mode. No crust forms on the products, as the preparation is done
with steam.
Reheating Mode
Use
The reheating/regenerating program can be used for gentle reheating of pre-prepared food on plates,
dishes or in bowls, without condensed water forming on the plate. At banquets, for instance, the various
products can be prepared and arranged well in advance of the serving without compromising the quality.
Advantages
•
•
Quick, efficient and flexible serving of hot courses – also at large banquets.
By using this working method, the workload in the kitchen will be reduced.
Many factors may influence the end result, for instance:•
•
•
The type and quality of the products
The number of plates, bowls, etc. in the oven
The height of the food on the plates and dishes and in the bowls
It is therefore important that you proceed by trial and error with each individual product/dish. In practice,
measuring the core temperature with the core temperature probe can be a great help.
•
•
•
•
•
The reheating time will typically be between 5 and 8 minutes and the temperature between 266
and 284 °F.
The larger the products, the longer the reheating time.
Similar courses on all plates produce the best result.
Do not place plates and bowls too close to each other in the oven. There should be some space
between the products to allow the air to circulate freely around the products.
It is best to reheat containers filled with for instance gravy, porridge or rice, at high humidity and
248 °F.
Steam Mode
Use
This Steam program provides moist heat at a temperature of 212° F. It ca be used for:
•
•
•
•
•
•
•
Steaming
Stewing
Blanching
Poaching
Simmering
Soaking
Thawing
30
Combi-Oven
Operation
Advantages
• Extremely short preheating time
• Excellent food consistency
• Conserves nutrients, color
• No added fats or oils
• Cook different products at same time with no taste transfer
• Can be partially unloaded for serving convenience
• No need to boil water in pots
31
Combi-Oven
Operation
VS Controller Operation
Controls and Indicators
Item #
1
Description
Time Display
2
Time
Programming
key
3
Time Clear key
Function
The time remaining is displayed, while the program is running. If any
operational defects occur, an error code appears in the time display.
The time can be set from 1 min. to 23 hours and 59 min. When the time
has run out, the steamer automatically stops and an alarm sounds. The
pre-set time can also be changed while the program is running. To set the
time, press key (2), press the up/down arrow keys (4, 11) until the desired
time value is reached then press key (2) again to enable this value.
Press this key to clear the current time value.
32
Combi-Oven
Item #
4
5
6
7
8
9
10
Description
Up arrow key
Chamber
Temperature
Display
Temperature
Programming
key
Oven
Temperature
Check key
Convection
operating mode
key
CombiSteaming
operating mode
key
Steam mode
key
11
Down arrow key
12
13
Start/Stop key
Oven ON/OFF
key
Operation
Function
Use this key in combination with keys 2 and 6 to increase time and
temperature values.
This display shows the pre-set temperature. The control lamp in the lefthand corner lights while the heating elements are active. See (7) for
checking of temperature in oven chamber.
The temperature can be changed any time during the program. To set the
temperature, press key (6), press the up/down arrow keys (4, 11) until the
desired temperature value is reached then press key (6) again to enable
this value.
You can check the actual temperature any time by pressing (7). The
actual temperature is shown as long as the key is pushed.
Choose the Convection operating mode by pressing (8). The oven is
automatically set to the pre-selected value. Activate the mode by pressing
(12).
This key allows you to choose the Combi-Steaming operating mode.
Press key 9 to select the mode. Activate the mode by pressing (12).
Choose the Steam operating mode by pressing (10). The oven is
automatically set to the pre-selected value. Activate the mode by pressing
(12).
Use this key in combination with keys 2 and 6 to decrease time and
temperature values.
This key starts and stops Operating modes.
Switch the unit on and off by pressing key (13). Before the unit starts, all
functions are automatically tested, and, consequently, all displays and
control lamps light up for approx. 2 seconds.
The unit always starts in the Convection mode.
How to Operate
Start-Up
The oven always starts in the CONVECTION mode automatically selected.
Setting of time, temperature in oven chamber
1. Press the key of the desired function (8-10).
2. Press the key of time (2), of oven temperature (6). The figure flashes.
3. Set the values with the arrow keys (4) (11).
• One push on the key = one unit
• Continuous pushing = quick setting
4. When the value has been set, the time, for instance, flashes for a few seconds, after which the
setting is automatically ‘locked’.
BUT: By pressing time again, the setting is locked at once.
For simultaneous setting of temperature (6), press the symbol while the time is flashing. The time
is ‘locked’ and the temperature flashes. Use the arrow keys and repeat the procedure.
33
Combi-Oven
Operation
Convection Mode
Use
The Convection operating mode can be used for:
•
•
•
•
•
Roasting
Grilling
Baking
Gratinating
Roasting of breaded products
Advantages of circulating hot air:
•
•
•
Shorter roasting time
Lower temperature
Even temperature in the entire oven chamber
The circulating hot air gives a faster and more efficient supply of heat and reduces the roasting/baking
time considerably as compared to traditional roasting and baking ovens. The larger the roast, the lower
the temperature. ) If you apply these two rules of The longer the cooking time, the lesser the shrinkage )
thumb, the roast becomes juicier.
In general, all individual products (pieces of chicken, steak, etc.) require preheating at a higher
temperature and roasting (baking) with the exhaust open.
Combi-Steaming Mode
Use
COMBI STEAMING is used for:
•
•
•
•
•
•
Roasting
Steaming
Baking
Glazing
Gratinating
Reheating (for instance, ‘cook & chill’)
Which humidity to choose depends very much on the type, quality and level of preparation of the product.
The best results are achieved by trial and error. This allows you to leave your mark on the preparation.
For the most common tasks, for instance baking of liver paste and roasting of large roasts, haunches,
fillets and saddles, use low or middle humidity pulsing. For braising, use high humidity pulsing.
Economy steaming program
High humidity pulsing is very suitable as an economy-steaming program for the steaming of small
portions of, for instance, vegetables and potatoes requiring considerably less energy than STEAMING.
Use a temperature of 208°F and high humidity pulsing.
Advantages of COMBI STEAMING
•
•
•
•
If the roast is steamed with injection steam at the start, the pores will close immediately
preventing the meat juice from disappearing.
In COMBI STEAMING, the shrinkage is reduced by up to 30 – 35%.
Ideal for long-term roasting
Deep-frozen, ready-prepared dishes can be reheated in COMBI STEAMING at approx. 266 °F
using medium humidity/steam pulsing. This reduces the heating time considerably as compared
to reheating in the HOT AIR mode. No crust forms on the products, as the preparation is done
with steam.
34
Combi-Oven
Operation
Steam Mode
Use
This Steam program provides moist heat at a temperature of 212° F. It can be used for:
•
•
•
•
•
•
•
Steaming
Stewing
Blanching
Poaching
Simmering
Soaking
Thawing
Advantages
• Extremely short preheating time
• Excellent food consistency
• Conserves nutrients, color
• No added fats or oils
• Cook different products at same time with no taste transfer
• Can be partially unloaded for serving convenience
• No need to boil water in pots
35
Combi-Oven
Installation
Installation
Unpacking the Oven
The oven is best handled while in its wrapping. Use a lifting trolley whenever possible. Introduce the lifting
trolley under the lower cross tube of the stand and place a couple of wooden blocks between the cross
tube and the lifting trolley.
To achieve the best possible balance, introduce the lifting trolley from the front of the oven or from the
motor side. Note that the oven can be lifted off the stand. Remove the original packaging from the oven.
Do not remove the foil that covers the surfaces until the oven has been installed, as the surfaces are
vulnerable to sharp objects such as tools, once the foil has been removed. Remove all protecting parts
that secure the racks in the oven compartment.
The packing must be destroyed in accordance with the rules and regulations
covering the disposal of rubbish in your country. Information on the packaging
material can be obtained from our technical department.
36
Combi-Oven
Installation
Positioning of oven
To ensure that the oven functions correctly when installed, it should be placed upright and level
(horizontally). This is measured at the front edge and side edge of the roof, and adjustment is made by
means of the adjusting screws on the stand or on the legs of table models. The height of the oven can
also be adjusted to fit the trolley for rack.
The oven should be placed at least 2 inches from the rear wall and the distance between the sides of the
oven and the nearest wall or piece of furniture, etc. should be at least 4 inches. This is to ensure the
necessary flow of cooling air to the oven. Strong sources of heat such as frying pans, fryers, etc. should
not be placed near the oven, especially not on its right side; otherwise the warranty may cease to apply.
Water Connection
As standard, the BKI Combi has one water connection. To facilitate cleaning and service, the oven should
be connected with an approved flexible 1/2" hose and the permanent installations should be fitted with a
stop-tap for the water supply to the oven.
Before connecting the oven to water, flush the water tubes thoroughly. Then fit the dirt filter and connect
the oven.
Water Requirements
Hardness:
Conductivity:
Water pressure
Water pressure Combi Clean:
Water temperature:
Chloride concentration:
max. 3 dH
min. 75 microsiemens
min. 1.5 bar (150 kP), max.6.0 bar (600 kP).
min. 2.5 bar dynamic pressure (CombiClean activated)
max. 20°C
max. 100 mg/litre
If the feeder is connected to the water distribution system with a flexible hose, this hose should be VA
approved.
A reversed osmosis plant must not be connected to ovens with a steam
generator as this may cause problems with respect to the registration of the
water level in the steam generator.
37
Combi-Oven
Installation
An authorized plumber in accordance with existing rules and regulations MUST
carry out the water connection.
Clogged up water filters and dirt in solenoid valves are not covered by the
warranty.
Alternatively, the oven can be supplied with two water connections (optional equipment):
1. for raw water for condensation nozzle (cold water)
2. for nozzle in oven cabinet and steam generator. Must meet the requirements made on water for
drain connection, however, the water temperature must not exceed 140°F.
Exhaust
The BKI Combis are equipped with an open/direct exhaust system that removes surplus humidity from
the oven compartment. The exhaust system has electrically or manually operated air exhaust.
The vent pipe can be connected to a ventilating system. In this case, a special extraction funnel is fitted to
avoid suction directly from the oven compartment. This extraction funnel can be ordered from BKI.
If an extraction hood is installed in the ceiling above the oven, it should project 50 cm over the front of the
oven. The suction effect should be 400 - 800m3/h.
The ventilation motor can be controlled directly from the oven. This means that the ventilation starts when
a program is started and runs for 5 minutes after the program is finished.
Electrical Connection
An authorized electrician in accordance with existing rules and regulations must carry out the electrical
connection.
There is a wiring diagram in the motor room.
Locate an approved plug outlet or a contact breaker close to the oven so that the oven can be
disconnected during repair and installation. The breaker must be able to cut off all poles with a length of
break of at least 3 mm. To facilitate cleaning and service, use an approved flexible connection cable, type
H05RN-F.
The oven may leak 1 mA current per kW.
After connection, check that the fan rotates in the right direction, i.e. COUNTERCLOCKWISE.
If the fan rotates in the wrong direction, the oven does not operate correctly, which may cause damage to
the oven.
38
Combi-Oven
Installation
The warranty does not cover incorrect connection.
Knock out openings for supply connection
Open type
Thread Size
Amps
Cable
2.10 - 2.14
1.16
1.10
1.06
1 1/2
1 1/4
1
3/4
70
56
42
22
2 AWG
4 AWG
6 AWG
10 AWG
Size /
opening
50.0 mm
43.7 mm
34.5 mm
27.8 mm
Drain Connection
As standard, The BKI Combi is equipped with a drain system that removes surplus water from the oven
compartment. Water may occur when steam is used in the oven and when the oven is cleaned.
An authorized plumber must carry out connection. The oven must be connected
to an open drain and the connection must end at least 20 mm above the outlet
grating or funnel.
The drain must never end directly under the oven. The drain tube must be of stainless steel, have a
diameter of at least 38 mm and a fall of at least 3° or 5%.
Never connect directly to a water trap so as to avoid obnoxious smells, bacteria
and possibly low pressure, suction or overflow.
39
Combi-Oven
Installation
Adjusting Flaps
The flaps can be adjusted individually to achieve a uniform baking result. Experience shows that the
following basic setting produces the best result in the vast majority of cases Air gap setting in mm:
Type 1.06 and 1.10
Type 2.10
For types 2.10 we recommend that a 10 mm rail be fitted at the top (part no. O 11.588).
40
Combi-Oven
Installation
Setting System Options for CVC Controller
System options are set through Engineering menus. To access these menus press and hold the F1 key
while pressing the START/STOP key. A list of menu commands will appear in the display. To see
additional menu commands press F1. To return to the main display, press the ENTER/STEP key. To
select a command, access it’s menu then press the numeric key associated with the command. Upon
selecting a command, its options will be displayed. To select/activate and navigate the command options
use the keys specified on the display. Return to the Engineering menu by pressing F1. The following table
lists the command options that need to be set to enable proper operation of the BKI Combi.
CVC Controller System Settings
Menu Command
Option Settings
1 = TEST FUNCTION
Only used to troubleshoot oven.
2 = ENCODE OVEN TYPE
2 = Autorestart
3 = SELECT LANGUAGE
4 = GB
2 = Adjust PT100 sensors
The values are factory set by the manufacturer.
Consult manufacturer before adjusting.
3 = Set Restart Time
Leave as is
1 = Oven Light ON/OFF
1 = Oven light 5min.
2 = Phase Test
OFF
3 = Transfer all menus
Enter = OK
1 = Setup
Oven type (2 = CVC)
Temperature mode (2 = Fahrenheit)
Keyboard (2 = BKI)
Special mode (1 = Normal)
Fan (1= Single direction)
Language (4 = GB)
2 = Motor Alarm
OFF
3 = Cleaning mode
1 = Normal 2 step
1 = Access Code
OFF
2 = Warm up in step 1
Normal 6 step
3 = Condensation ON/OFF
Leave as is
4 = Show empty tray
Leave as is
41
Combi-Oven
Installation
Setting System Options for S Controller
Refer to the figure below as necessary while using this section.
42
Combi-Oven
Installation
Start-Up Window
When the computer is switched on, it checks all control lamps and segments to make sure that they work.
Figures appear in the displays:
•
•
•
The time display shows how U1 is set.
The temperature display shows the current EPROM version.
The display for core temperature shows whether the computer includes CombiClean (0 = without
CC, 1= with CC).
Accessing the Set-Up Mode
Select the set-up mode by pressing key (4) and key (2) simultaneously for 5 sec. U1 appears in the time
display. Shift to the next setting (max. U5) by pressing key (2). The set-up mode can be
interrupted/closed any time by pressing key (18).
U1: Selecting Automatic Restart, Oven Model And Voltage
Automatic restart
1 or 0 is shown in the time display (1).
0 = The oven will not restart a program that has been interrupted because of power cut.
1 = The oven will restart a program that has been interrupted because of power cut.
Shift by pressing key (3).
Oven model
A digit between 1 and 6 is shown in the program display (17).
1 = CM, 2 = CV, 3 = BM, 4 = ST, 5=S, 6=VS
Shift by pressing (17).
Voltage
1 or 2 is shown in the core temperature display (8).
1 = Voltage with 0
2 = Voltage without 0
Shift by pressing the core temperature key (9).
U2: Selecting Interior Light
When the program display (17) shows 5, the interior light is automatically switched off after 5 min.
When the program display (17) shows 0, the interior light will shine continuously.
When the program display (17) shows 6, the interior light is automatically switched off after 5 min. In
addition, the light in the oven door is switched off after 3 sec. when the door is opened.
When the program display (17) shows 1, the oven light will shine continuously. In addition, the light in the
oven door is turned off after 3 sec. when the door is opened.
Settings 1 and 6 are very useful on ovens with oven light in the door in order to avoid blinding while the
door is open.
Shift by pressing (17).
43
Combi-Oven
Installation
U3: Adjusting Temperature Sensors (Pt-100)
The digit of the sensor in use is shown in the program display (17).
1 = oven chamber, 2 = probe, 3 = steam generator, 4 = condensation
Change the digit by pressing the program key (17).
The current temperature is shown in the temperature display (5).
The set point is shown in the core temperature display (8)
Standard set point = 100, which can be adjusted downwards to 80 and upwards to 120 with the arrow
keys.
Each temperature sensor can be adjusted/corrected by approx. +/-10°C, i.e. the temperature changes in
steps of 0.5°C.
The core temperature display holds only 2 digits, consequently 80 = 80, 00 = 100 and 20 = 120.
U4: Selecting Pre-Set/Current Temperature, Combiclean, Additional
Detergent, Showdisplay And Printer
Pre-set/current temperature
1 or 0 is shown in the time display (1).
0 = Pre-set temperature (standard)
1 = Current temperature during operation
Shift by pressing (3).
CombiClean
The oven size is shown in the temperature display (5).
You change between oven sizes by pressing the temperature key (7).
Additional Detergent
If the oven chamber is not properly clean when the cleaning program is completed, it is possible to add
additional detergent.
Press the key for manual humidity (24) until the control lamp is turned on. ”Additional detergent” is now
active.
Note that the programs are prolonged by 5 minutes + the detergent phase.
If the control lamp is off, this function is off.
Demo mode
It is possible to select a demo mode in which the oven rinses only.
Press the exhaust key (19)until the control lamp is turned on.
Showdisplay
Press (17) until the display shows 1.
The control lamps in (23) and (22) flash to indicate that the keys are active.
By pressing (23), you reserve memory in the showdisplay for the 16 programs.
44
Combi-Oven
Installation
With (22), you enter a start text for each program. However, this is usually not necessary, as the
showdisplay is ready for use on delivery.
If you have deleted or ruined a program, press (9) and select the program you have just ruined and then
to enter the start text again.
Note that there should be at least 20 characters in the program on the showdisplay in order for the
start text to be transferred.
Note! When the showdisplay is active, the printer cannot be used.
Printer
Press (17), until the display shows 0. The printer output is thus activated.
Press (18) to enter the start-up menu.
Press (20) for 5 seconds. The time display now shows PR*nt, “Yes” in the temperature display and “No” in
the display for core temperature probe.
Press (6).
The printer output is now activated.
To switch off the printer output, press (9)
.
Note! When the showdisplay is active, the printer cannot be used.
U5: Selecting Phase Sequence Test And Reversing
Phase sequence test
Phase sequence test is usually always active.
This alarm can be deactivated in the case of installation for demonstration purposes in order to avoid
error code 15.
The temperature display shows either ON or OFF. ON and OFF are selected by pressing (6).
Reversing
In the reversing function, it is possible to set the time before reversing as well as the time of the interval.
Change between 0, 1 and 2 by pressing (17).
0 = “Reversing” is switched off and the time is not shown (standard)
1 = “Reversing” is switched on and error code 5 “Fan too hot” works reversely because the thermo-switch
of the motor used is open and closes when the temperature is too high.
2 = “Reversing” is switched off and error code 5 “Fan too hot” works as usual, i.e. the thermo-switch is
closed and opens when the temperature is too high.
The time during which the fan is running is shown in the time display (1) and is set between 10 and 99
with the arrow keys (4, 11). Each step corresponds to 2 seconds, it is therefore possible to set the time of
the intervals between 20 and 198 seconds (standard is 50 = 100 seconds). The time of the interval is
shown in the core temperature display (8) and is set with the core temperature key (9) and the core
temperature ON/OFF key (10).
The time can be set between 1 and 30 seconds (standard = 10 seconds).
45
Combi-Oven
Installation
S Controller System Settings
Set-Up Mode
Settings
U1
Automatic restart (1)
Voltage (1)
Oven Model (5)
U2
Interior light (5)
U3
Leave as is
U4
Pre-set/current temperature (1)
CombiClean (select your oven size)*
Additional Detergent (press manual humidity key
until lamp turns on)*
Printer (Not applicable)
U5
Phase Sequence Test (OFF)
Reversing (2)
* - Only with CombiClean models.
46
Combi-Oven
Installation
Setting System Options for VS Controller
Refer to the figure below as necessary while using this section.
Start-Up Window
When the computer is switched on, it checks all control lamps and segments to make sure that they work.
Figures appear in the displays:
•
•
The time display shows how U1 is set.
The temperature display shows the current EPROM version.
47
Combi-Oven
Installation
Accessing the Set-Up Mode
Select the set-up mode by pressing key (4) and key (2) simultaneously for 5 sec. U1 appears in the time
display. Shift to the next setting (max. U5) by pressing key (2). The set-up mode can be
interrupted/closed any time by pressing key (12).
U1: Selecting Automatic Restart
Automatic restart
1 or 0 is shown in the time display (1).
0 = The oven will not restart a program that has been interrupted because of power cut.
1 = The oven will restart a program that has been interrupted because of power cut.
Shift by pressing key (3).
U4: Selecting Pre-Set/Current Temperature
Pre-set/current temperature
1 or 0 is shown in the time display (1).
0 = Pre-set temperature (standard)
1 = Current temperature during operation
Shift by pressing (3).
U5: Selecting Phase Sequence Test And Reversing
Phase sequence test
Phase sequence test is usually always active.
This alarm can be deactivated in the case of installation for demonstration purposes in order to avoid
error code 15.
The temperature display shows either ON or OFF. ON and OFF are selected by pressing (6).
VS Controller System Settings
Set-Up Mode
Settings
U1
Automatic restart (1)
U2
Not Used
U3
Not Used
U4
Pre-set/current temperature (1)
U5
Phase Sequence Test (OFF)
48
Combi-Oven
Installation
Initial Checks and Adjustments
Upon completion of the installation, perform the following to ensure proper operation of the oven.
Category
Oven exterior
Connections
Oven
compartment
Operating panel
Activity
• Check that the oven has suffered no transport
damages (dents, scratches, etc.)
•
Check/adjust height and check that the oven is
placed level (horizontally)
•
Check for correct water connection
o open water supply
o check for leaks
o close water supply
o check and clean dirt filter
o reopen water supply
o check hand shower and stop tap
(under the oven)
•
Check correct electrical connection
•
Check correct drain connection
o check correct mounting of drip tray
o check correct fall of hose from drip
tray, and examine for leaks
•
Check correct exhaust connection
•
Clean the oven
•
Apply the steel oil which is delivered with the
oven
Check the direction of rotation of the fan
•
•
Check that the filter housing is mounted
correctly
•
Check interior light
•
•
Clean the oven
Check and adjust, if necessary, each of the
pre-set values
•
Heat up the oven to 482°F for approx. 5 min.
49
Date Performed
Combi-Oven
Maintenance
Maintenance
Scheduled Maintenance
Category
Entire Unit
Oven
exterior
Perform
Daily
Annually
Activity
Cleaning (Refer to cleaning procedure)
•
•
Connections
Annually
•
•
•
Oven
compartment
Annually
•
•
•
•
•
•
Operating
panel
Annually
•
•
Oven door
o check that hinges are firmly fixed and that the oven door is
fitted straight in relation to the oven
o check door sealing for cracks
o check/adjust 2-step door handle
o check/adjust inductive sensor/door switch
Exhaust plug/vacuum valve
o Check for leaks
o Check for/remove scale deposits
Water connection
o check for leaks
o check and clean dirt filter
o check hand shower and stop tap (under the oven)
Electric connection
o check for irregularities
Exhaust
o check/adjust exhaust plate and motor
Check that the fan has been correctly fixed and that it rotates
freely
Check/adjust filter housing and flaps
Check interior light
Check/adjust rack and trolley for rack to ensure that the height of
the oven is correct
Check nozzle for correct dispersion
Heating elements
o check gaskets
o check/tighten heating elements
o start the oven, activate the mode HOT AIR for a couple of
seconds, then turn off the oven and check that all heating
elements are lukewarm
Test each program for a short period
Check temperature
o set the oven at HOT AIR, 338°F
o set the oven at STEAMING, 212°F
o check the oven temperature with a digital thermometer that
has been thoroughly tested and approved.
50
Combi-Oven
Category
Under the
oven
Maintenance
Perform
Annually
Activity
•
•
•
•
In motor
compartment
Annually
•
•
•
•
•
•
•
Solenoid valves
o check hoses
o clean solenoid valves
o check that solenoid valves close
Check/test drain pump
Drain
o check for leaks in drain system
o check that drain system is not blocked
o Check condensation nozzle in drain tube
Drip-tray system
o check/adjust drip-tray springs
o check drain basin and hose from drip tray
o check correct fall of hose
o check passage in hose (clean out hose, if necessary)
Heating elements for oven compartment
o check insulation for leaks
o check for electric leakage ("megges")
o check load distribution on phases
Steam generator
o check for leaks
o check for electric leakage in heating elements ("megges")
o check load distribution (idling) on phases
o check rubber gaskets at heating elements
o check/tighten heating elements
o check/adjust level sensors
o descale steam generator
Check/tighten copper tube connections
Check/tighten all electric connections
Contactors
o check that there are no bad connections
o check that all components are firmly fixed
Check/test motor for damper in air exhaust
Fan motor
o check that the motor is firmly fixed
o check direction of rotation
o check gasket at motor shaft
51
Combi-Oven
Maintenance
Cleaning
The construction of the BKI Combi makes it very easy to clean. The oven compartment is all-welded in
stainless steel and accordingly splash proof. You will find the easy-to-use hand shower with flexible hose
very suitable for inferior cleaning.
The door gasket at the oven door can easily be removed which ensures a quick and efficient cleaning
around it
The flat front panel also makes the exterior cleaning quick and efficient.
1. Interior cleaning
Manual Method
a.
Always clean the oven when it is cold or cool the oven compartment down to below 140°F.
b.
Add mild or strong oven detergent (according to requirement) with a soft brush to the sides of
the oven compartment, rack etc. Protect your face and hands as the oven detergent may be
caustic.
c.
Leave the oven detergent for approx. 5-10 min.
d.
With the MULTI STEAMING mode, the oven is set to steam for approximately 10 min. at
194°F.
e.
Flush the oven compartment with the hand shower.
f.
Check that the water can pass freely through the drain. The grating that comes with the oven is
to be placed over the drain hole inside the oven.
Integrated Cleaning Program (CVC and S Controllers only)
a.
Choose the cleaning program (“198” for CVC controller and “C” for S controller). The display
says “CLEA”.
b.
Press “START”.
c.
Apply an oven detergent with a soft brush or a sprayer when the alarm sounds and the display
says ”SOAP”.
d.
Close the oven door.
e.
When the alarm sounds and the display says ”AQUA”, rinse the oven chamber with the hand
shower.
Never use high-pressure cleaner. Never spray water directly on heating
elements behind the filter housing.
2. Cleaning behind filter housing
For a more thorough cleaning of the oven compartment, the filter housing is removed so that it is
possible to clean at the fan and the heating elements. You loosen the 2 screws (A) and (B) on the
filter housing. The filter housing is demounted by lifting it up till it is clear of the bottom pin and then
tipping it.
52
Combi-Oven
Maintenance
3. Cleaning of Nozzle
The water nozzle can be dismounted and cleaned according to needs. The easiest way of cleaning
the nozzle is by soaking it in scale remover for approx. 6-8 hours. When remounting the nozzle, note
that the small notch will turn upwards, see the figure below.
4. Exterior Cleaning
The oven cabinet is washed with soapy water and then dried with a soft and moist cloth. After drying,
steel oil is to be added (refer to directions on the packing). Note! The exterior of the oven is never to
be flushed with water hose or high-pressure cleaner which may damage the electronic components.
Troubleshooting
Error Codes
The BKI Combi ovens have an automatic error detecting system. In the event of malfunctioning of the
oven or faulty connection, error codes (for S or VS controller) or messages (for CVC controller) appear in
the display. This means that any defects are specified immediately and can be remedied quickly and
efficiently, which again means fewer interruptions of operation and thus fewer service calls. The following
list of error codes provides you with a brief description of each error code and an indication as to how the
fault can be remedied.
Error Code
Number
1
Error Message
Possible Cause
Remedy
Program switch
defective
The program switch has
been turned beyond stop
position.
Replace computer.
3
Faulty connection
4
Oven chamber above
305°C
Reconnect terminals 2 and 21
in plug S2.
The temperature circuit
breaker for the oven
compartment has gone. The
oven cannot be operated
until the defect has been
remedied.
53
Reconnect the thermostat that
is located in a hollow under the
oven on the left-hand side of
the front panel, by pressing the
red button gently. Note that the
thermostat may be
disconnected during transport.
Combi-Oven
Error Code
Number
5
Maintenance
Error Message
Possible Cause
•
Remedy
Fan is hot (The
temperature circuit
breaker in the fan
motor has gone.)
Breaking of phase /
fuses
• Fan blocked by
incorrectly fitted filter
housing
• Fan rotating in the
wrong direction
The oven cannot be
operated until the defect has
been remedied.
Check fuses in switchboard.
Check that the filter housing
has been correctly fitted on the
pins. Let the oven cool for
approx. 20-30 min., then
restart it. Check that the
direction of rotation of the fan
is counter-clockwise (looking
at the fan from inside
the oven compartment).
6
Drain temperature
above 75 °C (The
drain temperature is
normally kept below
60°C by means of the
built-in condensation
nozzle. If the drain
temperature exceeds
75 °C for more than 5
min., error code 6 will
appear for a short
moment at the
beginning and at the
end of the operating
mode.)
Dirt in solenoid valve, nozzle
or dirt filter, hot water
connected or defective
sensor for condensation.
The oven can be operated
even if the defect is not
remedied.
Check that the oven is
connected to cold water. Clean
solenoid valve, nozzle or filter.
7
Oven sensor
defective
The temperature sensor in
the oven chamber is
defective. The oven cannot
be operated until the defect
has been remedied.
Replace sensor.
8
Core temperature
probe defective or
wrongly fitted
Probe is not fitted in socket.
Probe defective, socket for
probe defective or shortcircuited (due to water or
fat). The program cannot be
used until the defect has
been remedied.
Check that the probe is
correctly fitted or clean the
socket.
9
Temperature sensor
in steam generator
defective (The
program cannot be
used until the defect
has been remedied.
However, programs
that do not require
the use of the steam
generator can still be
used.)
Replace heating element with
sensor.
54
Combi-Oven
Error Code
Number
10
Maintenance
Error Message
Possible Cause
Remedy
Replace sensor.
Condensation sensor
defective (The oven
can still be operated
even if the defect is
not remedied.
However, the
temperature in the
drain will exceed
60°C and the defect
should therefore be
remedied as soon as
possible.)
11
Water shortage in
steam generator (The
maximum water level
in the steam
generator has not
been reached after 2
minutes of filling.)
Solenoid valve or dirt filter
clogged, water supply
blocked or water pressure
too low (min. 1.5 bar). The
program cannot be used
until the defect has been
remedied.
Clean solenoid valve or dirt
filter. Check the water supply
to the oven. Check that the
water pressure is min. 1.5 bar.
13
Temperature in
steam generator
above 130 °C
(The temperature of
the upper heating
element in the steam
generator is above
130°C.)
Water shortage in steam
generator or scale on
heating elements. The
program cannot be used
until the defect has been
remedied.
Stop the oven for approx. 5
min., then resume the program
that was interrupted.
14
Breaking of phase
One or more phases in the
power transmission to the
oven is lacking, possibly due
to a defective fuse. The
program cannot be used
until the defect has been
remedied.
Check switchboard. Replace
defective fuses, if any.
15
Incorrect phase
sequence
Fan rotates in the
wrong direction.
• 2 phases in the electric
installation have been
exchanged by mistake.
The oven cannot be
operated until the defect has
been remedied.
Change about the 2 phases in
the electric installation. Let the
oven cool for 20-30 min., then
restart it. Check that the
direction of rotation of the fan
is counter-clockwise (looking
at the fan from inside the oven
chamber).
16
Wiring defect at door
switch
Wire for door switch shortcircuited or interrupted.
Cancel the message by
pressing any key reappears when the oven is
restarted. The oven can be
operated even if the defect is
not remedied.
Replace door switch.
•
55
Combi-Oven
Maintenance
Test Functions
Certain Combi functions can be tested via the controller. This section explains how to access these
functions and details what functions are available for each type of controller.
Accessing Test Functions with CVC Controller
To access the Test Function command, press and hold the F1 key while pressing the START/STOP key.
A menu will appear showing the Test Functions command. Simply press the numeric 1 key to execute this
command. The Test Functions display will appear and allow you to select/activate and navigate all the
test functions. Return to the Test Function command by pressing F1. To return to the main display, press
the ENTER/STEP key.
Accessing Test Functions with S Controller
To access the Test Functions press the up arrow key and the Time keys simultaneously for 5 sec. The
time display shows the Test Function number (ex. dd 1). Navigate the functions by pressing the up and
down arrow keys. The test functions can be interrupted/switched off any time by pressing the Storage key
key. The output can be switched on and off constantly by pressing the ON/OFF key, or you can switch the
output on and off by pressing the Manual key.
List of Test Functions
Number
Description
Controller without
this feature
Comments
dd:
1
Oven heat
dd:
2
Steam generator heat
dd:
3
Fan low
dd:
4
Fan high
dd:
5
Motor brake
dd:
6
Injection valve
dd:
7
Flooding valve
S, CVC
dd:
8
Drain pump
S, CVC
dd:
9
Condensation valve
dd:
10
Damper motor
dd:
11
Exhaust
dd:
12
Special Function
dd:
13
Buzzer
dd:
14
Interior light
dd:
15
Oven sensor
Shows °C or Err if a defect occurs
dd:
16
Core temperature sensor
dd:
17
Steam generator sensor
Shows °C or Err if a defect occurs
(core temperature probe missing)
Shows °C if Err if a defect occurs
S, CVC
Can only be active when the fan is
on
Can only be activated if there is
water in the generator
To be active for max. 5 sec. only
Works only if an external unit has
been connected
Loud continuous sound when
ON/OFF is activated
S, CVC
56
Combi-Oven
Maintenance
Number
Description
dd:
18
Condensation sensor
dd:
19
Motor Speed
dd:
20
Oven door
dd:
21
Water level in steam
generator
dd:
22
Thermal cutout, 305°C
dd:
23
Thermal cutout, fan motor
dd:
24
Contacts in damper motor
Controller without
this feature
Comments
Shows °C or Err if defect occurs
S, CVC
Shows a symbol for door open or
closed and Err if a defect occurs.
Can be initialized by pressing
exhaust key if door is closed and
oven sensor normal
Shows water level below min. and
max. Temperature key: water in )
CM and Core temperature key:
water out) ST
ON appears if OK, OFF if
interrupted or a wiring defect has
occurred
ON appears if OK, OFF if
interrupted or a wiring defect has
occurred
ON appears when the contacts
are connected and OFF if
interrupted
Replacement
Changing halogen lamps in oven compartment
Replace Oven Halogen Lamps with 12V, 20W maximum.
Remove the lamp glass by means of a screwdriver. Always use halogen lamps specially made for BKI
Combis. Never touch the lamp without first protecting your fingers with gloves or a piece of cloth.
57
P.O. Box 80400, Simpsonville, S.C. 29680-0400, USA
http://www.bkideas.com
Made and printed in the U.S.A
LI0197/0407