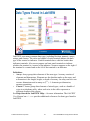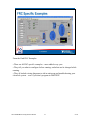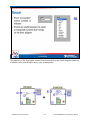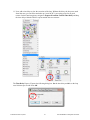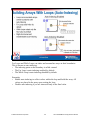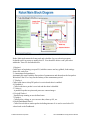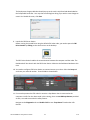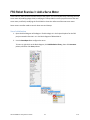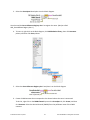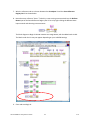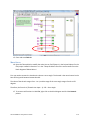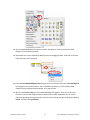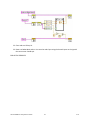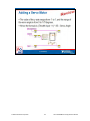
1
Contents Objective and Agenda…………………………………………………………………………………….2-4 Overview FIRST, FRC, and FRC Control System……….………………………………………….……..5 Vision and Mission……………………………………………………………………………..6-10 Sponsor Investment…………………………………………………………………………...11-12 Mentors…………………………………………………………….……….…………………….13 FRC Control System: LabVIEW and CompactRIO………………………………………………………14 Robotics Platform………………………………………………………………………………...15 Role of the Controller…………………………………………………………………………16-18 Flexible Inputs and Outputs………………………………………………………………………20 Easy to Program…………………………………………………………………………………..21 Software Development Fundamentals…………………………………………………………………….22 Software Development Method…………………………………………………………………..23 Define the Problem……………………………………………………………………………….24 Example Furnace……………………………………………………………………………...25-31 Example (Advanced) Coke Machine …………………………………………………………32-36 Example Robot: Remote Control……………………………………………………………..37-43 Introduction to NI LabVIEW………………………………………………………………...……………44 What is LabVIEW and VI’s…………………………………………………………………..45-46 Controls Palette (Controls and Indicators) ………………………………………………………47 Functions (and Structures) Palette…………………………………………………………….48-49 Tools Palette ………………………………………………………………………………….50-51 Debugging Techniques…………………………………………………………………………...52 Context Help Window……………………………………………………………………………53 Dataflow Programming……………………………………………………………………….54-55 LabVIEW Shortcuts and Tools…………………………………………………………………..56 LabVIEW Exercise 1: Create a Simple LabVIEW VI……………………………...57-69 Optional Exercise 1: The LabVIEW Help System……………………………………..70 Key LabVIEW Structures for FIRST……………………………………………………………..71 FRC Vision and Robotics…………………………………………………………………….…..72 Customized Example Finder…………………………………………………………………..….73 FRC Specific Examples……………………………………………………………………….….74 LabVIEW Project………………………………………………………………………………....75 Introduction to Clusters……………………………………………………………………….76-77 Loops………………………………………………………………………………………….78-79 How Do I Make Decisions in LabVIEW?......................................................................................80 Shift Register—Access Previous Loop Data……………………………………………………..81 Enum…………………………………………………………………………………………..82-83 LabVIEW State Machine……………………………………………………………………...84-85 LabVIEW Exercise 2: Controlling Program Execution…………………………….86-97 Advanced………………………………………….………………………………………………………98 Create SubVI……………………………………………………………………………………...99 Connector Pane and Icon Viewer……………………………………………………………….100 Icon Viewer- Create an Icon…………………………………………………………………….101 How Do I Time a Loop………………………………………………………………………….102 Charts—Add 1 Data Point at a Time With History……………………………………………..103 Graphs—Display Many Data Points at Once…………………………………………………...104 Building Arrays With Loops (Auto-Indexing) …………………………………………….105-108 Programming an FRC Robot……………………………………………………………………………..109 i Understanding Robot Main.vi……………………………………………………………...110-113 Begin.vi……………………………………………………………………………………..114-116 TeleOp.vi…………………………………………………………………………………...…...117 Autonomous Independent.vi………………………………………………………………..118-119 Finish.vi…………………………………………………………………………………….120-121 FRC Robot Exercise 1: Configure and Deploy Project…………………………..122-127 LabVIEW FRC Installation Shortcuts Review………………………………………………….128 Getting Started Review………………………………………………………………………….129 Create New FRC Robot Project Review ………………………………………………………..130 Project Explorer Review ………………………………………………………………………..131 Robot Main.VI Review …………………………………………………………………………132 Deploying Code to Robot Review ……………………………………………………………...133 FRC Driver Station Review …………………………………………………………………….134 Adding Joystick Controls…………………………………………………………………..135-136 FRC Robot Exercise 2: Add Joystick Controls…………………………………..137-142 Adding Joystick Controls Review………………………………………………………………143 Adding a New Device…………………………………………………………………………...144 FRC Robot Exercise 3: Add a Servo Motor……………………………………...145-152 Adding a Servo Motor Review………………………………………………………………….153 FRC Robot Exercise 4: Add a Digital Input as Limit Switch……………………154-161 Adding a Digital Line for a Limit Switch Review………………………………………………163 Additional Resources and Next Steps……………………………………………………………………164 Ensuring Success………………………………………………………………………………..165 Additional Resources……………………………………………………………… ……………166 ii © National Instruments Corporation 1 FRC LabVIEW Mentor Training Hands-On Seminar FIRST AND FRC For Inspiration and Recognition of Science and Technology (FIRST) is a notfor-profit organization whose mission is to inspire young people to be science and technology leaders by engaging them in exciting mentor-based programs that build science, engineering, and technology skills; that inspire innovation; and that foster well-rounded life capabilities including self-confidence, communication, and leadership. FIRST Robotics Competition (FRC) combines the excitement of sport with the rigors of science and technology. Under strict rules, limited resources, and time limits, teams of 25 students or more are challenged to raise funds, design a team ―brand,‖ hone teamwork skills, and build and program a robot to perform prescribed tasks against a field of competitors. It’s as close to ―real world‖ engineering that a student can get. Grades 9–12 (Ages 14–18) For the 2010/2011 season, 22,475 teams comprising 248,000 students and over 66,000 mentors participated in FIRST programs. To learn more about FIRST and the FIRST family of programs, please visit usfirst.org. FRC LabVIEW Mentor Training Hands-On Seminar 2 ni.com © National Instruments Corporation 3 FRC LabVIEW Mentor Training Hands-On Seminar Please Note: There are more exercises and background information than you can complete in a four-hour period. Mentors are encouraged to take the manual with them so they can review and complete additional optional exercises at their own pace. FRC LabVIEW Mentor Training Hands-On Seminar 4 ni.com © National Instruments Corporation 5 FRC LabVIEW Mentor Training Hands-On Seminar FIRST AND FRC For Inspiration and Recognition of Science and Technology (FIRST) is a not-for-profit organization whose mission is to inspire young people to be science and technology leaders by engaging them in exciting mentor-based programs that build science, engineering, and technology skills; that inspire innovation; and that foster well-rounded life capabilities including self-confidence, communication, and leadership. FIRST Robotics Competition (FRC) combines the excitement of sport with the rigors of science and technology. Under strict rules, limited resources, and time limits, teams of 25 students or more are challenged to raise funds, design a team ―brand,‖ hone teamwork skills, and build and program a robot to perform prescribed tasks against a field of competitors. It’s as close to ―real world‖ engineering that a student can get. Grades 9–12 (Ages 14–18) For the 2010/2011 season, 22,475 teams comprising 248,000 students and over 66,000 mentors participated in FIRST programs. To learn more about FIRST and the FIRST family of programs, please visit usfirst.org. Quick Facts 501(c)(3) not-for-profit public charity Founded 1989, by inventor Dean Kamen Headquarters in Manchester, NH Board Chairman John Abele, founder chairman of Boston Scientific $32 million operating budget 3,000+ corporate sponsors 92,000 volunteers FRC LabVIEW Mentor Training Hands-On Seminar 6 ni.com © National Instruments Corporation 7 FRC LabVIEW Mentor Training Hands-On Seminar FRC LabVIEW Mentor Training Hands-On Seminar 8 ni.com © National Instruments Corporation 9 FRC LabVIEW Mentor Training Hands-On Seminar FRC LabVIEW Mentor Training Hands-On Seminar 10 ni.com More than 3,000 leading corporations, foundations, and agencies, including founding sponsors and strategic partners © National Instruments Corporation 11 FRC LabVIEW Mentor Training Hands-On Seminar 130+ colleges, universities, and corporations provide close to $12 million in scholarship opportunities and host events, including: FRC LabVIEW Mentor Training Hands-On Seminar 12 ni.com http://usfirst.org/roboticsprograms/coachesmentors © National Instruments Corporation 13 FRC LabVIEW Mentor Training Hands-On Seminar From the 2009 competition, FIRST Robotics standardized on LabVIEW and CompactRIO for its next-generation mobile device controller. Impact of the Controller •Next-generation control system enables students to build more sophisticated robotics systems and meet more complex challenges •Hands-on learning helps connect theory and the real world •Industry-standard technology means students gain knowledge for university studies and professional careers FRC LabVIEW Mentor Training Hands-On Seminar 14 ni.com With LabVIEW for FIRST, students have one programming language they are working with throughout their school careers (from ages 6 to 18)—LabVIEW. If they pursue engineering careers, they can use LabVIEW in more than 5,000 universities across the globe. They will already have a solid foundation in LabVIEW to build on when they begin programming at the university level and into industry. © National Instruments Corporation 15 FRC LabVIEW Mentor Training Hands-On Seminar Overall how CompactRIO fits in. FRC LabVIEW Mentor Training Hands-On Seminar 16 ni.com © National Instruments Corporation 17 FRC LabVIEW Mentor Training Hands-On Seminar Benefits of the FIRST CompactRIO Controller •Students can build sophisticated robotics systems •Improved autonomous performance •Advanced vision capabilities •Multiple sensor choices •Intuitive, graphical LabVIEW software development will increase participation in autonomous programming •Industry-standard technology means students gain knowledge for university studies and professional careers FRC LabVIEW Mentor Training Hands-On Seminar 18 ni.com Note: Modules must be in the same slots in which they shipped for them to work with the FRC LabVIEW code. Please refer to usfirst.org for current slot placement. NI 9201: For connecting to sensors such as accelerometers, gyros, and so on NI 9403: For PWM, encoders, and so on NI 9472: Pneumatic relay for solenoids and relays © National Instruments Corporation 19 FRC LabVIEW Mentor Training Hands-On Seminar FRC LabVIEW Mentor Training Hands-On Seminar 20 ni.com © National Instruments Corporation 21 FRC LabVIEW Mentor Training Hands-On Seminar Software Development Fundamentals: Coaching students to implement flowcharts or state transition diagrams to meet control application challenges FRC LabVIEW Mentor Training Hands-On Seminar 22 ni.com Following a set of steps that has been refined over the years by software engineers can simplify solving problems using software. The software development method is a strategy for using LabVIEW to implement a software solution. Use the software development method to create a solution to your problem. In the software development method, complete the following steps: 1. Define the problem (scenario) 2. Design a flowchart (algorithm) 3. Implement the design 4. Test and verify the implementation 5. Maintain and update the implementation For more information on this process, please visit http://zone.ni.com/devzone/cda/tut/p/id/10051. © National Instruments Corporation 23 FRC LabVIEW Mentor Training Hands-On Seminar During the problem (scenario) stage of the software development method, you define what your problem is so that you can approach it with all of the necessary factors identified. You can remove extraneous factors during this phase and focus on the core problem that you must solve. How you identify the problem initially can save you time while you design and implement a solution. FRC LabVIEW Mentor Training Hands-On Seminar 24 ni.com During the problem (scenario) stage of the software development method, you define what your problem is so that you can approach it with all of the necessary factors identified. You can remove extraneous factors during this phase and focus on the core problem that you must solve. How you identify the problem initially can save you time while you design and implement a solution. © National Instruments Corporation 25 FRC LabVIEW Mentor Training Hands-On Seminar The first place to start with any software program is to map out a flowchart of how the process will execute. The ―process‖ could be a robot, a control loop, or basically any operation that has a series of steps that need to be completed. The image above shows a number of different flowcharts. The format/type of the flowchart is less important than the act of thinking through and drawing out the flowchart. Flowcharts help you develop a good understanding of the application flow by dividing the application into more manageable pieces called states or nodes. NI LabVIEW is a graphical programming language designed for measurement and automation applications, which makes it an ideal tool for quickly converting your paper design to code. Since a LabVIEW block diagram is similar to a flowchart, moving from the flowchart to software code is a quick process. FRC LabVIEW Mentor Training Hands-On Seminar 26 ni.com © National Instruments Corporation 27 FRC LabVIEW Mentor Training Hands-On Seminar Remember… Sub-Steps to Design a Flowchart 1. List all your inputs, outputs, and additional requirements 2. Define the possible states (nodes) and actions in each state 3. Define your state (node) transitions 4. Draw a flowchart linking the states (nodes) FRC LabVIEW Mentor Training Hands-On Seminar 28 ni.com 1. List all of your inputs, outputs, and additional requirements Inputs: Current Room Temperature • Since the temperature range is fixed at 70-75 deg F, the furnace set point temperature is not considered. • Assuming furnace is powered on and fuel (electricity or gas) is provided. • Outputs: Heater On/Off • Requirements: See above. • 2. • • • Define the possible states (nodes) and actions in each state Read Temp—Read the current room temperature Heater Off—Turn off heater Heater On—Turn on heater The more states you consider and add, generally the more robust the program/process will be. In many cases, additional states are added later during the code debug as scenarios not considered are encountered. For example, what happens when we need to shut down the furnace before the temperature reaches 75 °F for maintenance or if it is summer time? Here we could add the following new input, state, and action: Emergency Stop Button (input), EButton Pressed (state), and Turn Off Heater and Finish (action). © National Instruments Corporation 29 FRC LabVIEW Mentor Training Hands-On Seminar 3. Define your state (node) transitions • T<70 °F—Transition if temperature is less than 70 °F • T>75 °F—Transition if temperature is greater than 75 °F • If temperature within range do nothing 4. Draw a flowchart linking the states (nodes) *NOTE: Steps 3 and 4 are often most easily done together. FRC LabVIEW Mentor Training Hands-On Seminar 30 ni.com The more states you consider and add, generally the more robust the program/process will be. In many cases, additional states are added later during the code debug as scenarios not considered are encountered. For example, what happens when we need to shut down the furnace before the temperature reaches 75 °F for maintenance or if it is summer time? Here we could add the following new input, state, and action: Emergency Stop Button (input), E-Button Pressed (state), and Turn Off Heater and Finish (action). © National Instruments Corporation 31 FRC LabVIEW Mentor Training Hands-On Seminar During the problem (scenario) stage of the software development method, you define what your problem is so that you can approach it with all of the necessary factors identified. You can remove extraneous factors during this phase and focus on the core problem that you must solve. How you identify the problem initially can save you time while you design and implement a solution. FRC LabVIEW Mentor Training Hands-On Seminar 32 ni.com © National Instruments Corporation 33 FRC LabVIEW Mentor Training Hands-On Seminar 1. • • • List all of your inputs, outputs, and additional requirements Inputs: Quarters, Nickels, Dimes, Return Change Button Outputs: Coke, Change Requirements: See above. • • • • • • • • Define the possible states (nodes) and actions in each state Start—Initialize Nothing happens—Wait for event Quarter inserted—Quarter counted Dime inserted—Dime counted Nickel inserted—Nickel counted Return change—Change is returned Coke Product — Release Coke can Finish—End 2. The more states considered and added, generally the more robust the program/process will be. In many cases, additional states are added later during the code debug as scenarios not considered are encountered. For example, what happens if a damaged coin or fake coin is inserted? The scenario (state) is not considered in this example, but could be included with another state ―Unknown coin or object – return coin or object‖. Try to explore other unconsidered scenarios with the students. Another example, what happens if the machine is out of Coke!? FRC LabVIEW Mentor Training Hands-On Seminar 34 ni.com 3. Define your state (node) transitions • Return—Transition if the return change button pushed • Quarter/Dime/Nickel—Transition if the coin inserted is a quarter/dime/nickel • Money <50 cents—Transition to ―Wait for Event‖ to wait for more money or for return change button to be pushed. • Money >=50 cents—Transition to ―Coke Product‖ to issue a Coke if money is greater or equal to 50 cents. • Money >50 cents—This transition is used after Coke is dispensed to determine if change should be returned. • Money =50 cents—This transition is used after Coke is dispensed to determine if change should be returned. 4. Draw a flowchart linking the states (nodes) *NOTE: Steps 3 and 4 are often most easily done together. © National Instruments Corporation 35 FRC LabVIEW Mentor Training Hands-On Seminar More detail of this example. http://zone.ni.com/devzone/cda/tut/p/id/3024 The more states considered and added, generally the more robust the program/process will be. In many cases, additional states are added later during the code debug as scenarios not considered are encountered. For example, what happens if a damaged coin or fake coin is inserted? The scenario (state) is not considered in this example, but could be included with another state ―Unknown coin or object – return coin or object‖. Try to explore other unconsidered scenarios with the students. Another example, what happens if the machine is out of Coke!? FRC LabVIEW Mentor Training Hands-On Seminar 36 ni.com During the problem (scenario) stage of the software development method, you define what your problem is so that you can approach it with all of the necessary factors identified. You can remove extraneous factors during this phase and focus on the core problem that you must solve. How you identify the problem initially can save you time while you design and implement a solution. © National Instruments Corporation 37 FRC LabVIEW Mentor Training Hands-On Seminar FRC LabVIEW Mentor Training Hands-On Seminar 38 ni.com MANUAL MODE – Teleoperated 1. • • • List all of your inputs, outputs, and additional requirements Inputs: Joystick, Joystick Button Outputs: Left Motor, Right Motor, Arm Extender Requirements: See above. • • • • • • • • • • • Define the possible states (nodes) and actions in each state Start—Initialize Stand by—Wait for event Read Joystick—Read the joystick for a command Forward—Both motors forward Left—Right motor forward, Left motor reverse Right—Right motor reverse, Left motor forward Reverse—Both motors reverse Read Joystick Button— Poll to see if button pressed Extend Arm— Turn on digital line to extend arm Retract Arm— Turn off digital line to retract arm Finish—End 2. © National Instruments Corporation 39 FRC LabVIEW Mentor Training Hands-On Seminar *NOTE: Steps 3 and 4 are often most easily done together. FRC LabVIEW Mentor Training Hands-On Seminar 40 ni.com © National Instruments Corporation 41 FRC LabVIEW Mentor Training Hands-On Seminar AUTONOMOUS MODE – Step 2: Design a flowchart sub-steps shown below. 1. List all of your inputs, outputs, and additional requirements • Inputs: Line Follower, Linear Encoder, Rotary Encoder for Each Drive Motor, Proximity Sensor • Outputs: Left Motor, Right Motor, Arm Extender • This application has the following requirements: Robot must navigate a field with obstacles and other robots and press a button that can be reached only by an extendable arm There is a line on the course that marks a clear path from the robot’s starting position to the button’s location Autonomous mode only 2. Define the possible states (nodes) and actions in each state • Start—Initialize • Read Line—Get reading from line sensor to get position on line • On Line—Left and right drive motors forward at same speed • To Left of Line—Right motor 75% speed of left motor • To Right of Line—Left motor 75% speed of right motor • Run into Wall—Extend arm • Arm Extended to Required Distance—Retract arm • Finish—End The more states you consider and add, generally the more robust the program/process will be. In many cases, additional states are added later during the code debug as scenarios not considered are encountered. For example, what happens if another robot is in your robot’s path? The scenario (state) is not considered in this example, but it could be included with another state ―Robot Obstruction.‖ Try to explore other unconsidered scenarios with the students. Another example is what happens if the robot cannot find the line in the first place? 3. Define your state (node) transitions 4. Draw a flowchart linking the states (nodes) *NOTE: Steps 3 and 4 are often most easily done together. FRC LabVIEW Mentor Training Hands-On Seminar 42 ni.com © National Instruments Corporation 43 FRC LabVIEW Mentor Training Hands-On Seminar Introduction to NI LabVIEW: Overview of the LabVIEW environment, dataflow programming, and common programming structures used in the FRC code template FRC LabVIEW Mentor Training Hands-On Seminar 44 ni.com LabVIEW is a graphical programming language—you draw your program. It is easy to learn and use while being a powerful, full-featured programming language. LabVIEW uses data flow, meaning that a node does not run until it has all of the data from previous nodes at its input wires. A LabVIEW program consists of one or more virtual instruments (VIs). A VI is like a function or a procedure or a subroutine—except that it has a richer interface. © National Instruments Corporation 45 FRC LabVIEW Mentor Training Hands-On Seminar LabVIEW programs are called virtual instruments (VIs). Controls are inputs and indicators are outputs. Each VI contains three main parts: • Front Panel—How the user interacts with the VI. • Block Diagram—The code that controls the program. • Icon/Connector—Means of connecting a VI to other VIs. In LabVIEW, you build a user interface by using a set of tools and objects. The user interface is known as the front panel. You then add code using graphical representations of functions to control the front panel objects. The block diagram contains this code. In some ways, the block diagram resembles a flowchart. Users interact with the front panel when the program is running. Users can control the program, change inputs, and see data updated in real time. Controls are used for inputs such as adjusting a slide control to set an alarm value, turning a switch on or off, or stopping a program. Indicators are used as outputs. Thermometers, lights, and other indicators display output values from the program. These may include data, program states, and other information. Every front panel control or indicator has a corresponding terminal on the block diagram. When a VI is run, values from controls flow through the block diagram, where they are used in the functions on the diagram, and the results are passed into other functions or indicators through wires. FRC LabVIEW Mentor Training Hands-On Seminar 46 ni.com Use the Controls palette to place controls and indicators on the front panel. The Controls palette is available only on the front panel. To view the palette, select Window»Show Controls Palette. You also can display the Controls palette by right-clicking an open area on the front panel. Tack down the Controls palette by clicking the pushpin on the top left corner of the palette. © National Instruments Corporation 47 FRC LabVIEW Mentor Training Hands-On Seminar Use the Functions palette to build the block diagram. The Functions palette is available only on the block diagram. To view the palette, select Window»Show Functions Palette. You also can display the Functions palette by right-clicking an open area on the block diagram. Tack down the Functions palette by clicking the pushpin on the top left corner of the palette. FRC LabVIEW Mentor Training Hands-On Seminar 48 ni.com Express VIs are interactive VIs that have a configuration dialog box that helps the user customize the functionality of the Express VI. LabVIEW then generates a subVI based on these settings. SubVIs are VIs (consisting of a front panel and a block diagram) that are used within another VI. Functions are the building blocks of all VIs. Functions do not have a front panel or a block diagram. © National Instruments Corporation 49 FRC LabVIEW Mentor Training Hands-On Seminar If you enable the automatic selection tool and you move the cursor over objects on the front panel or block diagram, LabVIEW automatically selects the corresponding tool from the Tools palette. Toggle the automatic selection tool by clicking the Automatic Selection Tool button in the Tools palette. Use the Operating Tool to change the values of a control or select the text within a control. Use the Positioning Tool to select, move, or resize objects. The Positioning Tool changes shape when it moves over a corner of a resizable object. Use the Labeling Tool to edit text and create free labels. The Labeling Tool changes to a cursor when you create free labels. Use the Wiring Tool to wire objects together on the block diagram. FRC LabVIEW Mentor Training Hands-On Seminar 50 ni.com • • • • • • • • Click the Run button to run the VI. While the VI runs, the Run button appears with a black arrow if the VI is a top-level VI, meaning it has no callers and therefore is not a subVI. Click the Continuous Run button to run the VI until you abort or pause it. You also can click the button again to disable continuous running. While the VI runs, the Abort Execution button appears. Click this button to stop the VI immediately. Note: Avoid using the Abort Execution button to stop a VI. Either let the VI complete its data flow or design a method to stop the VI programmatically. By doing so, the VI is at a known state. For example, place a button on the front panel that stops the VI when you click it. Click the Pause button to pause a running VI. When you click the Pause button, LabVIEW highlights on the block diagram the location where you paused execution. Click the Pause button again to continue running the VI. Select the Text Settings pull-down menu to change the font settings for the VI, including size, style, and color. Select the Align Objects pull-down menu to align objects along axes, including vertical, top edge, left, and so on. Select the Distribute Objects pull-down menu to space objects evenly, including gaps, compression, and so on. Select the Resize Objects pull-down menu to change the width and height of front panel objects. © National Instruments Corporation 51 FRC LabVIEW Mentor Training Hands-On Seminar When your VI is not executable, a broken arrow is displayed in the Run button in the palette. • Finding Errors: To list errors, click on the broken arrow. To locate the bad object, click on the error message. • Execution Highlighting: Animates the diagram and traces the flow of the data, allowing you to view intermediate values. Click on the light bulb on the toolbar. • Probe: Used to view values in arrays and clusters. Click on wires with the Probe tool or right-click on the wire to set probes. • Retain Wire Values: Used with probes to view the values from the last iteration of the program. • Breakpoint: Set pauses at different locations on the diagram. Click on wires or objects with the Breakpoint tool to set breakpoints. FRC LabVIEW Mentor Training Hands-On Seminar 52 ni.com The Context Help window displays basic information about LabVIEW objects when you move the cursor over each object. Objects with context help information include VIs, functions, constants, structures, palettes, properties, methods, events, and dialog box components. To display the Context Help window, select Help»Show Context Help, press the <Ctrl-H> keys, or press the Show Context Help Window button in the toolbar. Connections displayed in Context Help: Required—bold Recommended—normal Optional—dimmed Additional Help • VI, Function, & How-To Help is also available. – Help» VI, Function, & How-To Help – Right-click the VI icon and choose Help, or – Choose ―Detailed Help.‖ on the context help window. • LabVIEW Help—reference style help – Help»Search the LabVIEW Help… © National Instruments Corporation 53 FRC LabVIEW Mentor Training Hands-On Seminar LabVIEW follows a dataflow model for running VIs. A block diagram node executes when all its inputs are available. When a node completes execution, it supplies data to its output terminals and passes the output data to the next node in the dataflow path. Visual Basic, C++, JAVA, and most other text-based programming languages follow a control flow model of program execution. In control flow, the sequential order of program elements determines the execution order of a program. Consider the block diagram above. It adds two numbers and then multiplies by 2 from the result of the addition. In this case, the block diagram executes from left to right, not because the objects are placed in that order, but because one of the inputs of the Multiply function is not valid until the Add function has finished executing and passed the data to the Multiply function. Remember that a node executes only when data is available at all of its input terminals, and it supplies data to its output terminals only when it finishes execution. In the second piece of code, the Simulate Signal Express VI receives input from the controls and passes its result to the Graph. You may consider the add-multiply and the simulate signal code to co-exist on the same block diagram in parallel. This means that they will both begin executing at the same time and run independently of one another. If the computer running this code had multiple processors, these two pieces of code could run independently of one another (each on its own processor) without any additional coding. FRC LabVIEW Mentor Training Hands-On Seminar 54 ni.com LabVIEW uses many common data types, including Boolean, numeric, arrays, strings, and clusters. The color and symbol of each terminal indicate the data type of the control or indicator. Control terminals have a thicker border than indicator terminals. Also, arrows appear on front panel terminals to indicate whether the terminal is a control or an indicator. An arrow appears on the right if the terminal is a control and on the left if the terminal is an indicator. Definitions • Array: Arrays group data elements of the same type. An array consists of elements and dimensions. Elements are the data that make up the array, and a dimension is the length, height, or depth of an array. An array can have one or more dimensions and as many as (231) – 1 elements per dimension, memory permitting. • Cluster: Clusters group data elements of mixed types, such as a bundle of wires in a telephone cable, where each wire in the cable represents a different element of the cluster. See Help»Search the LabVIEW Help… for more information. The LabVIEW User Manual on ni.com provides additional references for data types found in LabVIEW. © National Instruments Corporation 55 FRC LabVIEW Mentor Training Hands-On Seminar •View»Navigation Window or Ctrl-Shift-N The navigation window can help you navigate through your program if you have a large block diagram. •Tools»CompactRIO Imaging Tool… This is how to get to the Imaging Tool to update the firmware on your cRIO-FRC. •Tools»Setup Axis Camera This setup is used to configure your Axis camera including the IP address. •Tools»Options Use this for the myriad options on setting up LabVIEW, customizing the environment to your liking, and so on. FRC LabVIEW Mentor Training Hands-On Seminar 56 ni.com © National Instruments Corporation 57 FRC LabVIEW Mentor Training Hands-On Seminar Exercise 1: Create a Simple LabVIEW VI Use this exercise to create a simple LabVIEW VI that simulates an analog signal and plots it on a waveform graph. The VI tests the input values against a user-specified limit and lights an LED if the input value exceeds that limit. Below are pictures identifying each of the palettes found in LabVIEW to assist you as you complete these exercises. Note: LabVIEW has a built-in Automatic Tool Selection feature that changes the behavior of the cursor depending on what type of object you are pointing at. Functions Palette Controls Palette 1. If you have not already done so, click the LabVIEW icon on your quick launch toolbar. If the icon is not present in the quick launch, the desktop should feature a LabVIEW shortcut or you can navigate to Start»Programs»National Instruments»LabVIEW 8.6»LabVIEW. FRC LabVIEW Mentor Training Hands-On Seminar 58 ni.com Once you launch LabVIEW, a splash screen like the following appears. 2. Click More… 3. Under the VI tree heading expand From Template. Notice the different categories on the left side of the window that correspond to the types of tasks from which you can choose. You can select Blank VI to start from scratch. You also can use template VIs as a starting point to build your application. Projects and Other Files are more advanced components that are not described in detail in this manual. For more information on any of the listings in the New Dialog Box, click the Help button in the lower right corner of the window. © National Instruments Corporation 59 FRC LabVIEW Mentor Training Hands-On Seminar 4. Select VI»From Template»Tutorial (Getting Started)»Generate and Display and click OK. Two windows appear. The gray window is the front panel and the white one is the block diagram. The front panel contains the parts of your VI used for presenting information while interfacing with the user, and the block diagram contains the code that controls the VI functionality. You can toggle between the two windows by selecting Window»Show Block Diagram or Window»Show Front Panel. You can also switch between the windows by pressing <Ctrl-E> on the keyboard. FRC LabVIEW Mentor Training Hands-On Seminar 60 ni.com 5. Examine the front panel and block diagram of this template VI in the below figure. The front panel contains a waveform chart and a STOP button. The block diagram contains a Simulate Signal VI that is configured to simulate a sine wave and plot it to the graph. © National Instruments Corporation 61 FRC LabVIEW Mentor Training Hands-On Seminar 6. Switch back to the front panel by pressing <Ctrl-E>. Since the Run button (the white arrow in the top left corner) is solid, you can run this VI as it is. Click the Run button and examine the operation of the VI. When you are finished, click the STOP button on the front panel to stop running the VI. Note: As you will see later in the exercise, when the Run button in the upper left corner of both the front panel and the block diagram changes from a solid white arrow to a broken gray arrow, this new icon indicates that the VI is currently not executable. 7. Now you can add some functionality to this basic VI. Modify the VI to flash an alarm whenever the signal value is above a certain level. Open the Controls palette (if it is not open already) by rightclicking empty space on the front panel window. A small pushpin icon in the upper left corner of this palette appears. Click this pushpin to force the palette to remain on your screen. 8. Click the Numeric Controls sub-palette and select a Vertical Pointer Slide to be placed on the front panel. To do this, click the Vertical Pointer Slide and drag it to the front panel. Click once to place it. FRC LabVIEW Mentor Training Hands-On Seminar 62 ni.com 9. Click the Express menu item on the Controls palette to return to the Express Controls palette. 10. Click the LEDs sub-palette and place a Round LED on the front panel. © National Instruments Corporation 63 FRC LabVIEW Mentor Training Hands-On Seminar 11. Right-click the Vertical Pointer Slide and select Properties. The Properties Dialog Box appears. Examine the different properties that you can modify. Make the following changes on the Appearance tab and click OK to apply the changes. Label: Limit Slider 1: Check Show digital display(s) FRC LabVIEW Mentor Training Hands-On Seminar 64 ni.com 12. Right-click the Round LED labeled Boolean and select Properties. Examine the different properties that you can modify. On the Appearance tab, change the label from Boolean to Alarm. Click OK to apply your change. Move the objects on the front panel so it resembles the following. 13. Switch to the block diagram by pressing <Ctrl-E>. Double-click the Simulate Signal ExpressVI to bring up its properties window. Examine the different properties you can modify. Change the Amplitude of the signal to 10. Click OK to apply this change and to close the properties window. © National Instruments Corporation 65 FRC LabVIEW Mentor Training Hands-On Seminar 14. Open the functions palette by right-clicking the block diagram. Select Arithmetic & Comparison»Comparison and place the Comparison Express VI within the while loop on the diagram. FRC LabVIEW Mentor Training Hands-On Seminar 66 ni.com When you place the Comparison Express VI on the block diagram, a dialog box appears that you can use to configure which type of comparison you want to implement. Make the following selections and then click OK to apply these changes and to close the dialog box. Compare Condition: Greater Comparison Inputs: Compare to second signal input © National Instruments Corporation 67 FRC LabVIEW Mentor Training Hands-On Seminar 15. You can connect controls, functions, and indicators on the block diagram by pointing to an object and clicking it when the cursor changes to a spool of wire. You can then move the cursor to the object you want to connect it to and click again. Connect the Limit control to the Alarm indicator. Note: The Run button in the upper left corner of both the front panel and the block diagram has changed from a solid white arrow to a broken gray arrow. This new icon indicates that the VI is currently not executable. If you click the Run button when it is solid and white, it runs the VI. Clicking it when it is broken and gray opens the error list dialog box to help you debug the VI. 16. Click the Run button now. The resulting dialog box shows that, in this case, the error results from connecting the terminals of two different types. Since the Limit control is a Numeric type and the Alarm indicator is a Boolean type, you cannot wire these two terminals together. Highlight the error by clicking it and then click Show Error. LabVIEW highlights the location of the error. 17. Notice that the wire between Limit and Alarm is dashed and a red is displayed on it. To delete this broken wire, press <Ctrl-B>. This keyboard shortcut removes all broken wires from the block diagram. FRC LabVIEW Mentor Training Hands-On Seminar 68 ni.com 18. Make your block diagram resemble the below image by completing the following steps. a. Wire the Limit control to the Operand 2 input of the Comparison function. b. Connect the wire between the Simulate Signals block and the Waveform Graph to the Operand 1 input of the Comparison function. c. Wire the Result output of the Comparison function to the Alarm indicator. Your block diagram should now resemble the following: 19. Switch to the front panel by pressing <Ctrl-E>. 20. Run the VI. While running the VI, you can change the Limit value by moving the slider or changing the digital display next to it. Also notice that when a data point received from the Simulate Signal VI is greater than the Limit value, the Alarm indicator lights up. While the VI is still running, switch to the block diagram by pressing <Ctrl-E>. Enable Highlight Xxecution by clicking the light bulb on the tool bar. This slow the program and allows you to see the flow of data through your program. 21. When you are finished, stop the VI by clicking the STOP button on the front panel. END LABVIEW EXERCISE 1. © National Instruments Corporation 69 FRC LabVIEW Mentor Training Hands-On Seminar Optional Exercise 1: The LabVIEW Help System The LabVIEW help system is a great place to learn about LabVIEW and visit when you have questions. This exercise introduces you to this rich source of information. 1. Go back to the VI you just created and press <F1> on the keyboard to start the help system. 2. Expand Fundamentals»LabVIEW Environment and explore the information available here, look around, and get a feel for how it is organized. 3. Take a few minutes to explore other topics in the help system. 4. Click on the Search tab to try searching on analysis functions for features you might need in your work applications. FRC LabVIEW Mentor Training Hands-On Seminar 70 ni.com © National Instruments Corporation 71 FRC LabVIEW Mentor Training Hands-On Seminar From the LabVIEW block diagram within the Functions palette are a series of sub-palettes related to FIRST. The two primary palettes used are FIRST Vision and WPI Robotics. FRC LabVIEW Mentor Training Hands-On Seminar 72 ni.com Accessible from the Getting Started launch window of LabVIEW FRC is an option to ―Find FRC Examples‖. Here you will find may different examples of LabVIEW code to interface with different components of the robot. © National Instruments Corporation 73 FRC LabVIEW Mentor Training Hands-On Seminar From the Find FRC Examples: • There are 44 FRC specific examples – more added every year • They tell you what to configure before running, and what can be changed while running. • They all include wiring diagrams to aid in setting up and troubleshooting your electrical system – even if you don’t program in LabVIEW! FRC LabVIEW Mentor Training Hands-On Seminar 74 ni.com LabVIEW Project Use projects to group together LabVIEW and other files, create build specifications, and deploy or download files to targets. A target is a device or machine on which a VI runs. When you save a project, LabVIEW creates a project file (.lvproj), which includes configuration information, build information, deployment information, and references to files in the project. You must use a project to build stand-alone applications and shared libraries. You also must use a project to work with a real-time, FPGA, or PDA target. Refer to the specific module documentation for more information about using projects with the LabVIEW Real-Time, LabVIEW FPGA, and LabVIEW Mobile modules. Project-style LabVIEW Plug and Play instrument drivers use the project and project library features in LabVIEW 8.6. You can use project-style drivers the same you used previous LabVIEW Plug and Play drivers. Project Explorer Window Use the Project Explorer Window to create and edit projects. Select File»New Project to display the Project Explorer Window. You also can select Project»New Project or select File»New and then select Empty Project in the new dialog box to display the Project Explorer Window. © National Instruments Corporation 75 FRC LabVIEW Mentor Training Hands-On Seminar Clusters group like or unlike components together. They are equivalent to a record in Pascal or a struct in ANSI C. Cluster components may be of different data types. Examples • Error information—Grouping a Boolean error flag, a numeric error code, and an error source string to specify the exact error. • User information—Grouping a string indicating a user’s name and an ID number specifying the user’s security code. All elements of a cluster must be either controls or indicators. You cannot have a string control and a Boolean indicator. Think of clusters as grouping individual wires (data objects) together into a cable (cluster). FRC LabVIEW Mentor Training Hands-On Seminar 76 ni.com The terms bundle and cluster are closely related in LabVIEW. Example: You use a bundle function to create a cluster. You use an unbundle function to extract the parts of a cluster. Bundle—Forms a cluster containing the given objects in the specified order. Bundle by Name—Updates specific cluster object values (the object must have an owned label). Unbundle—Splits a cluster into each of its individual elements by data type. Unbundle by Name—Returns the cluster elements whose names you specify. Note: You must have an existing cluster wired into the middle terminal of the function to use Bundle by Name. © National Instruments Corporation 77 FRC LabVIEW Mentor Training Hands-On Seminar Use While or For Loops to enable sections of your LabVIEW code to run repeatedly. A While Loop will continue to execute until a stop condition is specified. The stop condition can be a simple button press or a series of specific logical conditions. The For Loop will execute a predetermined number of times as specified by the number of iterations you wire to the N input. You may also connect an array wire to the edge of a For Loop and leave the N input unwired. The For Loop’s number of iterations will be determined by the array size that is wired at its edge. This is called auto-indexing. To find the While and For Loops, as well as other control structures, left-click on any empty space on the block diagram and navigate to Programming»Structures. FRC LabVIEW Mentor Training Hands-On Seminar 78 ni.com Place loops in your diagram by selecting them from the Functions palette: • When selected, the mouse cursor becomes a special pointer that you use to enclose the section of code you want to include in the While Loop. • Click the mouse button to define the top-left corner and then click the mouse button again at the bottom-right corner. The While Loop boundary appears around the selected code. • Drag or drop additional nodes in the While Loop if needed. © National Instruments Corporation 79 FRC LabVIEW Mentor Training Hands-On Seminar Case Structure The case structure has one or more subdiagrams, or cases, one of which executes when the structure executes. The value wired to the selector terminal determines which case to execute and can be Boolean, string, integer, or enumerated. Rightclick the structure border to add or delete cases. Use the Labeling tool to enter value(s) in the case selector label and configure the value(s) handled by each case. It is found at Functions»Programming»Structures»Case Structure. Select Returns the value wired to the t input or f input, depending on the value of s. If s is TRUE, this function returns the value wired to t. If s is FALSE, this function returns the value wired to f. The connector pane displays the default data types for this polymorphic function. It is found at Functions»Programming»Comparison»Select. • Example A: Boolean input—Simple if-then case. If the Boolean input is TRUE, the true case executes; otherwise the FALSE case executes. • Example B: Numeric input. The input value determines which box to execute. If out of range of the cases, LabVIEW chooses the default case. • Example C: When the Boolean passes a TRUE value to the Select VI, the value 5 is passed to the indicator. When the Boolean passes a FALSE value to the Select VI, 0 is passed to the indicator. FRC LabVIEW Mentor Training Hands-On Seminar 80 ni.com Shift registers transfer data from one iteration to the next: • Right-click on the left or right side of a For Loop or a While Loop and select Add Shift Register. • The right terminal stores data at the end of an iteration. Data appears at the left terminal at the start of the next iteration. • A shift register adapts to any data type wired into it. An input of 0 would result in an output of 5 on the first iteration, 10 on the second iteration, and 15 on the third iteration. Said another way, shift registers are used to retain values from one iteration to the next. They are valuable for many applications that have memory or feedback between states. See Help»Search the LabVIEW Help… for more information. © National Instruments Corporation 81 FRC LabVIEW Mentor Training Hands-On Seminar FRC LabVIEW Mentor Training Hands-On Seminar 82 ni.com Text appears on the front panel control, but the terminal on the block diagram sends out a numeric value which can be move easy to manipulate. © National Instruments Corporation 83 FRC LabVIEW Mentor Training Hands-On Seminar One of the most important decision-making structures in LabVIEW is the case structure. The case structure enables you to encapsulate sections of code so they run only when a specific condition that you control occurs. The case structure changes states based on its input value. For example, you might have three states defined in your program: initialize, collect data, and report data. The code for these different states would reside within the boundaries of the case structure, and you would switch between the states with either buttons on a front panel or some combination of logic built into your LabVIEW application. FRC LabVIEW Mentor Training Hands-On Seminar 84 ni.com A real-world example of a state machine using the furnace example state diagram. © National Instruments Corporation 85 FRC LabVIEW Mentor Training Hands-On Seminar FRC LabVIEW Mentor Training Hands-On Seminar 86 ni.com Exercise 2: Controlling Program Execution If you are up for a challenge, try to build the following LabVIEW application without using the instructions; if you feel you need more guidance, skip down to the step-by-step section for a complete set of instructions. Challenge Application Using a While Loop, case structure, toggle switch, and the Random Number Generator VI, create a simple application that charts either a random number or a constant value, depending on your toggle switch position. If you are really ambitious, add logic to the VI so it stops EITHER when you press the STOP button OR when the loop iterations have exceeded 1,000. Step-by-Step Instructions In this exercise, create a LabVIEW VI that outputs either a random number or a constant value, depending on the state of a toggle switch. Use a case structure to handle the logic of which signal is output and a While Loop to keep the application running until a Stop button is pressed. 1. Create a New Blank VI, from the File menu. 2. Start by placing a While Loop on the block diagram. Draw it large enough to accommodate the other code you will place inside it. You can locate the While Loop on the Express» Execution Control palette as shown below. Note: Creating a while loop from the Execution Control Express Palette, auto-generated the STOP button. © National Instruments Corporation 87 FRC LabVIEW Mentor Training Hands-On Seminar 3. Next select the Case Structure from the same palette and place it inside the While Loop as shown below. 4. Then add the Random Number Generator to the True case of the case structure. On the Functions Palette, navigate to Programming»Numeric, select Random Number (0-1) as shown below, and place it inside the True case statement. Note that the Random Number function disappears, as it is contained inside the True case. It is still present in the Block Diagram, but the case structure only shows one case statement at a time. FRC LabVIEW Mentor Training Hands-On Seminar 88 ni.com 5. Next, switch the case statement from True to False, as shown below. 6. Now add the Numeric Constant to the False case of the case structure. On the Functions Palette, navigate to Programming»Numeric, select Numeric Constant as shown below, and place it inside the False case statement. © National Instruments Corporation 89 FRC LabVIEW Mentor Training Hands-On Seminar 7. Switch to your front panel (Ctrl-E) and place a Waveform Chart as shown below. FRC LabVIEW Mentor Training Hands-On Seminar 90 ni.com 8. Also add a vertical toggle switch from the Boolean palette to the front panel as shown below. 9. Your front panel should look like the following. © National Instruments Corporation 91 FRC LabVIEW Mentor Training Hands-On Seminar 10. Switch back to the block diagram and wire the toggle switch to the case selector input of the case structure as shown below. Also wire the Numeric Constant and Random Number VI to the Waveform Chart as shown. FRC LabVIEW Mentor Training Hands-On Seminar 92 ni.com 11. Next, add a time delay to slow the execution of the loop. Without this delay, the loop runs much faster than our eyes can follow and takes up a lot of the PC’s processing power for no good reason. On the Functions palette, navigate to Express»Execution Control»Time Delay and drop the time delay within the While Loop but outside the case structure. The Time Delay Express VI opens the following dialog box. Set the time delay to 0.01 s so the loop runs 100 times per second. Press OK. © National Instruments Corporation 93 FRC LabVIEW Mentor Training Hands-On Seminar 12. Your block diagram should resemble the one below. 13. You are ready to test your VI by running the program and switching the toggle switch back and forth. You should see the graph switch between a random and constant number on the chart. HINT: After running the program with the toggle in the “off” position, right-click the Waveform Chart from the front panel and deselect the AutoScale Y option. This stops the chart from autoscaling back and forth when the toggle is selected. FRC LabVIEW Mentor Training Hands-On Seminar 94 ni.com Extra Challenge Add logic to the VI so it stops either when you press the STOP button or when the loop iterations have exceeded 1,000. 1. Do this by inserting an Or function from the Boolean palette before the STOP button, as shown below. © National Instruments Corporation 95 FRC LabVIEW Mentor Training Hands-On Seminar 2. Next select the Greater? function from the Programming>>Comparisons palette. 3. Wire as shown below. FRC LabVIEW Mentor Training Hands-On Seminar 96 ni.com 4. Right-click on the open terminal of the Greater? block and select Create»Constant. 5. Change the constant to 1000 as shown below and Run the VI. Given that we have defined a loop rate of 0.01s, how long do we expect the program to run? END LABVIEW EXERCISE 2 © National Instruments Corporation 97 FRC LabVIEW Mentor Training Hands-On Seminar Useful-to-know tools, techniques, and details. Not covered in hands-on session. FRC LabVIEW Mentor Training Hands-On Seminar 98 ni.com Creating SubVIs After you build a VI, you can use it in another VI. A VI called from the block diagram of another VI is called a subVI. You can reuse a subVI in other VIs. To create a subVI, you need to build a connector pane and create an icon. A subVI node corresponds to a subroutine call in text-based programming languages. A block diagram that contains several identical subVI nodes calls the same subVI several times. The subVI controls and indicators receive data from and return data to the block diagram of the calling VI. Click the Select a VI icon or text on the Functions palette, navigate to and doubleclick a VI, and place the VI on a block diagram to create a subVI call to that VI. You can easily customize subVI input and output terminals as well as the icon. Follow the instructions below to quickly create a subVI. Creating SubVIs From Sections of a VI Convert a section of a VI into a subVI by using the Positioning tool to select the section of the block diagram you want to reuse and by selecting Edit»Create SubVI. An icon for the new subVI replaces the selected section of the block diagram. LabVIEW creates controls and indicators for the new subVI, automatically configures the connector pane based on the number of control and indicator terminals you selected, and wires the subVI to the existing wires. See Help»Search the LabVIEW Help…»SubVIs for more information. © National Instruments Corporation 99 FRC LabVIEW Mentor Training Hands-On Seminar With the connector pane and icon viewer, you can define the data being transferred in and out of the subVI as well as its appearance in the main LabVIEW code. Every VI displays an icon in the upper-right corner of the front panel and block diagram windows. After you build a VI, build the connector pane and icon so you can use the VI as a subVI. The icon and connector pane correspond to the function prototype in text-based programming languages. There are many options for the connector pane, but some general standards are specified above. Notably, always reserve the top terminals for references and the bottom terminals for error clusters. To define a connector pane, right-click the icon in the upper-right corner of the front panel and select Show Connector from the shortcut menu. Each rectangle on the connector pane represents a terminal. Use the terminals to assign inputs and outputs. Select a different pattern by right-clicking the connector pane and selecting Patterns from the shortcut menu. FRC LabVIEW Mentor Training Hands-On Seminar 100 ni.com An icon is a graphical representation of a VI. If you use a VI as a subVI, the icon identifies the subVI on the block diagram of the VI. The Icon Editor is a utility built into LabVIEW that you can use to fully customize the appearance of your subVIs. This allows you to visually distinguish your subVIs, which greatly improves the usability of the subVI in large portions of code. After you’ve defined the connector pane and have customized the icon, you are ready to place the subVI into other LabVIEW code. There are two ways to accomplish this: To place a subVI on the block diagram 1. Select the Select a VI… from the Functions palette 2. Navigate to the VI you want to use as a subVI 3. Double-click it to place it on the block diagram To place an open VI on the block diagram of another open VI 1. Use the Positioning tool to click the icon of the VI you want to use as a subVI 2. Drag the icon to the block diagram of the other VI © National Instruments Corporation 101 FRC LabVIEW Mentor Training Hands-On Seminar Time Delay The Time Delay Express VI delays execution by a specified number of seconds. Following the rules of dataflow programming, the While Loop will not iterate until all tasks inside it are complete, thus delaying each iteration of the loop. Timed Loops These loops execute each iteration of the loop at the period you specify. Use the Timed Loop when you want to develop VIs with multirate timing capabilities, precise timing, feedback-on-loop execution, timing characteristics that change dynamically, or several levels of execution priority. Double-click the Input Node or right-click the Input Node and select Configure Timed Loop from the shortcut menu to display the Loop Configuration dialog box, where you can configure the Timed Loop. The values you enter in the Loop Configuration dialog box appear as options in the Input Node. Wait Until Next ms Multiple Waits until the value of the millisecond timer becomes a multiple of the specified millisecond multiple. Use this function to synchronize activities. You can call this function in a loop to control the loop execution rate. However, it is possible that the first loop period might be short. This function makes asynchronous system calls, but the nodes themselves function synchronously. Therefore, it does not complete execution until the specified time has elapsed. Functions»Programming»Timing»Wait Until Next ms Multiple FRC LabVIEW Mentor Training Hands-On Seminar 102 ni.com The waveform chart is a special numeric indicator that displays one or more plots. It is located on the Controls»Modern»Graph palette. Waveform charts can display single or multiple plots. The following front panel shows an example of a multiplot waveform chart. You can change the minimum and maximum values of either the x-axis or y-axis by double-clicking on the value with the labeling tool and typing the new value. Similarly, you can change the label of the axis. You can also right-click the plot legend and change the style, shape, and color of the trace that is displayed on the chart. © National Instruments Corporation 103 FRC LabVIEW Mentor Training Hands-On Seminar Graphs are very powerful indicators in LabVIEW. You can use these highly customizable tools to concisely display a great deal of information. With the properties page of the graph, you can display settings for plot types, scale and cursor options, and many other features of the graph. To open the properties page, rightclick the graph on the front panel and choose Properties. You can also create technical-paper-quality graphics with the “export simplified image” function. Right-click the graph and select Data Operations»Export Simplified Image… FRC LabVIEW Mentor Training Hands-On Seminar 104 ni.com For Loops and While Loops can index and accumulate arrays at their boundaries. This is known as auto-indexing. • The indexing point on the boundary is called a tunnel • The For Loop is auto-indexing-enabled by default • The While Loop is auto-indexing-disabled by default Examples • Enable auto-indexing to collect values within the loop and build the array. All values are placed in the array upon exiting the loop. • Disable auto-indexing if you are interested only in the final value. © National Instruments Corporation 105 FRC LabVIEW Mentor Training Hands-On Seminar To create an array control or indicator as shown, select an array on the Controls»Modern»Array, Matrix, and Cluster palette, place it on the front panel, and drag a control or indicator into the array shell. If you attempt to drag an invalid control or indicator such as an XY graph into the array shell, you are unable to drop the control or indicator in the array shell. You must insert an object in the array shell before you use the array on the block diagram. Otherwise, the array terminal appears black with an empty bracket. FRC LabVIEW Mentor Training Hands-On Seminar 106 ni.com To add dimensions to an array one at a time, right-click the index display and select Add Dimension from the shortcut menu. You also can use the Positioning tool to resize the index display until you have as many dimensions as you want. 1D Array Viewing a Single Element: 1D Array Viewing Multiple Elements: 2D Array Viewing a Single Element: 2D Array Viewing Multiple Elements: © National Instruments Corporation 107 FRC LabVIEW Mentor Training Hands-On Seminar The waveform data type carries the data, start time, and ∆t of a waveform. You can create waveforms using the Build Waveform function. Many of the VIs and functions you use to acquire or analyze waveforms accept and return the waveform data type by default. When you wire a waveform data type to a waveform graph or chart, the graph or chart automatically plots a waveform based on the data, start time, and ∆x of the waveform. When you wire an array of waveform data types to a waveform graph or chart, the graph or chart automatically plots all of the waveforms. Build Waveform Builds a waveform or modifies an existing waveform with the start time represented as an absolute timestamp. Timestamps are accurate to real-world time and date and are very useful for real-world data recording. Bundle Builds a waveform or modifies an existing waveform with a relative timestamp. The input to t0 is a DBL. By building waveforms using the bundle, you can plot data on the negative x-axis (time). FRC LabVIEW Mentor Training Hands-On Seminar 108 ni.com Section Objectives: A. Understand the FRC code template including structure components, subVIs. B. Program a robot by completing several exercises. © National Instruments Corporation 109 FRC LabVIEW Mentor Training Hands-On Seminar As you will see in the next exercise, when you configure a new project in LabVIEW FRC, a default code template will be available. By using this core template, you should be able to drive the robot in Arcade mode without making any code changes. In the coming slides, we will investigate the block diagram (code) of the Robot Main.vi to understand the key components and their functions. FRC LabVIEW Mentor Training Hands-On Seminar 110 ni.com Robot Main implements the framework and scheduler for your robotics program. It should not be necessary to modify this VI. You should be able to code your robot within the Team VIs described below. 1. Begin.vi Called once at beginning, to open I/O, initialize sensors and any globals, load settings from a file, and so on. 2. Autonomous Independent.vi Automatically started with the first packet of autonomous and aborted on the last packet. Write this Team VI to loop for the entirety of the autonomous period. 3. TeleOp.vi Called each time a teleop DS packet is received and robot is enabled. 4. Disabled.vi Called each time a packet is received and the robot is disabled. 5. Vision.vi A parallel loop that acquires and processes camera images. 6. PeriodicTasks.vi Parallel loops running at user-defined rates. 7. Finish.vi Called before exiting, so you can save data, clean up I/O, etc. 8. Build DashBoard Data.vi Called for each driver station packet including timeouts. It is used to send select I/O values back to the Dashboard. © National Instruments Corporation 111 FRC LabVIEW Mentor Training Hands-On Seminar Referencing the LabVIEW block diagram above, the code will start by executing the Begin command, the Reference to the Autonomous Independent.vi, and the Generate Occurrence.vi in parallel. The StartCOM.vi will execute sequentially after the Generate Occurrence.vi has executed since it is connected with a data wire to the Generate Occurrence.vi. The Sequence Structure with the Vision.vi will execute sequentially after the Begin command has been executed since it is connected to the Begin.vi with an error wire. The large While Loop will execute only after the Begin.vi, Generate Occurrence.vi, and The Reference to the Autonomous Independent.vi have all executed. Data from these VIs must all flow to the edge of the While Loop before the While Loop will start. This is because the While Loop is waiting for data from all of these VIs as indicated by the wires connected to the left side of the While Loop. (The side of the loop the wire are connected is not important, but mentioned for clarity in referencing the image above.) The Sequence Structure and the While Loop will be running in parallel. Within the Sequence Structure, the Vision.vi and Timed Tasks.vi run in parallel. This is because there are no data wires connecting them to control the execution order. Within the While Loop, the Robot Mode.vi will run in parallel to the Dashboard Data.vi. The TeleOp.vi will run sequentially after the Robot Mode.vi since they are connected with data wires. FRC LabVIEW Mentor Training Hands-On Seminar 112 ni.com © National Instruments Corporation 113 FRC LabVIEW Mentor Training Hands-On Seminar This subVI is called once at the start of the Robot Main.vi. Its purpose is to initialize and define all of the motors, sensors, I/O, and other items connected to your robot. The default FRC robot code initializes the camera settings, two motors, and joystick. Turn on the Context Help by pressing <Ctrl-H>. Then hover over each function on the block diagram to see its name and description. FRC LabVIEW Mentor Training Hands-On Seminar 114 ni.com There are two green Boolean constants wired into the Open 2 Motor VI. They control the orientation of the motors. There are two blue parameters wired into Open 2 Motor VI, PWM 1 and PWM 2. They correspond to the PWM output ports on the robot. The Open 2 Motor VI outputs a reference cluster and an error cluster to the Motor Reference Registry Set VI. The Open 2 Motors VI opens a reference to the robot drive for a two-motor robot using Jaguar motor controllers. © National Instruments Corporation 115 FRC LabVIEW Mentor Training Hands-On Seminar Motor Reference Registry Set VI name is Robot DriveRefNumRegistry Set VI. The pink string refers to the refnum name given to the device. Here “Left and Right Motors” will be called later in the program when you need to access these Jaguar motor controllers. The Drive Reference Registry Set VI sets a reference into a registry so that other VIs can call the reference. FRC LabVIEW Mentor Training Hands-On Seminar 116 ni.com To see the block diagram of the Teleop SubVI, select Teleop Enable in the case structure and then double-click it in the Robot Main. The front panel of the Teleop SubVI will open. Switch to its block diagram. This is the code that reads the joystick and makes the robot move in Arcade Drive. © National Instruments Corporation 117 FRC LabVIEW Mentor Training Hands-On Seminar Autonomous mode is an Independent SubVI that gets launched whenever the robot driver station instructs the robot to go into autonomous mode. Unlike the Teleop VI, the autonomous independent VI actually runs once but lasts for several seconds. It does not run over and over again. Therefore, the Autonomous Independent SubVI is not included in the main loop. To access the Autonomous Independent SubVI , double-click on the SubVI reference icon in the Robot Main.vi. Switch to the block diagram of the Autonomous Independent SubVI by pressing <Ctrl-E>. On the left of the block diagram, there are Driver Station SubVIs that provide data on driver position, alliance color, digital switch settings, and analog voltages. The main code is disabled to prevent unexpected execution in Autonomous mode. To enable this code, right-click on the edge of the frame and choose Enable This Subdiagram. FRC LabVIEW Mentor Training Hands-On Seminar 118 ni.com In the first loop, the code will turn the robot to the right for 1 second. The loop iterates every 50 ms because of the wait (ms) function. (50 ms * 20 loops = 1 second) The loop will run 20 times because there is a comparison function attached to the iteration terminal. 1 is added to the value of the iteration terminal because it begins counting at 0. When the While Loop has iterated 20 times, the comparison function will output at true into the conditional terminal and will cause the program to exit the loop. The Arcade Drive VI in the first loop turns the robot to the right. The second loop is similar to the first loop, but it will turn the robot to the left for 0.5 seconds. The loop iterates every 50 ms due to the milliseconds to wait function, and the loop will run 10 times, for 0.5 seconds in total. The Arcade Drive VI in the second loop turns the robot to the left. The third loop stops the robot. This loop is an infinite loop because it has a false value (constant) wired to the conditional terminal, which causes the loop to run forever. The input values to the Arcade Drive VI are 0, which means the motors stand still. © National Instruments Corporation 119 FRC LabVIEW Mentor Training Hands-On Seminar To see the block diagram of Finish SubVI, select Finish in the case structure and then double-click it in Robot Main. The default FRC robot code closes the reference of the camera settings, two motors, and joystick. Whenever a device is added to Begin.vi, you should also close that device in Finish.vi. FRC LabVIEW Mentor Training Hands-On Seminar 120 ni.com To close a motor reference, use a Drive Reference Get VI (Robot DriveRefNum Registry Get.vi) and a Drive Reference Close VI (RobotDriveClose.vi). The Drive Reference Get VI gets the drive reference previously created (in the Begin VI) by name and outputs a reference cluster to the Drive Reference Close VI. The Drive Reference Close VI gets the reference cluster and closes the specific drive reference. © National Instruments Corporation 121 FRC LabVIEW Mentor Training Hands-On Seminar FRC LabVIEW Mentor Training Hands-On Seminar 122 ni.com FRC Robot Exercise 1: Configure and Deploy Project In this exercise, configure and deploy a LabVIEW Project and run the FRC Driver Station to drive the robot in arcade mode. When you open the LabVIEW program, a Getting Started Window pops up. Getting started tutorials for FRC are provided on the right side of the Getting Started Window. The tutorials include plenty of useful information. 1. To start a new FRC LabVIEW project, click FRC cRIO Robot Project on the left side of the Window. 2. Create New FRC cRIO Robot Project Here, you can change o Project name o Project location o cRIO IP address *Note: This setting tell LabVIEW the IP address of the cRIO control but does not set the IP address. To set the IP address use the cRIO Imaging Tool. © National Instruments Corporation 123 FRC LabVIEW Mentor Training Hands-On Seminar 3. Replace xx.yy in the cRIO IP address with your four-digit team number. o Team #1234 10.12.34.02 o Team #123 10.01.23.02 4. A preview of the project file is shown below. 5. Click Finish when done. 6. The Project Explorer opens after creating the new FRC robot project. Note: You can use the Project Explorer Window to create and edit LabVIEW projects. All code included in the FRC robot project default template is listed under the Items tab. 7. To start modifying the robot code, expand RT CompactRIO Target and double-click Robot Main.vi. FRC LabVIEW Mentor Training Hands-On Seminar 124 ni.com 8. Now deploy the code to the robot. You can run the Arcade Drive with the default FRC robot code provided. Always run the Robot Main.vi. To deploy the code to a CompactRIO device, click run Main.vi. © National Instruments Corporation 125 in the top left corner of the Robot FRC LabVIEW Mentor Training Hands-On Seminar The Deployment Progress Window should pop up as the code is initialized and downloaded to the CompactRIO controller. You may also see a dialog box asking if you wish to save changes to certain VIs. Should this occur, click Save. 9. Launch the FRC Driver Station. Before running the Arcade Drive using the default FRC robot code, you need to open the FRC Driver Station by clicking on the shortcut icon on the desktop. The FRC Driver Station handles the communication between the computer and the robot. The Dashboard will also launch with the FRC Driver Station. Minimize the Dashboard window at this time. 10. You need to configure FRC Driver Station to communicate to your robot. Select the Setup tab and enter your team ID number. Team ID 0001 is shown below. 11. For normal operation the FRC robot kit contains a Stop Button that is connected to the computer via USB. For the robots used in this training, there are no USB Stop Buttons provided. As such, we need to override this safety feature. Navigate to the Diagnostics tab and double-click the text “Stop Button” listed under USB Devices. FRC LabVIEW Mentor Training Hands-On Seminar 126 ni.com A small dialog window will pop-up verifying the safety override changes. Select “Yes, I’ll be careful”. After a 20 second delay, the changes to bypass the Stop Button will have been enabled. The FRC Driver Station light associated to the Stop button on the far left should now be orange in color. 12. When the lights of the Communications and Robot Code turn green, and the light of the Stop Button turns orange (or green if a USB Stop Button is connected) the robot is ready to run. 13. From the Operation tab select Teleoperated and then click Enable to start the robot. 14. Now you can drive the robot with the joystick. END OF FRC EXERCISE 1 © National Instruments Corporation 127 FRC LabVIEW Mentor Training Hands-On Seminar Review of LabVIEW FRC Robot Exercise 1 FRC LabVIEW Mentor Training Hands-On Seminar 128 ni.com Review of LabVIEW FRC Robot Exercise 1 © National Instruments Corporation 129 FRC LabVIEW Mentor Training Hands-On Seminar Review of LabVIEW FRC Robot Exercise 1 FRC LabVIEW Mentor Training Hands-On Seminar 130 ni.com Review of LabVIEW FRC Robot Exercise 1 © National Instruments Corporation 131 FRC LabVIEW Mentor Training Hands-On Seminar Review of LabVIEW FRC Robot Exercise 1 FRC LabVIEW Mentor Training Hands-On Seminar 132 ni.com Review of LabVIEW FRC Robot Exercise 1 © National Instruments Corporation 133 FRC LabVIEW Mentor Training Hands-On Seminar Review of LabVIEW FRC Robot Exercise 1 FRC LabVIEW Mentor Training Hands-On Seminar 134 ni.com © National Instruments Corporation 135 FRC LabVIEW Mentor Training Hands-On Seminar Review: Key LabVIEW Structures for FIRST—From Introduction to NI LabVIEW Section The JoystickGet VI outputs the values of the buttons as a Button cluster. To access data in a cluster, you need to insert an Unbundle by Name Function. To do this, right-click on the block diagram and click the Cluster, Class & Variant palette. Then click Unbundle by Name. Wire this up to the button output of the Joystick Get. Button 1 now appears in the Unbundle by Name function. Note the color of Button 1 is green because it is a Boolean value. To add a button, simply drag the bottom of the Unbundle by Name function to expand it. To change the button, simply click and select the desired button. FRC LabVIEW Mentor Training Hands-On Seminar 136 ni.com © National Instruments Corporation 137 FRC LabVIEW Mentor Training Hands-On Seminar FRC Robot Exercise 2: Add Joystick Controls In this exercise, modify code in the Teleop SubVI and add a joystick button to momentarily stop motors while driving. This functionality will act like a brake in our robot code. Use clusters and a case structure to implement this code. Note: Normally when adding a new device, you need to open and close the references to this device in Begin.VI and Finish.VI. This is shown in the following exercises. In this case, however, the joystick has already been added to the code template by default, so you need to modify only the code in the Teleop.VI. 1. Open the block diagram of Teleop.VI. To do this, select the “Teleop Enabled” case from the case structure on the Robot Main.VI block diagram. Then double-click on the subVI named Teleop.VI. If Robot Main is not open, you can also double-click Teleop.VI from the Project Explorer Window. Once the VI is launched, switch to the block diagram by selecting <Ctrl-E>. The Joystick Get VI outputs the values of the buttons as a Button cluster. FRC LabVIEW Mentor Training Hands-On Seminar 138 ni.com To access data in a cluster, you need to insert an Unbundle by Name Function. 2. To do this, right-click on the block diagram and from the Functions palette under Programming click the Cluster, Class & Variant palette. Then click Unbundle by Name. 3. Wire this to the button output of the Joystick Get. If you are unsure where to wire, open the Context Help (Ctrl-H) and hover the mouse over the VI. This shows where you can make all of the connections. Button 1 is the “trigger” on the back of the joystick. Button 1 now appears in the Unbundle by Name function. Note the color of Button 1 is green because it is a Boolean (True/False) value. NOTE: To add another button, simply drag the bottom of the Unbundle by Name function to expand it. To change the button, left-click and select the desired button. For this exercise only one button is needed. © National Instruments Corporation 139 FRC LabVIEW Mentor Training Hands-On Seminar To perform an action based on the value of the button, you need a case structure. A case structure contains one or more subdiagrams, or cases. The value wired to the selector terminal determines which case to execute. The value can be a string, integer, or enumerated type, but it is most often a Boolean. 4. To insert a case structure, right-click on the block diagram, click Structure palette, and then click Case Structure. Click and drag on the block diagram to create the case structure. FRC LabVIEW Mentor Training Hands-On Seminar 140 ni.com A default case structure has two cases: True and False. To change between subdiagrams, click the arrows on the top of the case structure or select it from the pull-down menu. A button has two states: True for pressed and False for not pressed. For a momentary stop button, the motors should stop when Button 1 is true and keep running when Button 1 is false. 5. To do this in LabVIEW, wire the output of Button 1 from the Unbundle by Name Function to the case selector on the left edge of the case structure. This allows the case structure to execute different code based on the Boolean value of Button 1. In the False Case (when Button 1 is not pressed), the motors should keep running. Therefore, the x- and y-axis values should go through the case structure without any change. 6. To wire the false case, delete the x- and y-axis wires and rewire them to Arcade Drive through the case structure. Note that the wires went through only the one visible case. © National Instruments Corporation 141 FRC LabVIEW Mentor Training Hands-On Seminar Four blocks are created when you are wiring through the case structure. The two blocks on the left of the case structure are where the wires go in and are called the input tunnels. The two blocks on the right of the case structure are where the wires come out and are called the output tunnels. In the True Case, when Button 1 is pressed, the motors should stop. Therefore, the x- and y-axis values that we send to the Robot Drive function should be zero. To do this, change to the True Case and wire a zero constant to the output tunnels. 7. To insert a constant, right-click on one of the output tunnels, click Create, and then click Constant. Note that you can reuse the constant for the second output tunnel. A momentary motor brake has now been created. 8. Close and save Teleop VI. 9. Return to Robot Main and deploy the code to test it out by click the Run button. NOTE: Remember the FRC Driver Station needs to be running. END OF FRC EXERCISE 2 FRC LabVIEW Mentor Training Hands-On Seminar 142 ni.com To access data in a cluster, you need to insert an Unbundle by Name function. A Case Structure contains one or more subdiagrams, or cases. The value wired to the selector terminal determines which case to execute. For a momentary stop button, remember that the motors should stop when Button 1 is true and keep running when Button 1 is false. Therefore, the x- and y-axis values should go through the case structure without any change. To wire the false case, delete the x- and y-axis wires and rewire them to Arcade Drive through the case structure. Note that the wires only went through the one visible case. Four blocks are created when you are wiring through the case structure. The two blocks on the left of the case structure are where the wires go in and are called the input tunnels. In the True Case, when Button 1 is pressed, the motors should stop. Therefore, the x- and y-axis values should be zero. To do this, change to the true case and wire a zero constant to the output tunnels. To insert a constant, right-click on one of the output tunnels, click Create, and then click Constant. Note that you can reuse the constant for the second output tunnel. © National Instruments Corporation 143 FRC LabVIEW Mentor Training Hands-On Seminar Think of this like a telephone conversation. First you need to dial the phone number and say whom you wish to speak with. This is the initialize stage in the Begin.VI. Next you talk back and forth, back and forth. This is done in the Teleop.VI (or Autonomous.VI) as the device (joystick) communicates to another device (such as the motors). This occurs over and over again as this code is called in a loop. Finally, you hang up and end the call. This is the close resources and clean-up stage in the Finish.VI. FRC LabVIEW Mentor Training Hands-On Seminar 144 ni.com © National Instruments Corporation 145 FRC LabVIEW Mentor Training Hands-On Seminar FRC Robot Exercise 3: Add a Servo Motor In this exercise, add a new servo motor device to the project. This is accomplished by initializing the new servo motor by modifying Begin SubVI, modifying the Teleop SubVI to use the joystick to move the new servo motor, and finally modifying the Finish SubVI to close the reference of the new servo motor. Servo motors are often used to control robot arms and clamps. Servo Initialization 1. Open the block diagram of the Begin.vi. Find the Begin.vi in the Project Explorer for the FRC project created in Exercise 1 or in the block diagram of Robot Main.vi. 2. Use the ServoOpen VI to configure the servo. To insert it, right-click on the block diagram, click WPI Robotics Library, then click Actuators palette, and then click Servo palette. FRC LabVIEW Mentor Training Hands-On Seminar 146 ni.com 3. Select the ServoOpen VI and place it on the block diagram. You also need the Servo Reference Registry Set VI to register the servo. (May be called WPI_ServoRefNum Registry Set.vi.) 4. To insert it, right-click on the block diagram, click WPI Robotics Library, then click Actuators palette, and then click Servo palette. 5. Select the Servo Reference Registry Set VI and place it on the block diagram. 6. Create a PWM constant that corresponds to the channel where the servo is connected. To do this, right-click on the PWM Channel input on the ServoOpen VI, click Create, and then click Constant. Select the desired channel (PWM3) from the pull-down menu of the PWM constant. © National Instruments Corporation 147 FRC LabVIEW Mentor Training Hands-On Seminar 7. Wire the reference and error cluster between the ServoOpen VI and the Servo Reference Registry Set VI as shown below. 8. Name the servo reference “Servo.” To do this, create a string constant wired into the Refnum Name Input of the Servo Reference Registry Set VI. Do so by right-clicking the Refnum Name input terminal and selecting create»constant. The block diagram to Begin.VI should resemble the image below, with the added code circled. The labels under the VIs may not appear depending on your LabVIEW settings. 9. Close and save Begin.VI. FRC LabVIEW Mentor Training Hands-On Seminar 148 ni.com Servo Reference Close Whenever a device is opened in the Begin.vi, it should also be closed in the Finish.vi. 10. Open the block diagram of the Finish.vi. You can find the Finish.vi in the Project Explorer for the FRC project created in Exercise 1 or in the “Finish” case of the case structure from the block diagram of Robot Main.vi. 11. From the Servo palette, insert a ServoRefNum Registry Get VI to get the reference of the previously configured servo. Note that you can find the palette in the same location as steps 2 and 4. HINT: If you need more room on the Finish.vi block diagram, try holding down the Ctrl key on the keyboard while selecting a portion of the screen with the mouse. This “pushes out” the block diagram relative to the size of the box you created with the mouse. 12. Create a string constant on the Refnum Name input and type in the name of the device. This was “Servo” or the name you used in step 8. 13. Place a ServoClose VI to close the reference of the servo. 14. Wire the reference cluster from the Servo Reference Get VI to the Servo Reference Close VI. The Finish.VI block diagram should resemble the image below, with the added code circled. The labels under the VIs may not appear depending on your LabVIEW settings. © National Instruments Corporation 149 FRC LabVIEW Mentor Training Hands-On Seminar 15. Close and save Finish VI. Move Servo 16. Open the Teleop SubVI to modify the code. You can find Teleop.vi in the Project Explorer for the FRC project created in Exercise 1 or in the “Teleop Enabled” case of the case structure from the block diagram of Robot Main.vi. First you need to convert the throttle axis value to a servo angle. The throttle is the round control at the base of the joystick between buttons 8 and 9. The value of the throttle ranges from -1 to 1, and the range of the servo angle ranges from 0 to 170 degrees. Therefore, the formula is (Throttle User Input + 1) * 85 = Servo Angle 17. To access math functions in LabVIEW, right-click on the block diagram and click the Numeric palette. FRC LabVIEW Mentor Training Hands-On Seminar 150 ni.com 18. Since the Add and Multiply functions are used in the equation, insert them into the block diagram from the Numeric palette. 19. Expand the axis cluster Unbundle by Name function by dragging it down. Then click on the new block and select axis 3 (throttle). 20. Insert the ServoRefNumRegistry Get VI to get the servo reference and insert a ServoSetAngle VI to change the servo motor position. You can find both of these VIs on the Functions»WPI Robotics Library»Actuators»Servo palette, as in steps 2 and 4. 21. Wire the ServoRefNumRegistry Get and ServoSetAngle VIs together. Then wire all the math functions, numeric and string constants as shown below. NOTE: Remember you can create constants quickly by hovering the mouse over the input terminal and right-clicking and selecting Create, and then clicking Constant. © National Instruments Corporation 151 FRC LabVIEW Mentor Training Hands-On Seminar 22. Close and save Teleop VI. 23. Return to Robot Main and run it to test the code. By moving the throttle input on the joystick the servo motor should spin. END OF FRC EXERCISE 3 FRC LabVIEW Mentor Training Hands-On Seminar 152 ni.com © National Instruments Corporation 153 FRC LabVIEW Mentor Training Hands-On Seminar In this exercise, add a limit switch to the robot. These switches are commonly used to determine if an object (wall, ball, and so on) is pressing up against the robot. The limit switch is monitored by a digital input line. This is accomplished by initializing the new switch by modifying Begin VI, modifying the Teleop VI to read the switch, and finally modifying the Finish VI to close the reference of the new switch device. For our robot, we will replace the joystick button used as a brake from the previous exercise with the limit switch. BONUS: Try to incorporate both the switch AND the limit switch as a brake for the robot. FRC LabVIEW Mentor Training Hands-On Seminar 154 ni.com FRC Robot Exercise 4: Add a Digital Input as Limit Switch Use this exercise to add a limit switch to the robot. These switches are commonly used to determine if an object (wall, ball, and so on) is pressing up against the robot. The limit switch is monitored by a digital input line. This is accomplished by initializing the new switch by modifying Begin SubVI, modifying the Teleop SubVI to read the switch, and finally modifying the Finish SubVI to close the reference of the new switch device. For your robot, replace the joystick button used as a brake from the previous exercise with the limit switch. BONUS: Try to incorporate both the switch AND the limit switch as a brake for the robot. Digital Input Initialization 1. Open the block diagram of Begin.vi. You can find Begin.vi in the Project Explorer for the FRC project created in Exercise 1 or in the block diagram of Robot Main.vi. Digital input initialization is similar to servo initialization from the previous exercise. 2. Insert the DigitalInput Open VI to configure the digital input. To insert it, right-click on the block diagram, click WPI Robotics Library, click IO palette, and then click Digital Input palette. Select DigitalInputOpen VI and place it on the block diagram. 3. Place the DigitalInputRefNum Registry Set VI to register the digital input. 4. Create DIO Channel and refnum name constants and wire them as shown below. Select DIO 4 from the pull-down list. (DIO 1-3 are reserved for Infrared Sensors that can be used in the autonomous mode.) Wire together the reference and error clusters. The Begin.VI block diagram should resemble the image below, with the added code circled. © National Instruments Corporation 155 FRC LabVIEW Mentor Training Hands-On Seminar Digital Input Reference Close 5. Open the Finish VI block diagram. The digital input reference close is similar to the servo reference close. 6. Place the DigitalInputRefNum Registry Get and the DigitalInputClose Vis on the block diagram of Finish VI. FRC LabVIEW Mentor Training Hands-On Seminar 156 ni.com 7. Wire a string constant to the Refnum Name input and then wire the reference clusters together. The Finish.VI block diagram should resemble the image below, with the added code circled. 8. Close and save Finish VI. Replace the Momentary Button With a Limit Switch 9. Open the Teleop SubVI to modify the code. You can find Teleop.vi in the Project Explorer for the FRC project created in Exercise 1 or in the “Teleop Enabled” case of the case structure from the Robot Main.vi block diagram. © National Instruments Corporation 157 FRC LabVIEW Mentor Training Hands-On Seminar 10. Remove the Button cluster Unbundle by Name function. To delete it, highlight it and press delete. To remove broken wires, press <Ctrl-B>. The Unbundle cluster you need to delete is circled below. The code after the Button is removed is also shown below. 11. Place the DigitalInputRefNum Registry Get VI (may be called WPI_DigitalInputRefNum Registry Get.vi ) to get the reference of the previously configured DIO in. You can find this VI under the Functions palette in the WPI Robotics Library»IO»Digital Input subpalette. 12. You also need the DigitalInputGetValue VI to get the input value. You can find this VI in the same digital input subpalette as the previous step. Select the DigitalInputGetValue VI and place it on the block diagram to the left of the case structure. 13. Create a Refnum Name constant and connect the reference cluster to the DigitalInputGetValue VI. Wire the Boolean output from DigitalInputGetValue VI to Case Structure Case Selector. The Teleop.VI block diagram should resemble the image below. FRC LabVIEW Mentor Training Hands-On Seminar 158 ni.com 14. Reverse the logic: In the case of this limit switch, when it is pressed (or closed), the output value is False. When the limit switch is not pressed (open), the output value is True. Since you want the robot to stop when the limit switch is pressed (similar to what occurred when pushing the joystick button in the previous exercise), you need to invert the logic of the limit switch (Make True ->False and False->True). You can choose from a few options to accomplish this. * If you plan to attempt the BONUS step, jump to Method 2.* Method 1: You can swap the code in the case structure by right-clicking the border of the case structure and selecting Make this case True or Make this case False. The end result is shown below. Notice the False case now forces the motors to “0.” © National Instruments Corporation 159 FRC LabVIEW Mentor Training Hands-On Seminar Method 2: Add a Not function between the DigitalInputGetValue VI and the case structure. You want to use this method if you plan to complete the BONUS step. You can find the Not function on the Functions palette under Programming»Boolean. The Teleop.VI block diagram is shown below. 15. BONUS: Try to incorporate both the joystick button AND the limit switch as a brake. FRC LabVIEW Mentor Training Hands-On Seminar 160 ni.com ANSWER: You can achieve this by using a Boolean function called OR. The Teleop.VI block diagram shown below uses both the joystick button and the limit switch as a brake for the robot. 16. Close and save Teleop VI. 17. Return to Robot Main and run it to test the code. While driving the robot you should now be able to apply a brake by depressing the limit switch (and if you completed the BONUS by also pushing Button 1 on the joystick). END OF FRC EXERCISE 4 © National Instruments Corporation 161 FRC LabVIEW Mentor Training Hands-On Seminar FRC LabVIEW Mentor Training Hands-On Seminar 162 ni.com © National Instruments Corporation 163 FRC LabVIEW Mentor Training Hands-On Seminar Additional Resources and Next Steps FRC LabVIEW Mentor Training Hands-On Seminar 164 ni.com The ni.com/first community is the place to go for LabVIEW for FRC and cRIOFRC support, specifications, training, and so on. © National Instruments Corporation 165 FRC LabVIEW Mentor Training Hands-On Seminar FRC LabVIEW Mentor Training Hands-On Seminar 166 ni.com