1
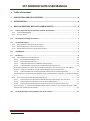
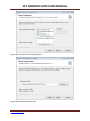
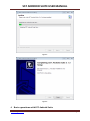
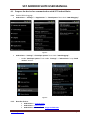
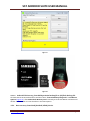
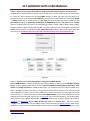
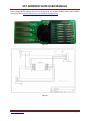
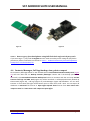
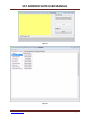
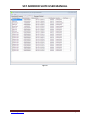
SST ANDROID SUITE USER MANUAL SST ANDROID SUITE USER MANUAL www.sst-gsm.com Page 1 SST ANDROID SUITE USER MANUAL 1 Table of Contents 2 SUPPORTED OPERATION SYSTEMS .................................................................................... 3 3 INSTALLATION ........................................................................................................................... 3 4 BASIC OPERATIONS WITH SST ANDROID SUITE............................................................ 5 4.1 Prepare the device for communication with SST Android Suite ........................................................... 6 4.1.1 Enable USB Debugging: ......................................................................................................................... 6 4.1.2 Root the device: ..................................................................................................................................... 6 4.2 SST Android Suite Program Launcher ................................................................................................... 7 4.3 SST Android Toolbox ............................................................................................................................ 7 4.3.1 Main operations with SST Android Toolbox .......................................................................................... 7 4.3.2 Advanced functions in SST Android Toolbox ......................................................................................... 8 4.3.3 Miscellaneous functions in SST Android Toolbox .................................................................................. 8 4.4 SST ADB Shell ....................................................................................................................................... 9 4.5 File Rescue ........................................................................................................................................... 9 4.5.1 Data recovery from working device .................................................................................................... 10 4.5.1.1 SST Android Data Backup Tool .................................................................................................... 10 4.5.1.2 Android File Recovery Tool ......................................................................................................... 11 4.5.1.3 Android File Recovery for USB Mass Storage Device .................................................................. 11 4.5.1.4 Android File Recovery from mounted DATA partition backup file ............................................. 11 DATA partition backup or internal SD card partition backup (in case internal SD card uses different partition – mainly in non-FUSE FS or older android designs) may be mounted with .................................. 11 4.5.1.5 Android File Recovery from DATA partition backup file or full flash backup file. ....................... 12 Click File Rescue in SST Android Suite and then select “Internal Memory Image File” in File Rescue Options (..................................................................................................................................................................... 12 4.5.2 Data recovery from dead (bricked, killed) device ................................................................................ 12 4.5.2.1 Data recovery from dead phones with Qualcomm chipset using 1 wire test-point ................... 13 4.5.2.2 Data recovery from dead phones using direct eMMC Reader ................................................... 13 4.5.2.3 Data recovery from dead phones using Full Flash back-up from 3rd-party tools....................... 15 rd If you are using a 3 party tool like Riff box and etc. make sure that you are saving the full flash in plain binary format. Follow the instructions in ..................................................................................................... 15 4.6 Contacts, Messages, Call logs backup, view, print or export .............................................................. 15 www.sst-gsm.com Page 2 SST ANDROID SUITE USER MANUAL SST ANDROID SUITE is the first professional service software for ANDROID DATA Recovery. With its help you can recover in user interactive mode pictures, videos, documents from external or internal memory. You can also read contacts, messages and call logs, view, print or export them to Excel or Open Office, read pattern user lock and view it as animated picture, reset user lock, read or reset google ID or full factory reset, enter android shell commands using a visual terminal emulator shell (ADB Shell). SST ANDROID SUITE v5.1.3 and later support ADB AUTH protocol and need SST Dongle to be connected to USB. 2 Supported Operation Systems SST ANDROID SUITE supports following OS: Windows XP, Windows Vista, Windows 7, Windows 8 and Windows 8.1 (both 32 bit and 64 bit). 3 Installation Download latest version of SST Android Suite from our support area http://www.sstgsm.com/support/ and run the downloaded file (SST_ANDROID_Suite_Setup.exe). Internet Explorer browser may warn you that the downloaded file is not often downloaded. In this case you should skip this message or use another browser or download manager as it is normal for a file in restricted user area to be not often downloaded. As a concern for your security all our executables and drivers are digitally signed. After welcome and license screen a “Choose Components” screen will appear (Figure 1). Please select all available components and click “Next>” button. “Choose Install Location” screen will pop up (Figure 2).Please Select destination folder or keep the setup default folder. Installing Setup screen will pop up (Figure 3). Setup is extracting files and installing drivers. Some antivirus software like Microsoft Security Essentials may significantly delay installation. You may temporary disable this antivirus software during installation. We guarantee that our software is virus free by digitally signing the setup package. Click here to view VirusTotal report about our software (56 antivirus software detect no viruses in our product). If you selected to install the useful third party software and drivers from Choose Components screen (Figure 1) wait until their installation finishes and click “Finish” button at the final page of our installer (Figure 4). On 64 bit Windows Vista / Windows 7 /Windows 8/ Windows 8.1 you may choose in Choose Components screen (Figure 1) to install Windows Test Mode Activation Tool. This tool enables or disables the special “Windows Test Mode” in which you will be able to install “unsigned” (not signed by Microsoft) drivers. These drivers should also meet some criteria, so if you are not already using such drivers from our other products or third parties, it is better not to install it. All drivers from SST Android Suite are digitally signed and do not need Windows Test Mode activation! www.sst-gsm.com Page 3 SST ANDROID SUITE USER MANUAL Figure 1 Choose Components screen during installation Figure 2 Choose Install Location Setup screen www.sst-gsm.com Page 4 SST ANDROID SUITE USER MANUAL Figure 3 Figure 4 4 Basic operations with SST Android Suite www.sst-gsm.com Page 5 SST ANDROID SUITE USER MANUAL 4.1 Prepare the device for communication with SST Android Suite 4.1.1 Enable USB Debugging: Android 2.x.x - “Settings”- > “Applications” -> “Development” then check “USB debugging”. Figure 5 Android 4.x.x- “Settings”- >“Developer options” then check “USB debugging”. o Enable “Developer options” if not visible- “Settings” -> “About device”-> tap “Build number” 7 times. Figure 6 4.1.2 Root the device: Android 2.x.x – SuperOneclick Android 4.x.x- Cydia Impactor Android 2.x.x – Android 4.x.x –Kingo Android Root www.sst-gsm.com Page 6 SST ANDROID SUITE USER MANUAL 4.2 SST Android Suite Program Launcher This is the main executable for SST Android Suite. You will find it on your desktop (“Windows key + D” is the short cut key combination for displaying desktop). After starting the launcher you will see this window (Figure 7). Select the tool which you want to use. Figure 7 4.3 SST Android Toolbox SST Android Toolbox (Figure 8) is universal android software that uses Android Debug Bridge (ADB) protocol. Some brand specific functions will be added in future releases. Figure 8 4.3.1 Main operations with SST Android Toolbox Main functions in SST Toolbox “Main” tab sheet (Figure 8) are Read Info, Read Battery Status, Read Google ID, Full Factory Reset, Reset Battery Status and Reset Google ID. Factory Reset function may completely erase all user data in the device! www.sst-gsm.com Page 7 SST ANDROID SUITE USER MANUAL 4.3.2 Advanced functions in SST Android Toolbox Advanced functions in SST Toolbox “Advanced” tab sheet (Figure 9) are Read Pattern, Reset Pattern, PIN Reset, Erase/Wipe DATA, Dalvik cache and History. Read Pattern function will display animated picture with device pattern lock (Figure 10). Pattern Reset will delete the current pattern lock making the device accept any pattern to unlock. PIN Reset will reset PIN/password lock of the device (This is device PIN lock not SIM PIN lock). Figure 9 Figure 10 4.3.3 Miscellaneous functions in SST Android Toolbox Miscellaneous functions in SST Toolbox “Misc.” tab sheet (Figure 11) in the current version are Reboot functions. The device will reboot in this mode if it is supported by the device. www.sst-gsm.com Page 8 SST ANDROID SUITE USER MANUAL Figure 11 4.4 SST ADB Shell SST ADB Shell is a terminal emulator connected with device over ADB protocol (Figure 12). It has easy to use interface with some useful commands shortcuts under “Commands” menu. The user can release ADB interface for other applications without closing SST ADB Shell. The user can later reestablish connection with the android device using Connection->Connect menu item. Figure 12 4.5 File Rescue File Rescue will recover deleted pictures, videos and documents from connected android device. The professional version which needs SST Dongle will be able to recover files even from dead (bricked) devices. The recovery is made by easy user interactive interface (Figure 13 and Figure 14). www.sst-gsm.com Page 9 SST ANDROID SUITE USER MANUAL Figure 14 Figure 15 The user may choose the deleted files location (the device may have several different storage locations) and device connection mode. 4.5.1 Data recovery from working device Start SST Android Suite if the application is not already running and click the File Rescue Button (Figure 7). Now File Rescue Options window (Figure13) will pop up. Now you have to select the deleted file/files location between Internal Memory, Internal SD Card, and External SD Card (depending on the memory type of the files location) or between Internal Memory Image File and Mounted Internal Memory Image File (for already saved image backup). If your files are in different locations you should first choose one of them, recover files and then choose the other. If you choose to recover files from internal memory or from internal SD Card without USB Mass Storage Device support at the next step the program will launch SST Android Data Backup Tool (Figure 16). All other selections will skip this step and launch directly Android File Recovery (Figure 17). 4.5.1.1 SST Android Data Backup Tool SST Android Data Backup Tool (Figure 16) will help you read the entire internal memory or copy it to the external SD Card (micro SD card inserted in the android device). Click Read Data to PC to read the internal memory or internal SD card (FUSE FS case) as image file. Warning! This option in the free version is limited to 2GB! SST Dongle version uses another protocol and should support larger data partitions. SST Android Backup Tool does not need admin privileges, so please use the default file saving folder (under user profile SST-GSM folder). After the image file is ready you may choose to mount it and review its contents. In this case you may click mount button. After you are ready just close SST Android Backup Tool and continue with next step which will start Android File Recovery Tool (Figure 17). www.sst-gsm.com Page 10 SST ANDROID SUITE USER MANUAL Figure 16 4.5.1.2 Android File Recovery Tool Android File Recovery Tool will recover data from connected USB Mass Storage devices, mounted as virtual drives image files and from data partition backup or full flash backup files. 4.5.1.3 Android File Recovery for USB Mass Storage Device USB Mass Storage Device capable devices should be with enabled USB Mass Storage Device Mode before using this operation and connected to PC with USB cable. External SD Cards in devices without USB Mass Storage Device support should use appropriate adapter (Figure 18) in order to connect to PC. Select SD Card Drive Letter or Physical Drive number corresponding to the plugged device or SD card adapter in Select SD Card Drive combo box and click Start button. Normally you should select the last Physical Drive number. After the operation ends the tool will open the target folder with recovered files. The recovered files may be placed in several different subfolders named “Recovered Files.N”, where N is the number of the subfolder starting from 1. 4.5.1.4 Android File Recovery from mounted DATA partition backup file DATA partition backup or internal SD card partition backup (in case internal SD card uses different partition – mainly in non-FUSE FS or older android designs) may be mounted with SST Android Backup Tool Mount button or Mount as ImDisk Virtual Disk in Windows Explorer context menu (right mouse button click on file). Only FAT32 and EXT2/3/4 FS are supported. You can select the drive letter in Select SD Card Drive drop down list and then click Start button. The rest of the process will run like in the case above. www.sst-gsm.com Page 11 SST ANDROID SUITE USER MANUAL Figure 17 Figure 18 4.5.1.5 Android File Recovery from DATA partition backup file or full flash backup file. Click File Rescue in SST Android Suite and then select “Internal Memory Image File” in File Rescue Options (Figure 14). After Android File Recovery tool is started just click Start Button and wait until all files are recovered as it was describes in the above points. 4.5.2 Data recovery from dead (bricked, killed) device www.sst-gsm.com Page 12 SST ANDROID SUITE USER MANUAL 4.5.2.1 Data recovery from dead phones with Qualcomm chipset using 1 wire test-point Android Phones with Qualcomm chipset have a special factory service mode which can be activated by 1-wire test point method. Our tool SST_LGQC supports reading full flash and data partition in Qualcomm factory service mode. SST BoxOne black test point needle should be connected to Data0 or Data2 eMMC line on device power on. SST_LGQC currently provides test point solution for full /partial flash reading for Qualcomm Snapdragon S1 (MSM7x27A chipset). SST_LGQC supports DATA partition reading using test point for the following LG models: LG400, LG405, LG410, LG425, LG435, LGE610, LGE612, LGE615, LGP700 and LGP705. Just select Test-point boot mode (Figure 19) and click “Read “in Data section in android tab in SST_LGQC (Figure 20). After the file is read, please follow the instructions in Android File Recovery from DATA partition backup file or full flash backup file. Figure 19 Figure 20 4.5.2.2 Data recovery from dead phones using direct eMMC Reader Direct eMMC Reader is a simple device that will connect eMMC memory to PC as USB Mass Storage Device. A direct eMMC Reader device consist of SD Card USB Mass Storage Device Controller, level shifter and voltage regulator for eMMC power supply. The interface lines can be directly soldered to PCB. The eMMC interface may have 1, 4 or 8 DATA lines whereas SD Card uses 1 or 4 Data lines.SD Card USB Mass Controller used for direct eMMC Card reader should not use the legacy SPI mode instead of the 1 or 4 bit bi-directional mode. Direct eMMC Reader can be easily build from low cost USB SD/micro SD Card reader like the one on Figure 18 and level shifter based on auto bi-directional level traslator IC like TXS206, MAX13030E, TXS2612 , ST2149 and etc. A design sample is provided on Figure 21 and Figure 22. Direct eMMC Reader may have 1 or 4 Data lines. There are already available some devices that convert eMMC to SD card interface like this EMMC adapter build with TI TXS2612 IC. There are also available eMMC Socket to SD Card adapters like this one on Figure 23 and www.sst-gsm.com Page 13 SST ANDROID SUITE USER MANUAL USB to eMMC Socket adapter like the one on Figure 24. For all direct eMMC readers please follow instructions like in Android File Recovery for USB Mass Storage Device Figure 21 Figure 22 www.sst-gsm.com Page 14 SST ANDROID SUITE USER MANUAL Figure 23 Figure 24 4.5.2.3 Data recovery from dead phones using Full Flash back-up from 3rd-party tools If you are using a 3rd party tool like Riff box and etc. make sure that you are saving the full flash in plain binary format. Follow the instructions in 3.5.1.5 Android File Recovery from DATA partition backup file or full flash backup file 4.6 Contacts, Messages, Call logs backup, view, print or export Click Contacts /Messages button In SST Android Suite and SST Android Contacts Backup Tool (Figure 25) will start. Now click on “Backup Contacts /Messages” button and if the backup operation is successful, close SST Android Contacts Backup Tool. Chose to continue with the next step and SST Contacts Call logs and SMS Tool (Figure 26) will be launched. It will displayed already backed up Phone Book (Figure 26) , Call logs (Figure 27) and Messages (Figure 28) databases. You can Print Preview or Print them with right mouse button menu or main menu->File-> Print. You can export all databases to MS Excel file format or Open Office Spread Sheet format from main menu->File>Export to Excel and main menu->File->Export to Open Office. www.sst-gsm.com Page 15 SST ANDROID SUITE USER MANUAL Figure 25 Figure 26 www.sst-gsm.com Page 16 SST ANDROID SUITE USER MANUAL Figure 27 www.sst-gsm.com Page 17 SST ANDROID SUITE USER MANUAL Figure 28 Anatoliy Tanev SST-GSM www.sst-gsm.com Digitally signed by SST-GSM DN: cn=SST-GSM Date: 2015.01.21 13:50:49 +02'00' Page 18