1
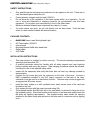
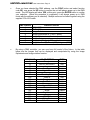
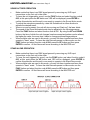
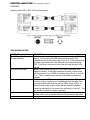
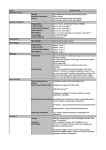
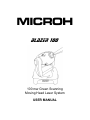
MICROH
Blazer 100
100 mw Green Scanning
Moving Head Laser System
USER MANUAL
MICROH Blazer 100
User Instructions: Page 1
Instructions:
Thank you for purchasing the MICROH Blazer 100 100 mw Green Laser System. For the
consideration of your safety and a better understanding of how to use this product, please read
this user’s manual carefully and adhere to the guidelines to protect the user and others from
the laser emission.
The Blazer 100 Green Laser System utilizes an advanced design and high quality
components. It features a highly efficient optical system and a very sophisticated drive
system. This unit can be operated via DMX and linked to other units, or run as a stand alone
unit (sound to light or auto, single units or linked). All aerial images look best with the use of
atmosphere, generated by a smoke machine or hazer.
SPECIFICATIONS:
•
•
•
•
•
•
•
•
•
•
•
•
•
•
Voltage:
AC Frequency:
Power consumption:
Fuse:
Laser Diode:
Wavelength:
Resistance:
Control Signal:
Pattern Trigger:
Strobe:
Beam Angle:
Scan:
Size:
Net Weight:
120VAC
60 Hz
60 Watts
3A
Semiconductor unit (100 mw output)
532nm
>2 MΩ
DMX 512
DMX/Auto
0-6 times/second, adjustable
Wide Angle, adjustable
Pan 370°, Tilt 265°
370x275x375mm
9.5 kg
MICROH blazer 100
User Instructions: Page 2
SAFETY INSTRUCTIONS:
•
•
•
•
•
Only qualified service technicans are authorized to do repairs on this unit. There are no
user serviceable parts inside this unit.
Correct primary voltages must be used (120VAC)
Do not block any of the ventilation of this laser system while it is in operation. Do not
use or store any flammable or explosive products (ie: pyrotechnics) near this laser
equipment. Do not place your hand directly in front of the laser beam.
Minimum distance between laser output and any object is 1 meter.
To avoid serious eye injury, do not look directly into the laser beam. Point the laser
effect in a safe manner towards the desired location.
PACKAGE CONTENTS:
•
•
•
•
•
•
Blazer 100 Green Laser Moving Head Light
AC Power cable (120VAC)
User manual
Mounting Bracket 2xM8 allen head bolts
Safety cable
XLR Cable
INSTALLATION INSTRUCTIONS:
•
•
•
•
•
•
•
This laser product is suitable for indoor use only. The normal operating temperatures
(ambient) must be below 35C.
A qualified technician should be familiar with all safety aspects and user functions
before installing and using this product. Safe hanging procedures should be followed,
including the use of the supplied safety cable.
Inspect all the equipment and verify that there has not been any damage caused by
transportation.
Connect the AC power plug into the connector on the back of the laser. Connect a
DMX compatitble controller to the XLR (input) connector on the back of the laser,
otherwise it may be used in a stand alone function. The laser may now be plugged into
an appropriate AC power source.
Install the laser system in a well ventilated area, make certain none of the vents are
blocked on the unit.
Only replace the fuse with the same type and rating (3A)
The supplied bracket and M8 bolts are to be used when it is desired to hang the unit in
the inverted position. Attach the bracket to the bottom of the laser and make certain the
M8 bolts are tightend appropriately. The supplied safety cable should be securely
attached to the cable flange and secured on the other end to a structure such as lighting
truss.
MICROH blazer 100
User Instructions: Page 3
OPERATING INSTRUCTIONS:
•
•
•
•
•
•
•
This unit may be used with or without a DMX controller
Every time the unit is powered on, it will undergo a “reset” and home. The laser system
will be ready for use once this reset is complete.
At power up, the LED NUMERICAL DISPLY will show the current function mode and
the RED small LED beside the numerical display indicates the unit is powered up
properly and is now ready for use.
The BLUE LED indicates the DMX signal is present.
The PATTERN SIZE knob varies the size of the image being displayed to best suit your
application. For best results, you may turn this knob to FULL.
The SOUND knob varies the audio sensitivity when it is in “Sound Active” mode
By pressing the FUNC button, you will be able to select all the different functions
available.
Function Code
001
002
003
004
005
006
007
008-009
Function Description
DMX Control
Sound Activated Control
Auto Stand Alone
Slave Operation
DMX Address
Sound Active speed setting
Reset
Not used
DMX OPERATION
•
•
After the unit is powered up and a DMX controller is plugged into the unit, the blue LED
will light, indicating that DMX signal is present.
To select the DMX address, press the FUNC button several times (do not hold the
button to advance to the next code) and select Function Code #005, at this point you
are now able to change the DMX address by using the up and down buttons. The
display will show the current DMX address. This unit uses 8 Channels of DMX to
operate. If you would like to select this unit to be the first in your DMX address, you
would select a starting address of 0. You may use the table below as an example. If
you are using an American DJ or LSC DMX Operator, you must use the address
structure for that particular controller. (ie. Unit #1 would have an address of 0, Unit #2
would have an address of 16, Unit # 3 would be 32, etc..)
FIXTURE #
1
2
3
4
DMX ADDRESS
0
8
16
24
MICROH blazer 100
•
Once you have selected the DMX address, use the FUNC button and select function
code 001, now press the UP button to confirm the unit will always power up in the DMX
mode. The LED display will show YES, at this point, press the ENTER button to confirm
your selection. (Once this procedure is completed, it will always power up in DMX
mode with the address you’ve selected). Multiple units can be linked together using the
supplied 3 Pin XLR cable.
DMX Channel
1
2
3
4
5
6
7
8
•
User Instructions: Page 4
Channel Function
PAN 0-370°
TILT 0-265°
Image Select
Image flip/animate on Y axis + speed
Image flip/animate on X axis + speed
Image rotate + speed
Image size (0-largest, 255 smallest)
Image blackout (0), Reset (100), Image on (255)
By using a DMX controller, you can now have full control of the fixture. In the table
below are the Images that can be displayed and manipulated by using the Image
flip/animate and Image rotation function.
DMX VALUE
IMAGE EFFECT
0
Triangle
15
“HAPPY BIRTHDAY”
30
Heart
45
Saw Blade
60
5-point Star
75
Square
90
Throwing Star
100
“DANCE”
125
Double Triangle (mirrored)
135
Fan Blade
145
Boomerang
155
8-point Star
170
Diamond
185
Arrow
200
Sine Wave
215
Cone
230
“PARTY”
245
Flying Bird
255
Cross Hairs
TYPE
Graphic
Text
Graphic
Graphic
Graphic
Graphic
Graphic
Text
Graphic
Graphic
Graphic
Graphic
Graphic
Graphic
Graphic
Graphic
Text
Graphic
Graphic
MICROH blazer 100
User Instructions: Page 5
SOUND ACTIVED OPERATION
•
•
•
•
•
•
Make certain that there is no DMX signal present by removing any XLR input
connections on the first unit in the chain.
To have the unit triggered by sound, use the FUNC button and select function code #
002, at this point press the UP button and YES will be displayed, press ENTER to
confirm this selection and the unit is now ready to operate in the Sound Active mode.
To adjust the microphone sensitivity, rotate the Sound knob in either direction to
achieve the desired result.
When no sound is present, the unit will stop moving and “black out” the laser diode.
The speed of the Sound Activated mode may be adjusted in the following manner:
Press the FUNC button and select function code # 006. By using the UP and DOWN
buttons, the time of which the unit changes head movement and pattern can be altered,
the higher the value, the more time it takes to change positions/image patterns.
When multiple units are used in this mode, you may link them together and have them
operate in “slave” mode. To have the other fixtures operate in slave mode, use the
FUNC button and select function code # 004, press the UP button and then press
ENTER to confirm. All the fixtures will move according to the MASTER unit.
STAND ALONE OPERATION
•
•
•
Make certain that there is no DMX signal present by removing any XLR input
connections on the first unit in the chain.
To have the unit triggered by sound, use the FUNC button and select function code #
003, at this point press the UP button and YES will be displayed, press ENTER to
confirm this selection and the unit is now ready to operate in the Stand Alone mode.
When multiple units are used in this mode, you may link them together and have them
operate in “slave” mode. To have the other fixtures operate in slave mode, use the
FUNC button and select function code # 004, press the UP button and then press
ENTER to confirm. All the fixtures will move according to the MASTER unit.
MICROH blazer 100
User Instructions: Page 6
APPENDIX
Adapting 5pin XLR to 3pin XLR (configurations)
TROUBLESHOOTING
PROBLEM
Red LED not lighting up
(Power indicator)
No control with DMX
No laser output
Unit “stutters” when reset
SOLUTION
Make certain the unit is plugged into a known working 120 VAC
supply. The female end of the power cable must be fully
inserted into the power entry point of the unit. If the external fuse
is blown, only replace the fuse with the same type and rating
(3A). If the fuse continues to blow, the unit must be sent in for
service.
Make certain that the BLUE LED is on which indicates DMX
signal is present. If the DMX operation is erratic, check to see
that the polarity of your DMX controller is set to Pin 2 (-) and Pin
3 (+). Test to make certain that the XLR cable is functioning
properly.
When operated in DMX mode, make certain that the “Blackout”
function of the controller is not enabled and that the fader that
operates Channel #8 is all the way up (DMX value of 255). In
Sound Active mode, make certain that the sensitivity knob is
turned up according to the sound you are trying to “pick up”. The
unit blacks out when no audio is present.
This is normal behaviour, the pan and tilt motors learn the home
position after a few moments and smooth pan and tilt will result.