1
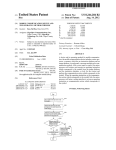
User Guide
Orion S450
www.poshmobile.com
CONTENT
1. PREFACE ...................................................................................................................................2
2. GETTING STARTED................................................................................................................4
2.1 KEYS AND PARTS .................................................................................................................4
2.2 KEYPAD DEFINITION..........................................................................................................4
2.3 USING THE TOUCHSCREEN..............................................................................................5
2.4 SET SCREEN LOCK AND UNLOCK IN THE HOMESCREEN .....................................5
2.4.1 SLIDE TO UNLOCK ...........................................................................................................5
2.4.2 SET UNLOCK PATTERN ...................................................................................................5
2.4.3 SET UNLOCK PIN CODE ..................................................................................................5
2.4.4 SET PASSWORD TO UNLOCK ........................................................................................5
2.5 LINKING TO NETWORKS AND DEVICES ......................................................................5
2.5.1 CONNECTING TO MOBILE NETWORKS ....................................................................6
2.5.1.1 SIM CARD .........................................................................................................................6
2.5.1.2 INSERTING AND REMOVING THE SIM CARD........................................................6
2.5.1.3 INSERTING AND REMOVING THE MEMORY CARD ............................................6
2.5.1.4 SWITCH ON/OFF .............................................................................................................6
2.5.1.5 SET UP SIM CARD LOCK ..............................................................................................6
2.5.2 CONNECTING TO WI-FI NETWORKS ..........................................................................7
2.5.3 CONNECTING TO BLUETOOTH DEVICES .................................................................7
2.5.4 CONNECTING TO A COMPUTER VIA USB ..................................................................7
2.6 MAIN INTERFACE ................................................................................................................7
2.6.1 NOTIFICATION PANEL ....................................................................................................7
2.6.2 EXPAND MAIN INTERFACE............................................................................................8
2.6.3 ADD ICONS ON THE MAIN INTERFACE......................................................................8
2.6.4 MOVE ICONS ON THE MAIN INTERFACE..................................................................8
2.6.5 REMOVE ICONS ON THE MAIN INTERFACE ............................................................8
2.6.6 CHANGE WALLPAPER .....................................................................................................8
3. FUNCTION MENU ...................................................................................................................8
3.1 PHONE .....................................................................................................................................8
3.1.1 MAKING CALLS .................................................................................................................9
3.1.1.1 MAKING DOMESTIC CALLS ................. ¡ERROR! MARCADOR NO DEFINIDO.
3.1.1.2 MAKING INTERNATIONAL CALLS ..... ¡ERROR! MARCADOR NO DEFINIDO.
3.1.2 EMERGENCY CALLS .................................. ¡ERROR! MARCADOR NO DEFINIDO.
3.1.3 ANSWERING CALLS ................................... ¡ERROR! MARCADOR NO DEFINIDO.
3.1.4 THE OPTION DURING THE CALL ........... ¡ERROR! MARCADOR NO DEFINIDO.
3.1.5 SPEED DIAL.........................................................................................................................9
3.1.6 CALL SETTINGS........................................... ¡ERROR! MARCADOR NO DEFINIDO.
3.2 MESSAGING ..................................................... ¡ERROR! MARCADOR NO DEFINIDO.
3.3 CONTACTS........................................................ ¡ERROR! MARCADOR NO DEFINIDO.
3.3.1 ADD CONTACT ............................................. ¡ERROR! MARCADOR NO DEFINIDO.
3.3.2 SEARCH CONTACTS .......................................................................................................10
3.3.3 CREATE GROUP CONTACTS ........................................................................................10
3.4 BROWSER .............................................................................................................................10
3.5 CALCULATOR .....................................................................................................................10
3.6 CALENDAR ....................................................... ¡ERROR! MARCADOR NO DEFINIDO.
3.7 CLOCK...................................................................................................................................11
3.8 DOWNLOADS.......................................................................................................................11
3.9 E-MAIL...................................................................................................................................11
3.10 FILE MANAGER ................................................................................................................11
3.11 FM RADIO ...........................................................................................................................11
3.12 GALLERY............................................................................................................................11
3.13 CAMERA..............................................................................................................................11
3.14 MUSIC ..................................................................................................................................12
3.15 SOUND RECORDER..........................................................................................................12
3.16 SIM TOOLKIT ....................................................................................................................12
3.17 VIDEO PLAYER .................................................................................................................12
3.18 SEARCH...............................................................................................................................12
3.19 SETTINGS............................................................................................................................12
3.19.1 WIRELESS & NETWORKS...........................................................................................12
3.19.1.1 SIM MANAGEMENT...................................................................................................12
3.19.1.2 WI-FI...............................................................................................................................12
3.19.1.3 BLUETOOTH ................................................................................................................12
3.19.1.4 DATA USAGE ................................................................................................................12
3.19.1.5 MORE .............................................................................................................................12
3.19.2 DEVICE .............................................................................................................................13
3.19.2.1 AUDIO PROFILES .......................................................................................................13
3.19.2.2 DISPLAY ........................................................................................................................13
3.19.2.3 STORAGE ......................................................................................................................13
3.19.2.4 BATTERY.......................................................................................................................13
3.19.2.5 APPS................................................................................................................................13
3.19.3 PERSONAL.......................................................................................................................13
3.19.3.1 LOCATION SERVICES ...............................................................................................13
3.19.3.2 SECURITY.....................................................................................................................13
3.19.3.3 LANGUAGE & INPUT.................................................................................................13
3.19.3.4 BACK UP & RESET .....................................................................................................13
3.19.4 ACCOUNTS ......................................................................................................................13
3.19.4.1 ADD ACCOUNT ............................................................................................................13
3.19.5. SYSTEM ...........................................................................................................................13
3.19.5.1 DATE & TIME...............................................................................................................13
3.19.5.2 SCHEDULE POWER ON & OFF ...............................................................................13
3.19.5.3 ACCESSIBILITY ..........................................................................................................14
3.19.5.4 DEVELOPER OPTIONS..............................................................................................14
3.19.5.5 ABOUT PHONE ............................................................................................................14
3.20 PLAY STORE.......................................................................................................................14
1. PREFACE
This user manual has been specially designed to guide you through the functions and features of your
phone. The policies and procedures are provided in this user manual to guide you for a better use.
POSH Mobile reserves the right to modify the policies, procedures, benefits, working conditions and
other contents described in this user guide any time for any reason without prior notice.
1
ATTENTION AND PRECAUTIONS
Please read the contents carefully to ensure safety and correct use.
For Your Safety
Obey all instructions in restricted areas where the usage of wireless phone is prohibited. Failure to
comply with legal requirements and local restrictions may be dangerous and illegal.
Always prioritize road safety. Avoid using your mobile phone while driving. Obey all regulations
where there are restrictions on mobile phone usage.
Comply with all the rules and regulations at locations where mobile phone use is restricted, such as,
but not limited to: refuelling point, near fuel, chemicals, or blasting area.
Mobile phones may interfere with medical devices such as hearing aids or pacemakers. Keep at least
20 cm. (9 inches) between the phone and any pacemakers. When using the mobile phone, hold it to
the ear furthest from your pacemaker. For more information, contact your medical device
manufacturer or relevant medical personnel.
All wireless phones may interfere with the performance of nearby TVs, radios, and personal
computers.
Use only approved POSH Mobile chargers. The main voltage (V) specified on the power supply unit
must not be exceeded, otherwise the charging device may be damaged.
The power supply must be plugged into an easily accessible AC main power socket when charging
the battery. Unplug the charger to turn off the charging device.
Repair of this product is only allowed by authorized personnel. Allowing unqualified personnel to
service your phone may result in damage to your phone and will void your manufacturer’s warranty.
The mobile phone, battery and charger are not water resistant. Keep it dry at all times.
Carefully read the user guide when connecting your device with other product to ensure safe and
correct usage. Connecting it to incompatible products, batteries and accessories, may result in injury
and damage to your phone.
Security Requirements
Obey all the rules and regulations and local laws governing the use of wireless mobile phones to
ensure safety of practical use.
Traffic Safety-Drive safely at all times! Obey all the regulations for traffic safety. Do not use your
mobile phone while driving.
Flight Safety- Please turn off your mobile phone while inside an airplane to avoid interference.
Environment Safety- Avoid using your mobile phone near precision electronics and medical
equipments Radio Wave interference may result in malfunction of nearby equipment. Do not use
your phone in a potentially dangerous environment. Please strictly observe restrictions on the use of
2
wireless devices.
Maintenance
Battery instructions
Please fully charge your battery prior to using it for the first time. Overcharging may shorten the
battery life. Unplug the charger from power source when not in use. If left unused, a fully charged
battery will lose its charge over time.
Do not expose your products to extreme temperatures. Extreme temperatures reduce the capacity and
lifetime of the battery. Please put the battery in a cool and well-ventilated place.
Caution:
x Using incompatible batteries may harm the phone.
x Dispose of used batteries according to the local and environmental laws and guidelines.
x Operating temperature range: -10 Υ ~ +55 Υ
x Do not use damaged battery and chargers. Use indoor chargers only.
x Do not expose your mobile phone to direct sunlight.High temperatures can shorten the life of
electronic devices.
x Do not dispose of your battery in fires. Return the worn-out battery to the provider or recycle
when possible. Do not dispose of as household waste.
Follow these guidelines to protect your products˖
x Keep the product out of reach of small children.
x Keep your product dry. Do not expose it to liquid or moisture.
x Do not short-circuit the battery, as this can cause excessive heat, and may cause it to
explode.
x Do not attempt to disassemble the mobile phone and battery by yourself. Non-expert handling
may cause damage to your phone.
2. Getting Started
2.1 Keys and Parts
The Symbols above indicate:
1. End Key / Power Key
2. Volume Key
3. Screen
4. Menu key
5. Home Key
6. Return key
7. Camera
8. Battery Cover
2.2 Keypad Definition
Key
Definitions
End Key/ Power Key
1. Mainly used as power on/off.
2. Press to return to standby screen in any interface.
3. End calls or reject incoming calls.
Volume Keys
1. Increase and decrease the volume.
3
Menu key
1. Option function.
2. Shortcut to manage application and settings of home screen.
Home Key
1. Press return to standby interface.
2. Long press to enter recently used applications.
Return Key
1. Press this button to return to the previous interface, or close
the dialog box, menu, or inform the panel screen keyboard.
2.3 Using the touch screen
Understand the basic actions to use the touch screen.
- In order to avoid scratching the touch screen, do not use sharp tools.
- The prohibition of touch screen in contact with other electronic equipment. Electrostatic discharge
will lead to touch screen fault.
- The touch screen has a detecting layer whichcan detect weak charge from the body. For best
results, please use the fingertip touch screen click. If using a stylus or pen sharp tool operation,
touch screen can not be in normal reaction.
- Slide up, down, left or right in the screen or scroll browser.
2.4 Set screen lock and unlock in the home screen
2.4.1 Slide to unlock
In standby mode, open up the application list, select settings > security > set screen lock >
slide.
In screen locked case, a sliding lock icon to the right to unlock and slide to the left for camera
interface.
2.4.2 Set unlock pattern
In standby mode, open up the application list, select settings > security > set screen lock >
pattern.
- Follow screen tips and sample pattern and the selection.
- Drag fingers to connect at least 4 points and draw a pattern.
- Confirm draw pattern.
- Press power key to lock.
- Draw the pattern to unlock.
2.4.3 Set unlock PIN code
In standby mode, open up the application list, select settings > security > set screen lock >
pin.
- Input PIN code (numeric) at least 4 characters and choose to continue.
- Confirm input PIN code.
- Press power key to lock.
- Enter your PIN code to unlock.
2.4.4 Set password to unlock
In standby mode, open up the application list, select settings > security > set screen lock >
password.
- Set a new password (alphanumeric) at least 4 characters and choose to continue.
- Confirm your password again and select ok.
- Press power key to lock.
- Enter your password to unlock.
2.5 Linking to Networks and devices
4
Your phone can connect to a variety of networks and devices, including mobile networks for voice
and data transmission, Wi-Fi data networks, and Bluetooth devices. You can also connect your
phone to a computer, to transfer files from your phone memory card and share your phone mobile
data connection via USB.
2.5.1 Connecting to Mobile networks
When you assemble your phone with a SIM card, your phone is configured to use your provider’s
mobile networks for voice calls and for transmitting data.
2.5.1.1 SIM Card
Insert valid SIM card (Subscriber Identity Module) before using the device.
All information related to the reach of the network is recorded in the SIM card, including the
name, phone number and messages stored in the SIM card contacts. In the event that
information in the SIM card is damaged or lost, users should avoid touching the metal side
and keep SIM card away from electrical and magnetic fields.
2.5.1.2 Inserting and Removing the SIM Card
Prior to inserting or removing your SIM card, switch off the device, and disconnect the
battery and external power supply from the device.Warning: Damages could happen to your
SIM card if the device is not switched off when taking out of the SIM card.
2.5.1.3 Inserting and Removing the Memory Card
Switch off the handset.
Insert the memory card into the slot.
Attention: This handset doesn't support the hot-swap of memory card. When you want to
remove the inserted memory card, you need to switch off the device first. Otherwise, it may
damage your memory card.
2.5.1.4 Switch ON/OFF
Do a long press the Switch ON/OFF key to switch on/off the phone.
If inserting the SIM card, the screen will show the notes in the following order when the phone
is switched on:
Type in PIN— if you have already set the PIN code.
Search— the handset will be searching for proper network connection.
2.5.1.5 Set up SIM card lock
In standby mode, open the application list, select settings > security > set up SIM card lock >
Lock SIM card.
To avoid illegal use, the SIM card is enciphered with PIN (Personal Identification Number) as
protection. When this function is ON and you have already set a PIN code, you need to type in
PIN code every time, the handset is switched on in order to unlock SIM card and use the
handset.
You can turn off the SIM PIN code. In this situation, the SIM card can't prevent illegal use.
Input PIN code, press arrowhead icon to erase typing error and press OK to end typing. For
example, if the PIN code is set as 1234, then type "1234" then press OK.
The SIM card will be locked if you type in wrong code. The handset will inform you to type in
PUK code.
5
Attention: Your network provider will set a standard PIN code (four to eight numbers) for your
SIM card. The default password is ‘1234’ It is recommended that you change the code into a
personal code as soon as possible.
When the SIM card is successfully unlocked, the handset will automatically search for an
available network (the lock screen shows searching). The handset will show the information of
the network provider; the status bar will show the signal strength and the network condition
once the handset is successfully connected to a network.
2.5.2 Connecting to Wi-Fi networks
Wi-Fi is a wireless networking technology that can provide Internet access at distances of up to 100
meters, depending on the Wi-Fi router and your surroundings. Touch Settings > Wireless & networks
> Wi-Fi. Check Wi-Fi to turn it on. The phone scans for available Wi-Fi networks and displays the
names of those it finds. Secured networks are indicated with a Lock icon.
Note: If the phone finds a network that you connected to previously, it connects to it.
Touch a network to connect to it. If the network is open, you are prompted to confirm that you want
to connect to that network by touching Connect. If the network is secured, you’re prompted to enter a
password or other credentials.
2.5.3 Connecting to Bluetooth devices
Bluetooth is a short-range wireless communications technology that devices can use to exchange
information over a distance of about 8 meters. The most common Bluetooth devices are headphones
for making calls or listening to music, hands-free kits for cars, and other portable devices, including
laptops and cell phones. Touch Settings > Wireless & networks > Bluetooth. Check Bluetooth to turn
it on.
You must pair your phone with a device before you can connect to it. Once you pair your phone with
a device, they stay paired unless you unpair them.
Your phone scans and displays the IDs of all available Bluetooth devices in range. If the device you
want to pair was not in the list, make it discoverable.
2.5.4 Connecting to a Computer via USB
You can connect your phone to a computer with a USB cable, to transfer music, pictures, and other
files between your phone memory card and computer.
2.6 Main interface
2.6.1 Notification Panel
In the standby mode, click on the upper screen and slide down to open notification panel. In this
area, it can on or off wireless connection function, access a notify list, such as information,
communication, activity or state of process. Please refer to the list of the upper screen frame:
In the notification panel, you can use the following options:
- Wi-Fi: Activate or deactivate Wi-Fi function.
- Bluetooth: Activate or deactivate wireless connectivity.
- GPS: Activate or deactivate Global Positioning System.
- Data connection: Activate or deactivate data connection function.
- Airplane mode: Activate or deactivate off-line mode/flight mode.
- Brightness: Adjust brightness of the screen.
- Time out: Adjusting the sleep time or inactivity mode of the screen.
- Auto rotation: Activate or deactivate automatic rotation.
6
-
General: To activate or deactivate easily the general mode.
Silent: To activate or deactivate easily the silent mode.
Meeting: To activate or deactivate easily the meeting model.
Outdoor: To activate or deactivate easily outdoor mode.
2.6.2 Expand Main Interface
The main interface may extend and exceed the screen width to provide more space for newly added
shortcuts and tools.
Slide your finger horizontally on the main interface to extend to the left or right area of the main
interface.
2.6.3 Add icons on the main interface
You can long press the icon on the main menu until it’s enlarged and copies the icon in the main
menu to the main interface.
2.6.4 Move icons on the main interface
Long press the icon on the main interface until it’s enlarged.
Drag the icon to the desired position and then release it.
2.6.5 Remove icons on the main interface
Long press the icon on the main interface until it’s enlarged.
Drag the icon to “Remove” to delete it.
2.6.6 Change wallpaper
Long press “Touch screen” to open the menu.
Choose wallpaper from “Gallery” /”Live Wallpapers” / “Video Wallpaper / “Wallpapers”, and Select
your desire wallpaper and press “Set wallpaper” to complete.
NOTE: Press menu key to go automatically to wallpaper, Manage apps and System settings.
3. Function Menu
3.1 Phone
Press the keyboard, enter the phone number, and press Dial icon.
3.1.1 Making Calls
When the network provider icon appears on the standby screen, you can call out or answer calls. The
indicator on the upper part shall shows the signal strength. Quality of connection will be greatly
reduced by obstructions. So movement in a small range may effectively improve the quality of
connection.
3.1.1.1 Making Domestic Calls
Use the virtual keyboard to enter phone numbers and then press Dial icon to call. If you need to
change the phone number, please press the delete key on the touch screen to delete. When the
call is answered, the screen shall show the connection status.
3.1.1.2 Making International Calls
7
If you need to make an international call, do a long press on the 0 key on the virtual keyboard
until there appears the sign "+" for international call prefix, which helps you call from any
country.
You can make an international call according to the following typing order: + > country code >
complete phone number > Dialing icon (type in the prefix code, and then enter the country code
and complete phone number). Country code usually follows conventional practice: German is 49,
Britain 44, Sweden 46 and so on.
When making international phone calls, the "0" in the city code should be emitted.
3.1.2 Emergency Calls
You can call for emergency service as long as you are in the network coverage (check the signal
strength indication bar on the upper right side of the handset screen). If your network provider
doesn't provide roaming service in this area, there will be "Emergency Calls” on the lock screen. If
you are in the network coverage, you can have emergency calls even without a SIM card.
3.1.3 Answering Calls
Slide to the right to answer an incoming call.
Slide to the left to reject an incoming call.
3.1.4 The option during the call
Talk can use the following options:
1. Dial pad: Open a dialing keyboard.
2. Loudspeaker: Activated loudspeaker function.
3. Mute: Turn off microphone icon; it will not hear your voice.
4. Hold: Keep an ongoing call on-hold
5. Contacts: Enter contacts during a call.
6. End call: To end an on going call.
3.1.5 Speed dial
- In the dialing interface press menu key and you can set the speed dial.
- Tap to add contacts, after that go to dial interface and long press the number according to your
speed dial and it can quickly dial a number.
3.1.6 Call settings
In the dialing interface press menu and enter settings
- Voice Call: voice call related setting.
- Internet Call: internet call related setting.
- Other settings: Fixed dialing Numbers, minute reminder, Quick responses and TTY mode.
3.2 Messaging
Messaging allows you to view messages, sent & received as a thread.
Click the icon in the lower left to compose new message.
Enter number, or press add contact icon and select stored contact number from Contacts.
Input contents into the typing frame on the touch screen.
Touch the attachment icon to add attachments.
Press menu key to Add subject, Discard, Insert quick text, Insert smiley, Insert contact and settings.
After editing, press send icon to send the text.
8
3.3 Contacts
Record the contacts saved on phone and SIM card.
3.3.1 Add contact
- Click the icon in the lower right to add new contact.
- Choose a store location; Phone or SIM card.
- Enter the contact information and click done.
3.3.2 Search contacts
icon in the lower left to search contact.
- Click
3.3.3 Create contact groups
By creating a group of contacts you can manage multiple contacts and send group messages.
- In the contact interface select group.
- In the lower right corner click to add group icon. Enter group name and add group member.
- Click done.
3.4 Browser
You can use Browser to access and browse the Internet.
3.5 Calculator
The handset is provided with a calculator with basic functions. Use the calculator to solve simple
arithmetic problems or use its advanced operators to solve more complex equations.
Touch Calculator to open the application.
Switching to the advanced panel on the Calculator screen, slide the screen to the right or left to
switch between advanced panel and basic panel.
In the calculator screen, you can touch menu icon to clear history or access advanced panel.
Note: The accuracy is limited and round-off error may occur.
3.6 Calendar
Use Calendar to create and manage events, meetings, and appointments. Depending on your
synchronization settings, the calendar on your phone stays in synchronization with your calendar on
the web.
Press the touch screen to browse date and the calendar information on the screen shall be
correspondingly updated.
3.7 Clock
Enter the clock menu and touch the alarm icon to enter the alarm list interface. When adding a new
alarm, Scroll the scrollbar to set alarm time. Press alarm of list to edit the Time, Repeat, Ringtone,
vibrate and label, choose “DONE” to finish the setting.
3.8 Downloads
You can check the downloaded or being-downloaded contents.
3.9 E-mail
When using the Email application for the first time, you must configure your email account.
The Email setup wizard helps you set up your account for many popular email systems.
Using the Email, you can send or receive emails from other email accounts.
9
3.10 File Manager
You can manage files, including music, videos, documents and other formats files. Enter the file
manager, you can choose Phone storage or Memory card, and touch the icons of the lower screen to
do some operations.
3.11 FM Radio
FM Radio lets you listen to FM radio stations on your mobile phone. Since FM Radio uses the
provided wired stereo headset as the antenna, connect the headset first to the audio jack of your
phone before you open the application.
3.12 Gallery
In the gallery interface, there are different folders. Select a folder and press to enter it.
Press image or video to view pictures or videos.
3.13 Camera
Under viewing condition, press the bottom icons to do the corresponding operations.
Press the capture icon to capture a picture and you can easily choose camcorder icon to capture
video. The Thumbnail icon shows the currently captured picture or video.
You can also choose other tools at the screen of camera mode to customize your photo. Press the
setting icon at the lower screen to customize your camera settings.
3.14 Music
Use the Music player to play music files. The songs saved in your Memory Card can be played using
the Music Player of the device.
The songs are categorized by Artist, Albums and Songs. You can make your favorite playlist by long
pressing on a song and selecting Add to Playlist. While listening to the music, you can choose among
the various sound effects.
3.15 Sound Recorder
Press Recording Key to start recording. In the middle of the screen is a timer. Press Stop Key to stop
recording then popped out "Discard/Save" options. You can press play key to listen to the record
before selecting "Discard/Save".
3.16 SIM toolkit
The contents in this menu will differ according to different network providers. For detailed
information, please look at the phone.
3.17 Video player
Play video. Enter the video list, scroll the screen to browse and choose the file you want to play.
3.18 Search
Input box to input the content in webpage search.
You can pull down the search icon arrow, music search, application, contact person.
Check this interface settings Icon, can check the search term.
3.19 Settings
3.19.1 Wireless & networks
3.19.1.1 SIM Management
10
The contents in this menu will differ according to different network providers. For detailed
information, please look at the phone.
3.19.1.2 Wi-Fi
To use Wi-Fi on your mobile phone, you need to have an access to wireless access points
(hotspots). Obstacles that block the Wi-Fi signal will reduce its strength.
3.19.1.3 Bluetooth
If you are using Bluetooth, remember to stay within 10 meters (33 feet) of other Bluetooth
devices. Be aware that obstacles like walls or other electronic equipment may interfere with your
Bluetooth connection.
Touching your Bluetooth device name lets others can find your Device
Touching SEARCH FOR DEVICES to scan and search devices
Touching other device name to Pair
Pressing the menu key to do other operation such as rename phone, visibility timeout, show
received files and advanced settings.
3.19.1.4 Data usage
To view the data usage conditions including SIM card and Wi-Fi.
3.19.1.5 More
In this menu, it includes Airplane mode, VPN, Tethering & portable hotspot, Mobile networks
and etc.
3.19.2 Device
3.19.2.1 Audio profiles
Include General, Silent, Meeting and Outdoor. You can also add custom profiles.
3.19.2.2 Display
Change settings of Brightness, Wallpaper, Theme, Auto-rotate screen, Sleep, Font size and so on.
3.19.2.3 Storage
Include the Preferred install location, Memory card storage, available storage, insert memory
card (If a memory card has already been inserted, then this option will become "Unmount
memory card ", Erase memory card and all available storage in the internal storage space.
3.19.2.4 Battery
View the battery usage.
3.19.2.5 Apps
Include the management of applications, to view and manage the applications of downloaded,
memory card, running and all.
3.19.3 Personal
3.19.3.1 Location services
Locate your position through tools like wireless network and GPS satellite.
3.19.3.2 Security
Change the settings of screen lock, Owner info, SIM card lock, passwords, device administration
and Credential storage.
3.19.3.3 Language & input
Include language settings, keyboard settings, and input method and so on.
3.19.3.4 Backup & reset
If you reset your phone to the settings that were configured at the factory, all of your personal
data from internal phone storage, including information about your Google Account, any other
accounts, your system and application settings, and any downloaded applications will be erased.
Resetting the phone does not erase any system software updates you’ve downloaded or any files
on your memory card, such as music or photos.
11
3.19.4 Accounts
3.19.4.1 Add account
Include general synchronisation settings and account management. The general synchronization
settings include background data and automatic synchronization.
3.19.5 System
3.19.5.1 Date & time
Include automatic date & time, automatic time zone, set date, set time, select time zone, use 24
hour format and select date format.
3.19.5.2 Schedule power on & off
You can set the time for ON/OFF, which include setting time and repeated date.
3.19.5.3 Accessibility
Include services and system.
3.19.5.4 Developer options
Include debugging, User interface, and apps.
3.19.5.5 About phone
Include System updates such as status, Legal information, Phone model, Android version,
Baseband version, Kernel version and Custom build number.
3.20 Play Store
Play Store is dedicated to establishing the latest, fastest and most comprehensive third-party
application store that makes Android system simpler. You can pick software and games to your taste
from more than 10,000 applications anywhere and anytime.
12
[email protected]