1
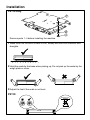
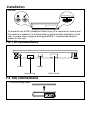
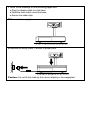
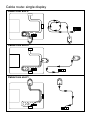
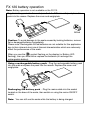
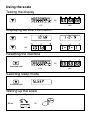
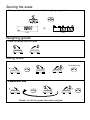
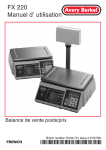
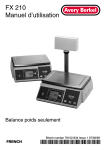
FX 110 / FX 120
User Instructions
Weight Only Scale
ENGLISH
Brisch number 76103-390 Issue 2 09/08/02
*76103-390*
c
Avery Berkel Limited 2001. All rights reserved.
The information contained herein is the property of Avery Berkel Limited
and is supplied without liability for errors and omissions. No part may be
reproduced or used except as authorised by contract or other written
permission. The copyright and the foregoing restriction on reproduction
and use extend to all media in which the information may be embodied.
Warnings
For your protection, all mains (110V or 230V) equipment used where damp or
wet conditions may occur, must be supplied from a correctly fused source and
protected by an approved RCD to BS7071 or BS7288 or IEC1008-2-2 BS EN
61008:1995. IF IN DOUBT SEEK ADVICE FROM A QUALIFIED
ELECTRICIAN.
To avoid the possibility of electric shock or damage to the machine, always
isolate from the mains power supply before carrying out any routine
maintenance.
Cleaning the scale
Harsh abrasives, solvents, scouring cleaners and alkaline cleaning solutions,
such as washing soda, should not be used especially on the display windows.
Under no circumstances should you attempt to wipe the inside of the machine.
The outside of the machine may be wiped down with a clean cloth moistened
with water containing a small amount of washing up liquid.
Installation
FX110 only
Remove parts 1- 4 before installing the machine
1 Make sure that the work surface is firm, steady and free from vibration and
draughts.
2 Hold the scale by the base when picking up. Do not pick up the scale by the
weigh plate or cross.
3 Adjust the feet if the scale is not level.
FX110
Installation
FX120
To avoid the risk of RSI (Repetitive Strain Injury) it is important to ensure that
the machine is placed on a surface which is ergonomically satisfactory to the
user. In cases where usage is prolonged EN614-1 recommends frequent
breaks for the user.
FX 110 connections
Power
Display
Programming
FX 120 connections
1 Remove weigh plate.
RS 232 Serial
2 Connect power cable.
3 To connect remote display.
OR
4 Replace the weighplate. Connect to power point.
Fitting the FX 120 scale mounted display
1 Make sure the scale is not connected to the power supply and remove
weigh plate.
2 Turn over machine and place on a safe, level surface.
3 Turn the machine round so the required mounting slot is next to the edge of
the counter.
Slot 1
Slot 2
Slot 3 - required mounting slot
4 Remove the screw in the mounting slot.
5 Place the mounting bracket into the slot.
6 Place washer over screw hole and fix with the large replacement screw.
7 Refer to the drawings on the following pages and:
! Plug the display cable into the base.
! Feed the slack cable round the base.
! Secure the cable clips.
8 Place machine upright.
9 Replace the weigh plate. Connect to power point.
Caution: Do not lift the scale by the column display or the weighplate.
Cable route: single display
Cable from slot 3
4
8
3
5
7
6
9
1
2
Cable from slot 2
1
2
3
4
Cable from slot 1
1
2
3
4
Cable route: dual display
Cable from slot 3
4
8
3
5
7
6
9
1
2
Cable from slot 1
1
2
3
4
Cable route: dual display
Cable from slot 2
1
2
3
4
Cable from slot 1
1
2
3
4
Cable route: dual display
Cable from slot 2
5
4
1
2
3
Cable from slot 3
4
8
3
5
7
6
2
9
1
Securing the cable clips
FX 120 battery operation
Note: Battery operation is not available on the FX110
Plug the battery pack into the scale (use 6 x 1.5v 2‘D’ size cells) and place the
pack into the recess. Replace the cover and weighplate.
NiCad
Caution: To avoid damage to the scale caused by leaking batteries, remove
flat or damaged batteries immediately.
Please note: Rechargable NiCad batteries are not suitable for this application
due to their inherent short circuit thermal characteristics which can adversely
affect the performance of the scale.
When you see the
symbol flashing on the display (or Battery LED
flashing), then you must either replace the batteries (or recharge the
rechargeable battery).
Using a rechargeable battery pack - Plug the rechargeable battery pack
into the scale and place the pack into the recess. Replace the cover and
weighplate.
Recharging the battery pack - Plug the mains cable into the socket
located on the base of the scale, then switch on using the mains ON/OFF
switch.
Note: You can still use the scale while the battery is being charged.
Error messages
F
30
If a persistent error message appears or the scale locks up,
disconnect then reconnect the scale to the power supply. If the
scale remains inoperative, contact your authorised service agent.
Temporary
error
Weight
unsteady
Balance
failed
Under
range
Error codes:
F 10 Battery failure.
F 11 Power supply voltage is too high.
F 30 Memory checksum invalid.
F 35 Prohibited function.
F 36 Prohibited scale capacity.
Contact your service agent if you see any other F messeges.
E
E
E
E
E
E
E
120
121
122
123
124
130
131
Tare weight unsteady.
Tare too heavy.
Tare already in operation.
Cannot use EPOS tare.
Mismatch between EPOS and scale tare increments.
Unit price not accepted.
Scale has not returned to zero between EPOS transactions.
Over
range
Using the scale
Testing the display
Or
LED
LCD
Displaying service information
LCD
LED
Resetting the machine
Or
Press and hold
LCD
LED
Selecting sleep mode
Press and hold
Waking up the scale
Depending on configuration...
Either
Or
T
Zeroing the scale
Make sure that the scale is at zero before weighing any goods.
Or
LCD
LED
Weighing goods
Place the goods onto the scale.
Using tares
To cancel a tare
T
T
Cumulative tare
T
Repeat until all the goods have been weighed.
T
Management Mode
Entering management mode
Or
C
LED
LCD
Navigating management mode
Branch
12.95
1
Sub-branch
Value
For Example:
Branch (12 )
Sub-branch ( 98)
Branch (13 )
Go to the next branch (press and hold)
Go to next sub-branch
Go to the previous branch (press and hold)
Go to previous sub-branch
C
Sub-branch ( 00)
Sub-branch ( 01)
Sets the value to 0 enabling you to display a new value
Return to Branch 00 (press and hold)
Displays the value. Press again to re-display
the branch / sub-branch
After clearing a value to be changed each key press
increments the value displayed. Pressing and holding
the key increments the value by 10.
Note: After changing a value, you must
go to the next branch to accept the value.
Exit management mode
Press and hold
Example: turn the keyboard bleeper off and change the backlight time to 5
seconds.
0.00
Press and hold
Press and hold
Press and hold
19.00
20.00
29.00
19.01
4
Press and hold
1
C
0
C
0
1
Switching the bleeper alarm on/off
Go to branch 19, Sub-branch 00
19.00
1
0 = Off
1 = On
Switching the keyboard bleeper on/off
Go to branch 19, Sub-branch 01
19.01
1
0 = Off
1 = On
Target bleep
Branch 19, Sub-branch 02 - Not applicable for this machine.
Error bleeper
Go to branch 19, Sub-branch 03
0 = Off
19.03
1 = On
1
Changing the bleeper volume
Go to branch 19, Sub-branch 04
19.04
1
0 = Quiet
1 = Loud
Changing the backlight time
Go to branch 20, Sub-branch 00
20.00
1
0 = always off
1 = 5 seconds
2 = 1 minute
3 = 5 minutes
4 = always on
Changing the sleep time
Go to branch 20, Sub-branch 01
20.01
1
0 = none
1 = 1 minute
2 = 5 minutes
3 = 30 minutes
Changing the duration of a ‘Long' press (press and hold)
Go to branch 29, Sub-branch 00
29.00
200
Enter a value in units of 10 milliseconds (50 -255).
For example :
200 = 2 seconds
150 = 1½ seconds
100 = 1 second
Enabling key timeout
Go to branch 74, Sub-branch 01
74.01
1
0 = Disabled
1 = Enabled
Changing the timeout period
Go to branch 74, Sub-branch 02
74.02
20
Enter a value in units of 10 milliseconds (1-255).
For example :
200 = 2 seconds
150 = 1½ seconds
100 = 1 second
Declaration of Conformity
The non-automatic weighing instrument
Manufacturer
Type
Number of EC type approval certificate
Avery Berkel
FX 110
UK 2625
Manufacturer
Type
Number of EC type approval certificate
Avery Berkel
FX 120
T5532
Corresponds to the requirements of the following EC directives:
Non-Automatic Weighing Instruments Directive
EMC Directive
Low Voltage Directive
The applicable harmonised standards are:
90/384/EEC*
89/336/EEC
73/23/EEC
EN 45 501*
EN 50 081-1
EN 60 950
EMC Compliance
This is a class A product. In a domestic environment, this product may cause
radio interference in whch case the user may be required to take adequate
measures.
*This declaration is only valid if the non-automatic weighing instrument was
verified by the manufacturer or with a certificate of conformity issued by a
notified authority.
A copy of the original signed declaration for this instrument is available from:
Foundry Lane, Smethwick, West Midlands, England. B66 2LP
Email: [email protected]
[email protected]
Internet: http://www.averyberkel.com