1
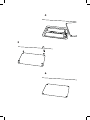
OWNER’S
MANUAL
You have purchased a Jetson® surfboard.
Its use is very intuitive but, nevertheless, YOU MUST READ
AND FAMILIARIZE YOURSELF WITH THE SAFETY INSTRUCTIONS
to ensure its correct use. It’s also good to learn a few details
that will allow you to unleash your Jetson’s full potential.
Jetson® is not a recreational boat. It’s not a toy you can take to the beach. It’s not a jetski to go over the waves head on and jump over them. It’s a surfboard and ou have to
find the channel and the gap between sets to go out. A correct use increases battery
autonomy.
Our advice to you: paddle, do some exercise, help the jet with your arms and use it only
when you need an extra boost.
PACK CONTENT:
1x Board.
1x Batteries Pack.
1x LIPO safe bag with instructions. 1x Charger.
1xLipomate Balancer.
2xAllen keys (batteries and grid).
1xBlank cover for the jet (to surf without assistance)
1xGeneral Use.
•DO NOT USE THE BOARD WITHOUT A LEASH, THE JET MAY
TAKE IT VERY FAR.
•EXCLUSIVELY FOR ADULT USE. UNDER NO CIRCUMSTANCE,
LET PEOPLE UNDERAGE USE IT.
•READ THE BATTERY INSTRUCTIONS BEFORE USE.
INSTRUCTIONS FOR USE
GENERAL CONSIDERATIONS
Jetson® is intuitive and easy to use; it has been designed so that all you have to worry
about is surfing but, even so, it features several components that traditional boards don’t
have and you must know them in order to make the most of them.
connecting & disconnecting
Jetson® boards don’t have an on/off switch. For that
purpose, you need to connect/disconnect the batteries.
It’s been designed this way to ensure batteries are taken
out after use.
battery life
When you use a Jetson®, you must always bear in mind
you are using batteries and, given the power output on
key moments, if we manage battery use carefully we’ll
have greater autonomy, we’ll be able to stay longer in
the water and we’ll catch more waves. The board is not
designed to avoid paddling all together or to keep the
jet on constantly. When surfing, there are many wait
and position-taking times.
surf without the jet
Jetson® boards allow you to surf without the jet too, but
in that case we recommend you don’t put the batteries
on (to avoid extra weight) and you make sure you close
the battery case correctly and substitute the grid with the
blank cover provided to keep the water out. Failing to do
will slow down the board’s gliding over the water.
sun exposure
Avoid exposure to excessive heat or sun. High
temperatures damage the board. Never leave the board
inside a car in a hot day. Excessive temperature can
make some board components bend or twist or alter the
characteristics of certain materials.
keels
Always use the keel key we provide. A different metrics
might damage the bolts.
BUTTON CONTROLS PANEL
Power Controls
Button controls are integrated on a panel located on the board’s nose for jet power
output control. There are 5 buttons – a stop button and 4 others for different power levels
adapted to the circumstances.
Button Controls Panel
Led Indicators
WARNING! NEVER START THE JET OUTSIDE THE WATER
A long dry start (more than one second) could damage the jet’s watertight seals.
boost for take off. It provides
maximum power and boost and it is only
used to ensure you take off and start
gliding on the wave. It uses up a lot of
battery power, which is why it is highly
recommended to use it only at takeoff,
which takes just a few seconds.
breaking zone.
It is used to go past the
breakers; it provides a powerful boost.
Because battery. Consumption is high
on this mode, it must only be used when
we have to leave the breaking zone as
quickly as possible.
paddle out.
To paddle out to the “line up”.
eco mode.
It provides a gentle but
noticeable boost to move slowly, saving
battery energy. It allows you to get all the
way to the peak or move between peaks
in an area with no breakers. If conditions
are not rough or waves aren’t breaking,
this speed is enough.
power. It stops the engine when we want
to paddle manually or remain in waiting
position.
Stop timers: Jet usage is meant to be intermittent. To help achieve this, the boards incorporates a timer that stops the
engine and leaves it on standby if the button controls are idle for over two minutes. If it has been stopped and left on
standby, it can be activated by pressing any button.
Led Indicators
There are six led indicators located on the upper section of the controls. They provide
information about the equipment’s function status.
temperature. If there is overheating in the
jet case due to engine overuse on high
power, this indicator lights up and the
engine stops. When the jet cools down
the indicator goes off and it can switched
back on.
propeller obstruction. The jet is
protected with a grid to keep objects
from drifting in and obstructing the jet.
Both the design and distances have
been optimized to avoid this problem.
However, it is impossible to rule this
possibility out completely, which is why
if the controls panel detects a foreign
body this indicator will light up. It the
obstruction is very serious the system
switches off completely. The surfer must
check whether there are any unwanted
objects in the jet. (See ‘Propeller Blockage’’)
water on the outside.* A blue led
indicates there is water in the jet.
To prevent any damage to the axis’
watertight seals, Jetson keeps the jet from
starting outside the water. This guarantees
watertight seals remain in good condition
and it is the reason why, if this indicator is
on, the engine won’t start.
water in the jet case.
If due to rush or
faulty closure the jet case is flooded, the
corresponding indicator will light up. In
this case, it is recommended to get out of
the water as soon as possible and check
both cases.
water in the batteries case.* If due to
rush or faulty closure the batteries case is
flooded, the corresponding indicator will
light up. In this case, it is recommended
to get out of the water as soon as
possible and check both cases.
battery status.
It can show 3 colors.
Green when the battery is OK. Yellow
when battery levels are below 25% of its
total capacity. And red when batteries are
at 0% capacity. When batteries reach 0%
the engine stops and it cannot be switched
back on.
* Only available for the Swordfish model.
BATTERIES
•IF YOU NOTICE THEY HAVE BLOATED UP, STOP CHARGING
OR USING THEM IMMEDIATELY AND CONTACT THE
MANUFACTURER.
•IF TENSION IN A BALANCER COMPONENT EXCEEDS 4.35V
OR FALLS BELLOW 3.10 V, CONTACT
•THE MANUFACTURER.
•NEVER STORE BATTERIES WITH THE LIPOMATE BALANCER
SWITCHED ON.
•NEVER LEAVE BATTERIES CONNECTED IN THE BOARD
FOR LONGER THAN 48 HOURS.
•NEVER LEAVE BATTERIES INSIDE THE BOARD IF DIRECTLY
IN THE SUN.
•NEVER LEAVE BATTERIES DIRECTLY EXPOSED TO THE SUN INSIDE
A CAR IN THE SUMMER.
•ALWAYS STORE, TRANSPORT AND CHARGE IN THE LIPO
SAFE BAG PROVIDED.
Instructions for battery recharge
1. Plug charger in (220 VAC)
2. Connect Lipomate balancer to battery (Diagram 1). Two connections possible. If
connected through the screen it will not switch on. Balancer screen must be switched on
for it to work correctly. NEVER CHARGE WITHOUT CONNECTING LIPOMATE
BALANCER CORRECTLY.
3. Connect battery to charger with the power connector. (Diagram 2).
4. Introduce security batteries in the Lipo bag leaving balancer and connectors outside the
bag and leave charging until led of the charger goes from red to green. That indicates
charge is complete. (Diagram 3).
5. It takes two hours to charge completely but it’s highly recommended to leave Lipomate
balancer connected for at least 6 additional hours.
1
4,19v
4,22v
4,22v
4,20v
4,21v
4,20v
2
3
4
5
6
Instructions for battery cover closure
Removable batteries are the best solution to enjoy a good day of surf without making
the board too heavy. ON THE FLIP SIDE, USING THEM MAKES THE USER
REPONSIBLE FOR THE CORRECT CLOSURE OF THE BATTERY CASE. READ THIS
BEFORE CLOSING THE CASE.
VERY IMPORTANT: Read these instructions carefully before closing the batteries’
cover. Close cover slowly, take up a few seconds to ensure you maximise battery life.
1.
2.
3.
4.
Insert charged batteries in the case located in the board and connect them. (Diagram 4).
Place cover correctly.
Screw bolts on only half-way. (Diagram 5).
Once all 4 bolts are in place, tighten them all the way but not too much, just so that
the bolts’ head is at a level with the cover.
5. Once the bolts are inside the cover but not too tightly screwed on, start tightening
them one turn of each bolt at a time, following a criss cross pattern. Screw on until
their are firmly secured (it’ll feel different). DO NOT OVERTIGHTEN BEYOND THIS
POINT. Overtightening can damage the board permanently.
6. Verification: We know it is covenietly secured in the four corners are at the same hight
and at a level with the board. (Diagram 6).
•NEVER LEAVE THE COVER SECURED ON (FIRMELY TIGHTENED)
FOR LONG PERIODS OF TIME.
•TO STORE THE BOARD OR TRAVEL (PARTICULARLY BY PLANE)
PUT THE BATTERY COVER ON AND SCREW ON THE BOLTS
WITHOUT TIGHTENING THEM.
Propeller blockage. Dismantling the grid and the nozzle.
The jet includes a grid to minimize risk of foreign bodies that can block the propeller
entering the jet. Nevertheless, sometimes an object may block the propeller.
In waters with many floating objects that could potentially enter the propeller, it’s advisable
to minimize jet use. However, in case there’s a total obstruction and the propeller gets
blocked, JETSON® INCLUDES ULTRAFAST PROTECTION BY DISCONNECTING THE
WHOLE SYSTEM TO AVOID GREATER DAMAGE. YOU WILL KNOW THAT PROTECTION
HAS BEEN OPERATED AUTOMATICALLY BECASE ALL THE LEDS ON THE BUTTON
CONTROLS WILL SWITCH OFF AND IT WILL NOT WORK ANY MORE.
There could also be a partial obstruction that can be detected by a change in the jet
sound of the fact that it seems to have lost power. The led with the propeller icon
will light up (see ‘Led Indicators’ on this manual).
In any of the above cases, you must check the jet and remove any foreign object but,
be careful!: IT IS COMPULSORY TO DISCONECT THE BATTERY ir order to perform any
operation involving jet handling.
1. Make sure the battery IS DISCONNECTED. To avoid untimely starting of the propeller
during handling withut the grid.
2. Unscrew the grid’s bolts. (Diagram 7).
3. Remove the grid. (Diagram 8).
4. Remove object that is blocking the propeller. (Diagram 9).
5. Put the grid back on (in the correct position) and tighten the bolts.
6. If necessary, remove nozzle to gain access to obstructing object.
7. Unscrew the nozzle’s 4 bolts. (Diagram 10).
8. Remove nozzle by pulling with your fingers towards the stern. It it’s tight, turn it
clockwise. In case of having to use a metallic tool, NEVER LEAVE THE NOZZLE in
direct contact with it. It could damage it or reduce propelling power. (Diagram 11)
Protect from tool with a rag.
9. Now you can remove the object.
10.Before replacing the nozzle, gently tap on it with a nylon or rubber hammer or place
a softer material between tool and nozzle (Diagram 12). Never apply an iron hammer
directly (Diagram 13), the propeller must be facing the stern to ensure it has reached
its furthest position.
11.Place the nozzle correctly and screw on the bolts until nozzle meets jet.
12.Reconnect battery. In case of total blockage, the system reboots.
Run a dry test to check if the jet turns and sounds correctly.
¡WARNING! DRY TEST RUNS MUST NEVER LAST LONGER THAN A
SECOND OR ELSE THE PROPELLER’S SEALS WILL BURN.
7
10
8
9
11
12
13
For further information, questions,
comments or any kind of query, please
contact our technical support service.
T +34 722 444 564
[email protected]
www.jetson.es