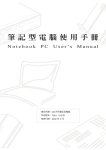
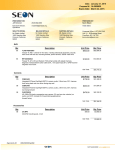
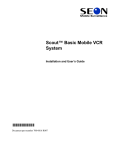
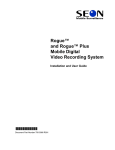
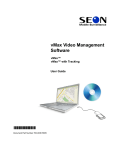
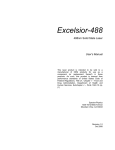
1
Rogue™ Player Software
User Guide
Manual Type
*700-0065*
Document Part Number 700-0065 R001
Seon Design® Inc.
Seon Design Inc. is a specialist in the design and manufacture of video surveillance systems for mobile applications. Seon has
been the preferred solutions provider for the pupil transportation industry since 1999. Today, we are proud that our success in
this area has made us the leading manufacturer of mobile video surveillance systems in North America.
Contact Information
Seon Design Inc.
Unit 111, 3B Burbidge Street
Coquitlam, BC
Canada V3K 7B2
Telephone
Toll Free Telephone
Fax
Toll Free Fax
Email
Web site
604.941.0880
1.877.630.7366
604.941.0870
1.866.664.3677
[email protected]
www.seon.com
Seon Design Inc. Trademarks
Seon Design Inc. holds the following trademarks:
Rogue™ is a registered trademark of Seon Design Inc.
“Seon Design” is a registered trademark of Seon Design Inc.
The Seon logo (
) is a registered trademark of Seon Design Inc.
In this User Manual there are references to trademarks, registered trademarks, and product names not owned by Seon Design
Inc. that are the property of their respective owners. They are used in this User Manual for identification purposes only.
User Manual Revision
This is the February 2009 revision for this User Manual and is copyright, February 2009 of Seon Design Inc. All rights
reserved.
Exclusion of Liability
SEON DESIGN INC.:
(a) MAKES NO REPRESENTATION, WARRANTY, GUARANTEE OR COVENANT, EXPRESS OR IMPLIED, AS TO THE ACCURACY,
SUFFICIENCY OR SUITABILITY OF ANY TECHNICAL OR OTHER INFORMATION PROVIDED IN THIS USER MANUAL OR ANY OTHER
USER OR OTHER MANUAL OR OTHER DOCUMENTATION PROVIDED BY SEON DESIGN INC. WITH RESPECT TO THE PRODUCT(S)
DESCRIBED HEREIN, INCLUDING WITHOUT LIMITATION ANY DESCRIPTION OF GOODS OR SERVICES, SPECIFICATIONS, MODELS,
DRAWINGS, OR DIAGRAMS.
(b) DOES NOT ASSUME AND SHALL NOT BE SUBJECT TO AND DISCLAIMS ANY AND ALL RESPONSIBILITY AND/OR LIABILITY FOR
LOSSES, DAMAGES, COSTS OR EXPENSES ARISING OUT OF BREACH OF CONTRACT OR OF WARRANTY, TORT (INCLUDING
NEGLIGENCE AND STRICT LIABILITY) OR OTHERWISE, WHETHER SPECIAL, DIRECT, INDIRECT, CONSEQUENTIAL, INCIDENTAL,
SPECIAL OR CONTINGENT, WHICH MIGHT ARISE OUT OF THE USE OF SUCH INFORMATION. THE USE OF ANY SUCH INFORMATION
WILL BE ENTIRELY AT THE USER ’S RISK; AND
(c) EXPRESSLY DISCLOSES THAT IF THIS MANUAL IS WRITTEN IN ANY LANGUAGE OTHER THAN ENGLISH, THAT ALTHOUGH SEON
DESIGN INC. HAS USED REASONABLE CARE TO MAINTAIN THE ACCURACY OF THE TRANSLATION FROM THE ENGLISH
LANGUAGE, THE ACCURACY OF SUCH TRANSLATION IS NOT GUARANTEED OR WARRANTED BY SEON DESIGN INC. PLEASE REFER
TO THE ENGLISH LANGUAGE VERSION OF THIS USER MANUAL FOR APPROVED SEON CONTENT. THE ENGLISH LANGUAGE
VERSION IS AVAILABLE UPON REQUEST FROM THE SEON CUSTOMER SERVICE DEPARTMENT.
Please refer to the Seon Design Inc. Product Warranty applicable to the Product(s) described in this User Manual which
exclusively sets forth Seon Design Inc.’s entire liability arising from or in connection with such product(s) and their use and
the exclusive remedies available for purchasers and users thereof.
Document Part Number
This User Manual is valid for Seon Design Inc. Document Part Number 700-0065
PRINTED IN CANADA
ii
Who This Guide is For
The User Guide is intended for anyone who needs to install and use the Rogue™
Player Software to manage video files.
Conventions Used
CAUTION
Cautions identify conditions or practices that could result in damage to the unit or other equipment.
Important: These notes provide important tips, which are not as serious as a Caution.
Abbreviations and Acronyms
Acronym
Definition
DVR
Digital video recorder
FPS
Frames per second
GPS
Global Positioning System
HD
Hard drive
IPS
Images per second
IR
Infrared
RA
Return Authorization
USB
Universal Serial Bus
Related Documentation
Rogue™ Mobile Digital Video Recording System Installation and User Guide,
Document part number 700-0066
Finding Information Online
You can find more information about Seon Design Inc. as well as its products and
services at www.seon.com.
700-0065 R001
iii
iv
Contents
Chapter 1
Introduction
1.1. Rogue™ Player Software - - - - - - - - - - - - - - - - - - - - - - - - - - - - - - - - - - - - - - - - - - - - - - - - 1–2
Chapter 2
Installation and Setup
2.1. System Requirements- - - - - - - - - - - - - - - - - - - - - - - - - - - - - - - - - - - - - - - - - - - - - - - - - - - 2–2
2.2. Installing the Rogue Player Software - - - - - - - - - - - - - - - - - - - - - - - - - - - - - - - - - - - - - - - - 2–2
2.3. Connecting the Media Cartridge to a Computer - - - - - - - - - - - - - - - - - - - - - - - - - - - - - - - - - 2–4
Chapter 3
Managing Video Files
3.1. Starting the Rogue Player Software - - - - - - - - - - - - - - - - - - - - - - - - - - - - - - - - - - - - - - - - - 3–2
3.1.1. Using the Rogue Player Window - - - - - - - - - - - - - - - - - - - - - - - - - - - - - - - - - - - - - - - - - - - - - - 3.1.2. Viewing the Video Files - - - - - - - - - - - - - - - - - - - - - - - - - - - - - - - - - - - - - - - - - - - - - - - - - - - - 3.1.3. Opening and Closing a Video File - - - - - - - - - - - - - - - - - - - - - - - - - - - - - - - - - - - - - - - - - - - - - 3.1.4. Opening and Closing a Media Cartridge - - - - - - - - - - - - - - - - - - - - - - - - - - - - - - - - - - - - - - - - -
3–3
3–5
3–5
3–6
3.2. Searching for a Video File - - - - - - - - - - - - - - - - - - - - - - - - - - - - - - - - - - - - - - - - - - - - - - - - 3–6
3.2.1. Viewing the Log - - - - - - - - - - - - - - - - - - - - - - - - - - - - - - - - - - - - - - - - - - - - - - - - - - - - - - - - - - 3.2.2. Search by Playlist - - - - - - - - - - - - - - - - - - - - - - - - - - - - - - - - - - - - - - - - - - - - - - - - - - - - - - - - 3.2.3. Search by Event - - - - - - - - - - - - - - - - - - - - - - - - - - - - - - - - - - - - - - - - - - - - - - - - - - - - - - - - - 3.2.4. Search by Time and Date - - - - - - - - - - - - - - - - - - - - - - - - - - - - - - - - - - - - - - - - - - - - - - - - - - - -
3–6
3–7
3–8
3–9
3.3. Archiving Video and Data Files - - - - - - - - - - - - - - - - - - - - - - - - - - - - - - - - - - - - - - - - - - - 3–10
3.4. Saving a Still Image - - - - - - - - - - - - - - - - - - - - - - - - - - - - - - - - - - - - - - - - - - - - - - - - - - - 3–12
3.5. Help > Viewing the Software Version - - - - - - - - - - - - - - - - - - - - - - - - - - - - - - - - - - - - - - - 3–12
700-0065 R001
v
vi
CHAPTER 1
Introduction
This chapter describes the software features of the Rogue™ Player
Software.
Introduction
1.1. Rogue™ Player Software
The Rogue Player software is for use with the Rogue Mobile DVR system. The
software lets you play back and archive video from the different types of
supported media cartridges.
The software features include:
•
•
•
•
1–2
User-friendly graphical user interface (GUI)
Playback features
• Change the playback speed from 1× to 2×, 4×, 8×, 16×, and 32×.
• Play back video forward or backward.
• Step forward or backward by one or more images.
• Move the slider to quickly move forward or backward in the video clip.
• Show/hide video text displaying temperature, system voltage, GPS data
(if recorded), speed, time, and date.
Search by Playlist or Event List
Archive video as an AVI file and individual images to .jpeg or .bmp
700-0065 R001
CHAPTER 2
Installation and Setup
This chapter describes how to:
• Install the Rogue Player software.
• Connect the media cartridge to a computer.
Installation and Setup
2.1. System Requirements
To use the Rogue Player software, you will need a computer with the following
minimum system requirements:
Table 2-1 Minimum System Requirements
Computer/Processor
•
•
•
2 GHz or higher speed processor
1024 × 768 monitor resolution
Sound card and speakers
Operating systems
Windows XP with Service Pack 2 or higher or Windows Vista™
Memory
1 GB of RAM
Disk space
10 MB of available hard-disk space
Drive
CD
Interface
USB 2.0 high speed port (a second USB port may be required)
Other requirements
Adobe® Acrobat® Reader to view the Rogue Player Software User Guide
2.2. Installing the Rogue Player Software
To install the Rogue Player software on your computer:
1. Close all programs running on your computer.
2. Insert the Rogue Player software CD into your CD-ROM drive.
The autorun.exe program should launch automatically on your computer.
3. OR if the installer does not launch automatically, run the program called
CDAuto.exe from your CD. Click on My Computer on your desktop, and
click on the CD drive. Double click on the CDAuto.exe program.
The Welcome to the Rogue Player Software Setup Wizard appears.
4. Click Next.
The License Agreement window appears.
2–2
700-0065 R001
Installation and Setup
5. Click on I accept the agreement to continue. Click Next.
The Select Destination Location window appears.
6. Verify the settings. Click Next.
The Select Additional Task window appears with the Create a desktop icon
check box selected (recommended).
7. Click Next.
The Ready to Install window appears.
700-0065 R001
2–3
Installation and Setup
8. Verify the settings, and click Install.
The Rogue Player software installs on your computer.
2.3. Connecting the Media Cartridge to a Computer
To connect the media cartridge to a computer:
1. Connect the media cartridge from the Rogue Mobile DVR to a USB 2.0 port
on the computer using the supplied USB cable.
2. Connect the black USB into the high speed port.
3. Connect the red USB auxiliary power into a second USB port.
4. Wait for the computer to connect a USB connection.
PC
USB
Rogue DVR
USB auxiliary
Rogue Player Software
2–4
Media Cartridge
700-0065 R001
CHAPTER 3
Managing Video Files
This chapter describes how to use the Rogue Player software to:
• Play back video.
• Save a still image as a .jpg or .bmp.
• Archive video footage as an AVI file.
Managing Video Files
3.1. Starting the Rogue Player Software
To start the Rogue Player software:
1. Double click the Rogue Player icon
on your computer’s desktop.
The Rogue Player window appears.
2. On the File menu, click Open Cartridge (Ctrl + O), or click on the open
folder icon
.
3. Browse your computer’s local disk to select the media cartridge.
If the media cartridge contains any data, the set folder appears.
o
4. Select Local Disk (E in this case) and click OK.
The files on the cartridge are opened and the Rogue Player window appears.
3–2
700-0065 R001
Managing Video Files
3.1.1. Using the Rogue Player Window
The Rogue Player software has the following features for playing back and
archiving video.
Title bar
Maximize button
Close
button
Menu
bar
Video
display
area
Metadata
(Text
overlay)
Slider
Tool bar
Status
bar
Window
corner
Features
Description
Menu bar
Contains the following commands:
• File: Open Cartridge, Close Cartridge, Open File, Close File
(see page 3–6)
• View: Log, Playlist, Event List (see page 3–8)
• Tools > Options > Fit Image to Window, Configure Metadata
• Help > About Rogue Player (see page 3–12)
Title bar
Right-click to display window control options.
Video display area Resize by dragging on the window corner.
Slider
700-0065 R001
Move the slider to quickly move forward or backward in the video clip.
3–3
Managing Video Files
3.1.1.1. Tool Bar
The icons in the tool bar provides the following features:
Tools Bar Icon
3–4
Description
Open Cartridge
•
Click to browse the folders on your computer to select
the media cartridge.
Click to close the media cartridge.
Close Cartridge
•
Reverse Frame
•
Slower speed
•
Click to reverse during playback or with playback
paused. Each click reverses the video by one frame.
Click to speed down/reverse during playback.
Play
Pause
•
•
Click to start playback.
Click again to pause playback.
Forward
•
Faster Speed
•
Click to fast forward during playback, or with playback
paused, each click on Forward advances the video by
one frame.
Click while paused to play frame by frame at 2×, 4×,
8×, 16×, 32×.
Play by Time
Click with the playback paused. A Play by Time menu
appears. Select the start date and start time, and end date
and end time. (See “Search by Time and Date” on page 3–
9.)
Capture Still Image
Click to display a menu. Save the still image as a .jpg or
.bmp to your computer. (See “Saving a Still Image” on
page 3–12.)
Set Archive Start
Click to set the start point of the archive video clip.
Set Archive End
Click to set the end point of the archive video clip.
Archive
Click to archive a video clip as an AVI file on your
computer. (See page 3–10.)
Metadata
Click to turn on text overlay: temperature, system voltage,
GPS data (if recorded), speed, and date and time.
Volume Control
Click to display the dialog window to adjust the volume.
700-0065 R001
Managing Video Files
3.1.1.2. Status Bar
The status bar displays playback information on the video file.
Status bar
Status Bar
Features
Description
Playback counter
Indicates the position of the video playback.
Playback speed
Shows the currently configured playback speed.
Playback file name
Indicates the name of the file that is being played back.
Archive range
Indicates the start and end points of the archive footage in 00:00 to 00:00
format.
3.1.2. Viewing the Video Files
The Rogue Player software lets you view files from the Rogue Mobile DVR. The
files are stored on a media cartridge or archived on your computer’s local disk.
3.1.3. Opening and Closing a Video File
To open a video file from a media cartridge or hard disk:
1. On the File menu, click Open File and browse for a media file (.mp4 file
name) from the media cartridge or hard disk.
2. Click Open.
To close a video file:
1. On the File menu, click Close File.
700-0065 R001
3–5
Managing Video Files
3.1.4. Opening and Closing a Media Cartridge
To open a media storage:
1. On the File menu, click Open Cartridge (Ctrl + O), or click on the
and browse for a folder.
icon,
2. Browse your computer’s local disk to select the media cartridge.
If the media cartridge contains any data, the set folder appears.
o
3. Select Local Disk (E in this case) and click OK.
The files on the cartridge are opened and the Rogue Player window appears.
To close a media storage:
1. On the File menu, click Close Cartridge (Ctrl + C), or click on the
icon.
3.2. Searching for a Video File
To search for a video file, click on the View menu to view the application log,
search by Playlist or Event List.
3.2.1. Viewing the Log
The application log contains the log file entries for events that occurred while the
Rogue Player Software was running. Each entry in the log file includes the date/
time that the entry was generated and a diagnostic message. The log lists the
diagnostic messages in chronological order from the earliest file to the most recent
file.
To view the log:
1. Click on the View menu and click on log.
The Application Log appears.
3–6
700-0065 R001
Managing Video Files
2. Scroll the list to view the diagnostic messages.
3.2.2. Search by Playlist
The playlist items are identified by Start Date/Time and End Date/Time, File
Name, and Comments which identifies the frames per second (FPS) and
resolution setting. The playlist lists the MPEG-4 data files in chronological order
from the earliest file to the most recent file.
Quick Tip Click on
View menu>Playlist or
Ctrl + P.
1. Click on the View menu and click on Playlist.
The Playlist appears.
2. Click on the desired file, and click on
to start playback of the video clip.
The playlist will play back as a single continuous stream of video.
3. Click on
to speed the play forward from 1× to 2×, 4×, 8×, 16×, 32× the
normal speed. Click on
to decrease the speed.
The playback speed is shown in the status bar.
700-0065 R001
3–7
Managing Video Files
To play back video one frame at a time:
1. Click
to pause the video.
2. With playback paused, each time you click on
one frame.
, the video advances by
To reverse playback of recorded video from the event list:
1. Click on the desired file, and click on
2. Click on
to start playback of the video clip.
to start reverse playback.
3. Click on
to speed up the reverse playback from 1× to 2×, 4×, 8×, 16×,
32× the normal speed.
The playback speed is shown in the status bar.
To reverse playback video one frame at a time:
1. Click on
to pause the video.
2. With playback paused, every time you click on
one frame.
, the video reverses by
3.2.3. Search by Event
The Event list items are identified by the event type and date/time. Event items
include Ignition Start, Ignition Stop, Record Stop, and Unknown Event. The Event
list is sorted by date/time in chronological order from the earliest file to the most
recent file.
Quick Tip
To play back an event from the Event List:
Click on View menu >
Event or Ctrl+E.
1. Click on the View menu, and click on Event List.
The Event List appears.
2. Click on the desired file, and click on
to start playback of the video clip.
The playlist will play back as a single continuous stream of video.
3–8
700-0065 R001
Managing Video Files
3. Click on
to speed the play forward from 1× to 2×, 4×, 8×, 16×, 32× the
normal speed. Click on
to decrease the speed.
The playback speed is shown in the status bar.
To play back video one frame at a time:
1. Click
to pause the video.
2. With playback paused, each time you click on
one frame.
, the video advances by
To reverse playback of recorded video from the event list:
1. Click on the desired file, and click on
2. Click on
to start playback of the video clip.
to start reverse playback.
3. Click on
to speed up the reverse playback from 1× to 2×, 4×, 8×, 16×,
32× the normal speed.
The playback speed is shown in the status bar.
To reverse playback video one frame at a time:
1. Click on
to pause the video.
2. With playback paused, every time you click on
one frame.
, the video reverses by
3.2.4. Search by Time and Date
In order to play back video by time, the media cartridge must be open, and no
application must currently be playing.
1. Click on the Play by Time
icon.
The Play by Time window appears.
2. In the Start date list, click the arrow to display a monthly calendar.
3. Select a day and month or click on the year, month, and date in the Start date
box, and type the date.
700-0065 R001
3–9
Managing Video Files
4. In the Start time list, click on the arrow to select a time or click on the time,
and type the hour, minute, and second.
5. Click OK.
Playback starts at the selected start and date time.
6. Click Cancel to stop.
3.3. Archiving Video and Data Files
Rogue Player software provides the following options for archiving audio/video
to your computer’s disk.
•
Archive individual audio/video channels to AVI files. The archived files can
be viewed in any standard media player.
• Save individual video images to .jpg or .bmp files.
To archive audio/video to your computer’s disk:
1. Use the video playback or search controls to view the start date and time of
the video you want to archive.
2. Locate in Play mode, and click Pause.
3. Click
to set the start point of the archive clip.
4. Locate the end of the video you want to archive in Play mode, and click
Pause.
5. Click
to set the end point of the archive clip.
Archive From start and stop times appear in the status bar.
6. Click
3–10
.
700-0065 R001
Managing Video Files
The Save As window appears.
7. Choose a directory where you want to save the archive file.
8. In the File name box, type a name for the file to be archived.
The AVI file type appears automatically in the Save as type box. In the
Encoder Selection area, the selected encoder appears greyed out. In the
Archive Options, all the checkboxes are selected.
9. Select or clear the Archive Option checkboxes.
•
•
Include Metadata (displays the text overlay)
Include Audio
Important: If video compression is disabled, the file size will be substantially increased and
image quality improves, depending on the frame rate (FPS) and picture resolution.
•
•
Disable Video Compression
• If the checkbox is selected, the Encoder Selection options are not
available.
• If the checkbox is cleared, the Encoder Selection becomes active. Click
the Change button to display the Archiving Encoder Selection list.
Select one from the list and click OK or click Cancel. Select Use the
selected encoder as default check box to set as the default. Click
Configure to change the settings for the encoder.
Native Image Aspect Ratio
• If the checkbox is selected, the video retains its original recorded
resolution.If the checkbox is cleared, the video is scaled. For example, a
video clip recorded at 720 × 240 pixels will scale to 720 × 480 pixels.
Important: The 720 × 480 image may be less sharp than the 720 × 240.
700-0065 R001
3–11
Managing Video Files
10. Click Save.
A warning message will appear, asking for confirmation that No compression
is selected, continue? The Archiving Media Completed progress bar appears.
11. Click OK.
3.4. Saving a Still Image
To save a still image:
1. During video playback, click Pause.
2. Click Capture Still Image to display the Capture Image to File window.
3. In the File name box, enter a file name.
4. Click on the Save as type arrow and select either .jpg (JPEG) or .bmp
(bitmap) file format. JPEG files are commonly used for storing and sending
photographs on the Internet. Bitmap files are usually not compressed and are
generally not very well suited for transferring images on the Internet.
3.5. Help > Viewing the Software Version
Click on the Help menu to view About Rogue Player, which displays the software
version as well as contact information for Seon Design.
Wtih the program open, click on the Help menu, and click on About Seon Rogue
Player Software.
3–12
700-0065 R001
Seon Design Inc.
Unit 111, 3B Burbidge Street
Coquitlam, BC
Canada V3K 7B2
Telephone
Toll Free Telephone
Fax
Toll Free Fax
Email
Web site
700-0065 R001
604.941.0880
1.877.630.7366
604.941.0870
1.866.664.3677
[email protected]
www.seon.com
Printed in Canada