1
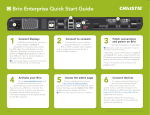
Brio Quick Start Guide
4
2
LINE OUT
1
2
3
5
4
NETWORK 2
2
IN B
6
4
4
IN A
A
1
INPUT
B
1
OUTPUT
INPUT
OUTPUT
Wireless sources
System Settings
General
Settings 1
Main
Network
One
Two
Settings 4
Settings 2
Settings 5
Network
Settings 3
Wired sources
LAN
Connect monitors
Connect to network
Connect outputs and
turn on monitors before
powering on Brio. Brio
automatically sets the
resolution of both outputs to
match the EDID of the monitor on
output A.
Connect the Brio to your
network using the
Network 1 connector. Brio
is DHCP enabled when
shipped and will be recognized
automatically by the network.
1
A multi-touch panel is required on
Output A for whiteboard.
Do not turn on power (
Page 1
) until after step 2.
2
If you have purchased the PtP option,
connect the WAP dongle now.
Once all physical connections are in place,
turn on power.
Check settings
and updates
Connect devices
and audio
Go to the System Settings
page by typing the
following in the address bar
of your browser: IP address/admin
(e.g. 10.10.30.143/admin). The default
password for this page is admin.
To connect personal
devices to Brio and start
sharing content, follow the
instructions on the meeting room
displays, and then browse to the
Brio IP address/connect (e.g.
10.10.30.143/connect) for
additional information.
3
Use this page to change your
network settings, if needed; and to
check for updates for your license
and/or software.
4
The specific method for connecting a
device to Brio depends on the operating
system for that device.
Brio Quick Start 020-101299-03 Rev. 1 (03-2014)
Welcome to Brio
Brio is a presentation and collaboration solution that makes it easy to share up to five presentations. With
a few quick keystrokes or taps on your Mac, PC, iPad, or wired or wireless device, you can share your
audio, high definition video, whiteboards, and other information in a single room or in multiple locations.
Meeting Manager
When attempts are made to view the Meeting Manager, users will be prompted for the password. The
password can be reset by clicking Security and entering a password.
Share Presentation Area When you are hosting a meeting, you can invite another Brio to be a
presenter and share their presentation area. If you are attending a meeting, you can send a request to
the host asking to be the presenter and share your presentation area.
• Attendee requests to be presenter, selects
The Meeting Manager is the user interface for Brio. To browse to it, connect your browser-capable
device to the same network and subnet as Brio, and then enter the Brio IP address in your Web
browser address field.
Source List From the source list, you can rearrange the sources on the presentation area and use
the buttons and check boxes as follows:
. Selects again to quit sharing.
• Host requests an attendee to be presenter, selects
• Host ends sharing, clicks
and then selects presenter.
and selects self.
Update Meeting Attendees Host selects
to invite additional attendees or remove
existing attendees.
Auto-show
Select to automatically show the source when the source is connected to Brio.
Use numbers
Select to display the source numbers on the sources in the presentation area.
Duplicate #1
Select to duplicate source #1 on both outputs.
Start Collaborating
Add your sources for your presentation and start collaborating.
Toggle to show/hide the source.
Add Sources Select Help --> How to Connect and follow the steps for your operating system.
Previews the source in a pop-up.
Whiteboarding From the Meeting Manager, select Start.
Toggle to turn audio on/off for sources.
Disconnects the source from Brio and removes the source from the list.
Rearranges the sources in the presentation using drag/drop in the list.
Select primary To change your primary output, use the Select primary buttons.
From a personal device, browse to the Meeting Manager, and then select Join.
If a whiteboard session isn’t started, select Start, and then Join.
Sketching Use the tools to start sketching:
Pen / Eraser / Clear sketch
Meetings Click Start to start a multisite meeting
(license required) with other Brio locations in your
address book.
Meeting host
Select the desired check boxes and click Start (click
Name or Location to sort).
Attendee declined invite
The status for the meeting is updated as responses
are received.
When attending a meeting, the whiteboard is shared with all attendees and the attendees can interact
with the whiteboard.
Attendee accepted invite
Pen thickness - Small / Medium / Large
Colors (9)
Attendee has not responded
Current presenter in the meeting
Load sketch / Delete sketch (Brio whiteboard only) / Save sketch
Undo the last action / Redo the previously undone action
Zoom in (Brio whiteboard only) / Zoom out (Brio whiteboard only)
Security To secure access to the Meeting Manager, click Security, enter a password and the
duration to secure the Meeting Manager, and then share this password with users who need to view
the Meeting Manager.
Page 2
Learn More This is a Quick Start Guide. See the Brio User Manual for more details.
Brio Quick Start 020-101299-03 Rev. 1 (03-2014)