1
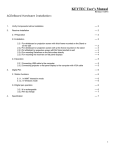
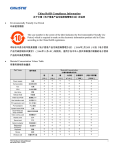
Brio Enterprise Quick Start Guide
COM
IN A
OUTPUT A/B
INPUT A
Brio Enterprise
NETWORK 1
1
Connect displays
With Brio powered off, connect a
touch display to Output A
(DisplayPort connector) and connect
the USB cable from the display to a blue
USB port. Optionally, connect a second
display to Output B (DisplayPort) and to a
blue USB port. Set the second display to
the right of the first display.
2
1
3
2
4
IN B
4
Go to www.updatebrio.com and
complete the activation form.
Download the current software and
documents to a USB drive. Connect the
USB drive to Brio. Connect your device to
the same network as Brio using the
information displayed on the Splash Screen
(on the Brio outputs).
Page 1
KVM A
ANT
KVM B
NETWORK 2
Connect to network
Connect Brio to your network
using the Network 1 connector.
Brio is DHCP enabled when shipped
and is recognized automatically by a
DHCP-enabled network.
A multi-touch display is required for the touch
interface, whiteboarding, and annotating.
Activate your Brio
INPUT B
LINE OUT
3
Finish connections
and power on Brio
• Connect the speakers to Line Out.
Optionally, audio for a DisplayPort may be
selected in System Settings.
• Optionally, connect DVI sources to Input A
and Input B. For audio, connect In A for the
DVI device connected to Input A and connect
In B for the DVI device connected to Input B.
• Plug in the power cord and press the
power button.
5
Access the admin page
Open a web browser and enter
http: //Brio IP address /admin
(password: admin). From the Software tab in
System Settings, use the Update from USB
on Brio button to update your Brio.
This may take several minutes to complete.
6
Connect devices
To connect personal devices to
Brio and start sharing content,
follow the instructions on the
Splash Screen, and then browse to the
Brio IP address or DNS name (for example
http: //10.10.30.143 or http: //Brio72) for
additional information.
The specific method for connecting a
device to Brio depends on the operating
system for that device.
LIT GUID START Brio Enterprise 020-101703-02 Rev. 1 (7-2015)
Welcome to Brio Enterprise
Security Securing Brio prevents unauthorized devices from connecting to it and it also limits
Brio Enterprise is a presentation and collaboration solution that makes it easy to share up to five
presentations. With a few quick keystrokes or taps on your Mac, PC, iPad, or wired / wireless
device, you can share your audio, high definition video, whiteboards, and other information in a
single room or in multiple locations.
access to the Meeting Manager. When Brio is secured, the password must be shared with users
who need to view the Meeting Manager or share sources in a meeting.
When a secure session is started or ended, all sources (except DVI sources) are disconnected.
On a touch display, tap the security icon
Meeting Manager The Meeting Manager is the user interface for Brio. It can be accessed
.
From the web Meeting Manager, click Security.
from a touch display or the web. On a touch display, tap the Touch Control.
The Touch Control has three states: whiteboard
, annotation on
, and annotation off
.
Flick down (touch, move down, and release) on the Touch Control to toggle the state. To browse
to the Meeting Manager, connect your browser-capable device to the same network as Brio, and
enter the Brio IP address/meeting in your web browser address field.
Auto-show
Select to automatically show the source when the source is connected to Brio.
Use numbers
Select to display the source numbers on the sources in the presentation area.
Duplicate #1
Select to duplicate source #1 on both outputs.
To change presenter, select the change presenter icon
Select primary To change your primary output, use the Select primary buttons.
box is updated), and then tap the start meeting
Pen / Eraser / Pen thickness - Sm / Md / Lg
/ Annotation Mode / Load sketch
Color palette - 7 (of 10)
Undo / Redo / Color palette - 3 (of 10)
/ Clear sketch / Screenshot
Attendee has not responded
.
From the web, click
Attendee declined invite
.
http://10.10.30.143 or http://Brio72) and follow the steps.
Meeting host
Attendee accepted invite
Start
Connect Sources Browse to the Brio IP address or DNS name (for example
On a touch display, tap the Touch
Tap the attendees you want to invite (the check
to open the menu. Tap the annotation icon
From the web Meeting Manager, click the start button
Rearranges the sources in the presentation using drag/drop in the list.
.
to
to toggle to whiteboard.
Disconnects the source from Brio and removes the source from the list.
Control, and tap the meeting icon
.
Whiteboarding/Annotating Whiteboarding and annotating require a touch display.
From a touch display, tap the Touch Control
Toggle to turn audio on/off for sources.
Start . Select the attendees
Current presenter in the meeting
(click Name or Location to sort) you want to
Brio is disconnected
invite, and then select Start.
Brio is not licensed for meetings
Page 2
request to the host asking to be the presenter and share your presentation area.
invite additional attendees or remove existing attendees.
Toggle to show/hide the source.
icon
be a presenter and share their presentation area. If you are attending a meeting, you can send a
Update Meeting Attendees Host selects the invite / remove attendees icon
Source List The source list contains the following options:
Meetings
Share Presentation Area When you are hosting a meeting, you can invite another Brio to
Learn More This is a Quick Start Guide. See the Brio User Manual (020-101758) for more details.
Technical Support
Contact Christie Technical Support at +1-519-744 -7986.
LIT GUID START Brio Enterprise 020-101703-02 Rev. 1 (7-2015)