1
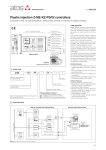
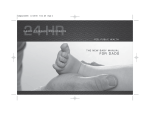
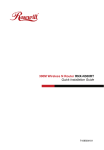
PORTABLE ICE MAKER 26.5 lb RHIM-15001~2
User Manual
PORTABLE ICE MAKER 26.5 lb RHIM-15001~2 USER MANUAL
• TABLE OF CONTENTS
INSTRUCTION MANUAL
It is important that you read these instructions before using your portable ice maker, and we strongly recommend
that you keep this booklet in a safe place for future reference.
IMPORTANT SAFETY INSTRUCTIONS ……………………………………………2
RODUCT OVERVIEW
GETTING TO KNOW YOUR ICE MAKER ………………………………………………… 3
CONTROL PANEL FUNCTIONS
UNDERSTANDING THE CONTROL PANEL ……………………………………………… 4
BEFORE USING YOUR ICEMAKER
UNPACKING YOUR ICE MAKER …………………………………………………………5
CONNECTING YOUR ICE MAKER ……………………………………………………… 5
CLEANING AND MAINTAINING YOUR ICE MAKER ……………………………………… 5
INSTRUCTIONS
USING YOUR ICE MAKER ……………………………………………………………… 6
TROUBLESHOOTING ……………………………………………………………… 7
SPECIFICATION TABLE …………………………………………………………… 8
TECHNICAL PARAMETERS & CIRCUIT DIAGRAM …………………………… 8
PARTS DRAWINGS…………………………………………………………………… 9
We appreciate you purchasing a quality Rosewill product. If you have
any questions or need assistance, please contact our Customer
Service Department: 1-800-575-9885 or [email protected].
1
PORTABLE ICE MAKER 26.5 lb RHIM-15001~2 USER MANUAL
• IMPORTANT SAFETY INSTRUCTIONS
Your safety and the safety of others are very important.
Always read and obey all safety massages.
This is the safety alert symbol
All DANGER or WARNING messages alert the user because you can be killed or seriously
injured if you don’t immediately follow the instructions.
DANGER Read the following safety instructions before using the ice machine.
When using electrical appliances, basic safety precautions should be followed to reduce the
risk of fire, electric shock, and injury to persons or property. Read all instructions before using
any appliance.
Do not operate this or any other appliance with a damaged cord. If the supply cord is damaged, it must be
replaced by the manufacturer or its service agent or a similarly qualified person in order to avoid a hazard.
• This ice-maker mustbe positioned so an outlet is accessible.
Connect to properly polarized outlets only. No other appliance should be plugged into the same outlet. Be sure that the plug is fully inserted into the receptacle.
• Do not place the power cord over carpeting or other heat insulators. Do not cover the cord. Keep the cord away
from traffic areas, and do not submerge the cord in water.
• We do not recommend usingan extension cord because it may overheat and becomea fire risk. If youmust use
an extension cord, use No.14AWG minimum size and rated no less than 1875 Watts.
• Unplug the ice makerbefore cleaning, servicing or making any repairs.
• Be cautious and supervise children when they are near the ice maker.
• Do not use your ice maker outdoors and keep the ice maker away from direct sunlight.
• Keepa minimum 4-inch area surrounding your unit free from walls and other hazards.
• Do not use liquids other than water to make ice-cubes.
• Do not clean your icemaker with flammable fluids. The fumescan cause fire, explosion, or damage to the unit.
• Do not tip the unit over.
• If theice maker is brought in from outside in wintertime, let it set a few hours to defrost and warm to room temperature before plugging it in.
• To avoid an accident due the appliance beingunstable, it must be placed at an even or flat surface.
WARNING: This appliance must be grounded into a 3-hole receptacle outlet.
IMPORTANT: The wires in the main power cable are color-coded in accordance with the
following code:
Green or Green / Stripe
2
Yellow
Ground
White
Neutral
Black
Black
PORTABLE ICE MAKER 26.5 lb RHIM-15001~2 USER MANUAL
• PRODUCT OVERVIEW
Getting to Know Your Ice Maker
1.Ice Scoop
2.Full Ice Basket Sensor
3.Ice Basket
4.Top Cover With Transparent Window
5.Air Outlet
6.Water Drain Cap: Tucked under base
7.MAXIMUM WATER LEVEL — ▲ — Remove the ice basket to see the water level mark.
7
4
1
2
3
5
6
3
PORTABLE ICE MAKER 26.5 lb RHIM-15001~2 USER MANUAL
• CONTROL PANEL FUNCTIONS
Understanding the Control Panel
All operations are controlled by the touch-panel located on the top of the unit. This Control Panel has functions
that are easy to use.
A
Small (S) and Large (L) Size Ice Cube Indicator
B
Power Indicator
C
Full Ice Basket Indicator
D
Low Water Level Indicator
E
Power On or Off Button
F
Select Small or Large Ice Cube Size
4
PORTABLE ICE MAKER 26.5 lb RHIM-15001~2 USER MANUAL
• BEFORE USING YOUR ICEMAKER
UNPACKING YOUR ICE MAKER
1.Remove all exterior and interior packaging. Check if the
ice basket and ice scoop are inside. If any parts are
missing, please contact our customer service.
1-800-575-9885 2.Clean the tank and ice basket. See “Cleaning and
Maintaining Your Icemaker.”
3.Put the ice maker on a level and flat counter top without
direct sunlight and other sources of heat (stove, furnace,
radiator, etc.). Make sure that there is at least a 4 inch gap
surrounding all sides for air circulation.
4.Allow one hour for the refrigerant fluid to settle before
plugging in the ice maker.
5.Position the unit so that the plug is accessible and a
ground outlet is available.
CONNECTING YOUR ICE MAKER
If the power cord is damaged please call our customer service. (1-800-575-9885)
WARNING: Electrical shock can occur if the ice machine is not properly grounded.
To use this safety feature, you must “ground” the ice machine by plugging the 3-prong
plug into a 3-hole wall outlet.
1.Check that there is an available standard 110 ~ 120 V, 60 Hz electrical outlet for a three-prong ground style plug.
Make sure it is properly installed and has a working ground wire.
2.Plug your appliance into the outlet in Step 1. Do not under any circumstances, cut or remove the third (ground)
prong from the power cord. Any questions concerning power and/or grounding should be directed toward a
certified electrician.
CLEANING AND MAINTAINING YOUR ICE MAKER
Before using your ice maker, it is strongly recommended to thoroughly clean it.
1.Take out the ice basket.
2.Clean the interior with diluted detergent and warm water.
3.Wipe the outside of the ice maker with a mild detergent solution and warm water. (Repeat regularly for proper maintenance.)
4.Dry the interior and exterior with a clean, soft cloth.
IMPORTANT: Do not wash any removable parts (ice basket, scoop, etc.) in a dishwasher.
IMPORTANT: When the machine is off, make sure to drain the water from the machine
and wipe it dry.
5
PORTABLE ICE MAKER 26.5 lb RHIM-15001~2 USER MANUAL
• INSTRUCTIONS
USING YOUR ICE MAKER
Make sure the machine is at room temperature and is clean.
1.Open the cover, remove the ice basket and pour water into the tank.
INSTRUCTIONS
Keep water below the water level mark.
2.Press the “Power” button on the control panel to start the ice making cycle.
3.Select the ice cube size by pressing the “Select” button. If the room temperature is below 60℉, “small” ice cubes
are recommended in order to prevent them from sticking together.
4.Change the water in the water reservoir every 24 hours to ensure clean and sanitary water.
5.Drain and dry the machine after use.
•
•
•
•
The ice-making cycle lasts approximately 6 to 13 minutes, depending on the ice cube size and the room
temperature. The recommended room temperature is 50°F to 105°F.
Allow the refrigerant liquid inside the compressor at least 3 minutes to settle before restarting.
The ice maker stops when the ice basket is full. The “Full Ice Basket” indicator will light
for notification.
See the “Troubleshooting” section for further assistance, or contact Rosewill Customer Support at 1-800-5759885 or [email protected].
WARNING: There is an infrared sensor underneath each screw inside the ice tray. This
sensor detects when the ice tray is full. Direct or reflected sunlight may cause this infrared
sensor to malfunction and continue to make ice when the tray is full. If this happens, move the
machine away from the sunlight or its reflection.
6
PORTABLE ICE MAKER 26.5 lb RHIM-15001~2 USER MANUAL
• TROUBLESHOOTING
PROBLEM
"Add Water" indicator is on.
"Ice Full" indicator is on.
POSSIBLE CAUSE
SOLUTION
Low water level in the tank.
Press "Power" button, add
water, and press "Power"
button again to restart the
unit.
Ice basket is full.
Remove ice from ice basket.
Continuously press “Select”
button for 5 seconds for
machine to restart.
The ice making cycle is too
long.
Stop the ice maker, and
restart it when the ice blocks
melt. Select the small size
ice cube selection.
Room temperature or water
temperature in tank is too
warm.
Change the room and/or
water temperature. Room
temperature: 50-105°F.
Water temperature: 15-90°F
Refrigerant in cooling system
is leaking.
Verify by a qualified
technician.
Pipe in the cooling system is
blocked.
Verify by a qualified
technician.
Ice cubes stick together.
Ice-making cycle is normal
but made no ice.
We appreciate you purchasing a quality Rosewill product. If you have any questions or need assistance, please
contact our Customer Service Department: 1-800-575-9885 or [email protected].
7
PORTABLE ICE MAKER 26.5 lb RHIM-15001~2 USER MANUAL
• SPECIFICATION TABLE
Part Number
96-268-085
96-268-084
Model
RHIM-15001
RHIM-15002
Dimensions
9.53 × 14.09 × 12.91"
9.53 × 14.09 × 12.91"
Water Tank Volume
2 Liters
2 Liters
Ice Basket Volume
1.54 pounds
1.54 pounds
Voltage
120 V
120 V
Cord Length
72 Inches
72 Inches
Weight
18.08 pounds
18.08 pounds
Color
Silver and White
Silver and Black
Material
Stainless Steel And Plastic
Stainless Steel And Plastic
• TECHNINCAL PARAMETERS & CIRCUIT DIAGRAM
8
PORTABLE ICE MAKER 26.5 lb RHIM-15001~2 USER MANUAL
• PARTS DRAWINGS
17 19 18 16 15 14 13 12 11 10
20
21
9
8
7
6
22
23
24
5
4
25
26
27
28
29
3
2
40
1
30 31 32 33 34 35 36 37 38 39
1. Power cord
4. Magnetism valve
7. Main PCB 10. Micro switch
13. Ice scoop link
16. Back top panel 19. Touch pad
22. Ice basket
25. Inner tank brackt, RH
28. Condenser
31. Copper tube filter
34. Silicon sealing pump 37. Plate bottom 40. Water tank
2. Back panel
5. Evaporator
8. Control box
11. Inner tank bracket, LH
14. Ice scoop
17. Clear window 20. Front top panel
23. Foaming asm
26. Sychronuous motor
29. DC Fan motor 32. Silicon plug drain
35. DC water pump 38. Rubber foot 9
3. Plate inforce
6. Control box cover
9. Ice making box
12. Cam
15. Back btm panel
18. Displaying PCB
21. Front btm panel
24. Water filter
27. Stainless wire
30. Filter dryer
33. Nylon plug drain
36. Compressor
39. Air grille