1
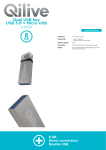
Advanced User’s Guide
Advanced User’s Guide
OTG Cloud
V2.4
Trademarks
Copyright @2014
Contents are subject to change without notice. All trademarks belong to their respective
proprietors.
Monster, the Monster logo, Monster Digital, the RoHS logo, the product and packaging are
trademarks or registered trademarks of Monster Cable Products, Inc., or its subsidiaries in the
U.S. and other countries. Tandon Digital is the official licensee of the Monster Digital brand
and logo. Mac is a registered trademark of Apple Inc., registered in the U.S. and other
countries. Windows is a registered trademark of Microsoft Corporation in the United States and
other countries. Android is a trademark of Google Inc. Trademarks and registered trademarks
are property of their respective owners.
2 MONSTER DIGITAL OTG CLOUD ADVANCED USER GUIDE CONTENTS
CHAPTER 1
INTRODUCTION ........................................................................ 4
1.1 INTRODUCTION................................................................... 4
1.2 PACKAGE CONTENTS........................................................ 4
1.3 CHARGING THE OTG CLOUD………………………………..5
1.4 HARDWARE FEATURES .................................................... 6
1.5 SOFTWARE FEATURES .................................................... 6
1.6 ACCESS……………………………………………………….…6
CHAPTER 2
HARDWARE INSTALLATION .................................................. 7
2.1 LED INDICATOR AND PORT DESCRIPTION .....................7
2.2 TWO POSITION SLIDE SWITCH ........................................ 8
2.3 RESET SWITCH .................................................................. 8
2.4 RJ45 PORT DOOR……………………………………………...8
CHAPTER 3
BROWSER WIRELESS SETUP ................................................ 8
3.1 WIRELESS SETUP…………................................................. 8
3.2 DEFAULT CONFIGURATION ...............................................8
3.3 CONFIGURE OTG CLOUD.................................................. 8
3.4 MANUAL SETTINGS ………................................................. 11
3.5 MANAGEMENT .................................................................... 11
3.6 VIEW, UPLOAD FILES ……………….………………………. 12
CHAPTER 4
MOBILE APPLICATION …....................................................… 13
4.1 SETTINGS …………………………....................................... 13
4.2 NAVIGATION ………………………………………………….. 15
4.3 CLOUD OPTIONS …………………………………………….. 18
4.4 TRANSFERRABILITY ………………………………………… 18
4.5 SORTING & DELETING FILES ………………………………. 20
4.6 CREATING A FOLDER ……………………………………….. 21
4.7 ACCEPTED FILE EXTENSIONS …………………………….. 21
CHAPTER 5
FAQ …………………................................................................... 22
Chapter 1
1.1 Introduction
Thank you for purchasing OTG Cloud, the ultimate in digital connectivity! Hopefully you have
already been having a great experience with the product. If you don’t find answers to your
questions in this guide manual please reach out to us by phone, e-mail or Facebook so we can
help you.
1.2 Package Contents
4 MONSTER DIGITAL OTG CLOUD ADVANCED USER GUIDE 1.3 Charging the OTG Cloud
When not in use, make sure you unplug any USB device from OTG Cloud to avoid the battery
from being drained.
Connect Wirelessly
OTG Cloud is its own independent wireless network. When browsing for Wi-Fi networks from
your computer, or mobile device, you will see the OTG Cloud Wireless in the list of available
networks.
Settings App --> Wi-Fi--> Select the OTG Cloud network
AngryBacon234 for example, you can rename through the application (Chapter 4), or through
the browser (Chapter 3).
By default, there is no password and when you connect your devices, it may take up to one
minute to connect so be patient. Please wait for the Wi-Fi LED on the OTG Cloud to flash to
confirm the connection. Once you connect to OTG Cloud Wireless, you can setup your own
SSID and password.
By connecting to the OTG Cloud you will no longer have access to the Internet.
However, OTG Cloud does provide a bridging function that allows you to maintain access to
OTG Cloud Wireless’s content while connecting to a Wi-Fi Internet connection.
1.4 Hardware Features
Standard IEEE 802.11b/g/n standards compliant
1. RJ45 10/100 Ethernet port (can be configured LAN/WAN)
2. MicroSD Up to 64GB
3. SD Up to 64GB
4. Micro USB Power In; 5V 1A
5. USB USB2.0 High Speed up to 2 TB
6. ON/OFF Power Switch
ON: Turns Device On
OFF: Turns OFF OTG Cloud device. When connected to computer in off position, device turns
into memory storage reader, and can charge devices from USB out.
Battery: Li-Poly 2000mA; Normal use: 5 hours
Dimensions: 124 x 65 x 11.8mm,
Operating Temperature: 5 ~ 40°C
1.5 Software Features
Download our application from the Apple App Store or the Google Play Store
The application will allow you to do a variety of tasks with you OTG Cloud. These tasks include
features such as streaming and transferring content to and from the OTG Cloud, transferring to
and from Dropbox and Google Drive, and Sorting Files.
COMPATIBLE FILE TYPES
Photos: JPEG, BMP, GIF
Videos: MP4, MOV, M4V
Music: MP3, WAV, WMA, M4A
Documents: PDF, DOC, XLS, PPT, TXT
Languages
English and Simple Chinese
Operating System Compatibility
iOS, Android, Windows PC OS, Apple Mac OS
1.6 Access
a. After charging OTG Cloud, turn the power switch on. When OTG Cloud is turned on,
Wi-Fi is enabled allowing wireless data transfer and streaming between the storage plugged
into OTG Cloud and the devices connected to OTG Cloud via Wi-Fi.
6 MONSTER DIGITAL OTG CLOUD ADVANCED USER GUIDE b. On the box next to the UPC code is the factory set SSID number for OTG Cloud. On your
phone, tablet or computer go to “settings” and select “Wi-Fi”. From the available networks
choose that SSID, for example AngryBacon234. Later we will show you how to rename it.
THE FIRST TIME YOU ACCESS OTG CLOUD FROM YOUR TABLET OR PHONE IT CAN
TAKE UP TO 60 SECONDS SO BE PATIENT!
By factory default you will be connected to OTG Cloud as a router, so you will not be able to
connect to the Internet at the same time. Please see Wifi Repeater instructions (Chapter 3).
Now that you are wirelessly connected to OTG Cloud you can access the SD, microSD and
USB storage connected to OTG Cloud via browser, app or wireless drive enumeration.
By Browser – There are two ways to access
1. In any browser on any device type http://10.10.1.1 into the address bar.
It’s easy to remember if you say it as “ten-dot-ten, dot-one, dot-one”.
2. On a Windows® based device you can type http://mdOTGCloud into the address
bar.
By App – Free download from the App Store or Google Play.
By Wireless Enumeration – Storage connected to OTG Cloud will appear as a network drive
on a Mac or PC. This is really cool because many other wireless devices don’t do it.
For a Windows PC - After connecting to the device, double click the network icon. The OTG
Cloud device icon will appear. Click the icon to access the media.
Chapter 2 Hardware
2.1 Indicator and Port Descriptions
1 Power – Green/on, off/off
2 LAN - An Ethernet cable is connected into RJ45 WAN port, Green
3 WiFi - WiFi is ready, Green
4 SD - SD/micro SD is inserted to the appropriate slot.
5 Charging – Blue when charging
6 Battery – 100-50% Blue, 50-20% Orange, 20-0% Red.
2.2 Two Position Slide Switch
This is located at the top of the device, next to the USB port. Sliding towards the USB port
turns the device on. Sliding away from the USB port will turn the device off. This will control
whether the device is in Card Reader mode, or Wireless mode.
2.3 Reset Switch
Press and Hold the button:
• Less than 2 seconds = Reboot
• Greater than 10 seconds = Reload the default settings and system reboot
2.4 RJ45 port
Located at the bottom of the drive. You can connect your RJ45 Ethernet cable here, in order to
use hotspot capabilities.
Chapter 3
This chapter describes how to configure OTG Cloud to setup different modes:
Wireless Router and WIFI Repeater Modes. Each mode has AP capability.
3.1 Wireless Setup
Operation Mode
Router Mode: The device is supposed to connect to the Internet via ADSL/Cable modem. The
NAT is enabled and PCs in LAN ports share the same IP to ISP through WAN port. The
connection type can be setup in WANe by using PPPoE, DHCP client, or static IP.
WIFI Repeater: In this mode, the Ethernet port and the WIFI interface are bridged together
(NAT function can be disabled or enable) to another Gateway/Router thru a WIFI interface.
3.2 Default Configuration
IP address: 10.10.1.1
Subnet mask: 255.255.255.0
Username
Password
Operation Mode Gateway
DHCP On
SSID WeC-XXXXXX
Channel Auto
Security Off
3.3 Configure OTG Cloud
1. Turn on OTG Cloud. Make sure the WIFI LED is flashing
2. Connect the OTG Cloud through WIFI from any device
3. Open any browser
4. Type http://10.10.1.1 in the URL to take you to home page of OTG Cloud.
8 MONSTER DIGITAL OTG CLOUD ADVANCED USER GUIDE A. Status
This page displays detailed information on the OTG Cloud
B. Setup Wizard
There are 2 operation modes: WIFI Router or WIFI Repeater.
Gateway: The WIFI data will be routed to RJ45
Ethernet cable. [Default Mode]
WIFI Repeater: The WIFI data will be routed to both OTG Cloud and local Internet Network.
WAN (or another WIFI Router/Gateway) through WIFI. It can also be used as a WIFI extend
range.
Note: At this mode the RJ45 is served as LAN out.
Gateway Connect the RJ45 (Ethernet cable) from the Gateway/Router to the OTG Cloud RJ45
Port.
•
•
•
•
•
•
Connect to OTG Cloud by WIFI.
Open any browser and enter: 10.10.1.1
Select Gateway
Click Next
Enter the IP/Subnet Mask you prefer for the device. The Default is
10.10.1.1/255.255.255.0
Click Next
WAN Access Type: Enter the WAN access method. It will be one of the following:
•
•
•
•
•
DHCP Client [Default]
Static IP
PPPoE (Most of the home ADSL modem is using PPPoE).
If PPPoE is selected, than a username and password must be enter. The username and
password can be obtained from the ADSL’s provider.
Click Next
Band: 2.4GHz (b+g+n) [Default]
SSID: It can be changed to any word
•
•
•
•
Channel Width: 40MHz [Default] to have a better performance. If there is an old
Gateway/Router that does not support 11n, then change the Channel Width to 20MHz.
Channel Number: Auto [Default]. OTG Cloud will select the best/cleanest Channel.
Click Next
C. Encryption
This purpose of this section is to prevent unauthorized users from accessing your network.
Every OTG Cloud is factory defaulted to having NO Encryption.
Recommendation: WPA2 (AES)
• WPA2 TKIP = Transfer Key Integrity Protocol. This is a less secure network then AES.
Setup an Encryption to prevent unauthorized user from accessing the network
•
•
•
•
•
•
•
•
Encryption: NONE [Default]. Suggest: WPA2 (AES).
Pre-Shared Key Format: Passphrase [Default].
Any easy phrase can be entered for easy memorization if Passphrase is selected.
Pre-Shared Key: Enter the Encryption
Click Finished
Click Next
It will takes about 90sec to 2 min to connect.
It will reboot
D. WIFI Repeater
•
•
•
•
•
•
Connect to OTG Cloud through WIFI.
Open any browser and enter: 10.10.1.1
Select WIFI Repeater
Click Next
Enter the IP/Subnet Mask you prefer for the device. The Default is
10.10.1.1/255.255.255.0
Click Next
WAN Access Type: Enter the WAN access method. It will be one of the following:
• DHCP Client [Default]
• Static IP PPPoE
(Most of the home ADSL modem is using PPPoE). If PPPoE is selected, then a username and
password must be entered. The user name and password can be obtained from the ADSL’s
provider.
•
•
•
•
•
Click Next
Band: 2.4GHz (b+g+n) [Default]
SSID: It can be changed to any word for easy identification.
Channel Width: 40MHz [Default] to have a better performance. If there is an old
Gateway/Router that does not support 11MHz, than change the Channel Width to
20MHz. Channel Number: Auto [Default]. OTG Cloud will select the best/cleanest
Channel.
Click Next
Please wait for the WiFi signal to confirm the connection.
Then you need to reconnect your device to Monster digital OTG Cloud via WiFi SSID.
Select the WIFI Gateway/Router you want to connect with.
1 MONSTER DIGITAL OTG CLOUD ADVANCED USER GUIDE 0 3.4 Manual Settings
SSID Setting
SSID: Enter a new preferred SSID
Encryption: Select an encryption method.
Suggest: WPA2 (AES)
Pre-Shared Key Format: Select Passphrase
Pre-Shared Key: Enter any combination characters or word that it won’t easily forget.
Click Finished
Site Survey
This section will show all available Gateway. Only under WIFI Repeater mode, the selection is
available to select the AP. The selection option is not available
in Gateway mode. If under WIFI Repeater mode,
Select the AP and Click Next.
Enter the AP Encryption if the AP has setup an encryption.
3.3.1 Manual Setting – LAN Interface
TCP/IP.
NOTE: IF YOU ARE NOT FAMILIAR WITH THESE SETTINGS DON’T CHANGE ANYTHING.
SETTING THEM WRONG MAY CAUSE THE DEVICE FAIL TO OPERATE.
IP Address: 10.10.1.1[Default].
Subnet Mask: 255.255.255.0 [Default]. This field is depending on the IP Address value. Default
Gateway: 10.10.1.1[Default]. It should be the same as IP Address.
DHCP: Server [Default]. It will generate IP Address. If select Client, than the device won’t
generate IP Address DHCP Client Range: The range of IP addresses, which are generated by
DHCP server.
DHCP Client Range: 480[Default] is the IP leasing time. Click Apply Changes to save the
setting.
3.5 Management
A. Upgrade Firmware
Firmware Version: Record down the firmware version before you upgrade to a new version.
Select File: Click Upload Box to select the Firmware to upgrade.
After downloading the firmware file to your computer click the Upload button. OTG Cloud will
reboot itself when the upgrade is complete.
Do not turn off the power during the firmware upload.
B. Save/Reload Settings
Save Settings to File: The configuration can be saved into a file and/or saved in current
computer.
Load Settings from File: A previously saved configuration file can be loaded back.
Reset Settings to Default: Click Reset to load the manufacture default setting value.
The OTG Cloud will reboot itself after successfully upgrade/change.
C. Password Setup
NOTE: YOU SHOULD WRITE DOWN AND KEEP IN A SAFE PLACE. WE ARE NOT ABLE
TO RECOVER THE USER NAME IF YOU FORGET OR LOSE IT.
New Password: Enter any preferable name or word next to SSID.
NOTE: YOU SHOULD WRITE DOWN AND KEEP IN A SAFE PLACE. WE ARE NOT ABLE
TO RECOVER THE PASSWORD IF YOU FORGET OR LOSE IT.
Confirmed Password: Enter the same password as above Click Apply Changes to apply the
new user name and password.
3.6 View/Upload Files
To add content to OTG Cloud Wireless, you can:
1. Connect it in the off position to a computer using the USB cable that came with the
device (with one of the supported expansion media slots occupied).
2. Copy contents directly to a USB, SD, or MicroSD drive and then insert the media into
the appropriate slot on the OTG Cloud Wireless.
When connected to a computer, and in off position, the OTG Cloud behaves like a media
reader. Each media type you have inserted USB, SD, MicroSD will be accessible.
You can populate each volume with digital content that you can later share or access
wirelessly via the OTG Cloud Wireless app.
When copying content to the media drive, it is highly recommended that you create folders on
each volume to help you organize and quickly locate files each time you update and/or change
the content of OTG Cloud (as opposed to dumping all of your files onto the root volume or into
a single folder). For example, you may want to store all of your music files in a folder called
“My Music”, or keep all of your photos in a separate folder called “My Pictures”, and so on.
When you are finished loading content eject or otherwise safely disconnect OTG Cloud from
your computer as you would any other connected memory. This will automatically turn the
device off.
Note: In card reader mode, since device must be off and plugged into computer via USB
cable, there is no WIFI signal. Therefore you cannot access it from your Smartphone, Tablet
or other device wirelessly.
1 MONSTER DIGITAL OTG CLOUD ADVANCED USER GUIDE 2 Chapter 4 – Mobile Application
Please note this device does NOT have any on board storage! You cannot save/transfer/view
any files if there is no USB flash drive, SD, or microSD card plugged into the OTG Cloud!
4.1 Settings
The settings are located in the left side bar of the application. You can access this side bar by
performing one of two actions: 1. Click on the icon in the upper left side of the screen or 2.
Drag your finger from the left side of the screen to the middle.
Setting up your new OTG Cloud via App
A. Wifi Section
This section was created to notify the user to connect the cloud if he/she hasn’t done so
already.
B. Wireless Mode
There are two options of how you can configure your Wireless settings:
1. Router Mode – This is the factory default setting and is the left toggle. In this setting, your
OTG Cloud will be able to act as a server to access all the data on your drives and cards. In
this mode you will not be able to connect to the Internet, unless you disconnect from OTG
Cloud’s network and use either data or connect to a local wifi network. This mode gives you
access to the full bandwidth for streaming/transferring files.
2. Repeater Mode - The right toggle will be “Repeater Mode”. In this mode, it will allow you to
access both the Internet, and the OTG Cloud network at the same time. This bypasses the
process of disconnecting from OTG Cloud every time you want to use the Internet.
The bandwidth will be cut in half for both access point and Internet.
Instructions on Repeater Mode set up
1. Click the “Repeater Toggle”
2. This page will provide you with a list of local networks in the area. Select the local
network you would like to use.
3. Now input the password (if one is needed) in order to connect to that specific network.
4. Once the password is inputted and you click “Save”, please allow anywhere from 1-2
minutes for the OTG Cloud to reset itself and implement the new settings.
NOTE: Please do not turn off device when these changes are being implemented.
C. Password Setting
SSID network is the Service Set Identifier. The SSID differentiates one WLAN from another; so
all access points and all devices attempting to connect to a specific WLAN must use the same
SSID to enable effective roaming.
This section will help you encrypt your SSID network. This function prevents unauthorized use
of your content on your OTG Cloud.
It is standard AES 256 bit encryption and works just like encrypting your other networks. The
first time you connect to the OTG Cloud, it will ask for the password, but after that it will
connect without the password, unless accessing from a device.
Steps to change/add password to your SSID.
1. Click on the Password section under Settings.
2. Choose your SSID you would like to use. This just changes the name of the network
from the defaulted name to one of your choosing.
3. Next to Encryption click the box which says “None” and click on “WPA2”
4. The Encryption will be defaulted to AES, which is the more secure network.
5. In the box underneath this, type in your password. We recommend checking the box,
which says “Show Password” so you don’t mistype the word. This will make it difficult to
log back in.
6. Once you are finished, click on “Save” and it will start rebooting the device to implement
the changes. Please allow 1-2 minutes for these changes to occur.
NOTE: Please do not turn device off when these changes are being implemented.
E. Help
This section opens up a PDF of the QSG or Quick Start Guide. You also receive the same
QSG when you purchase the device.
F. FAQ
Right underneath your Help menu, you will see an FAQ menu. This will take you to the link of
all of our FAQ’s for not just the OTG Cloud, but of our other products as well.
1 MONSTER DIGITAL OTG CLOUD ADVANCED USER GUIDE 4 The version number underneath the FAQ section tells the user of the app version they have.
Feel free to contact us at [email protected] if there are any questions regarding
what the latest version is for the application.
G. Memory Usage
Memory Usage is located at the bottom of the Settings section. This tracks how much space is
being used up in the microSD, SD or USB, which is plugged into the OTG Cloud device.
4.2 Navigation
The navigation bar is located in the slide-out sidebar menu of the application. The first way to
access the side bar menu is to press this button
, which is located in the top left corner of
the application at the home page. The second way is to use a gesture of dragging your finger
from the left side of the screen to the center.
There are six options in the side bar menu, three of which are collapsible options.
These options are Home, Local, OTG Cloud, Categories, Cloud, and Settings.
There are three different ways to navigate through your OTG Cloud.
A. First path of navigation: Home Page/ Categories (Side bar)
The first way to Navigate is through the Home Page. You should be able to see five icons:
Videos, Pictures, Music, Documents or Other Files. This is the same as going to the categories
pathway in the sidebar.
Pictures: If you click on Photos>OTG> the storage which you would like to access, this is the
pathway that leads to your photos, but they will all appear in grid mode. When you click inside
a photo, you will be able to scroll to the previous/next photo with a swipe of your finger.
Flipping your device to landscape mode will give you a larger viewing screen, depending on
how the photograph was taken.
Videos: Clicking on videos from home screen>OTG>the storage which you would like to
access will take you to all the videos on that device. Your video has the option to be viewed in
landscape mode for full screen..
Some things to keep in mind:
• Certain extensions will not be able to play. Our app supports these
extensions, however your handheld device may not support them.
One example is trying to view an .avi movie on an iOS device. iOS does
not have the capability to view these types of files.
• If your video is lagging or the resolution does not seem to be up to par,
check to see if you are in Router or Repeater mode. It is generally
recommended to be in Router Mode for watching videos using full
bandwidth streaming to and from your OTG Cloud.
Audio: Using this pathway to take you to the music in your mobile device, or streaming content
from your OTG Cloud. Androids should not have a problem playing music if they are from the
Google Play store.
Some things to keep in mind:
• Music from iTunes will not be able to be accessed from the application. If
you are playing music from another source like a ripped CD, or other
locations, you will be able to listen to your songs.
• If music is lagging, check to see if you are in Router mode instead of
Repeater mode, as Repeater mode will slow your connection down.
Documents: These will display any documents that have been saved to the device plugged
into your OTG Cloud. Standard formats include: pdf, doc, docx, xls, xlsx, ppt, pptx. For iOS
users, iWorks will work with our app as well, as long as you have Pages, Numbers, and
Keynote installed on your I-device.
If you are trying to open a document like a PDF, and it is not opening on your device, you may
need to download a third party application in order to help you view it, like Adobe Acrobat.
All files: This section will list all the files on your phone/ storage device through OTG Cloud. It
will even list files extensions that did not get recognized in any of the sections mentioned
above.
B. Second path of navigation: OTG Cloud drop down (Sidebar)
1 MONSTER DIGITAL OTG CLOUD ADVANCED USER GUIDE 6 Going down this pathway lets the user navigate by storage device instead of by category. It is
simply a preference in choosing which pathway the user likes better.
This path organizes all of the user’s files in one screen.
C. Third path of navigation: Local
This path lists every file in your phone/tablet. It will show you photos, videos, and documents in
your phone. It also creates four folders: OTG_Music, OTG_OtherFile, OTG_Photo,
OTG_Video. These folders are created for the sole purpose of transferring data.
When you transfer a file to your local folder in your phone, you will only be able to access it
only through the application in iOS devices. Since Android platform is a little more relaxed in
what they allow, you will be able to view your files from the device itself and the application. In
Android you will be able to edit documents, and then transferring them back to whatever
storage device is connected in the OTG Cloud.
D. List view/ grid view
As we talked about earlier, there are different ways to navigate throughout the application.
Depending on the path you take, your files will either show up in Grid view, or in List view.
Grid View: By clicking on the icons from the home page, they will first present you with folders,
and then your files. Your files will be listed in Grid view when you enter into this pathway.
Going through the ‘Categories’ section in the sidebar will present the same results.
List View: Going through the ‘OTG Cloud’ however will present your files in List view. This
gives our users the ability to choose preference on how they can view their files. Using this
view will present more detailed description on the file name and extension. Using Grid view will
present just the thumbnail with the file’s name.
4.3 Cloud Options
Our application allows quick and easy integration with two Cloud services, Dropbox and
Google Drive. You must have the Cloud applications installed on your phone in order to be
able to connect through the OTG Cloud application. Once you are all set up and signed in, you
will be able to view documents in these two cloud services, and also transfer between the
Cloud services and the OTG Cloud. We have included the instructions on how to transfer in
the ‘Transferability’ section. With these two Cloud services integrated, you will be able to see,
edit and transfer any documents you wish.
One important thing to keep in mind is the format your documents are in. Different devices will
not be able to read different types of documents.
4.4 Transferability
Transferring is a pretty simple process. Once inside a folder, you will see an icon appear in the
upper right of the screen
. This is the multi function button for selecting, copying, and
pasting files. The icon in the Apple application looks like this: Please note that the button on
the Android looks like three dots positioned horizontally like so:
Once you press this button, you will get options to Select, Select All, and others as shown in
the picture.
1 MONSTER DIGITAL OTG CLOUD ADVANCED USER GUIDE 8 Once you have selected the files you would like to transfer, click the multi-function button again
located at the top right, which will present you with copying options like in the picture below.
For copying files to OTG Cloud, we will select Copy to OTG Cloud.
Once you select “Copy to OTG”, you will be taken to a page to select the storage device in
which you need would like to transfer the files to. (USB, SD, microSD)
Now that your destination has been selected, you can find the location where you would like to
paste your files. Select the icon in the top right corner, and click on paste. Allow the transfer
process to complete before turning application or device off.
4.5 Sorting & Deleting Files
Go into a category, the click the folder you would like to enter. From here, you simply click the
multi task button and select one of the options for sorting. There are three options listed: Sort
by Name, Sort by Size and Sort by Category.
Select a file you want to delete and press the trash icon located in the bottom right of the
screen.
2 MONSTER DIGITAL OTG CLOUD ADVANCED USER GUIDE 0 4.6 Creating a Folder
Creating a folder gives extended options for sorting.
Call out the side bar menu. Click on the OTG Cloud dropdown menu and see a choice of three
different storage devices (SD, uSD, USB). Click on the device which is plugged into your OTG
Cloud, and that you would like to create the new folder in. Once in the storage device, navigate
to where you would like to create the new folder, and then click on the multi-function icon in the
upper right corner.
One of the options will be to create a folder. After clicking on this, type in the name of the folder
and click ok. Refer to the picture below.
NOTE: Creating a folder cannot be done through the Categories pathway in the side bar, only
through the OTG Cloud pathway.
4.7 Accepted File Extensions
•
Android - http://developer.android.com/guide/appendix/media-formats.html
•
Apple https://developer.apple.com/library/ios/documentation/Miscellaneous/Conceptual/iPhon
eOSTechOverview/MediaLayer/MediaLayer.html
Chapter 5
Q&A
Q: WIFI connection drops
A: Check the battery and make sure the AC adapter is able to deliver 5 volts, 1 amp.
Q: Where can I find the name of the OTG Cloud wireless network?
A: This is written on the side of the box where it says SSID.
Q: What is the wireless range?
A: Wireless range is about 10 meters or 33 feet.
Q: Do I need to pay a service charge for using this device?
A: No. The device emits its own wireless network that does not connect to the cellular or
satellite network. However, in order to use it for a hotspot, you will need to connect it an
Ethernet port that has an Internet connection.
Q: When OTG Cloud is in repeater mode, does it slow down?
A: Yes by 50%. In repeater mode you the bandwidth is split in half. Half is used for the OTG
Cloud while the other half is used by local network for Internet.
Q: I forgot my password and don’t know how to access my OTG Cloud drive’s network now.
What do I do?
A: Perform a hard reset. Hold down the reset button down for 10 seconds and it will restore
your drive to its default settings.
Q: Can I share items directly from a tablet to a phone (or one device to another)?
A: No. In order to transfer from a tablet to a phone or vice versa, you would need to transfer to
the storage device in the OTG Cloud first, then you can download that content from the OTG
Cloud to your phone (or secondary device).
For more FAQs, please visit us at support.monsterdigital.com.
2 MONSTER DIGITAL OTG CLOUD ADVANCED USER GUIDE 2