1
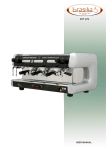
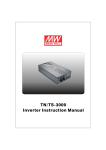
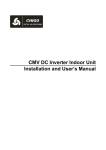
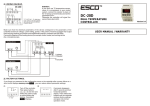
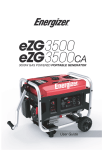
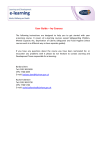
ASSEMBLY AND OPERATION MANUAL Water flow heaters PERFECT 350, 400, 450, 500 electronic 1. Appropriation and characteristic Flow water heaters type PERFECT 350, 400, 450, 500 ELECTRONIC are designed for delivery of warm water to sanitary equipment such as sinks, wash-bowls used at bath-rooms, work-shops lavatories, etc. Heaters are equipped with electronic control systems which eliminate the most deceptive parts as membranes, electric contacts used in traditional devices of such kind. This system substantially prolong heaters work life and reliability. Additionally, application of electronic air-plugging sensor increased heaters resistance against serious damages caused by lack of water in the system, particularly during first starting without prior air blowing-out from heating element. Heater can be connected to cold water pipe only. Caution! The heater must never be mounted, disconnected or inclined while being engaged to electric power system. The device can only work in position showed on drawing below. Trying to start the device in position other than proper one will result in damaging a heating element and deprivation of guarantee. drawing No 1 2. Safety regulations Connection to the electric power installation and measurement of earthing effectiveness should be made by qualified electrician; Heater must be earthed or neutralized; Heater must be permanently connected to the power line; Power installation must be equipped with differential switch; In rooms where heater is installed air temperature never should be below 0OC State of electrical installation should be periodically checked (voltage drop) and in particular electrical connection; Electrical power must be switched off before each disconnection from water system; Heater must work only in position presented on drawing No 1; Heater should be always in perfect technical condition and faultlessly installed; In case the heater works incorrectly power must be switched off and water must be turned off; Housing never can be taken out when power is on; 2 Water flow should be so regulated that water should not to be too hot (especially for children); The appliance should not be installed in aggressive environment or danger of explosion; Heater should never be exploited with voltage below 200V measured under load; Only original spare parts can be used for repair; Heater can be connected to tap assembly delivered by the heaters manufacturer; All service and maintenance works can be completed only with power switched off; Avoid electronic system to be splashed with water; Water tap drain tube sprinkler (strainer) should be cleaned regularly. 3. Heater assembly Wiring system b) power net system TN-S F2 over-current bipolar switch L live lead N neutral lead PE protective lead Minimum cross-section of wires: PERFECT 350 ELECTRONIC 1.5 mm2 PERFECT 400, 450, 500 ELECTRONIC 2.5 mm2 Fuse rating: PERFECT 350 ELECTRONIC 20A PERFECT 400, 450, 500 ELECTRONIC 25A 3 Heaters exploded view 1 2 3 4 5 6 7 8 9 Control lamp signaling heaters switching on Water temperature adjusting screw Water filter Gaskets Water tap nuts Drain tube sprinkler (strainer) Hot water knob Cold water knob Water tap assembly 4 Assembly Caution! Disconnect the heater from power supply prior to dismantling it from tap assembly. Otherwise heating element can be damaged. Mounting without conformity to manufacturers instruction result in deprivation of guarantee. Clean water tube thread of dirt to eliminate filter blockage. Fit tap assembly (9) sealing thread with adequate sealing material. Feed-pipe should not be retreated into wall. If anyway it happened, extension of 1/2 should be used. Connect heater to the tap assembly (9) with nuts (5), gaskets (4) and water filter (3). Open water flow to the tap (9). Because dirt can flow out and cause filter or water sprinkler plugging, therefore is necessary: 1 Screw off sprinkler (6) from drain tube. 2 Open cold water tap (8) for few seconds. 3 Release air-plug by opening hot water tap (7) for few seconds. 4 Screw in sprinkler (6) into drain tube. Check tightness of water connections. Connect heater to power installation and switch on. Correct water temperature (chapter 4). Lack of water filter can cause damage to the heater because of dirt. 4. Temperature adjustment Caution! Water temperature on heater exit depends of: water flow intensity (lower flow higher temperature, higher flow lower temperature) entering water temperature voltage drop during heater work Entering water temperature 15OC 5 1 Turn on hot water knob (2) 2 Put screw driver to a hole (1) located on the right side of housing 3 Turn screw driver left or right to suppress water flow in order to reach requested temperature. 5. Cleaning the heater of dirt Caution! Disconnect the heater from power supply prior to dismantling it from tap assembly. Otherwise heating element can be damaged. 6 Water filter cleaning 1. 2. 3. 4. 5. 6. 7. 8. Disconnect power supply. Disconnect heater from tap assembly (6). Remove filter (1) from connecting tube (5). Remove dirt from filter (1). Replace filter (1) to connecting tube (5). Connect heater to tap assembly (6). Release air-plug by opening hot water tap (7) for few seconds. Switch on power supply. Sprinkler cleaning 1. Screw out sprinkler (4) from drain tube (8). 2. Clean sprinkler thoroughly. In case sprinkler is composed of few rings screw out connecting screw. Take out each ring. Remove all dirt (particularly lime scale) and reconnect all parts. 3. Screw sprinkler onto drain tube. 6. Elimination of defects Water flow too small blocked water filter (clean it out according to chapter 5) blocked sprinkler (clean it out according to chapter 5) Heater does not switch on suppressed water flow blocked water filter (clean it out according to chapter 5) water pressure in water system too low lack of power supply fuse blown out Heater does not warm up water but control lamp lights voltage too low (supplying installation overloaded) temperature of entering water too low water flow too high (adjust water flow according to chapter 4) Water temperature on heater exit too low water flow too high (adjust water flow according to chapter 4) temperature of entering water too low high voltage drop Water temperature on heater exit too high water flow suppressed too much by control valve (adjust water flow according to chapter 4) blocked water filter (clean it out according to chapter 5) water pressure in water system too low blocked sprinkler (clean it out according to chapter 5) Heater is switching on and out automatically oscillation of water pressure in water system water flow suppressed too much by control valve (adjust water flow according to chapter 4) Stepwise changes of water temperature on exit current rush in power supply system changes of water flow in result of pressure changes in water system 7 Technical data Perfect 350 electronic Perfect 400 electronic Perfect 450 electronic Perfekt 500 electronic Voltage 230V 50Hz 230V 50Hz 230V 50Hz 230V 50Hz Current intensity 15.2A 17.4A 19.6A 21.7A Heating element power 3500W 4000W 4500W 5000W Heating coil resistance 15.2Ω 13.3Ω 11.8Ω 10.6Ω Max. entering water pressure 0,6 MPa 0,6 MPa 0,6 MPa 0,6 MPa Min. entering water pressure 0.04 MPa 0.04 MPa 0.05 MPa 0.05 MPa Water pressure on exit 0 Bar 0 Bar 0 Bar 0 Bar Min. water resistance at 15 C 1300Ωcm 1300Ωcm 1300Ωcm 1300Ωcm Splash-proofing IPX4 IPX4 IPX4 IPX4 Min. switching on water flow 1.2 l/min 1.3 l/min 1.4 l/min 1.5 l/min Max. entering water temp 28 C 28 C 28 C 28OC O O O Outfit Water flow heater Water tap assembly Gasket Water filter List of service shops 1 pc 1 pc 2 pcs 1 pc 1 pc O