1
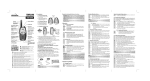
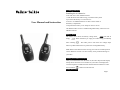
Walkie-Talkie
Getting Started
Installing the AA Batteries
Your radio uses 3 AA Alkaline batteries.
1. With the back of the radio facing you, lift the battery latch
up to release the battery cover and remove.
User Manual and Instruction
2. Insert 3 AA Alkaline batteries as shown on the inside of
the battery compartment.
3. Reposition the battery cover and press down to secure.
The Walkie-Talkie can use a NiMH rechargeable battery instead of 3 AA
Alkaline batteries.
Battery Meter
The battery icon shows the battery charge level,
from full to
empty
.When the battery is empty, the radio chirps periodically
after releasing
.
The radio powers off when the voltage drops
below a predetermined level to protect the rechargeable battery.
Note: Remove the batteries before storing your radio for extended periods
of time. Batteries corrode over time and may cause permanent damage to
your radio.
Turning Your Radio On and Off
After you insert batteries turn the radio on, the radio chirps and the display
briefly shows all feature icons available on your radio. The display then
scrolls through the available channels and Interference Eliminator Codes.
Press and hold
button turn the radio off.
Setting the Volume
Page 1
-
Press the up button to increase the speaker volume.
Press the down button to decrease the speaker volume.
The speaker volume level is indicated by the numbers 1-16
displayed.
• Lock and unlock the keypad (when held down and not in a menu)
Use
to:
• Talk
• Save a setting
Get
Setting a Channel
1. With the radio on, press
Talking and Listening
, The current channel flashes.
2. Press up or down to set the channel.
To communicate, all radios in your group must be set to the same channel
3. Press PTT to save the channel setting.
and Interference Eliminator Code.
Getting Started
To talk, press and hold PTT. Hold the radio 2 to 3 inches away from your
mouth when speaking.
When you finish speaking, release PTT (press to talk, release to listen).
Control Buttons
Use
• Scan
/
Checking the Channel Before Transmitting
to:
Your radio has multiple channels shared on a “take turn” basis. For
• Turn radio on/off
uninterrupted communication, do not talk on a channel if someone else is
currently talking on it.
Use UP/DOWN to:
To check for activity on a channel before you talk, press and hold ♪/MON .
• Adjust volume
If you hear static, the channel is clear to use.
• Scroll through menus
Special Features
Special Features
♪/MON to:
• Transmit call tone
Use
Interference Eliminator Code
Interference Eliminator Codes help minimize interference by providing you
Use
with a choice of code combinations. To set the code for a channel:
to:
• Select menu options
• Exit the menu (when pressed while in a menu)
1. Press
Page 2
until the code starts to flash.
Page 3
2. Press UP or DOWN to select the code 0-121 OR 121-0.
5 seconds.
3. Press PTT to save the code setting.
Scan Advance
You can set a different code for each channel using this procedure.
If the radio stops scanning on a channel you do not want to listen to, briefly
Note: You must set the Interference Eliminator Code to 0 on an FRS radio
press and release ] or [ to resume scanning for the next active channel.
that uses Interference Eliminator Codes to communicate with other FRS
radios that do not have Interference Eliminator Codes.
Removing Channels from the Scan List (Nuisance Delete Feature)
To remove a channel so the radio does not stop on it while scanning, press
Push to Talk Timeout Timer
and hold UP or DOWN for at least 3 seconds, then release. This temporarily
To prevent accidental transmissions and save battery life, the radio emits a
removes the channel from the scan list.
continuous warning tone and stops transmitting if you press PTT for 60
To restore the channel, turn the radio off and then back on.
continuous seconds.
Note: You cannot remove the channel your radio was set to when you
Special Features22
started the scan (called your home channel).
Locking the Keypad
Alerts
To avoid accidentally changing your radio settings, press and hold
for
Setting and Transmitting Call Tones
Your radio can transmit different call tones to other radios in your group so
3 seconds or until
displays. You can turn the radio on and off, receive,
transmit, send a call tone, and monitor channels. All other
you can alert them that you want to talk.
functions are locked.
1. With the radio on, press
To set a call tone:
and
To unlock the radio, press and hold
for 3 seconds or until
is no
3 times. The current call tone setting flashes
displays.
2. Press UP or DOWN to change and hear the call tone.
longer displayed.
3. Press
or
to set the new call tone.
Scanning Channels
To transmit your call tone to other radios set to the same channel and
Use scanning to monitor channels for transmissions or to find someone in
Interference Eliminator Code as your radio, press
your group who has accidentally changed channels.
To start scanning, briefly press and release
. The scan indicator
Notes
displays. When the radio detects channel activity, it stops scanning and you
• Setting the call tone to 0 disables the call tone feature.
can hear the transmission. To respond to the transmission, press PTT within
Page 4
Page 5
3. Press PTT to save the double channel monitor setting.
Voice Activation (VOX)
Voice activation (VOX) allows you to talk hands-free.
1. Press PTT and
Turn the radio on.
Setting the SQUELCH Level 1-6
2. Turn the radio on.
displays.
1. Press
until SL displays.
3. To transmit, speak into microphone. There is a short delay
2. Press UP or DOWN to select the receive sensitivity level:
between the time you start talking and when the radio transmits.
01 = High receive Sensitivity
4. To receive, stop talking.
02~05 = Medium receive Sensitivity
To turn VOX off, press PTT.
06 = Low receive Sensitivity
Setting the Sensitivity Level
Setting the TX POWER LO/HI
Adjusting your radio’s sensitivity level helps minimize the possibility of
unintended noises triggering a transmission and helps the radio pick up soft
1. Press
voices.
1.
2.
1. Press
until
until
pr displays.
Press UP or DOWN to select the LO OR HI level.
Press PTT to save the TX POWER LO/HI setting.
displays.
2. Press UP or DOWN to select the sensitivity level:
Safety and General Information
3 = High Sensitivity
for quiet environments
Important Information on Safe and Efficient Operation
2 = Medium Sensitivity
Read This Information Before Using Your Radio
for most environments
The information provided in this document supersedes the general safety
1 = Low Sensitivity
information contained in user guides published prior to July 2000.
for noisy environments
Transmit and Receive Procedure
29
Your two-way radio contains a transmitter and a receiver. To control your
Setting the double channel monitor
exposure and ensure compliance with the general population/uncontrolled
environment exposure limits, always adhere to the following procedure:
1. Press
until
CH displays, The current channel flashes.
2. Press up or down to set the monitor channel.
• Transmit no more than 50% of the time.
Page 6
• To transmit (talk), press the Push to Talk (PTT) button.
Page 7
• To receive calls, release the PTT button.
in a potentially explosive atmosphere can cause an explosion or fire
Transmitting 50% of the time, or less, is important because the radio
resulting in bodily injury or even death.
generates measurable RF energy exposure only when transmitting (in terms
Note: The areas with potentially explosive atmospheres referred to above
of measuring standards compliance).
include fueling areas such as below decks on boats, fuel or chemical
transfer or storage facilities, areas where the air contains chemicals or
Exposure to Radio Frequency Energy
particles, such as grain, dust or metal powders, and any other area where
Your radio is designed to comply with the following national and
you would normally be advised to turn off your vehicle engine. Areas with
international standards and guidelines regarding exposure of human beings
potentially explosive atmospheres are often but not always posted.
to radio frequency electromagnetic energy:
Two-Way Radio Operation
Blasting Caps and Areas
When using your radio as a traditional two-way radio, hold the radio in
To avoid possible interference with blasting operations, turn off your radio
a vertical position with the microphone one to two inches (2.5 to
when you are near electrical blasting caps, in a blasting area, or in areas
5 cm) away from the lips.
posted: “Turn off two-way radio.” Obey all signs and instructions.
Facilities
Operational Cautions
To avoid electromagnetic interference and/or compatibility conflicts, turn
off your radio in any facility where posted notices instruct you to do so.
Antennas
Hospitals or health care facilities may be using equipment that is sensitive
Do not use any portable radio that has a damaged antenna.
to external RF energy.
If a damaged antenna comes into contact with your skin, a minor burn can
result.
Aircraft
Safety and General Information
When instructed to do so, turn off your radio when on board an aircraft.
Batteries
Any use of a radio must be in accordance with applicable regulations per
All batteries can cause property damage and/or bodily injury such as burns
airline crew instructions.
if a conductive material such as jewelry, keys, or beaded chains touch
exposed terminals.
Potentially Explosive Atmospheres
The conductive material may complete an electrical circuit (short circuit)
Turn off your radio prior to entering any area with a potentially explosive
and become quite hot. Exercise care in handling any charged battery,
atmosphere. Do not remove, install, or charge batteries in such areas. Sparks
particularly when placing it inside a pocket, purse, or other container with
Page 8
Page 9
metal objects.
Battery Charger Safety Instructions
1. Do not expose the charger to rain or snow.
2. Do not operate or disassemble the charger if it has received a sharp blow,
or has been dropped or damaged in any way.
3. Never alter the AC cord or plug provided with the unit. If the plug will
not fit the outlet, have the proper outlet installed by a qualified electrician.
An improper condition can result in a risk of electric shock.
4. To reduce the risk of damage to the cord or plug, pull the plug rather than
the cord when disconnecting the charger from the AC receptacle.
5. To reduce the risk of electric shock, unplug the charger from the outlet
before attempting any maintenance or cleaning.
6. Use of an attachment, not recommended, may result in a risk of fire,
electric shock, or personal injury.
7. Make sure the cord is located where it will not be stepped on, tripped
over, or subjected to damage or stress.
8. An extension cord should not be used unless absolutely necessary. Use of
an improper extension cord could result in a risk of fire and/or electric
shock. If an extension cord must be used, make sure that:
• The pins on the plug of the extension cord are the same number, size, and
shape as those on the plug of the charger.
• The extension cord is properly wired and in good electrical condition.
• The cord size is 18 AWG for lengths up to 100 feet, and 16 AWG for
lengths up to 150 feet.
Page 10