1
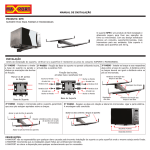
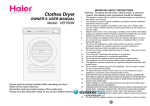
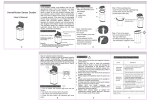
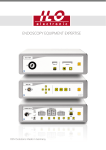
SwiftCam X3
User manual
Warranty Disclaimer
SwiftCam shall not in any way or manner be liable to the buyer under this clause unless the
following conditions for the installation, use and/or operation of the SwiftCam product in
question are strictly complied with:
The SwiftCam product is installed and operated in accordance with SwiftCam’s
instructions and any manual issued by SwiftCam in conjunction with the installation and
operation of the SwiftCam product and in accordance with generally accepted industrial
practices.
The SwiftCam product is used under normal conditions for which it is designed.
The SwiftCam receives due and proper care and maintenance.
The SwiftCam product is used with an electrical protection system and a charger approved
by SwiftCam.
The SwiftCam product is not subjected to any modification or adaptation which is not
authorized by SwiftCam in writing.
No device, instrument, equipment (either separately or in combination) is installed for use
in connection with or as part of the SwiftCam product, the use or combination of which
has not been approved or recommended by SwiftCam in writing.
Limitation of Liability
In no event, regardless of cause shall SwftCam be liable for ay indirect, special, incidental,
punitive or consequential damages of any kind, whether arising under breach of contract, tort
(including negligence), strict liability or otherwise, and whether based on this agreement or
otherwise, even if advised of the possibility of such damages.
Care and Maintenance
Place the SwiftCam X3 steadied onto the gimbal stand then starting
the maintenance process.
SwfitCam X3 is a delicate instrument, please keep away from sand, dust, or any kind of
liquid, the main unit or accessories will be damaged due to improper use or maintenance. Use
soft and dry cloth to clean it. DO NOT apply any detergent or solvent while cleaning the main
unit or accessories.
Contents
Warranty Disclaimer & Limitation of Liability
P. 2
Specifications
P. 4 - 8
Item Included
P. 9 - 10
X3 Installation Instructions
P. 11 - 26
Accessory installation instruction
P. 27 - 28
Assembly Instructions Operation Mode
P. 29 - 31
Control Modes Instructions
P. 32 -34
Remote Controller Instructions
P. 35 - 37
Charger LCD Display Instruction
P. 38 - 39
Battery Capacity Indicator Instruction
P. 40
Specifications
1) Central grip
2) Video transmitter antenna
3) Main control box with battery capacity indicator
4) Top folding arm buckle
5) Follow focus servo
6) Pitch Motor
7) Gimbal main unit
8) Quick Release Screw
9) Battery handle
10) 4.3” Onboard screen
11) Folding Arm Buckle (Left)
12) Folding Arm Buckle (Right)
13) Follow focus joystick
14) Gimbal movement joystick
15) HDMI/AV converter
16) Horizontal adjustment knob
17) Adjustable gimbal plate
18) Camera fixing knob
19) Camera position adjustment knob
Specifications
Working Current : < 1.5A
Working Voltage : 14.8V 4S Lipo
Working Battery Type : 26650 LiIon Battery *4Pcs
Working Performance
Operating Temperature : -15°C 50°C (5°F 120°F)
Weight : 3.07kg (6.77lbs) fully loaded without Camera
Gimbal Dimensions : 553mm (W) x 200-282mm (D) x 439mm (heart)
Max. Gimbal Load (Reference Value) : 2Kg
Controlled Angle Accuracy : 0.02°
Supported Camera
Dimensions
Controlled Rotation
Speed
Controlled Rotation
Range
Maximum width : 160mm
Maximum depth at center of mass on camera base plate : 120mm
Maximum height measured from top of camera base plate : 180mm
Pan axis : Proportional to Joystick Input
Tilt axis : Proportional to Joystick Input
Roll axis : NULL
Pan axis control : ±360°
Tilt axis control : ±360°
Roll axis control : NULL
Charger Input Voltage : 5V USB
Charger Input
Radio 2.4G Transmitter Power :
11.1V Lipo Battery with JST-XH Balance Connector (Optional )
Item Included
Carrying bag
(2)
Gimbal stand
(1)
A complete set of 3-axis handheld brushless gimbal
(4)
USB charging cable (2pcs)
(3)
7CH Transmitter with built-in video receiver
(5)
and live view screen
Li-ion charger (2pcs)
(6)
( 7.1 )
( 7.2 )
22650 Li-ion battery (4pcs)
Hex key (2mm & 2.5mm)
Hex key (2mm & 2.5mm)
( 7.3 )
Li-ion charger (2pcs)
X3 Installation Instructions
(1)
Open the backpack of X3, hold the upper arm and the camera mount with each of your hands as
illustrated, and take the X3 set out of the backpack.
(2)
Put the X3 vertically as illustrated, level the camera mount set while the arms are still folded.
(3)
Release the folding arm buckle, hold the upper side of the arms and open them fully.
(4)
Then tighten the folding arm buckle again.
*For most of the setting steps, we recommend you to place the gimbal as illustrated
(triangle position).
(5)
Put the X3 upside down as illustrated for remove/install the batteries.
(6)
Turn the arm counter-clockwise to release the battery tray.
(7)
Install the battery as illustrated.
*Note the direction of the positive/negative poles.
(8)
Tighten the arm clockwise after installing the batteries and place the X3 onto the gimbal mount
as illustrated.
(9)
Take out the follow/focus parts.
( 10 )
Insert the black rubber sleeves into each side of the belt, then insert both sides of the belt into
the blue rubber ring.
( 11 )
Fold the end of the belt and fix it into the black rubber sleeve as illustrated.
( 12 )
Fix the belt onto the lens and tighten it.
( 13 )
Fold the other side of the belt and fix it into the black rubber sleeve as illustrated.
( 14 )
Unscrew the adjustable gimbal plate before mounting the camera onto the X3.
A.
Short adjustment knob – for tighten / loosen the camera
B.
Long adjustment knob – for adjusting camera position
( 15 )
Unscrew the fixing screw, put the camera onto the adjustable gimbal plate, then fixing the tripod
socket
( 16 )
After mounting on the camera, tighten the short adjustment knob and adjusting the position of
the camera for balancing the gimbal.
( 17 )
After balancing the gimbal, move the camera forward and align it with the follow/focus ring.
( 18 )
Adjust the follow/focus ring to closely fit with the belt. (Do not over tighten the follow/focus ring.)
* The gimbal will level itself back when you push the camera slightly forward with your hand if the
CG is set properly.
( 19 )
Use the hex key to loosen the vertical adjustment mount.
You can adjust the vertical position of the camera with it.
( 20 )
Loosen the horizontal adjustment knob for adjusting the CG of the gimbal with the camera.
Please adjust the vertical position of the camera concurrently for making sure the camera is
located at its CG position.
( 21 )
Loosen 4 screws below the yaw motor arm with hex key, hold the arm
and adjust it to CG position.
*If the CG is set properly, the gimbal will balance perfectly when you lean the X3 backward as
illustrated.
Accessory installation instruction
(A)
Please hold the connector head instead of the cable when inserting it to the socket.
(B)
Open the socket cover of your camera and insert the HDMI Cable.
(C)
Insert the other side of the HDMI cable to the HDMI/AV converter.
Installation completed
Assembly Instructions
Operation Mode 1
Central Mode, the gimbal is at the central position for easy shooting and control.
Operation Mode 2
Upright Mode, the gimbal is above the grip and control panel for
shooting some vertical-align scenes.
Operation Mode 3
Folding Mode, fold the arms for wider shooting angle.
*Loosen the top folding arm buckles, fold the arms backward as illustrated
then tighten the buckles.
Control Modes Instructions
Mode 1 : Hanging Mode ( press 2 times )
Follow pan movements
Pan, Pitch controllable by Joystick
Controllable by transmitter at the same time
Follow/Focus controllable
Mode 2 : Follow “Upright” Mode ( press 2 times )
Follow Pan and Pitch axis movements.
Pan Tilt controllable by Joystick
Controllable by transmitter at the same time
Follow/Focus controllable
Mode 3 : Lock Mode ( press 3 times )
3-Axis Auto balancing
Pan, Pitch controllable by Joystick
Controllable by transmitter at the same time
Follow/Focus controllable
Remote Controller Instructions
1) Contrl Mode Switch
*Up : Mode 1, Down : Mode3
2) Radio Antenna
3) Sun Shield
4) Video Antenna
5) Follow Focus Control Stick
6) Direction Control Stick
7) Monitor Power Switch
8) Monitor Setting Button
9) 7 Inch LCD monitor
10) Main Power Switch
11) Video Receiver Channel Switch
12) Radio Setting Buttons
13) Radio Setting Display
14) Power Display Buzzer
15) Radio Barrery Case Lock
16) Radio Barrery Case
Battery Installation Instruction
Prepare a 3S 11.1V Lipo (1800~2200mAh) battery, unlock the battery case lock. Open the
battery case, then connect the balance port of the battery to the battery port inside the battery
case.
*Note: All the other buttons, switches or sockets not mentioned in the manual are for factory
maintenance, please DO NOT set them.Factory maintenance buttons, if you mistakenly press
it, just leave it for about 5 seconds, then it will return to normal mode.
Charger LCD Display Instruction
1) Charging and percentage indication
2) Battery voltage indication
3) Worse Battery alert indication
4) Clock
5) Hour & Minute
6) Charging Capacity indication
Battery voltage indication
Charging Time indication
Charging Capacity indication
Worse Battery alert indication
POOR CELL
Li-ion – Li-ion Battery
Li-FeP – Li-FePO4 Battery
Ni-MH – Ni-MH Battery
Battery type indication
Features
Press the button select LiFePO4 or NiMH/Li-ion batteries
Automatic 3.7V/1.2V battery cell voltage and polarity detection
Mix charge the battery, Reverse protection, Precision end-of-charge voltage detection
Over Charging timeout protection
Auto active function for Lithium battery cell open (0 Voltage)
LCD displays for multi-information, battery type ,voltage ,time ,charging percentage ,charging
capacity ,worse battery and bad battery
Auto alert indication for worse battery cell and bad battery cell
Charge methods
1. Ni-MH battary or Li-ion battery, put in the battery, automatic identification and automatic
charging.
2. LiFePO4 battery or Li-ion battery, before charging press the start button, the LCD display
shows LiFeP, charger into LiFePO4 mode, put in the battery and charge.
Specifications
DC IN : 5V 2000mA / 12V 1000mA /6V 10W (Photovoltaic solar panel)
Output :
1000mA*2@ Li-ion 3.7V Battery
1000mA*2@ Ni-MH 1.2V Battery
1000mA*2@ LiFePO4 3.2V Battery
Charger mode : CC / CV (Li-ion Battery/LiFePO4 Battery)/ DELTA V (Ni-MH Battery)
Conditions
LCD condition
Power on
LCD display show “Stby”
Charging battary
Icon and levels running light up
Bad batery
Show ”FAIL”, “POOR CELL”, @ Li-ion LiFePO4
Conditions
Ni-MH Charging time
Li-ion Charging time
Li-FePO4 Charging time
600mAh
~45min
~45min
~45min
1000mAh
~72min
~72min
~72min
1800mAh
~110min
~110min
~110min
2200mAh
~160min
~160min
~160min
Ni-MH 250mAh
~60min
~60min
Li-ion 600mAh
Maximum charging time : 99 hour 59 minute
Maximum charging capacity : 9999mAh
~100min
Battery Capacity Indicator Instruction
You can check how much battery capacity is left by observing the color
of the LED of the indicator.
Yellow: Fully Charged
Orange: Satisfactory
Red: Low
The LED lights will be turned off if the remaining battery power is exhausted.