1
University of Twente
Department of
Electrical Engineering
20-Sim code generation
for ADSP-21990 EZ-KIT
Ceriel Mocking
Individual Design Assignment
Supervisors
dr.ir. J.F. Broenink
D. Jovanovic, MSc.
December 2002
Report 040CE2002
Control Engineering
Faculty of Electrical Engineering
University of Twente
P.O.Box 217
7500 AE Enschede
The Netherlands
20-Sim code generation for ADSP-21990 EZ-KIT
Summary
The goal of this project is to design a 20-Sim Code Generation template for the Analog Devices
ADSP-21990 EZ-KIT lite evaluation board using VisualDSP++ 3.0. Also, the gap between simulation
and realization should be spanned automatically, so that no manual effort needs to be made to cross
this gap. This board, together with the 20-Sim code generation template, can then be used during the
Mechatronica project for second-year Electrical Engineering students of the University of Twente.
A code generation template has been created, which functions well, making use of the AD- and DAconverters on the evaluation board. Drivers have been designed for these features. The generated
software is automatically loaded onto the ADSP-21990 target and executed. Furthermore, 20-Sim
library submodels have been designed for the ADC and the DAC, which can be used when
constructing 20-Sim models, that have to run on the ADSP-21990 target.
Further work is to make the sample time programmable from the 20-Sim code generator. Also, other
peripherals, like encoders, PWM’s and other I/O should be supported.
Samenvatting
Het doel van dit project is het realiseren van een template voor de 20-Sim code generation tool voor de
Analog Devices ADSP-21990 EZ-KIT lite evaluation board. Hierbij wordt gebruik gemaakt van de
VisualDSP++ 3.0 software ontwerp omgeving. Onderdeel van dit project is ook het automatisch
overbruggen van de kloof tussen simulatie en realisatie. Uiteindelijk moet een ontworpen systeem na
simulatie moeiteloos gerealiseerd kunnen worden. Hierna kan deze DSP, samen met de code
generation template, gebruikt worden voor het Mechatronica project voor tweede-jaars EL-studenten
aan de Universiteit Twente
Er is een goed werkende code generation template gerealiseerd. Deze maakt gebruik van de op de
evaluation board aanwezige AD- en DA-converters. De door de code generation tool gegenereerde
software wordt automatisch op de ADSP-21990 board geladen en gestart. Verder zijn er ook 20-Sim
submodellen van de ADC en de DAC gemaakt voor de 20-Sim bibliotheek. Deze submodellen kunnen
gebruikt worden voor het ontwerpen van 20-Sim modellen die op ADSP-21990 gedraaid moeten
worden.
Verdere taken zijn het programmeerbaar maken van de sample tijd vanuit de 20-Sim code generator en
het toevoegen van drivers voor andere I/O apparaten, zoals encoders, PWM’s e.a.
i
20-Sim code generation for ADSP-21990 EZ-KIT
Preface
With this report I finish my BSc. assignment (IOO, when using Dutch terms). For sure I could not
have done this assignment without the help of certain persons. I do want to thank them all in this way.
The ones I always could fall back to are my supervisors Jan Broenink and Dusko Jovanovic. They
always kept me on the right track.
When encountering strange effects when programming in C, Gerald Hilderink was always helpful to
exterminate the bugs in the Software.
I thank Marcel Schwirtz for helping me around in the Embedded Lab and the people from Controllab
Products BV (the producers of 20-Sim) for their tips and hints regarding 20-Sim.
Marcel Groothuis for the permission to use his report ’20-Sim code generation for PC/104 target’.
Finally, I want to thank the people of Analog Devices, who made the assignment possible by donating
the Digital Signal Processor and the software to operate it.
There are, of course, people I have forgotten at the moment. Let them be sure that does not mean I’m
not thankful.
Enschede, October 2002
Ceriel Mocking
iii
20-Sim code generation for ADSP-21990 EZ-KIT
Contents
Summary .................................................................................................................... i
Samenvatting.............................................................................................................. i
Preface ......................................................................................................................iii
Contents..................................................................................................................... v
1 Introduction........................................................................................................ 1
1.1
1.2
1.3
2
Statement of the project................................................................................................ 1
Code Generation with 20-Sim...................................................................................... 1
Report Outline................................................................................................................ 3
The Target: ADSP-21990 EZ-KIT lite board & IDE........................................ 5
2.1
2.2
Introduction .................................................................................................................... 5
ADSP-21990 EZ-KIT lite board .................................................................................. 5
2.2.1
2.2.2
2.3
3
Analog Devices Visual DSP++ 3.0 ............................................................................... 7
Design and Code Implementation for the ADSP-21990.................................... 9
3.1
3.2
Introduction .................................................................................................................... 9
20-Sim thoughts .............................................................................................................. 9
3.2.1
3.2.2
3.2.3
3.3
3.4
Introduction ...............................................................................................................11
Designing the dynamic link library.............................................................................11
Designing the ADSP-21990 Target specific template files..........................................12
C-code Target Specific Template: Function implementation ............................... 13
3.4.1
3.4.2
3.4.3
3.4.4
3.5
The AD-converter Function implementation ..............................................................13
The DA-Converter Function implementation..............................................................14
20-Sim Standard template files...................................................................................15
ADSP-21990 EZ-KIT target specific template files ....................................................16
Post-processing............................................................................................................. 16
Testing............................................................................................................... 19
4.1
4.2
Introduction .................................................................................................................. 19
Testing the 20-Sim Test model................................................................................... 19
4.2.1
4.3
Introduction ...............................................................................................................19
Testing the Template ................................................................................................... 20
4.3.1
4.3.2
4.3.3
4.4
Introduction ...............................................................................................................20
ADC_DAC test program............................................................................................20
ADSP21990_nopol test program................................................................................21
Code Generation and Postprocessing....................................................................... 22
4.4.1
4.4.2
5
20-Sim Main model .....................................................................................................9
ADSP-21990 I/O-devices...........................................................................................10
20-Sim Library for the ADSP-21990 ..........................................................................11
The ADSP-21990 template.......................................................................................... 11
3.3.1
3.3.2
3.3.3
4
General description......................................................................................................5
I/O Interface devices....................................................................................................5
Introduction ...............................................................................................................22
Code generation Experiment......................................................................................22
Conclusions and Recommendations ................................................................ 27
5.1
5.2
5.2.1
5.2.2
5.2.3
Conclusions ................................................................................................................... 27
Recommendations........................................................................................................ 27
Software Environment & Target board.......................................................................27
ADSP-21990 EZ-KIT Template files .........................................................................27
20-Sim .......................................................................................................................28
Appendix A: Code Generation Process.................................................................. 29
Appendix B: VisualDSP++ 3.0 User Manual ......................................................... 33
v
20-Sim code generation for ADSP-21990 EZ-KIT
Appendix C: 20-Sim ADSP-21990 template User Manual .................................... 37
Appendix D: I/O-Peripheral Descriptions ............................................................. 41
Appendix E: Target Board Layout......................................................................... 43
Appendix F: ADC & DAC Registry info................................................................ 45
Appendix G: Creating ADSP_Sim.dll.................................................................... 47
Appendix H: ADC_DAC test program .................................................................. 51
Appendix I: Target Specific Function Chart ......................................................... 53
Appendix J: Target Specific files............................................................................ 55
Appendix K: Submodel Standard Template: Program Flow ............................... 63
Appendix L: TARGETS.INI................................................................................... 65
Appendix M: 2 Alternative implementations......................................................... 67
References................................................................................................................ 69
vi
20-Sim code generation for ADSP-21990 EZ-KIT
1 Introduction
1.1 Statement of the project
Due to a plan to change the project “P2.2” to Mechatronica project, in which students have to design
and control a dynamic system using 20-Sim, a digital signal processor board (DSP-board) was chosen
to serve as a programmable controller for these systems (see Figure 1-1).
PC
DSP-Processor
SignalGenerator1
ADC_1
DAC
ò
Controlled
Integrate1
system
SignalMonitor1
K
ADC_2
Gain1
DSP&Peripherals
Feedback
Figure 1-1: control system with DSP-controller
To program the DSP, the C-code generator of 20-Sim has to be used, as the dynamic system is already
modeled in 20-Sim. This 20-Sim C-code generator is able to generate C-code of a 20-Sim (sub-)model
for a specific target (Groothuis, 2001). For that, the code generator uses template files, which contain a
program, almost ready to be compiled and deployed as a controller. Only the target specific drivers
have to be added. So, for every target, a new template has to be written, containing these drivers.
As DSP, the newest processor of Analog Devices, the ADSP-21990, has been chosen. According to
AD, its main function is to handle analogue signals, using its I/O-devices, like AD-converters, DAconverters, pulse-width modulators and an encoder circuit (Analog Devices, 2002a).
Objectives
The purpose of this BSc project is to design the template files containing the drivers for the ADSP21990, using the Analog Devices VisualDSP++ 3.0 software development environment. Also a 20Sim library has to be designed, containing submodels of the ADSP-21990 I/O-devices, to be used to
load the designed controller onto the digital signal processor. Furthermore, dll-files have to be
designed defining submodel behavior so that these submodels can be used in 20-Sim simulations.
1.2 Code Generation with 20-Sim
The newest versions (3.1 or later) of 20-Sim include a code generation tool, which can be used to
generate C-code for a various number of targets, in order to let these targets perform certain tasks.
The code generation tool can be accessed via the 20-Sim simulator window. The menu-item Tools
contains the option C-code generation, which brings the user into the code generator dialog window.
Definitions
In the following a number of definitions will be used:
•
Template: A template is a set of files containing unfinished ANSI-C source code. They
also contain Tokens, which are used to finish off the code.
There are standard template files, which are designed by Controllab Products B.V.
1
20-Sim code generation for ADSP-21990 EZ-KIT
and contain the calculations of the system variables. Beside these standard template
files, there are also target specific template files, which contain the drivers for the
target functionalities (like AD-converters and DA-converters). For example a mobile
robot: The standard template files calculate that the robot must steer right. Then this
command is send to the target-specific template files, which must contain a function
that steers the robot right. In short: the standard template files control the target and
the target specific template files are the drivers that pass through commands from the
standard template files to the hardware. All template files are located in one
subdirectory per target in the ..\20-Sim\Ccode directory.
•
Token: Tokens are placeholders for modelnames. They can be of any C-type (a string or an
integer etc.). When generating code, 20-Sim (sub-)model parameters and variables (such as
states, rates, component names or dll-function replace these tokens. See also Appendix A.
The process of code generation
The code generation process consists of 4 subsequent steps, visualized in Figure 1-2 (the parts with
thick contours are the parts on which this report focuses):
Figure 1-2: Code Generation Process
1. 20-Sim Submodel
When having created a model or a system consisting of one or more submodels, the user can
choose to simulate his creation. When the model is processed, the code generation tool
becomes available in the Tools menu of the 20-Sim simulator. The user can choose between
various targets (Figure 1-3). These targets are specified in a target configuration file
(Targets.ini see Appendix L). When choosing a Target, which supports submodel code
generation, the user can also choose a submodel.
2. Substituting tokens
When the user has confirmed his choices, the code generation tool will generate token
contents. The names of the tokens are shown in the file Keywords.txt (in the ..\20-Sim\Ccode
directory).
2
20-Sim code generation for ADSP-21990 EZ-KIT
3. Preprocessing
When necessary, a pre-processor can be started, which can process the unfinished template
files beforehand.
4. Code-Processing
The template files contain tokens. When code-processing, these tokens are replaced by 20-Sim
states, rates, parameters etc. This means, that the template files now form a complete and
ready-to-compile program. Finally, the finished template files are copied to the output
directory that was specified in the code generation dialog, Figure 1-3. The template files in
which the tokens are filled in, are specified in Targets.ini by the templateFiles= command.
These files are put in a subdirectory in the 20-Sim Ccode directory. The template files will be
taken from this subdirectory, processed as described in the previous lines, and then put into the
output directory, usually ..\temp\%SUBMODELNAME%
Figure 1-3: Code Generation dialog
5. Post-processing.
In the output directory a post-processor can be started, which will process the template files
further. For example a compiler, a linker and a loader can be started for running the program
on the target, that has been chosen in the code generation dialog window
For more and more detailed information on this topic of code generation and its possibilities, see
Appendix A.
1.3 Report Outline
This report starts with describing the hardware and the software that is to be used designing the
template files for the ADSP-21990 digital signal processor (Chapter 2).
Chapter 3 explains the design of the target specific template files software development environment
is to be used. Chapter 4 shows the testing results and verifications.
The final chapter (Chapter 5) contains the conclusions and recommendations.
3
20-Sim code generation for ADSP-21990 EZ-KIT
2 The Target: ADSP-21990 EZ-KIT lite board & IDE
2.1 Introduction
This chapter gives an overview of the features of the Analog Devices ADSP-21990 mixed signal
digital signal processor. Section 2.2 gives a general description of the ADSP-21990. Section 2.3
explains the use of the Software Development Environment.
2.2 ADSP-21990 EZ-KIT lite board
2.2.1 General description
The ADSP-21990 Mixed Signal DSP Controller Target (release date: April 2002) is an evaluation
development board and it consists of a digital signal processor, which acts as a CPU and a number of
processor peripherals (Analog Devices, 2002f). Among those peripherals there are a number of I/Odevices that make the target a mixed-signal processor, which can process both digital and analogue
signals.
The Core Processor of the ADSP-21990 has an internal instruction cycle time of 6.25 ns, which gives
it a performance of 160 MIPS.
The most important features of the ADSP-21990 EZ-KIT lite evaluation board are (Analog Devices,
2002e): (also shown in Figure 2-1)
-
8-channel, 20 MSps, 14-bit Analogue to Digital Converter system.
-
SPI Communications Port, containing a 8-channel 12-bit Digital to Analogue system
-
2 Auxiliary Pulse-Width generator units.
-
Dedicated 32-bit Encoder Interface unit for position feedback.
-
Synchronous Serial Communications PORT (SPORT).
Figure 2-1: ADSP-21990 with processor and peripherals
Those features are described in the following sections, while the EZ-KIT hardware layout is given in
Appendix E.
2.2.2 I/O Interface devices
Next, short descriptions of the most important ADSP-21990 EZ-KIT lite peripherals are given. (see
Appendix D for more details).
5
20-Sim code generation for ADSP-21990 EZ-KIT
The Analogue-to-Digital Converter (ADC)
The ADSP-21990 AD-Converter is an 8-channel 14-bit Pipeline Flash ADC with dual channel
simultaneous sampling capability. This means that the combination of channels 0 & 4 are
simultaneously sampled, subsequently the combinations of channels 1 & 5, up to channels 3 & 7.
The AD-converter can be triggered in 4 different ways:
-
By generating interrupts with the Three-Phase PWM unit (resembling an internal clock).
-
By generating interrupts with the Auxiliary PWM unit (resembling an internal clock).
-
By external triggering (rising edge on CONVST pin) (resembling an external clock).
-
By writing to the SOFTCONVST register of the AD-converter (user command).
When triggered, all of the 8 input channels are sampled and converted. All 8 channels are converted in
approximately 800 ns, so a maximum sample frequency of 1.25 MHz on each channel is achievable.
When finished converting, the data are put into data-registers. The status register contains 4 ‘finished
converting’ flags. Each flag stands for a combination of 2 channels (0 & 4, 1& 5, etc.). When the input
signals are successfully converted and put into the data registers (ADC_DATA#, with # ranging 0–7)
these status flags are made high to indicate a successful conversion (see Appendix F).
The input voltage range of the ADC is –1V to +1V (default). The ADC input voltage range is always
2Vpp. An extern reference voltage can be applied to the processor to indicate the maximum voltage
input, above which voltage the ADC clips. This extern reference voltage can vary between 0V and
+2V (so the voltage range can vary between –2V to 0V and 0V to +2V).
The Serial Peripheral Interface (SPI, containing DAC)
The SPI of the ADSP-21990 contains an 8-channel 12-bit Digital-to-Analogue Converter, which is to
be used as an analogue output. Digital output data is to be loaded into the Transmit Data Buffer
Register of the SPI (TDBR0 or TDBR1), which will then be converted to an analogue signal.
To activate the DAC’s, PF2 (or SPISEL2) in the SPI Flag Register (SPIFLG0) has to be ‘high’. PF3 is
used to update the DAC registers. The DAC output voltage ranges from 0V to +2V and this range
cannot be adjusted, in contrary to the input range of the ADC.
The SPI is also capable of communicating with other devices in master-slave mode. However, this will
be of no importance to this project.
The Serial Communications Port (SPORT)
The SPORT can be used as a device for communicating with other devices, such as a PC. This
peripheral can be useful when internal processes have to be monitored.
The Pulse-width Modulator (PWM)
The ADSP-21990 includes a PWM generation unit. The PWM is capable of generating pulse-trains
with 16-bit programmable frequency and duty cycle.
The PWM has two additional channels. These can operate in independent mode and in offset mode. In
independent mode, the two channels are completely separated and can have their own frequencies and
duty cycles programmed. In offset mode, the frequencies of both channels are identical.
The PWM can be used to trigger the ADC convert start.
The Encoder Interface Unit
The Encoder Interface Unit contains a 32-bit encoder counter for position feedback in motion control
systems.
6
20-Sim code generation for ADSP-21990 EZ-KIT
2.3 Analog Devices Visual DSP++ 3.0
General information
Visual DSP++ is a software development environment, designed by Analog Devices, for programming
digital signal processors from the five Analog Devices DSP families (Blackfin TM, SHARC,
TigerSHARC, ADSP-21xx and Mixed Signal DSP families) (Analog Devices, 2002g).
The development environment gives the programmer the possibility of coding in C/C++ or in the
ADSP Assembly code. It is also possible to use both languages simultaneously.
The EZ-KIT lite version that was used for this project contains 4 tools (Figure 2-2).
§
A C/C++ compiler.
§
An assembler, for assembling the ADSP assembly code.
§
A linker, for linking the compiled and assembled code into an executable file.
§
A loader, which loads the executable onto the target.
§
A Splitter, to use external memory, so that more memory space is available.
A number of target specific run-time libraries have been included in the environment, as well as a
number of standard run-time libraries.
Figure 2-2: VisualDSP++ Tool Tree
Appendix B gives extra information about VisualDSP++ 3.0 and the tools it contains. It also contains a
quick start.
7
20-Sim code generation for ADSP-21990 EZ-KIT
3 Design and Code Implementation for the ADSP-21990
3.1 Introduction
In this chapter, the implementation of the target specific template files will be discussed. Section 3.2
explains the choices that have been made during the design of the template files. Section 3.3 describes
the dynamic link library for 20-Sim simulation and the target specific template files for 20-Sim codegeneration. Then, Section 3.4 will treat the actual implementation of the ADSP-21990 EZ-KIT API.
Finally, Section 3.5 describes the post-processing phase, when code has been generated and must be
compiled and loaded.
3.2 20-Sim thoughts
3.2.1
20-Sim Main model
The starting point of generating code for a target is a 20-Sim model (Figure 3-1).
Controller
Plant
Plant
ACME
TM
t
Setpoint_generator
Figure 3-1: example of20-Sim control system
The model contains a setpoint generator, a controller and a plant. The plant is a system, either existing
or just simulated, that has to follow a certain setpoint. The controller keeps track of the difference
between the output of the plant and the desired output and generates the input of the plant. It is the
controller of which code should be generated and loaded onto the ADSP-21990 EZ-KIT lit board, so
that the setpoint can be externally varied. It is very well possible to generate code of setpoint generator
too, but then the setpoint trajectory cannot be changed during execution. This is because a command &
control interface to change parameters of the controller is not yet available.
Note that the focus is on control software design, implying the plant to be given. In order to design the
controller, the controller and the plant have to be simulated (Figure 3-2).
9
20-Sim code generation for ADSP-21990 EZ-KIT
I
ZOH
MSe
EZ -KIT
ADSP0
ADC
Input
14-bits
òz-1
K
1
0
R
C
DAC
K
12-bit
Output
K
ADC
K
14-bits
Input2
ADSP-Core
EZ-KIT Hardware
Figure 3-2: Completely simulated control system
This model contains a plant, which, in this case, consists of a modulated effort source (MSe), a
capacitance (C), an inductance (I) and a resistance (R), and a controller, which consists of a number of
components in the black EZ-KIT box.
The 20-Sim model of the black EZ-KIT box contains 2 areas. These areas resemble the core processor
(“ADSP-Core”) and the I/O hardware interface (“EZ-KIT Hardware”). The first contains the actual
20-Sim controller model, of which code has to be generated. The latter is the area in which the ADSP21990 EZ-KIT hardware components (like PWM’s, ADC’s etc) are placed. The implementation of the
20-Sim submodels of the EZ-KIT Hardware components is explained in Section 3.2.3.
The figure also contains submodels, which are of importance when creating a discrete 20-Sim model.
Those submodels are a zero-order-hold circuit and 2 samplers. When including these components, 20Sim is able to simulate discrete models (like digital controllers). Those discrete components and
discretizers are, however, a representation of the behavior of the ADC’s and the DAC and should be
modeled apart from the EZ-KIT submodel, because they should not be included when generating code.
It can be discussed whether a discrete model containing registers (time step delays) should be used
instead of calculating integrals with integration methods. For now, the standard template files contain
integration methods, so these will be used when generating C-code.
In short, the discretizers (ZOH and samplers) together with the 20-Sim submodels of the ADC and
DAC form the model of ADSP-21990 EZ-KIT lite hardware. The model shown in Figure 3-2 is a
model with which the discrete behavior of the designed controller can very well be simulated.
It is a subject of debate whether the behavior of the ADC and DAC’s (ZOH and sampling) should be
included in the ADC and DAC submodels. Because those effects are only 20-Sim representations of
the physical world, those effects are not to be included in the code-generated software that has to be
uploaded to the ADSP-21990 EZ-KIT, only the communication function of the ADC’s and the DAC
have to be included in code-generation. Because the present version of 20-Sim does not allow for code
generation of parts of submodels, the discretizers (ZOH and samplers) are not to be included in the
ADC and DAC submodels.
3.2.2
ADSP-21990 I/O-devices
Only the drivers for the AD-converters and the DA-converters are implemented. This is due to the lack
of background registry information about the other I/O-devices. As this device is very lately released,
proper literature (such as information on device registers) about the subject is scarce and not always
available. Therefore, the pulse width modulators (PWM) and the encoder (ENC) will not be used or
implemented.
10
20-Sim code generation for ADSP-21990 EZ-KIT
3.2.3
20-Sim Library for the ADSP-21990
The AD-converters and the DA-converters of the ADSP-21990 are represented by 20-Sim submodels,
which contain a dll-statement (see Appendix A). As there are 8 of each converter type, there are also 8
different submodels (because each contains a dll-call for a different function) for each converter type.
ADC
14-bits
// created 8/7/02 by Ceriel Mocking
parameters
string file = 'ADSP21990.dll';
string function = 'getADInput1';
variables
real x;
equations
x =ADC_in;
ADC_Out = dll(file, function, x);
Figure 3-3: 20-Sim submodel of ADC with implementation
Figure 3-3 shows a graphical submodel and its implementation of AD-converter 1 of the ADSP21990. The signal operation of the submodel is described by the function ‘getADInput1’ in the file
ADSP21990.dll when simulating in 20-Sim. The other ADC’s are designed in the same way, except
for the function, which is ‘getADInput#’ with # the number of the ADC. The same applies to the
DAC’s. In this way the ADC’s (and DAC’s) keep ‘separated’. The main problem is namely to identify
the various ADC’s correctly.
The disadvantage of this way of identifying ADC’s is the extensiveness of the ADSP-21990 API. To
reduce the size of the API, it is possible to create one function (an “ADC-Handler”) that is called by
all ADC’s. But to identify the ADC’s, the number of the ADC has to be passed on to the ADCHandler together with the input signal. The ADC-Handler then has to decide by looking at the ADC
number which function should be invoked on the input data.
In that way, the ADSP-21990 API would be smaller, but the size of the code would increase.
Therefore the ‘extensive API’-way will be used to identify the ADC’s (and DAC’s), which means that
each device will call its own function, as shown in Figure 3-3.
3.3 The ADSP-21990 template
3.3.1
Introduction
This section describes the design of the 20-Sim code generation template for the ADSP-21990.
The implementation of template consists of 2 phases:
-
The design of the ADSP-21990 dynamic link library for simulation purposes.
-
The design of the ADSP-21990 target specific template files.
3.3.2
Designing the dynamic link library
When the 20-Sim simulator encounters a dll-function call in a submodel, it looks for this function in
the dynamic link library file (dll-file) that is specified in the submodel. This dll-file also contains an
‘Initialize’ function and a ‘Terminate’ function, which are called upon by the 20-Sim simulator when
it respectively starts and stops running.
Because the ADC’s and the DAC’s have no effect on the signal in the ideal case, the only thing the
dll-function has to do is to connect the inputs of the ADC’s and the DAC’s to their outputs. The
initialize and terminate functions are not that important when simulating and can be left empty, but
11
20-Sim code generation for ADSP-21990 EZ-KIT
they have to exist in the dll-file, because if 20-Sim does not find these functions, it will stop simulating
and return an error message.
The dynamic link library can be programmed and compiled in any C or C++ software development
environment. In this case, use was made of Microsoft Visual C++ 6.0, and the dynamic link library has
been programmed in C++.
Appendix G shows the contents of adsp21990.cpp, before compiling to adsp21990.dll. One function is
included below, the other functions simply call upon this function, because all devices have the same
functionality:
DllExport int getADInput1(double *inarr, int inputs, double *outarr, int outputs, int major)
{
if (inputs != 1) return 1;
if (outputs != 1) return 1;
outarr[0] = inarr[0];
return 0;
}
The function is preceded by the word ‘DllExport’ meaning this function is a dll-function. For a correct
functioning of the 20-Sim simulator the function returns an integer, which is a 1, when the function is
wrongly used, and a 0 when everything is all right. When a 1 is returned, 20-Sim immediately stops
simulating and gives an error, mentioning the function that returned the 1.
3.3.3
Designing the ADSP-21990 Target specific template files
The target specific template files contain, in contrast to the dll-file, the actual implementation of the
ADSP-21990 hardware drivers. For the ADSP-21990 EZ-KIT lite, 3 files are used.
A convenient aid in designing these template files was included in the EZ-KIT CD. 4 examples of
ADSP-21990 assembly programs were given by Analog Devices, of which one (ADC_DAC) is a
simple program that connects all the AD-converters to the DA-converters. Such a program can be used
when testing the speed of the code and as an example of how to control the various devices of the
ADSP-21990 EZ-KIT and its various assembly functions can be used by the target specific template
files (see Section 3.4.2). Details of this test program are shown in Appendix H.
The first target specific template file is the assembly file SPI_dac.dsp, which is included in the
mentioned example program ADC_DAC. This file contains assembly code to initialize and operate the
DA-converters on the SPI circuit. The use of this file would simplify and decrease the amount of target
specific code that still has to be designed.
As mentioned in Section 3.2.3, the ‘extensive API’ method is used. Appendix I shows the flow chart
of the target specific functions. ADSP21990.c is the target specific template, which connects the
standard template files (software) to the ADSP-21990 EZ-KIT hardware. This is a whole different file
then ADSP21990.cpp, mentioned in the dynamic link library section (Section 3.2.2). Appendix A
describes how the dll-function calls in 20-Sim submodels are translated to C/C++ functions and put
into the standard template files (section 3.4.3), and why the file name of the connecting target specific
template should be ADSP21990.c.
The third target specific template file is main.h. This file contains all hardware parameter values and
I/O parameters and constants, such crystal clock frequency and number of DAC channels. This file is
also included in Appendix J.
The actual implementation of the target specific template files is explained in Section 3.4.
Important note
The Software development environment gives the programmer the ability to design executable
programs for the ADSP-21990 EZ-KIT lite in C or C++ as well as in assembly code, but programming
12
20-Sim code generation for ADSP-21990 EZ-KIT
in C/C++ causes the amount of code to increase and the program speed to decrease, as the C-compiler
creates more overhead, then an assembly programmer would do.
3.4 C-code Target Specific Template: Function implementation
In the following, the implementations of the AD-converter and the DA-converter are treated.
3.4.1
The AD-converter Function implementation
To control the AD-converter, it is important to know the layout of the ADC control register
(ADC_CTRL). Appendix F contains registry information of the ADC and SPI control registers.
ADC
14-bits
ADC1
Polling or interrupts or something else?
It is possible to let the ADC start converting:
-
by generating ADC convert start pulses with the PWM Unit and using an interrupt service for
handling the data after converting,
-
by an external convert start pulse, and
-
by writing a 1 to the SOFTCONVST register of the ADC (Software convert start).
When using the interrupts (PWM Unit convert start pulses), one is sure about the convert rate of the
ADC. The complexity of the code, however, increases. Appendix H shows the ADC interrupt service
routine of the ADC_DAC test program. This interrupt service routine simply puts all data from the
ADC’s data registers into the data memory locations of the SPI. It takes much knowledge of the
ADSP-21990 assembly language to write a program to store data from the ADC’s and using it for the
calculations in the standard template files and writing it. This is especially hard, knowing the API has
to be coded in C (because the standard template files are calling for C-functions in the target specific
template files). Using interrupts is a feature that may be used in improved version of this template of
the ADSP-21990 EZ-KIT lite.
Polling is easy to implement. By coding the software to write a 1 to the SOFTCONVST register of the
ADC, it is possible to let the ADC convert when the programmer suits. The moment the ADC has
finished converting and the data in the data registers of the ADC is updated, is pinpointed by polling
the status register of the ADC. Then the program can continue.
The use of polling (or ‘busy waiting’), however, slows down the program, because the processor has
to wait, till the ADC has finished converting.
It is also possible to use the ‘software convert start’ without polling the ADC status register. The ‘wait
for data updated’-state can be deleted, making the code even less complex, and the program speeds up.
The disadvantage of this method is that, when data registers are read immediately after the convert
start command, the data may not be up to date (ADC is still converting, when reading data from data
registers). This delay can be considered as ADC latency, and will not be take more than 1 ADC
convert cycle.
The last option, using the software convert start without polling is the simplest to code option,
therefore this option is used.
C-code
VisualDSP++ includes a header file called sysreg.h that enables the programmer to use 3 C-functions,
which can directly access ADSP-21990 EZ-KIT hardware registers. These functions are:
13
20-Sim code generation for ADSP-21990 EZ-KIT
1) sysreg_write(sysreg_IOPG,ADC_Page); This function enables the programmer to
directly access the system registers in C-code, in this case the I/O-page register, which
activates a certain I/O-device, by serving as a off-set for the IO-mapped I/O-address.
2) io_space_write(ADC_SOFTCONVST, 1); This function enables the programmer to write
directly to I/O-registers in C-code, in this case, a 1 is written to the SOFTCONVST register.
The SOFTCONVST register can only be accessed when the I/O-page register is set to
ADC_Page.
3) outarr[0] = io_space_read(ADC_DATA1); This function enables the programmer to read
data directly from registers in C-code. In this case, the data from the ADC_DATA1 register is
put into the variable outarr[0].
The tasks of the getADInput# functions are to let the ADC start converting and to read the data from
the data registers. An important aspect to remember is that with once a 1 is written to the
SOFTCONVST register, all 8 ADC’s are converting and all 8 data registers are updated. Therefore,
only one getADInput# function should contain the ‘software convert start’ code. And this means, that
when one or more ADC’s are used in the 20-Sim model of which code is generated, the ADC
submodel containing the function with the software convert start code has always to be included in the
20-Sim model, i.e. ADC1 and DAC1 always have to be present in the model, when using ADC’s and
DAC’s.
The implementation of getADInput1 (with Software convert start) and getADInput2 become (lines 2535 of Appendix J):
void ADSP21990__getADInput1(double *inarr, int inputs, double *outarr, int outputs, int major)
{
sysreg_write(sysreg_IOPG,ADC_Page);
/* set IO-page to ADC*/
io_space_write(ADC_SOFTCONVST, 1);
/* Start converting (Software convert start)*/
outarr[0] = io_space_read(ADC_DATA0);
/* Read data */
}
void ADSP21990__getADInput2(double *inarr, int inputs, double *outarr, int outputs, int major)
{
outarr[0] = io_space_read(ADC_DATA1);
}
All other getADInput functions are like the getADInput2 function, with increasing ADC_DATA#
registers.
Initialize
The initiation of the ADC is implemented in the function Initialize() (Appendix J, lines 95-103), in
which the control register is loaded with the contents specified in Appendix F.
3.4.2
The DA-Converter Function implementation
DAC Usage
As the DAC is part of the SPI and has no own data registers, another way of data storage has to be
used. The SPI can only use one data register (TDBR0) at once for all 8 DAC’s. The data that has to be
converted by a DAC are fetched from the data memory of the ADSP-21990 EZ-KIT and put into
TDBR0. When this data is converted, the data for the next DAC is fetched from memory and put into
TDBR0. This goes on, until the data for all 8 DAC’s has been converted, whether the DAC is used or
not. Only after all 8 DAC’s have finished converting, the program continues with other functions.
This is the result of using the assembly function DAC_Update_ in the file SPI_dac.dsp (Appendix J,
lines 231-345). It is possible to change the program code such that only the data for the DAC’s that are
14
20-Sim code generation for ADSP-21990 EZ-KIT
actually used in the simulation is converted. However, this means a lot of programming (in assembly,
which is difficult) and little extra program speed.
DAC
12-bit
DAC1
C <-> Assembly
Here, for most of the work has already been done by using the SPI_dac.dsp file, the challenge is to
find out how an assembly function can be invoked from C-code. This can be done by implementing a
function in the assembly code (SPI_dac.dsp), which is preceded by an underscore. For example
(Appendix J, line 145, declaration, and line 362, implementation): One wants to call the function,
which initializes the SPI, such that the DAC is activated (the DAC_init_ function). Therefore the
programmer creates a new function (with an underscore): InitializeDAC . This function has also to be
declared as an extern function without preceding underscore in the C-code, from which the function is
invoked (ADSP21990.c) (Appendix J, line 14). The implementation of this function is then the
assembly command to call an already existing function. For instance:
_InitializeDAC:
call DAC_Init_;
rts;
DAC functions
The functions of the DAC are generally corresponding to the ADC functions: all DAC’s have their
own C-function, implemented like the example above. The only thing these functions do is putting the
data, that has to be converted, into the data memory (by invoking the assembly function DAC_inp#,
in the file SPI_dac.dsp), from where it can fetched by the DAC_Update_ function. Also corresponding
to the ADC-functions, only one of the DAC’s (DAC1) contains the ‘convert start’ command of the
DAC circuit (call DAC_Update_, in the assembly function DAC_inp1, line 365 in Appendix J).
Initialize
The initiation of the DAC on the SPI interface is implemented in the Initialize() function (Appendix J,
line102). The function InitializeDAC() is invoked. This function calls the assembly function
DAC_Init_ as showed in the file SPI_dac.dsp, which initializes the DAC’s by passing the appropriate
register values to the SPI control register (SPICTL0) and the SPI Flag Register (SPIGLG0).
3.4.3
20-Sim Standard template files
As mentioned before, the standard template files consist in general of the integration method
calculations. The template files that are used for this target are:
-
xxmain.c
Contains the main program flow and initializing variable values.
-
xxmodel.c
Contains the main model calculations.
-
xxsubmod.c
controls submodel program flow.
-
xxinteg.c
Contains the integration method calculation functions (for Euler and RungeKutta 4).
-
xxfuncs.c
Contains mathematic functions, used by 20-Sim.
-
xxtypes.h
Defines specific data types, used in the various template files for 20-Sim Code
generation for the ADSP-21990 EZ-KIT lite.
15
20-Sim code generation for ADSP-21990 EZ-KIT
-
ADSP.ico
1-3)
The icon file which is shown in the code generation dialog window (Figure
The main program flow (standard template files) is shown in Appendix K.
The standard template files that are used to implement matrices (xxmatrix.h, xxmatrix.c and
xxinverse.c) are not yet included, in order to keep the code generation simple. Also the standard
template files for on-screen output (xxoutput.h, xxoutput.c) are not included, because there is no use
for the functions of these template files on the target board.
3.4.4
ADSP-21990 EZ-KIT target specific template files
The target specific template files are:
-
main.h
Holds all hardware parameters, needed to initialize the target.
-
Adsp21990.c
Contains all functions necessary for connecting the software to the hardware.
-
Adsp21990.h
Adsp21990.c header file.
-
21990_ivt.dsp ADSP-21990 interrupt vector table.
-
SPI_dac.dsp
Assembly file containing functions to operate the DA-converter.
-
SPI_dac.h
Spi_dac.dsp header file.
-
headers.h
Contains header include commands.
These files are, together with the standard template files, included in the file Target.ini, of which a
short description can be found in Appendix L.
3.5 Post-processing
The post-processing part is the final part. The post-processor consists of one or more operations that
are carried out, when all code has been generated. The complete postprocessor is given by the line
“postcommand =” in the file Target.ini.
The tasks of the post-processor in this case are (Analog Devices, 2002c):
-
Library building
-
C-Code-Compiling
-
Assembling assembly-code
-
Linking the compiled and assembled code into one executable file
-
Loading the executable file to the Target
-
Running the program on the Target
In the following Sections, all post-processor tasks are analyzed and implemented.
Building a library file
Because the memory space on the target is limited, the program code has to be as small as possible.
Therefore it is a good idea to exclude functions that are not used from the code. The way to do that is
using a library file in which all functions are put. When compiling, the compiler can fetch the function
code from the library file, if it encounters a reference to a function in the code. The files which contain
functions that are probably not used are: spi_dac.dsp, xxmodel.c, xxfuncs.c, xxsubmod.c, xxinteg.c and
adsp21990.c. A library file can be build by the VisualDSP++ compiler (see Appendix B). The DOS
command line to build a library file is (Analog Devices, 2002c):
PostCommand=cc219x –Os spi_dac.dsp xxmodel.c xxfuncs.c xxsubmod
xxinteg.c adsp21990.c –build-lib –o libccode.dlb
16
20-Sim code generation for ADSP-21990 EZ-KIT
Cc219x.exe is the compiler. The command line switches that are used here cause the compiler to
optimize the code for size (-Os) and build (-o) a library file (-build-lib) with the name libccode.dlb.
.dlb is in this case the standard extension of library files.
Compiling the C-code
When a library file has been build, the remaining C-code has to be compiled. In this case the
remaining code consists only of xxmain.c, which is to be compiled into an object file:
PostCommand=cc219x –Os –c xxmain.c –proc ADSP-21990 –o xxmain.doj
Again, the compiler has been used, this time with other switches. The optimize-for-size switch is used
again. Also, the compiler is told it should only compile (-c; this means it does not link) and generate (o) an object file (xxmain.doj) for the ADSP-21990 processor (-proc ADSP-21990).
Assembling assembly code
The assembly code, that is not included in the library file(s), is to be assembled into an object file.
VisualDSP++ contains an assembler easm219x.exe for this job (Analog Devices, 2002b).
postCommand=easm219x -proc ADSP-21990 -o 21990_ivt.doj 21990_ivt.dsp
The assembler uses a slightly different order of file declarations on the command line. The use of
switches is generally the same as when using the compiler.
The only file that has to be assembled is the interrupt vector table, which file depends on the processor
type.
Linking the objects
When all objects have been generated, they can be linked into one executable file. The inputs of the
linker are the object files (*.doj) and, optionally, library files. The linker input files are: xxmain.doj,
21990_ivt.doj and the library file libccode.dlb. The linker command line is then:
postCommand=cc219x -Os 21990_ivt.doj xxmain.doj -lccode -T ADSP21990.ldf -proc ADSP-21990 -o adsp.dxe
The optimize-for-size switch has again been used. The –lccode specifies the included library file
(libccode.dlb; when immediately writing the library file after the –l switch, the preceding ‘lib’ and the
extension ‘.dlb’ can be left out). The linker description file ADSP-21990.ldf is specified after the –T
switch. The linker output file is called ‘adsp.dxe’ (Analog Devices, 2002d).
Loading and Running the Program
To run the program on the target, the post-processor must be able to access VisualDSP++ to give a
‘run’-command. The program on the target can be told to ‘run’ by clicking on the appropriate button.
It is also possible to use a special TCL-script. TCL scripting enables the user to make its own
debugging and analyzing programs.
It is possible to run a TCL script from DOS by using:
postCommand=idde –f dsprun.tcl
In this case, the TCL file dsprun.tcl contains only the commands:
dspload adsp.dxe
- which loads the executable onto the target.
dsprun
- which runs the target.
After executing these commands, the target runs for the time that was programmed in 20-Sim. A
disadvantage is that executing the DOS-command to run the TCL script (idde –f) starts up
VisualDSP++. Therefore, the program has to be closed when the target stops running. Before
executing another test run, the target has to be reset (by pressing S1: see Appendix E).
17
20-Sim code generation for ADSP-21990 EZ-KIT
4 Testing
4.1 Introduction
In this chapter, the designed code is tested. There are 3 things to be tested:
- The dll-file for simulating the 20-Sim models of the EZ-KIT lite (the ADC and the DAC),
(Section 4.2)
-
The target specific template files (file SPI_dac.dsp for operating the DAC and the file
adsp21990.c for operating the whole ADSP-21990 EZ-KIT), (Section 4.3)
-
The code generation for the ADSP-21990 EZ-KIT. (Section 4.4)
There are 3 test programs: the Analog Devices ADC_DAC program (mentioned in Section 3.3.3), a
similar program, which is run by the code that was designed in Chapter 3, and, finally, the Code is
tested with the 20-Sim code generation tool.
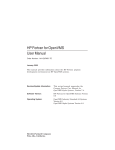
4.2 Testing the 20-Sim Test model
4.2.1
Introduction
In order to test the designs, one needs a 20-Sim test model, such as a controller or a filter. This 20-Sim
test model includes the submodels containing dll-calls for functions specifying the behavior of the 20Sim submodel. A filter is preferable over a controller, because it does not need a feedback input. This
implies that there is also no need for a controlled system, which makes the test model independent of
other systems.
To test the dll-file, only the ADC1 and the DAC1 have to be tested, because the other converters
simply invoke the same function as ADC1 and DAC1 do (Section 3.3.2). So, to test the dll-file, the
experimental set up of Figure 4-2 is used. As the dll-file does nothing except to connect the inputs of
the converters to the outputs, the signal monitor has to show the exact output of the wave generator.
7
1
6
0
5
-1
4
-2
3
-3
2
-4
1
-5
0
-6
-1
-7
SignalMonitor2
SignalMonitor1
model
2
-2
0
1
2
3
4
5
time {s}
Figure 4-1: DLL-file test results
Figure 4-1 shows the test results of the testing the dll-file. As can be clearly seen, the output of the
DAC is the same as the input of the ADC. This means that the ADC and DAC submodels do not
interfere the signal, but only put it through.
19
20-Sim code generation for ADSP-21990 EZ-KIT
4.3 Testing the Template
4.3.1
Introduction
To test the SPI_dac.dsp file, the ADC_DAC program is used. Actually, nothing has been changed in
this program (the functions below line 353 in Appendix J are added in next section), so it is not a
matter of testing. It is more like verifying if the EZ-KIT functions correctly and providing an example
for the second program (adsp21990_nopol; ‘nopol’ because the polling element has been thrown away
as not necessary from previous program), which does the same as the ADC_DAC program; it connects
the AD-converters directly to the DA-converters.
4.3.2
ADC_DAC test program
This program makes use of PWM Unit for the convert start signal of the ADC. Together with the
convert start signal, an interrupt is generated, which is handled by an interrupt service routine. This
routine does all the work, fetching the converted input data and storing it in the data memory.
Furthermore it triggers the DAC to start fetching the data from data memory and converting it, so that
the data is put on the output channels of the DAC. After that is done, the program returns to its waitfor-interrupt state (see Appendix H).
The speed of the program is determined by the frequency of the PWM Unit, generating interrupts. This
frequency can be changed in the file main.h where all hardware parameters are mentioned.
Expectations and Experimental Set up
Because the program is a simple read-and-write program (output = sampled input), the experimental
set up consists of a function generator connected to an arbitrary ADC input and the corresponding
DAC output is connected to the second channel of an oscilloscope. As mentioned, ADC1 and DAC1
should be used. The function generator output is connected to the first channel of the oscilloscope
(Figure 4-2). The figure only gives a 20-Sim impression of the connections in the file main.dsp.
DAC
ADC
14-bits
WaveGenerator1
12-bit
ADC1
DAC1
SignalMonitor2
ADSP-Core
EZ-KIT Hardware
SignalMonitor1
Figure 4-2: Experimental set up
When this set up is used, the DAC output signal should resemble the function generator output. But
the ADC and the DAC will introduce a phase shift and a discretisation.
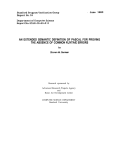
Results
Figure 4-3 shows the oscilloscope image. As expected, the DAC output is a shifted and sampled
version of the function generator output. The ADC_DAC test program sample frequency has also been
measured. The sample frequency is 12,82 kHz, which means that signals below the Nyquist frequency
of 6,4 kHz can be properly sampled. The input signal frequency is 2,66 kHz.
20
20-Sim code generation for ADSP-21990 EZ-KIT
Figure 4-3: ADC_DAC test program test results.
Findings
According to the ADC_DAC test program test, the SPI_dac.dsp file works correctly. The file can be
used for operating the DAC.
4.3.3 ADSP21990_nopol test program
The ADSP21990_nopol test program is meant to test the file adsp21990.c (see Appendix I). As
mentioned in Section 3.3.3, the adsp21990.c file forms the interface file between the hardware and the
software, for it fetches and sends data from the AD-converters and to the DA-converters. For testing
this interface, a test bench has been created, consisting of a main.c, containing a simple for-loop in
which the input channel of the ADSP-21990 EZ-KIT (the AD-converter) is connected to the output
(the DA-converter). This way, the test program resembles the ADC_DAC test program of Section
4.3.2 and thus, the results can be properly compared.
Expectations and Experimental set up
The Experimental set up is entirely the same set up as for the previous experiment. Also, the same
results are expected for this experiment, only a difference in the sample frequency can be expected.
This is because the ADC_DAC test program uses a fixed sample frequency, while the
adsp21990_nopol test program entirely depends on the size of the code and does not have a fixed
value (Section 3.4.1). One cannot tell, however, if the sample frequency will be higher or lower then in
the previous example.
Results
The results of the testing of the adsp21990_nopol test program are put into Figure 4-4. As expected,
the output signal resembles that of the ADC_DAC test program, but the sample frequency is twice as
high: 25,64 kHz. Now, signals below the Nyquist frequency of 12,8 kHz can be sampled. The input
signal frequency is 7,98 kHz, in order to measure the sample frequency. When using this input
frequency, the separate signal levels are better to see, then when using the input frequency of Section
4.3.2.
21
20-Sim code generation for ADSP-21990 EZ-KIT
Figure 4-4: Adsp21990_nopol test program test results.
Findings
The results show a behavior that is similar to that of the experiment with the ADC_DAC test program.
The input signal is sampled, but this time, the sample frequency is approximately two times as high.
Clearly, the file adsp21990.c functions correctly, and can be used in further experiments.
4.4 Code Generation and Postprocessing
4.4.1
Introduction
In this Section, the actual code generation for the ADSP-21990 EZ-KIT lite board is tested. A 20-Sim
test model is designed and simulated. Then code is generated from the 20-Sim submodel.
4.4.2
Code generation Experiment
As was mentioned in Chapter 1, this ADSP-21990 EZ-KIT lite board is meant primarily to function as
a controller. For the sake of simplicity of this experiment, only a first order low-pass filter is modeled
and simulated and put onto the ADSP-21990 EZ-KIT. When a filter is used for this experiment,
instead of a controller, there is no need for a plant and a feedback loop. Then there is also no necessity
for an interface to make the EZ-KIT and the plant compatible.
When code generating, the Euler integration method is used, because it’s the simpler and requires less
code then the Runge-Kutta 4 method.
Experimental set up and Expectations
Again, the set up is a wave generator and a signal monitor that are connected to the ADSP-21990 EZKIT. The ADSP-21990 EZ-KIT, however, contains now a first order linear low pass filter, with a time
constant determined by K2 (gain 2), and a system gain determined by K1/K2 (Figure 4-5).
22
20-Sim code generation for ADSP-21990 EZ-KIT
ADSP-21990
WaveGenerator1
SignalMonitor1
ADC
Input
14-bits
ADC1
K
òz 1
Gain1
Integrate1
DAC
-
K1
s + K2
Output
12-bit
DAC1
K
Gain2
EZ-KIT core
ADSP-Hardware
Figure 4-5: Experimental set up Code generation
Instead of a sinus, a square wave is put into the filter. When a square wave is put into a low pass filter,
the squares become somewhat rounded. A simulation can illustrate the filter response to a square
wave:
model
6
1
5
0
4
-1
3
-2
2
-3
1
-4
0
-5
-1
-6
0.3
0.4
0.5
time {s}
0.6
0.7
SetPoint
SignalMonitor1
2
-2
Figure 4-6: 20-Sim Simulation of Low Pass Filter
Figure 4-6 shows the typical output of a low pass filter, fed by a square wave. This simulation is done
with an input signal frequency of 10 Hz and K1 = K2 = 100. In this simulation, the input signal square
wave has a voltage range of -1V to 1V, as has the output signal.
When the actual measurement was performed, also the full AD-converter input range (-1V to +1V) is
used (the input signal has 2 Vpp). As mentioned in Section 2.2.2, the DA-converter output range is
from 0V to 2V. The SPI_dac.dsp file fits the DAC input (in this case the integrator output which lies
between
–1V and +1V) into the DAC output range. This means that the analog-to-digital conversion adds a
DC-component of +1V.
23
20-Sim code generation for ADSP-21990 EZ-KIT
Furthermore, it is likely that the sample frequency is different from the measured sample frequency in
Section 4.3.3 as the amount of code is different to the adsp21990_nopol program. The sample
frequency will probably be lower, because 20-Sim code is larger then the adsp21990_nopol test bench.
Results
After simulating the 20-Sim model, code is generated and compiled. When the ADSP-21990 EZ-KIT
is run for the first time, the sample frequency is measured and the step size of the Euler is adapted to
the sample frequency of this program (see Appendix C).
Figure 4-7: Sample frequency measurement
In Figure 4-7, the sample frequency can be measured: 14,3 kHz. This means that the interval between
2 samples is approximately 70 µs. This value can be used for the ‘stepsize’ of the Euler integration
method. With this new value for the step size, the response of the filter on the ADSP-21990 EZ-KIT to
an input square wave with a frequency of 10 Hz is shown in Figure 4-8
24
20-Sim code generation for ADSP-21990 EZ-KIT
Figure 4-8: Filter Output
The output signal range is 0V to 2V and has the shape of the simulated DAC output (Figure 4-6).
Findings
All code generation template files for the ADSP-21990 EZ-KIT lite function correctly for at least
simple 20-Sim models, using the Euler integration method. The generated code can be made real-time
manually, by measuring the sample frequency of the downloaded program on the EZ-KIT board and
adjusting the step size of the integration method that is being used.
25
20-Sim code generation for ADSP-21990 EZ-KIT
5 Conclusions and Recommendations
5.1 Conclusions
Code generation for the ADSP-21990 EZ-KIT lite target board functions correctly. This tool of 20Sim can be successfully used when creating controllers or other designs, like filters, that are to be
implemented on the target board (Section 4.4).
The sample frequency is dependent on the amount of generated code, and thus the complexity of the
20-Sim model. This frequency is high enough for the P2.2-project and most basic Mehcatronica
applications. When the complexity of the models that are to be loaded onto the ADSP-21990 EZ-KIT
increases, the sample rate decreases.
However, the implementation of the target specific template files misses a very essential aspect: the
sample frequency is not adjustable for users, who use the 20-Sim code generation tool to program the
ADSP-21990 EZ-KIT. Without the ability of adjusting the sample frequency of the target, this way of
programming cannot be used for extensive and professional use of the ADSP-21990 EZ-KIT lite, such
as during the P2.2-project.
The amount of ADSP-21990 EZ-KIT lite devices that can be programmed using 20-Sim is small; only
the AD-converters and the DA-converters can be used, while the ADSP-21990 EZ-KIT has a lot more
at its disposal, such as pulse width modulators, encoder circuits, a serial Port interface etcetera.
The ADSP-21990 EZ-KIT lite template files also miss the ability to handle pre-programmed 20-Sim
tools, like (controlled) linear system blocks and filter blocks, because the template files are not able to
perform matrix-calculations yet.
About the 20-Sim models of the ADSP-21990 EZ-KIT lite I/O devices can be said that the ADconverter model works fine. The DA-converter, however, introduces a DC-component of +1V in the
output signal. This is not included in the dll-file ADSP21990.dll that specifies the behavior of the
ADSP-21990 EZ-KIT lite I/O devices.
5.2 Recommendations
As is clearly stated, the building of the template files for the ADSP-21990 EZ-KIT lite is not
complete. Many things can be improved in the present version of the ADSP-21990 EZ-KIT template
files. For example, drivers can be added for other I/O-devices.
5.2.1
Software Environment & Target board
At first, one must know that there already is an improved version of the ADSP-21990 EZ-KIT lite.
The ADSP-21992 EZ-KIT lite has for example much more memory space (32K words instead of 4K)
and can therefore contain more complex code.
5.2.2
ADSP-21990 EZ-KIT Template files
The template files of the ADSP-21990 EZ-KIT lack at least one really important aspect. The 20-Sim
user cannot adjust the sample frequency of the program that is run on the target board. That must be
the very first thing to be taken care of when improving the template files for this target. 2 alternative
ways of introducing an adjustable sample frequency in the template files of the ADSP-21990 EZ-KIT
are given in Appendix M.
When starting to design the template files for the ADSP-21990 EZ-KIT it was very important to save
as much memory space as possible. Only for this reason the C-files for calculating matrices were
excluded from the template files for this target. Later on, when the library function of the
VisualDSP++ compiler was discovered, these files could be included in the template files for the
ADSP-21990 EZ-KIT, but this was postponed to a later version of the code generation template files
of the ADSP-21990 EZ-KIT. This later version was never designed, due to lack of time.
27
20-Sim code generation for ADSP-21990 EZ-KIT
The existing version of the ADSP-21990 EZ-KIT template files contains redundant code. For
example: headers.h (Section 3.4.4) can be eliminated by transferring the include-commands directly
into the other template files. It is also possible to rewrite the standard 20-Sim template files (beginning
with xx…) to optimize the code.
The lack of drivers for the Pulse width modulators and the Encoder Interface has already been
mentioned in the conclusions. In a later version of the ADSP-21990 EZ-KIT lite Code Generation
template, this should also be settled.
5.2.3
20-Sim
As stated in the Conclusions Section, the 20-Sim DAC submodel does not add a +1V DC-component
to the input signal. In next version of the 20-Sim ADSP-21990 EZ-KIT library, this should be settled
28
20-Sim code generation for ADSP-21990 EZ-KIT
Appendix A: Code Generation Process
This Appendix gives more information about the code generation process and attributes. It starts with
explaining the code generation process and the use of tokens when generating code. Furthermore it
explains the use of dll-calls to connect other c-files to the standard template files.
This appendix ends with a short description of the pre- and postprocessing abilities of the code
generation tool.
Code generation process
The 20-Sim code generation process is basically not different to the 20-Sim simulation process, in
respect to the following. To be able to simulate in 20-Sim, one must open the simulator, which also
makes 20-Sim process the model. When the model is processed, the user can choose to ‘simulate or
generate’ the model. Fig. 1shows the parallel processes of simulation and code generation. As can be
clearly seen in the picture, the model of which code will be generated is not necessarily the simulation
model; there can be differences between the models.
Postprocessing
Fig. 1: Code Generation and simulation overview
When simulating 20-Sim calculates the models states, rates and variables. When C-code has been
generated (and compiled), the target itself performs the calculations.
The standard 20-Sim code generation template files use the same execution structure as the 20-Sim
simulator does (Fig. 2).
29
20-Sim code generation for ADSP-21990 EZ-KIT
Fig. 2: Calculation structure
The core of the structure consists of an integration method (Euler, Runge-Kutta 4). The initial
equations are equations that are calculated before anything else. The static equations depend only on
model parameters and constants. The inputs and outputs are calculated every time step. The dynamic
equations are calculated by the integration method to calculate new model states. And finally, the final
equations are calculated after all calculations are completed.
Target specific template files form the connection between the standard template files (the calculation
of the system variables) and the physical resources. The standard 20-Sim template files can access
these target specific template files by means of replacing dll-calls (used in simulation models) with
actual driver’s function invocations (see next page).
Tokens
The concept of 20-Sim code generation is basically the determination of the values of the tokens of
which the names are put together in the file Keywords.txt. These names (or keywords) refer to the
tokens and can be used when designing template files. These keywords are characterized by a variable
name (like MODEL_NAME) preceded and followed by a %: %MODEL_NAME%.
As mentioned in the preceding paragraphs, 20-Sim includes standard template files (characterized by
the preceding xx (meaning ‘20’ of 20-Sim in roman notation), like in xxmodel.c and xxmain.c), which
can be freely used and adjusted to the users needs.
Fig. 3 shows an example of the use of tokens in a short part of C-code in one of the template files
(xxmodel.c), before code generation. The example shows the declaration and initialization of some
global variables. The XXDouble type is a 20-Sim double type, as well as the XXInteger and
XXBoolean, which are in fact an integer and a boolean.
30
20-Sim code generation for ADSP-21990 EZ-KIT
/* the global variables */
XXDouble %VARPREFIX%start_time = %START_TIME%;
XXDouble %VARPREFIX%finish_time = %FINISH_TIME%;
XXDouble %VARPREFIX%step_size = %TIME_STEP_SIZE%;
XXDouble %VARPREFIX%%XX_TIME%;
XXInteger %VARPREFIX%steps;
XXBoolean %VARPREFIX%%XX_INITIALIZE%;
XXBoolean %VARPREFIX%major = XXTRUE;
Fig. 3: Part of standard 20-sim code generation template
The template files connection to the real world: DLL-calls
Virtually every possible target (robots, I/O-devices, micro-controllers etc.) has connections to the
physical world, like AD-converters (for sensor readings) and DA-converters (to excite actuators).
These functions (as components of the used target) have to be simulated in 20-Sim. When generating
code, however, the simulation code has to be replaced by target specific function calls. These program
functions contain drivers for the components.
These drivers have to be designed by the user. For testing purposes, 20-Sim makes use of dll-function
calls in 20-Sim submodels:
Y = dll(filename, functionname, X);
This dll-call invokes a certain function in a certain dynamic link library on an input matrix X. The
output of this function is matrix Y. The function also returns 20-Sim an integer, which can be either 0
or 1. When a 1 is returned (meaning an error has occurred), 20-Sim immediately stops simulating and
reports an error.
Summarizing: to simulate certain target specific functions, a dynamic link library has to be created
(and put in the directory …\20-Sim\bin).
When generating code, the dll-call above will be replaced by an ANSI-C function-call:
void filename_functionname(double *inarr, int inputs, double *outarr, int outputs, int major)
This statement is put into a token and then placed into the template. This means that the user has to
add a target specific template file (with the same filename as the dll has) to standard template files (see
Section 5.3.3), which contains the implementation of the target specific functions, like the function
“functionname” in previous example.
Pre- and postprocessing
When 20-Sim has finished generating code, all generated files are placed (default; it is also possible to
specify the destination path in the code generation dialog window) in the directory
C:\temp\%MODEL_NAME%. Now it is possible for the user to add postcommands to his design
(Error! Reference source not found.: Targets.ini), which, for example, could invoke a compiler and
a linker, so that the generated code can be uploaded to the target. These postcommands are treated as
DOS commands.
It is also possible to add precommands, which enables the user to execute a program before 20-Sim
generates code.
31
20-Sim code generation for ADSP-21990 EZ-KIT
Appendix B: VisualDSP++ 3.0 User Manual
General information
Visual DSP++ is a software development environment, designed by Analog Devices, for programming
digital signal processors from the five Analog Devices DSP families (Blackfin TM, SHARC,
TigerSHARC, ADSP-21xx and Mixed Signal DSP families).
The development environment gives the programmer the possibility of coding in C/C++ or in the
ADSP Assembly code. It is also possible to use both languages simultaneously.
The EZ-KIT lite version that was used for this project contains 5 tools:
§
A C/C++ compiler.
§
An assembler, for assembling the ADSP assembly code.
§
A linker, for linking the compiled and assembled code into an executable file.
§
A loader, which loads the executable onto the target.
§
A Splitter, to use external memory, so that more memory space is available.
A number of target specific run-time libraries have been included in the environment, as well as a
number of standard run-time libraries.
Quick start
Fig. 4 shows the common view on the VisualDSP++ tool window. The arrangement of program
windows is similar to Microsoft Visual Studio. On the left is the browsable project window, which
contains project information such as included files. On the bottom of the screen, there is the output
window, which shows the building and loading reports. In the center of the screen, there is the
programming window in which the programmer can implement his code. The windows on the right
side show target memory or register contents. The registers and/or memories can be selected in the
menu bar items “Memory” and “Register”
33
20-Sim code generation for ADSP-21990 EZ-KIT
Fig. 4: The VisualDSP++ 3.0 workbench
When starting a new project, the user selects Project > New . Then the user can choose a project
directory and a project name. When done, a project options window appears (Fig. 5). The ADSP21990 has to be selected, as well as ‘DSP executable file’. The Tool Chain shows the tools that will be
used to build the DSP executable file. A splitter is not included in this software version.
Fig. 5: Project Options window
34
20-Sim code generation for ADSP-21990 EZ-KIT
An empty project is now presented. At first the user has to include a linker definition file (adsp21990.ldf; links the separate files into the executable) and a interrupt vector table (21990_ivt.dsp).
When that is done, the user can add and create files at will.
To compile a source file, the user selects Project > Build file or push the corresponding button on the
task bar. Building the project: Project > Build Project. When built, VisualDSP++ automatically loads
the executable file onto the target.
In order to load a previously built executable file onto the target, the user has to select
File > Load Program or push the corresponding button on the task bar.
To run the program on the target, the appropriate button has to be clicked, or Debug > Run has to be
selected.
The VisualDSP++ tools
In the previous section, the existence of 4 tools was mentioned. The relationship between those tools
will be explained in the next 4 subsections.
C/C++ compiler
The VisualDSP++ C/C++ compiler is able to compile ANSI-C and C++ files and their header files.
The compiler can be used in various ways. Fig. 6 shows the various file types and the tools that can be
used to build the files.
Fig. 6: VisualDSP++ Tool Tree
The main use of the compiler is to compile C/C++ projects into linkable object files (.doj). Another
option is to use the compiler as an library compiler. Instead of creating a linkable object file, a library
file (.dlb, which is called an archiver file) is created, which can be used when linking.
Library files feature
The library files feature is a way to decrease the amount of compiled C-code. Normally, when
compiling C-code, all functions and methods are included in the compiled code, whether they are used
or not. When functions, methods and variables are put in a library file, and this library file is included
in the compiling process, the library contents are only included in the compiled code, when referenced
to.
Assembler
The VisualDSP++ Assembler is a dual of the C/C++ compiler when compiling ADSP assembly files.
The assembler output file is also a linkable object file (.doj). The assembler cannot build libraries.
35
20-Sim code generation for ADSP-21990 EZ-KIT
Linker
The VisualDSP++ Linker links the various object files together. The linker uses a linker definition file
(.ldf) to map all files into the target memory. It is possible to include library files here to decrease the
size of the program. The Linker output file is an executable file (.dxe).
Loader & Splitter
The VisualDSP++ Loader simply translates the executable file (.dxe) into a loadable file (.ldr), which
can be inserted in the internal Target program and data memory.
Instead of loading the executable onto the processor internal memory, it is also possible to load the
executable into external memory. For this, the VisualDSP++ Splitter is used. The splitter, however, is
not included in this EZ-KIT lite version.
36
20-Sim code generation for ADSP-21990 EZ-KIT
Appendix C: 20-Sim ADSP-21990 template User Manual
This appendix gives in short the way to use the 20-Sim ADC and DAC submodels in a 20-Sim model.
Setting up: Top to bottom
As an example, the implementation of a control system is being treated.
When setting up a 20-Sim model that is suitable for both simulation and code generation, a 20-Sim
user should start with designing the overall model of a control system of Fig. 7.
Plant
nameTM
ACME
ADSP-21990
SignalMonitor1
Controller
WaveGenerator1
Fig. 7: First set up. ADSP-21990 and plant are still empty
The figure shows the overview of the control system being treated, with the basic components (wave
generator, signal monitor, controller and plant) implemented. This model features a simple controller
with a 1-dimensional input, output and feedback.
Second, the plant should be implemented. This is quite trivial; a plant has to be known, before any
controller can be designed to influence the behavior of a plant.
Now the linear controller can be designed and implemented in the ADSP-21990 Controller. The
starting point is shown in Fig. 8.
DAC
ADC
Input
14-bits
ADC1
12-bit
The Controller should be
implemented here as a
signal block diagram
Output
DAC1
ADC
14-bits
feedback
ADC2
Fig. 8: ADSP-21990 Controller contents
The I/O devices (ADC and DAC) contain dll-calls, which are replaced by the 20-Sim code generator
when generating code by a C-function, which executes the necessary hardware instructions to fetch or
send data to the ADSP-21990 EZ-KIT lite I/O devices. Because code will only be generated of the
ADSP-21990 Controller submodel, the I/O devices should be located inside the ADSP-21990
Controller submodel.
Important notes
The submodels of the ADC’s and DAC’s are prototypes. The implementation of an ADC submodel is
given below: the implementation is with equations and contains only a dll-call. This call invokes a
function ‘getADInput1’ in the file ADSP21990.dll when simulating. When code generating, the same
function is invoked, but then the one that is implemented in the file ADSP21990.c.
37
20-Sim code generation for ADSP-21990 EZ-KIT
// created 8/7/02 by Ceriel Mocking
parameters
string file = 'ADSP21990.dll';
string function = 'getADInput1';
variables
real x;
equations
x =ADC_in;
ADC_Out = dll(file, function, x);
As there are 8 ADC’s, there are also 8 functions of the form ‘getADInput#’ with number of the ADC.
In the implementation above is the implementation of the ADC that is found in the library (prototype),
it invokes the first ADC. When other ADC’s are implemented as well, the function that is invoked has
to be changed, for example ‘getADInput2’, ‘getADInput8’ etc. This applies to the DAC’s too.
It is important to do this, otherwise there will be, for example, two outputs connected to one DAC.
Then there is a big chance of losing one of the output signals.
It is also very important to use the function ‘getADInput1’ when using at least 1 ADC. This is because
this function contains the instruction for the AD-converter circuit to start converting all 8 analogue
inputs. The same applies, again, to the function ‘setDAOutput1’ which is implemented in the DAC
submodel.
Controller design
When the I/O devices are implemented, the actual controller can be implemented (Fig. 9).
ADC
Input
14-bits
ADC1
òz
K
-1
Gain1
Integrate1
DAC
12-bit
Output
DAC1
ADC
K
Gain2
14-bits
feedback
ADC2
Fig. 9: Controller implementation example
When the controller is implemented, the whole model can be simulated. After simulation (or before,
that does not matter) code can be generated of the (sub-)model. This is done by the code generation
tool, which can be found in the 20-Sim Simulator: Tools > C-code Generation. Before starting the
code generation tool the simulation parameters (integration method, step size, simulation time) must
be specified in the ‘Run Properties’ dialog.
To generate code for the ADSP-21990 EZ-KIT lite, this target must be chosen in the dialog window of
the code generation tool and the submodel containing the controller and the I/O devices must be
specified. When the ‘OK’ button has been pressed, code is generated of the submodel. The code is also
put into a directory in C:\temp, compiled, and loaded onto the target and run. As the sample frequency
is not known, the controller on the target board will not behave as simulated. Therefore it is advisable
to measure the sample frequency of the running program and use that frequency to calculate the actual
step size that should be used for the integration method.
It is also advisable to use the Euler integration method, as this method run almost flawlessly.
38
20-Sim code generation for ADSP-21990 EZ-KIT
Ending the Run
To command the target to run, VisualDSP++ 3.0 is started automatically. When the 20-Sim user wants
to end the running of the target, the user should push the Halt button (Fig. 10) in VisualDSP++ to let
the target stop running.
Fig. 10: Debug bar for running or halting the target
When the target has been halted, the 20-Sim user needs to close down VisualDSP++ in order to be
able to generate code again. It can happen that when VisualDSP++ is closed down, the target begins to
run again. This does not matter. When code is generated for the target, the target is automatically reset.
If an error message is given when the code generator starts up VisualDSP++, the PC has to be
restarted and rebooted, before the 20-Sim user is able to generate code again.
39
20-Sim code generation for ADSP-21990 EZ-KIT
Appendix D: I/O-Peripheral Descriptions
AD-Converter:
Description:
The analogue input circuit of the ADSP-21990 EZ-LITE consists of two 14-bits AD-converters, which
can simultaneously sample at 20 MSPS. In addition, each of the AD-converters has 4 input-channels,
which are multiplexed before sampling. That makes a total of 8 ADC inputs.
At a conversion rate of 20 MSPS, that means that each input is sampled at 2.5 MHz.
When used for P2.2, this will have no important side-effects. When used for more sophisticated (high
frequency) applications, one must take this sample-frequency into account.
Functionality:
The functionality of the AD-converter consists of one function (for each input channel), which “gets
the analogue translated into an 14-bits digital value”. So the ADC_handler contains 8 (max. number of
ADC’s) functions:
int getADInput1(), ..., int getADInput8()
Each of the functions returns a value from [0, 214 – 1], which can be used for calculations by the ADSP
processor.
DA-Converter:
Description:
The analogue output of the ADSP-21990 EZ-LITE consists (according to the website, so this is still
not confirmed) of 2 4-input-channel 12-bits DA-converters (almost the dual of the AD-converter).
The sample rate is not yet known and so is the way of controlling this device. The website also
mentions that the DA-converters will be located in de Serial Peripheral Interface I/O-peripheral
Functionality:
As long as the evaluation board has not arrived yet, the exact functionality of the DAC’s is not known.
Until that moment, the functionality of the DAC’s will be the dual of the ADC’s:
void setDAOutput1(int output1), ..., void setDAOutput8(int output8)
Each of the functions has an argument in the range [0, 212 – 1], which will be converted into an
analogue signal. The output voltage range is not yet known.
Pulse Width Modulators:
Description:
The pulse width modulators are suited for ac-motors (the three-phase PWM) and dc-motors (the two
extra channels). By modulating the pulse width, the user controls the dc-component of the signal and
therefore the user controls the power supply of the dc-motor.
The ADSP-21990 contains two 16-bit pulse width modulators of which the pulse frequency and the
pulse duty-cycle can be regulated.
The datasheets mention the use of a PWM for triggering ADC converting start, but extra information
(probably included in the software development tool) about this application is needed.
Encoder Circuit:
Description:
The incremental encoder circuit is generally used as a (rotor-)position feedback circuit. When using a
motor, a disc with a certain number of black and white slices (like pizza slices) is added. Those black
41
20-Sim code generation for ADSP-21990 EZ-KIT
and white spots are ‘seen’ by two light sensors. When turning, the light sensors measure pulses, which
are counted by the encoder circuit. By analyzing the number of light pulses, the encoder is able to
determine the position (angle) of the disc.
The difference between turning forward and backward is made by phase-shifting the second light
sensor 90 degrees. When changing directions, the output of the second light sensor will shift 180
degrees.
The ADSP-21990 contains a 32-bit encoder. The encoder contains some more functionality’s, but
these may be treated later on, when extra functionality is added.
42
20-Sim code generation for ADSP-21990 EZ-KIT
Appendix E: Target Board Layout
This appendix describes the layout of the ADSP-21990 Evaluation Board.
This layout is shown in Fig. 11. A brief description of the various components follows.
This description is an abstract of the layout description in the ADSP-21990 EZ-KIT Lite Evaluation
System Manual
Fig. 11: Target Board layout
P1:
Power supply. The ADSP-21990 EZ-KIT needs a supply of +5V for digital circuitry (VDD)
and +5V and –5V for analogue circuitry (respectively +AVDD and –AVDD). The ADSP21990 EZ-KIT lite board is laid out with separate analogue and digital ground planes (AGND
and DGND). Jumper JP1 connects these ground planes.
4 LED’s are provided to indicate that the power supplies are working correctly (CR1 – CR4)
P2:
Serial Port (SPORT) interface. P2 is the SPORT interface connector. A standard 9-pin female
D-Sub socket is also provided (P9)
P3:
External Memory Interface (EMI)
P4:
AD-Converter inputs. The middle 8 pins are the ADC inputs. The 2 outmost pins are ground
pins. Take care: the middle pins are numbered 0 – 7 (up – down) but in fact they are connected
the other way around.
P5:
DA-Converter outputs. Again, the middle 8 pins are the outputs, while the outmost pins are
ground pins. Here, the pins are connected correctly.
P6:
Encoder Interface Unit (EIU) Circuitry inputs.
P7:
SPI interface Master/Slave select pins.
P8:
Programmable Flag (PF) pins for SPI I/O. PF2 high activates DAC’s. PF3 high updates DAC
registers
P9:
SPORT, see P2.
P10: Pulse Width Modulator (PWM) outputs for the PWM Generation Unit and the Auxiliary
PWM Unit as well as the three General Purpose Timers.
P11: USB Interface connector.
P13&P14:
SPI CAN Interface connectors.
S1:
Reset button. When resetting, LED CR7 is off. When reset, CR7 is lit.
43
20-Sim code generation for ADSP-21990 EZ-KIT
Appendix F: ADC & DAC Registry info
This appendix contains a descriptions of the most important registers of the ADSP-21990.
ADC
Fig. 12 shows the layout of the ADCCTRL register:
Bit 0-2: Selects triggering device (SOFTCONVST activates the software convert start register: when a
1 is written to this register, the ADC starts converting)
Bit 4-6: Operating Mode Select; default contents are 000 = simultaneous sampling.
Bit 8-11: Selects ADC clock speed, by indicating the factor by which the internal clock is divided;
default contents are: 0010 = HCLK/4, as shown in picture.
Bit 12: For working with Latches; not important to this project
Bit 13: For working with Latches; not important to this project
Bit 15: ADC data format select.
Fig. 12: ADC Control register description
DAC
Fig. 13 shows the register layout of the SPI. Bit descriptions with defaults are given as well.
Fig. 13: SPI control register
45
20-Sim code generation for ADSP-21990 EZ-KIT
Bit 0-1: TIMOD; defines transfer initiation mode and interrupt generation. When using DAC, TIMOD
= 01, indicating the use of the transmit buffer.
Bit 2: SZ, selects the sending of zero’s or last word when transmission buffer (TDBR) is empty.
Default is 1: send zeros
Bit 3: GM, selects operating mode when read buffer is full. No use when using TDBR. Default = 0.
Bit 4: PSSE, enables Slave-Select input for master. When not used, it can also be used as general
purpose I/O. Default is 0, disabled.
Bit 5: EMISO, for Master-Slave operations. Default = 0, disabled.
Bit 8: SIZE, selects word length. Default is 1, 16 bits.
Bit 9: LSBF, data format. Default is 0, MSB send first.
Bit 10: CPHA, selects Clock phase. Default is 1.
Bit 11: CPOL selects clock polarity. Default is 0, active high.
Bit 12: MSTR, configures SPI module as master or slave, default is 1, device is master.
Bit 13: WOM, Master-Slave operations, default is 0
Bit 14: SPE, SPI module enable bit: default is 0, disabled. (device is enabled when in use for data
output, which is immediately after TDBR fill.
Fig. 14 shows the layout of the SPI Flag register, used for slave-selecting. In this case, the DAC ahs to
be selected.
Fig. 14: SPI Flag register
Bits 1-7: SPI Flag Select bits. Default value is: 0000110 (7à1).
Bits 9-15: SPI Flags. Default value is: 0000110 (15à9).
46
20-Sim code generation for ADSP-21990 EZ-KIT
Appendix G: Creating ADSP_Sim.dll
As was said, 20-sim uses dll-calls when simulating the test model. The dll-file that is used by 20-sim
in this project is ADSP_Sim.dll.
The exported dll functions are:
•
Initialize
•
Terminate
•
PWM_Handler
•
ENC_Handler
•
getADInput1, … , getADInput8 (those 8 functions should be put together in 1 function)
•
setDAOutput1, … , setDAOutput8 (those 8 functions should be put together in 1
function)
When called upon for the first time, the dll is linked to the simulator. Then: “When the simulator has
attached the dll-file it automatically searches for a function with the name ‘int Initialize()’. If this
function is found it is called. The return value is checked for success, 0 means success, 1 means error.
At the end of the simulation run just before the dll-file is detached the simulator searches for a
function called ‘int Terminate()’.” (20-Sim Help)
To create this dll-file, the option “A simple DLL project” of the “Win32 Dynamic Link Library” of the
project wizard of Microsoft Visual C++ 6.0 was selected. Three files will be generated, of which the
.cpp file with the project name is to be edited by the programmer. All generated contents of this file
can be deleted, except for the line
#include “stdafx.h”
(line 6 in figure below).
The functions that are to be exported can be put into this file by using the DllExport-command (only
when #define DllExport __declspec( dllexport)
is executed ! ).
The first few lines of the .cpp file (also in figure below) can be copied from 20-Sim Help (Writing
Static DLL’s).
The two additional files (StdAfx.cpp and StdAfx.h) are necessary for compiling the edited file to a .dll
file and the contents of these files should not be altered.
Each of the functions at first checks the dimensions of the inputs and outputs. When something is
wrong, the functions return 1, and the simulation is automatically terminated. When correct, the
functions return 0. Initialize and Terminate always return 0.
// ADSP_Sim.cpp : Defines the entry point for the DLL application.
// ADSP_Sim.dll for testing 20-Sim submodels
// created by Ceriel Mocking, 26-04-2002
#include <windows.h>
#include <math.h>
#include <stdlib.h>
#include <time.h>
#include "stdafx.h"
#define DllExport __declspec( dllexport )
extern "C"
{
// AD-converters
DllExport int getADInput(double *inarr, int inputs, double *outarr, int outputs, int major) {
if (inputs != 1) return 1;
if (outputs != 1) return 1;
outarr[0] = inarr[0];
return 0;
}
DllExport i nt getADInput1(double *inarr, int inputs, double *outarr, int outputs, int major) {
47
20-Sim code generation for ADSP-21990 EZ-KIT
return getADInput(inarr, inputs, outarr, outputs, major);
}
DllExport i nt getADInput2(double *inarr, int inputs, double *outarr, int outputs, int major) {
return getADInput(inarr, inputs, outarr, outputs, major);
}
DllExport int getADInput3(double *inarr, int inputs, double *outarr, int outputs, int major) {
return getADInput(inarr, inputs, outarr, outputs, major);
}
DllExport int getADInput4(double *inarr, int inputs, double *outarr, int outputs, int major) {
return getADInput(inarr, inputs, outarr, outputs, major);
}
DllExport int getADInput5(double *inarr, int inputs, double *outarr, int outputs, int major) {
return getADInput(inarr, inputs, outarr, outputs, major);
}
DllExport int getADInput6(double *inarr, int inputs, double *outarr, int outputs, int major) {
return getADInput(inarr, inputs, outarr, outputs, major);
}
DllExport int getADInput7(double *inarr, int inputs, double *outarr, int outputs, int major) {
return getADInput(inarr, inputs, outarr, outputs, major);
}
DllExport int getADInput8(double *inarr, int inputs, double *outarr, int outputs, int major) {
return getADInput(inarr, inputs, outarr, outputs, major);
}
// DA-converters
DllExport int setDAOutput(double *inarr, int inputs, double *outarr, int outputs, int major)
{
if (inputs != 1) return 1;
if (outputs != 1) return 1;
outarr[0] = inarr[0];
return 0;
}
DllExport int setDAOutput1(double *inarr, int inputs, double *outarr, int outputs, int major) {
return setDAOutput(inarr, inputs, outarr, outputs, major);
}
DllExport int setDAOutput2(double *inarr, int inputs, double *outarr, int outputs, int major) {
return setDAOutput(inarr, inputs, outarr, outputs, major);
}
DllExport int setDAOutput3(double *inarr, int inputs, double *outarr, int outputs, int major) {
return setDAOutput(inarr, inputs, outarr, outputs, major);
}
DllExport int setDAOutput4(double *inarr, int inputs, double *outarr, int outputs, int major) {
return setDAOutput(inarr, inputs, outarr, outputs, major);
}
DllExport int setDAOutput5(double *inarr, int inputs, double *outarr, int outputs, int major) {
return setDAOutput(inarr, inputs, outarr, outputs, major);
}
DllExport int setDAOutput6(double *inarr, int inputs, double *outarr, int outputs, int major) {
return setDAOutput(inarr, inputs, outarr, outputs, major);
}
DllExport int setDAOutput7(double *inarr, int inputs, double *outarr, int outputs, int major) {
return setDAOutput(inarr, inputs, outarr, outputs, major);
}
DllExport int setDAOutput8(double *inarr, int inputs, double *outarr, int outputs, int major) {
return setDAOutput(inarr, inputs, outarr, outputs, major);
}
// Pulse Width Modulators
DllExport int PWM_Handler1(double *inarr, int inputs, double *outarr, int outputs, int major)
48
{
20-Sim code generation for ADSP-21990 EZ-KIT
if(inputs != 2) return 1;
else if (outputs != 1) return 1;
else
{
outarr[0] = inarr[0];
return 0;
}
}
DllExport int PWM_Handler2(double *inarr, int inputs, double *outarr, int outputs, int major) {
return PWM_Handler1(inarr, inputs, outarr, outputs, major);
}
// Encoder
DllExport int ENC_Handler(double *inarr, int inputs, double *outarr, int outputs, int major) {
if(inputs != 2) return 1;
else if (outputs != 1) return 1;
else
{
outarr[0] = inarr[0];
return 0;
}
}
// Initialize & Terminate
DllExport int Initialize() {
return 0; //no need for initiation
}
DllExport int Terminate() {
return 0; //no need for termination
}
}
49
20-Sim code generation for ADSP-21990 EZ-KIT
Appendix H: ADC_DAC test program
The ADC_DAC test program is an Analog Devices program for showing ADSP-21990 EZ-KIT users
how to use some of the ADSP-21990 EZ-KIT possibilities. The ADC_DAC test program is entirely
implemented in assembly code.
The program makes use of timed interrupts (generated by the Pulse Width Modulator Unit) to signal
the ADC to start converting. When an interrupt has been generated, the program jumps to the ADC
interrupt service routine in which all data of the ADC data registers is put in the data memory. Then
the DAC_Update routine is called, which fetches the data from the data memory and puts it on the
data registers of the SPI and converts it. After this routine the program goes back to its waiting-forinterrupt state.
The flow chart of this program is shown in Fig. 15.
Main.dsp
SPI_dac.dsp
Start
Interrupt init
DAC_Init_
No
PWM interrupt ?
Yes
ADC_isr
DAC_Update
Fig. 15: Flow chart ADC_DAC test program
The program contains 3 files of major importance: Main.dsp, SPI_dac.dsp and Main.h. The first file
contains the general initializing operations and the PWM Unit and ADC interrupt service routines. The
second file contains the initialize and operating functions of the SPI and the DAC on the SPI. The last
file contains the default hardware parameters, such as the ADSP-21990 internal clock speed and Pulse
Width Modulator Unit frequency and duty-cycle.
The ADC interrupt service routine is included below.
ADC_Isr:
iopg = ADC_Page;
ar = IO(ADC_DATA0);
ar = IO(ADC_DATA1);
ar = IO(ADC_DATA2);
ar = IO(ADC_DATA3);
ar = IO(ADC_DATA4);
ar = IO(ADC_DATA5);
ar = IO(ADC_DATA6);
ar = IO(ADC_DATA7);
DAC_Put( 1 , ar );
DAC_Put( 2 , ar );
DAC_Put( 3 , ar );
DAC_Put( 4 , ar );
DAC_Put( 5 , ar );
DAC_Put( 6 , ar );
DAC_Put( 7 , ar );
DAC_Put( 8 , ar );
DAC_Update;
iopg = ADC_Page;
ar = 0x0100;
IO(ADC_STAT) = ar;
// W1 to clear interrupt ADC
51
20-Sim code generation for ADSP-21990 EZ-KIT
rti;
In this fragment can be seen what happens after an interrupt: All data from the 8 ADC’s is put into the
memory (by DAC_Put operations) and after that, DAC_Update is called. This function gets all data
from memory (in which it was put by the DAC_Put operations) and lets the DAC’s convert the data.
In short: Between the command lines “ar = IO(ADC_DATA0);” and “DAC_Put( 1 , ar );” the data can be
used for calculations. After the last mentioned command line, the data is stored for converting by the
DAC’s.
52
20-Sim code generation for ADSP-21990 EZ-KIT
Appendix I: Target Specific Function Chart
This appendix contains the flowchart of the Target Specific template files. There are only 2 target
specific template files, due to the ‘extensive API’ method of calling functions from 20-Sim submodels.
All ADSP21990.c functions can be called upon from main.c. All AD-converter functions are
implemented in ADSP21990.c, while the functionality of the DA-converters is implemented in
SPI_dac.dsp. Encoder circuit and Auxiliary PWM Unit functionalities are not yet implemented and
therefore drawn with a dotted line.
ADSP21990.c
SPI_dac.dsp
getADInput1
getADInput2
getADInput3
getADInput4
getADInput5
getADInput6
getADInput7
getADInput8
DAC_inp1
DAC_inp2
DAC_inp3
DAC_inp4
DAC_inp5
DAC_inp6
DAC_inp7
DAC_inp8
setDAOutput1
setDAOutput2
setDAOutput3
setDAOutput4
setDAOutput5
setDAOutput6
setDAOutput7
setDAOutput8
InitializeDAC
Aux_PWM
functions
ENC functions
Initialize
Terminate
53
20-Sim code generation for ADSP-21990 EZ-KIT
Appendix J: Target Specific files
ADSP21990.c:
5
10
15
20
25
30
35
40
45
50
55
60
65
70
/* ADSP21990.c : Target specific API file
created by Ceriel Mocking, 26-04-2002 */
#include <math.h>
#include <stdlib.h>
#include <stdio.h>
#include <sysreg.h>
#include <adsp-21990.h>
#include "adsp21990.h"
// "private" functions
extern void InitializeDAC();
extern void DAC_out();
extern void DAC_inp1(int inarr);
extern void DAC_inp2(int inarr);
extern void DAC_inp3(int inarr);
extern void DAC_inp4(int inarr);
extern void DAC_inp5(int inarr);
extern void DAC_inp6(int inarr);
extern void DAC_inp7(int inarr);
extern void DAC_inp8(int inarr);
/* ADC's*/
void ADSP21990__getADInput1(double *inarr, int inputs, double *outarr, int outputs, int major)
{
sysreg_write(sysreg_IOPG,ADC_Page);
/* set IO-page to ADC*/
io_space_write(ADC_SOFTCONVST, 1);
/* Start converting */
outarr[0] = io_space_read(ADC_DATA0);
/* Read data */
}
void ADSP21990__getADInput2(double *inarr, int inputs, double *outarr, int outputs, int major)
{
outarr[0] = io_space_read(ADC_DATA1);
}
void ADSP21990__getADInput3(double *inarr, int inputs, double *outarr, int outputs, int major)
{
outarr[0] = io_space_read(ADC_DATA2);
}
void ADSP21990__getADInput4(double *inarr, int inputs, double *outarr, int outputs, int major)
{
outarr[0] = io_space_read(ADC_DATA3);
}
void ADSP21990__getADInput5(double *inarr, int inputs, double *outarr, int outputs, int major)
{
outarr[0] = io_space_read(ADC_DATA4);
}
void ADSP21990__getADInput6(double *inarr, int inputs, double *outarr, int outputs, int major)
{
outarr[0] = io_space_read(ADC_DATA5);
}
void ADSP21990__getADInput7(double *inarr, int inputs, double *outarr, int outputs, int major)
{
outarr[0] = io_space_read(ADC_DATA6);
}
void ADSP21990__getADInput8(double *inarr, int inputs, double *outarr, int outputs, int major)
{
outarr[0] = io_space_read(ADC_DATA7);
}
/* DAC's */
void ADSP21990__setDAOutput1(double *inarr, int inputs, double *outarr, int outputs, int major)
{
DAC_inp1((int) inarr[0]);
//DAC_out();
}
void ADSP21990__setDAOutput2(double *inarr, int inputs, double *outarr, int outputs, int major)
{
DAC_inp2((int) inarr[0]);
}
void ADSP21990__setDAOutput3(double *inarr, int inputs, double *outarr, int outputs, int major)
{
DAC_inp3((int) inarr[0]);
}
void ADSP21990__setDAOutput4(double *inarr, int inputs, double *outarr, int outputs, int major)
55
20-Sim code generation for ADSP-21990 EZ-KIT
75
80
85
90
95
100
{
DAC_inp4((int) inarr[0]);
}
void ADSP21990__setDAOutput5(double *inarr, int inputs, double *outarr, int outputs, int major)
{
DAC_inp5((int) inarr[0]);
}
void ADSP21990__setDAOutput6(double *inarr, int inputs, double *outarr, int outputs, int major)
{
DAC_inp6((int) inarr[0]);
}
void ADSP21990__setDAOutput7(double *inarr, int inputs, double *outarr, int outputs, int major)
{
DAC_inp7((int) inarr[0]);
}
void ADSP21990__setDAOutput8(double *inarr, int inputs, double *outarr, int outputs, int major)
{
DAC_inp8((int) inarr[0]);
}
/* Initialize & Terminate*/
void ADSP21990__Initialize()
{
/* initialize ADC by selecting proper ADCCTRL register configuration*/
sysreg_write(sysreg_IOPG, ADC_Page);
/* iopg = ADC_Page*/
io_space_write(ADC_CTRL, 0x0207);
/* Initialize & configure DAC */
InitializeDAC();
105
}
void ADSP21990__Terminate()
{
}
SPI_dac.dsp, this file came as part of the ADC_DAC test program. The letters CM in some of the
commentary are the author’s initials, indicating parts added by the author.
110
115
120
125
/****************************************************************************************
*
*
* Library: Interface Routines to serial DAC via SPI
*
*
*
* Description: code file
*
* Purpose : Library Routines for DAC Block Operation
*
*
*
* Author : KU
*
* Version : 1.0
*
* Date
: Jan 2002
*
* Modification History: None
*
*
*
* Embedded Control Systems
*
* Analog Devices Inc.
*
****************************************************************************************/
#include <main.h>;
#include "SPI_dac.h"
130
// added - CM
/****************************************************************************************
* Calculate Configuration Register Contents from Parameters
*
****************************************************************************************/
/* No calculation required: the Parameters are already the contents of the registers */
135
140
145
/****************************************************************************************
* Constants Defined in the Module
*
****************************************************************************************/
/****************************************************************************************
* Routine s Defined in this Module
*
****************************************************************************************/
.GLOBAL DAC_Init_;
.GLOBAL DAC_Update_;
.GLOBAL _InitializeDAC;
.GLOBAL _DAC_inp1;
.GLOBAL _DAC_inp2;
.GLOBAL _DAC_inp3;
/*added CM*/
/*added CM*/
/*added CM*/
/*added CM*/
56
20-Sim code generation for ADSP-21990 EZ-KIT
150
155
.GLOBAL _DAC_inp4;
.GLOBAL _DAC_inp5;
.GLOBAL _DAC_inp6;
.GLOBAL _DAC_inp7;
.GLOBAL _DAC_inp8;
.GLOBAL _DAC_out;
/*added CM*/
/*added CM*/
/*added CM*/
/*added CM*/
/*added CM*/
/*added CM*/
/****************************************************************************************
* Global Variables Defined in this Module
*
****************************************************************************************/
160
//.section/dm
.section/dm
seg_dmdata;
data1;
/* changed CM */
.VAR
165
170
Dac_Channels[Number_of_DAC_channels];
/*Buffer for values to be sent to DAC */
.GLOBAL Dac_Channels;
/****************************************************************************************
* Local Variables Defined in this Module
*
****************************************************************************************/
.VAR
175
Dac_buffer[Number_of_DAC_channels];
/*temporary buffer
.VAR DAG1_backup[3];
/*temporary saving of pointer registers*/
//.section/pm
.section/pm
180
185
190
195
*/
seg_pmcode;
program;
/*changed CM*/
/****************************************************************************************
*
*
* Type: Routine
*
*
*
* Call: DAC_Init_;
*
*
*
* Initialize the DAC-Module (SPI interface) with the Parameters set in main.h
*
*
*
* Inputs :
None
*
*
*
* Ouputs : None
*
*
*
* Modified:
AR, AY0
*
*
*
****************************************************************************************/
DAC_Init_:
iopg = SPI0_Controller_Page;
200
ar = b#0001010100000101;
IO(SPICTL0) = ar;
// not enabled yet
205
ar = IO(SPIFLG0);
ay0= 0x0C0C;
ar = ar or ay0;
IO(SPIFLG0) = ar;
// set PF2 and PF3 as SS and high
ar = Ratio_IO_clock_over_SCLK / 2;
IO(SPIBAUD0) = ar;
// clock speed
210
215
220
ax0 = Dac_Channels;
reg(b0) = ax0;
ax0 = Dac_buffer;
reg(b1) = ax0;
// base registers
rts;
/****************************************************************************************
*
*
* Type: Routine
*
*
*
* Call: DAC_Update_;
*
*
*
* Update the DAC with the New Value Written to the Registers
*
*
*
57
20-Sim code generation for ADSP-21990 EZ-KIT
230
* Inputs :
None
*
*
*
* Ouputs : None
*
*
*
* Modified:
I0, L0, M0, I1, L1, M1, AR, CNTR, AY0, TX0
*
*
*
****************************************************************************************/
235
DAC_Update_:
/* forms the data and starts the transfer
*/
/* No interrupts are used, status bits are polled until all eight values are transferred*/
ax1 = iopg;
iopg = SPI0_Controller_Page;
225
ar = IO(SPICTL0);
ar = clrbit 14 of ar;
240
I0 = Dac_Channels;
L0 = length(Dac_Channels);
M0 = 1;
I1 = Dac_buffer;
L1 = length(Dac_buffer);
M1 = 1;
245
cntr = L0;
ax0 =0;
do form_data until CE;
ar = DM(I0, M0);
ay0= 0x8000;
ar = ar + ay0;
sr = lshift ar by -4 (LO);
/* Loop all channels*/
255
ar = clrbit 2 of ax0;
sr = sr or lshift ar by 14 (LO);
ar = setbit 13 of sr0;
DM(I1, M1) = ar;
// ar contains A0 and A1 values
// sr0 contains data word (BUF and GAIN are zeros)
// set gain to 1 (output range 0-2Vref)
// store into temporary buffer
260
ar = ax0 +1;
ax0 = ar;
nop;
ar = IO(SPICTL0);
ar = setbit 14 of ar;
IO(SPICTL0) = ar;
250
form_data:
265
270
275
285
290
/* convert from signed to unsigned integer*/ This means adding +1 VDC (CM)
// obtain 12 bit value right justified
// ax0 contains logical number of channel
/* End of loop */
// enable SPI
ar = IO(SPIFLG0);
ar = clrbit 10 of ar;
IO(SPIFLG0) = ar;
// ss active PF2
ay0= DM(I1+4);
IO(TDBR0) = ay0;
// start transmission
call Wait_for_SPI_finished;
ay0= DM(I1+0);
IO(TDBR0) = ay0;
280
/* get current channel value, format 1.15 */
// start transmission
call Wait_for_SPI_finished;
ar = IO(SPIFLG0);
ar = setbit 10 of ar;
IO(SPIFLG0) = ar;
// ss inactive after two words PF2
ar = IO(SPIFLG0);
ar = clrbit 10 of ar;
IO(SPIFLG0) = ar;
// ss active PF2
ay0= DM(I1+5);
IO(TDBR0) = ay0;
// start transmission
call Wait_for_SPI_finished;
295
ay0= DM(I1+1);
IO(TDBR0) = ay0;
// start transmission
call Wait_for_SPI_finished;
58
20-Sim code generation for ADSP-21990 EZ-KIT
300
305
310
ar = IO(SPIFLG0);
ar = setbit 10 of ar;
IO(SPIFLG0) = ar;
// ss inactive after two words PF2
ar = IO(SPIFLG0);
ar = clrbit 10 of ar;
IO(SPIFLG0) = ar;
// ss active PF2
ay0= DM(I1+6);
IO(TDBR0) = ay0;
// start transmission
call Wait_for_SPI_finished;
ay0= DM(I1+2);
IO(TDBR0) = ay0;
315
// start transmission
call Wait_for_SPI_finished;
320
325
ar = IO(SPIFLG0);
ar = setbit 10 of ar;
IO(SPIFLG0) = ar;
// ss inactive after two words PF2
ar = IO(SPIFLG0);
ar = clrbit 10 of ar;
IO(SPIFLG0) = ar;
// ss active PF2
ay0= DM(I1+7);
IO(TDBR0) = ay0;
// start transmission
call Wait_for_SPI_finished;
330
ay0= DM(I1+3);
IO(TDBR0) = ay0;
// start transmission
call Wait_for_SPI_finished;
335
340
345
ar = IO(SPIFLG0);
ar = setbit 10 of ar;
IO(SPIFLG0) = ar;
// ss inactive after two words PF2
ar = clrbit 11 of ar;
IO(SPIFLG0) = ar;
// LDAC active PF3
ar = setbit 11 of ar;
IO(SPIFLG0) = ar;
// LDAC inactive PF3 (load dacs)
iopg = ax1;
rts;
350
355
360
Wait_for_SPI_finished:
ar = IO(SPIST0);
ar = tstbit 0 of ar;
if EQ jump Wait_for_SPI_finished;
rts;
// All following functions are added functions for C <-> Assembly communications (by CM)
_InitializeDAC:
call DAC_Init_;
rts;
_DAC_out:
// puts data through DAC on output pins
call DAC_Update_;
rts;
_DAC_inp1:
365
// puts DAC-input data into memory
ax0 = dm(1, i4);
// fetch value/data from stack
dm(Dac_Channels + 0) = ax0;
call DAC_Update_;
rts;
_DAC_inp2:
370
// puts DAC-input data into memory
ax0 = dm(1, i4);
// fetch value/data from stack
dm(Dac_Channels + 1) = ax0;
rts;
59
20-Sim code generation for ADSP-21990 EZ-KIT
375
_DAC_inp3:
// puts DAC-input data into memory
ax0 = dm(1, i4);
// fetch value/data from stack
dm(Dac_Channels + 2) = ax0;
rts;
380
_DAC_inp4:
// puts DAC-input data into memory
ax0 = dm(1, i4);
// fetch value/data from stack
dm(Dac_Channels +3) = ax0;
rts;
_DAC_inp5:
385
// puts DAC-input data into memory
ax0 = dm(1, i4);
// fetch value/data from stack
dm(Dac_Channels + 4) = ax0;
rts;
390
_DAC_inp6:
// puts DAC-input data into memory
ax0 = dm(1, i4);
// fetch value/data from stack
dm(Dac_Channels + 5) = ax0;
rts;
395
_DAC_inp7:
// puts DAC-input data into memory
ax0 = dm(1, i4);
// fetch value/data from stack
dm(Dac_Channels + 6) = ax0;
rts;
400
_DAC_inp8:
// puts DAC-input data into memory
ax0 = dm(1, i4);
// fetch value/data from stack
dm(Dac_Channels + 7) = ax0;
rts;
Main.h
405
410
415
420
425
/******************************************************************************************
*
*
* Application: Acquires ADC channels and shows the results on the on-board DACs
*
*
*
* File: Main.h
*
*
*
* Description: system include file
*
* Purpose : define system parameters, include all necessary library routines
*
*
*
* Author : JC
*
* Version : 1.0
* Date
: Jan, 2002
* Modification History: none
*
*
*
* Embedded Control Systems
*
* Analog Devices Inc.
*
*******************************************************************************************/
#ifndef MAIN_INCLUDED
#define MAIN_INCLUDED
/**********************************************************************************************
* General System Parameters and Constants
*
**********************************************************************************************/
430
435
#define Cry_clock
#define PLL_clock_multiplier
#define H_clock_ratio
#define Core_clock
#define H_clock
50000
1
2
// Crystal clock frequency [kHz]
// Multiplier for core clock
// core/H clock ratio
Cry_clock * PLL_clock_multiplier
Core_clock / H_clock_ratio
// do not change
// do not change
#include <adsp-21990.h>;
440
445
/**********************************************************************************************
*
PWM block parameters
*/
#define PWM_freq
#define Deadtime
#define PWM_syncpulse
10000
2000
440
//Desired PWM switching frequency [Hz]
//Desired Deadtime [nsec]
//Desired PWMSYNC pulse time [nsec]
#define PWM_Period
#define PWM_DeadTime
H_clock * 1000 / 2 /PWM_freq
Deadtime * H_clock / 1000 / 2 / 1000
60
20-Sim code generation for ADSP-21990 EZ-KIT
450
455
#define PWM_syncwidth
PWM_syncpulse*H_clock/1000/1000-1
/**********************************************************************************************/
/**********************************************************************************************/
// Parameters for SPI_DAC
// Number of channels to be transmitted (1-8)
#define Number_of_DAC_channels
8
// Ratio between Crystal frequency and Frequency of the serial port clock (min 4)
#define Ratio_IO_clock_over_SCLK
4
460
/**********************************************************************************************/
#endif
61
20-Sim code generation for ADSP-21990 EZ-KIT
Appendix K: Submodel Standard Template: Program Flow
The figure shows the standard template files program flow. The submodel functions are called upon
from xxmain.c. The Target specific functions will be called upon from xxmodel.c in functions
XXCalculateDynamic and XXCalculateOutput.
63
20-Sim code generation for ADSP-21990 EZ-KIT
Appendix L: TARGETS.INI
This file is used when generating code. All targets are specified, by filling in the various variables
(like the name of the target and the template files that are used). Also the post-processing commands
are specified. These commands must have the form of DOS commands.
The targets appear in the 20-Sim code generation dialog.
Only the contents of the ADSP-21990 EZ-KIT target are included:
; Specify a list of targets here which can be specified further in their own sections. Feel free to add your own targets!
;
; Please have a look at the 20-sim Help file that explains a lot more on targets and the C-code generation process itself.
;
; Option-keywords for the targets:
; targetName= the name that will appear in the ccode generation dialog in 20-sim
;
; iconFile=the name of a icon file (.ico) which contains an icon to appear in the 20-sim ccode generation dialog.
;
; description= the string that will appear in the description field in the ccode generation dialog
;
; SubmodelSelection= values: TRUE (default) FALSE
; Determines whether c-code is generated for the complete 20-sim
; model or that a submodel selection is required
;
; preCommand= a Command which will be executed in the target directory before that the c-code will be generated.
;
; templateDirectory= here the pathname where the template files for the c-code can be found can be specified. The default
;name is the target name in the "ccode" directory of 20-sim. If no full path is specified then as offset the ccode directory in 20;sim is taken. The name may be in double-quotes, but this is not necessary.
;
; templateFiles= Specifies a list of files, ';'-separated, which specify what files are generated in the targetDirectory. A
;find/replace of keywords is done by 20-sim. Names may be in double-quotes, but this is not necessary.
;
; targetDirectory= this holds the default target directory where the files will be generated. this will appear in the 20-sim dialog
;box when c-code is generated and can be overruled. Names may be in double-quotes, but this is not necessary.
;
; postCommand= a Command which will be executed in the target directory after that the c-code has been generated. For
;example a "mex" command for simulink. but also the name of a batch-file(.bat) can be specified, so that a make command can
;be invoked.
;
; newLineCharacter=
;
0 = CRLF (0x0d0a = DOS Standard)
;
1 = CR (0x0d = Macintosh Standard)
;
2 = LF (0x0a = Unix Standard)
;
; List of keywords which are predefined but may be given a
; different value
; VARPREFIX
;
default = "xx_"
; FUNCTIONPREFIX
;
default = "XX"
; XX_TIME
;
when generated default combined with VARPREFIX
; XX_INITIALIZE
;
when generated default combined with VARPREFIX
; XX_VARIABLE_ARRAY_NAME
;
the name used for variable array names in generated instructions
; XX_PARAMETER_ARRAY_NAME
;
the name used for parameter array names in generated instructions
; XX_CONSTANT_ARRAY_NAME
;
the name used for constant array names in generated instructions
; XX_STATE_ARRAY_NAME
;
the name used for state array names in generated instructions
; XX_RATE_ARRAY_NAME
;
the name used for rate array names in generated instructions
; XX_MATRIX_ARRAY_NAME
;
the name used for matrix array names in generated instructions
; XX_UNNAMED_ARRAY_NAME
;
the name used for unnamed array names in generated instructions
;
; Any keywords can be defined or redefined by the following construct
; %KEYWORD%=keyword
;
This will define the keyword "KEYWORD" and give the value "keyword"
65
20-Sim code generation for ADSP-21990 EZ-KIT
; e.g.
; %XX_TIME%=realTime
;
will redefine the time variable with the value "realTime"
;
; Possible targets for 20-sim C-Code Generation
;
[targets]
StandAloneC
CFunction
Simulink
20simDLL
ADSP21990
; Generate specific CCode for ADSP-21990
; Generated CCode will then be compiled
[ADSP21990]
targetName="ADSP-21990 Mixed Signal DSP"
iconFile="Adsp.ico"
description="Generates executable program from a 20-sim submodel for ADSP-21990 Target."
SubmodelSelection=TRUE
templateDirectory="ADSP21990"
templateFiles=xxfuncs.c; xxfuncs.h;xxmodel.c; xxmodel.h;
templateFiles= xxinteg.c; xxinteg.h; xxmain.c; xxtypes.h; xxsubmod.c; xxsubmod.h;
templateFiles=headers.h; main.h; string.h; sysreg.h; def2191.h; def219x.h
templateFiles="ADSP21990.c"; "ADSP21990.h"; "21990_ivt.dsp"; SPI_DAC.dsp;
templateFiles=SPI_DAC.h; "ADSP-21990.ldf"; "ADSP-21990.h";
targetDirectory="c:\temp\%MODEL_NAME%"
postCommand=cc219x -Os spi_dac.dsp xxmodel.c xxfuncs.c xxsubmod.c xxinteg.c adsp21990.c -build-lib -o libccode.dlb
postCommand=easm219x -proc ADSP-21990 -o 21990_ivt.doj 21990_ivt.dsp
postCommand=cc219x -Os -c xxmain.c -proc ADSP-21990 -o xxmain.doj
postCommand=cc219x -Os 21990_ivt.doj xxmain.doj -lccode -T ADSP-21990.ldf -proc ADSP-21990 -o adsp.dxe
postCommand=idde –f “dsprun.tcl”
66
20-Sim code generation for ADSP-21990 EZ-KIT
Appendix M: 2 Alternative implementations
In this appendix, 2 alternative implementations are given, in order to design target specific template
files, which enable the 20-Sim user, who wants to design programs for the ADSP-21990 EZ-KIT lite,
to adjust the sample frequency of the ADC’s and DAC’s of the ADSP-21990 EZ-KIT.
PWM Implementation
When using the PWM Unit as convert start tool, the PWM Unit also generates interrupts, which cause
the program to switch to a interrupt service routine (Fig. 16). The ADC data registers are updated
(PWM Unit causes the ADC to start converting) and are read in the interrupt service routine. Also, the
output data for the DAC’s is updated. When all I/O-instructions are finished, the program returns to
integration method calculations.
PWM Unit:
interrupts
Do Program
Calculations
If interrupt then à
int
Get ADC Data
Set DAC Data
Fig. 16: Example of program flow with PWM interrupts
The interrupt generation frequency can be adjusted to the likes of the user of the ADSP-21990 EZ-KIT
lite. As this template is specifically designed for the 20-Sim code generation tool, the template must
have some kind of method to calculate the PWM Unit’s interrupt generation frequency from the
integration step size, that is specified in the 20-Sim simulator.
Implementation
This way of generating interrupts has actually been implemented and tested. The fundamental problem
with the PWM Unit generating interrupts seemed to be the lack of proper register information, so it
was not known how to actually program the device registers. Therefore, in spite of the information
given by the Analog devices test program ADC_DAC, the effort turned out to be pointless, as the
PWM Unit interrupt is seen once, and no more after that.
Using a Timer
The timer is used as a clock more then an interrupt generator. As the calculation structure of the 20Sim code generated processor contents has a cyclic nature (Fig. 17), a timer can be used to set the
program cycle time.
67
20-Sim code generation for ADSP-21990 EZ-KIT
Get ADC Data
Do Program
Calculations
Timer
Adjustable
Timer freq.
Set DAC Data
Wait for
Timer signal
Fig. 17: Example of program flow with Timer
When a timer controlled program is run on the ADSP-21990 EZ-KIT, the program carries out the
normal tasks (fetching data from ADC, calculating the system states and variables and sending output
data to the DAC) and ends up in a ‘wait state’. In this ‘wait state’ the ADSP-21990 processor waits for
the timer signal that starts the program to execute the next program cycle.
Implementation
This way of making the sample frequency of the ADSP-21990 EZ-KIT lite adjustable when running
code generated by 20-Sim has not yet been implemented nor tested, so not much can be told about the
effectiveness. The timer, however, is easier to implement then the interrupt generating PWM Unit.
68
20-Sim code generation for ADSP-21990 EZ-KIT
References
Analog Devices (2002)a, ADSP-21990 Mixed Signal DSP Controller Hardware Reference, Analog
Devices, Inc., Norwood, Massachusets.
Analog Devices (2002)b, Assembler and Preprocessor Manual for ADSP-21xx DSPs, Analog Devices,
Inc., Norwood, Massachusetts.
Analog Devices (2002)c, C Compiler and Library Manual for ADSP-219x DSPs, Analog Devices,
Inc., Norwood, Massachusetts.
Analog Devices (2002)d, Linker and Utilities Manual for ADSP-218x and ADSP-219x DSPs, Analog
Devices, Inc., Norwood, Massachusetts.
Analog Devices (2002)e, ADSP-21990 EZ-KIT liteTM Evaluation System Manual,
http://www.analog.com/productSelection/pdf/ADSP-21990_pra.pdf.
Analog Devices (2002)f, Preliminary Technical Data, Analog Devices, Inc., Norwood, Massachusetts.
Analog Devices (2002)g, Analog Devices Website,
http://www.analog.com/technology/dsp/developmentTools/index.html
Groothuis, M (2001), 20-Sim code generation for PC/104 target, BSc. Thesis University Twente,
Enschede.
69