1
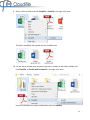
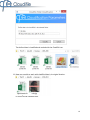
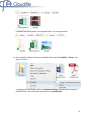
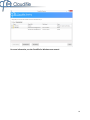
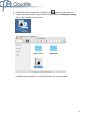
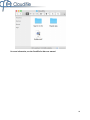
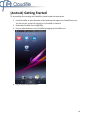
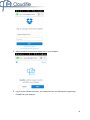
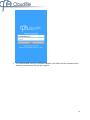
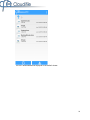
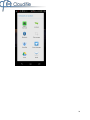
Cloudifile Getting Started 1 Contents About............................................................................................................................................................... 3 System Requirements ..................................................................................................................................... 3 Cloudifile Recommendations for Use ............................................................................................................. 4 Cloudifile: How It Works? ............................................................................................................................... 6 [Windows] Getting Started ............................................................................................................................. 8 [Mac OS X] Getting Started ........................................................................................................................... 15 [Android] Getting Started ............................................................................................................................. 19 Contact Us ..................................................................................................................................................... 25 2 About Welcome to Cloudifile! Cloudifile is an application that encrypts your data in Dropbox and protects your data on the local machine or device thus ensuring secure work with data in the cloud and local data. In such a way it is possible to protect practically all types of files simply in a couple of clicks. System Requirements To run Cloudifile on your computer correctly, we recommend to have: Operating system: Windows 8.1, Windows 8, Windows 7 Mac OS X 10.10, Mac OS X 10.9, Mac OS X 10.8 Android 5.0 LolliPop, 4.4 KiKat, 4.1 – 4.3 Jelly Bean. Installed Dropbox application and registered Dropbox account. [Windows] .Net Framework 4.0 or higher. You can download for FREE .Net Framework 4.0 here. [Windows] Platforms: Both x86 and x64 are supported. 3 Cloudifile Recommendations for Use To fully enjoy the correct work of Cloudifile, there are a few instructions which we recommend you to know and follow: Please do not edit/delete data in the Cloudifile service folder, which is by default located here: <Dropbox folder>\Cloudifile\.cloudifile Please do not rename files/folders in the Cloudifile service folder. Please do not copy/move data to the Cloudifile service folder. For these purposes, you can use the virtual Cloudifile disk or volume. In the current version of Cloudifile, it is not recommended to rename folders containing cloudified files while working with these files. [Windows] This might cause the folders to be duplicated. [Mac OS X] You will not be able to access older versions of these files. To rename a folder, please first close any cloudified files stored in it. [Windows] Cloudified files are accessible in their original locations only to the user who has cloudified them and hidden from all others irrespective to their Windows permissions. Cloudified files are not visible to the applications started under the Administrator account (Run as Administrator) and cloudified .exe files requiring Administrator privileges cannot be started (unless they are cloudified from the Administrator account). [Windows] It is impossible to cloudify system folders (Program files, etc.). [Windows] While working with USB drives, Cloudifile is unable to recognize the USB drive. Cloudifile identifies only the letter of the USB drive. That is why cloudified data from one USB drive can be displayed on the other USB drive. [Windows] When you cloudify data from USB drives on your PC, the data is moved to the Dropbox folder. It is not displayed when you use USB drives on other PCs. [Windows] If you cloudify a folder and then start sharing it with other users over a Network (by Windows means), in the current version of Cloudifile, the content of the cloudified folder will be unavailable from the Network via sharing. [Windows] If you create a folder on the Cloudifile disk, it is impossible to perform the procedure of sharing such folder in the current version of Cloudifile. 4 [Windows] In the current version of Cloudifile, it is impossible to open cloudified files with the Windows 8 default applications (so-called the Metro apps). For this purpose, please use other existing programs. [Windows] Merging of cloudified and not cloudified folders while copying/renaming is not available in the current version. [Windows] If a separate file is cloudified, then temporary files created while working with it (for example, in Word) are not automatically cloudified. To avoid this, it is recommended to cloudify a folder instead of a separate file. 5 Cloudifile: How It Works? Cloudifile is intended to help you secure the work with files in Dropbox and on the local machine or device. What does Cloudify mean? After you have installed Cloudifile on your computer, it is possible to start protecting local data and data in the cloud in a couple of clicks. Cloudify means to encrypt selected data and automatically synchronize the copy of encrypted data with the Dropbox folder. Decrypted files appear on the virtual Cloudifile volume or disk, or in the Cloudifile application on Android. [Windows] The virtual decrypted files appear in the original location of cloudified files. How Cloudifile Protects Data As soon as you cloudify your data, Cloudifile starts protecting the selected data. During the process of cloudification on Windows and Mac operating systems, Cloudifile performs the following operations: 1. Automatically moves the selected data to the Dropbox folder. 2. Encrypts the moved data in the Dropbox folder. For each cloudified file the individual encryption key is used. 3. Places virtual decrypted files on the virtual Cloudifile disk or volume. It is visible only when you are logged into Cloudifile. [Windows] On the virtual Cloudifile disk, Cloudifile creates paths to placed files corresponding to their original location. 4. [Windows] Places virtual decrypted files in the original location of the cloudified data. Virtual decrypted files are visible if you are logged into Cloudifile. When you log out of Cloudifile, virtual decrypted files disappear from their original location. Only folders where cloudified files are located remain visible. 5. If you change cloudified data, Cloudifile encrypts all changes in flight. You can view data, cloudified in the desktop versions of Cloudifile on Android devices. 6 How Cloudifile Deals with User Data, Keys, and Encryption User Data Storage Under the term user data we mean the following: Email which you enter during Cloudifile account registration. Password to your Cloudifile account. Cloudified data. You enter email during Cloudifile account registration to use it as your Cloudifile account login. Email is needed for your account identification during the procedure of sharing. We do not store your Cloudifile account password and have no access to it. The password is needed to create a hash from it for further encryption of the RSA keys. NOTE: Registration of Cloudifile account is currently possible only on Windows and Mac operating systems. Your cloudified data is stored in the encrypted form in your Dropbox account. Cloudifile encrypts each file with the individual key. This key is encrypted/decrypted with the help of the private and public RSA keys. No person can get access to the cloudified data. Even if the Dropbox account is cracked, only encrypted data will be seen. Usage of Cloudifile Account Password As soon as the password is entered, it is being hashed with 10000 iterations using HMACSHA512, HMACSHA1, and HMACMD5 encryption algorithms. As a result, a hash in the form of a long string is received. Due to it your password is always secured and will not be found even if your Dropbox account is cracked. After this, a file with encrypted RSA keys (private and public) is placed in your Dropbox folder. This file is protected with the Blowfish algorithm. The file with encrypted RSA keys is accessible only to you via your Dropbox account. With the help of the Cloudifile account password (a hash) the file with the RSA keys is decrypted during the active Cloudifile session (if you enter a correct password). On the basis of the decrypted RSA keys, an individual key for each cloudified file is generated. 7 Recovery Key In case of forgetting the password, it is possible to reset it with the help of the Recovery Key, which is stored in the location defined by you. Hence, the Recovery Key is not stored in any other external location. With the help of it, you can change your Cloudifile account password and decrypt the cloudified data. [Windows] Getting Started To successfully start working with Cloudifile, please follow the steps below: 1. Install Dropbox on your PC and log in to it. 2. Install Cloudifile. 8 3. Restart your PC. 4. Upon restart, Cloudifile launches automatically. 5. Register a Cloudifile account: Enter the valid email address to be used as your Cloudifile login. You will receive a confirmation email to validate the Cloudifile account. Enter and confirm the password for logging in to your Cloudifile account. Generate Recovery Key that can be used in case you forget your Cloudifile password. 9 6. Validate the registered Cloudifile account by clicking the link in the received confirmation email. 7. Start the Cloudifile session. 8. Cloudifile icon ( ) appears in the notification area. Cloudifile options are embedded into the right-click menu of files and folders. 10 9. Select a file or a folder and click Cloudifile -> Cloudify in the right-click menu. The data is cloudified and marked with the Cloudifile icon. 10. You are able to cloudify only document-type files in folders as well. Select a folder and click Cloudifile -> Cloudify with Parameters in the right-click menu. Define the parameters of folder cloudification and click Cloudify. 11 The defined data is cloudified and marked with the Cloudifile icon. 11. Now you are able to work with cloudified data in its original location. Or on the virtual Cloudifile disk. 12 Cloudified data also appears in the Dropbox folder in an encrypted state. 12. Share cloudified folders. Select the cloudified folder and click Cloudifile -> Share in the right-click menu. To manage your shared data, open the Cloudifile Sharing window by right-clicking the Cloudifile icon in the notification area and selecting Shared Data. 13 For more information, see the Cloudifile for Windows user manual. 14 [Mac OS X] Getting Started To successfully start working with Cloudifile, please follow the steps below: 1. Install Dropbox on your Mac and log in to it. 2. Install Cloudifile. 3. Register a Cloudifile account: Enter the valid email address to be used as your Cloudifile login. You will receive a confirmation email to validate the Cloudifile account. Enter and confirm the password for logging in to your Cloudifile account. 15 Generate the Recovery Key that can be used in case you forget your Cloudifile password. 4. Validate the registered Cloudifile account by clicking the link in the received confirmation email. 16 5. Cloudifile launches automatically. Cloudifile icon ( ) appears on the status bar. 6. Protect your separate files or entire folders using Cloudifile by moving (not copying) them to the Cloudifile virtual volume. The moved data is cloudified. Cloudified data also appears in the Dropbox folder in an encrypted state. 17 For more information, see the Cloudifile for Mac user manual. 18 [Android] Getting Started To successfully start working with Cloudifile, please follow the steps below: 1. Install Cloudifile on your Windows or Mac desktop and register the Cloudifile account. You will use this account for logging in to Cloudifile on Android. 2. Download Cloudifile from Google Play. 3. On your Android device, start Cloudifile by tapping the Cloudifile icon. 4. Log in to your Dropbox account. 19 5. Allow Cloudifile to access and display files in your Dropbox. 6. Log in to your Cloudifile account. Use credentials that you defined when registering Cloudifile on your desktop. 20 7. All cloudified data from your computers appears in the folder with the computer name. Browse to the necessary file and tap to open it. 21 The file is downloaded and displayed in the default viewer. 22 8. Upload data to Cloudifile, either by tapping Upload files with Cloudifile from third-party applications. in Cloudifile, or by sharing the Please note that the uploaded data will be encrypted in Dropbox, but is decrypted and can be viewed via Cloudifile on other devices or computers. 23 24 Contact Us Our specialists are continuously improving Cloudifile features and work. If you do not find an answer to your question in this guide, or you want to leave us your feedback, or you encounter some issues while working with this Cloudifile version, please visit the Cloudifile Support and Feedback Forum by following the link: www.cloudifile.uservoice.com. There, you can give us your ideas on the new Cloudifile features or you can report any issues regarding Cloudifile. We appreciate your feedback! Reporting an Issue When reporting an issue regarding Cloudifile, we appreciate if you: 1. Mention your operating system details. 2. Attach Cloudifile log files, which are located at: [Windows] in the Cloudifile installation folder and have the following name: CloudifileSvc<number>.log (For example, Cloudifile000.log). By default, the Cloudifile installation folder is located here: C:\Program Files\Cloud Labs\Cloudifile\. [Mac OS X] in the ~/Library/Cloudifile folder and have the following names: cloudifile.log, cloudifileFS.log, and installer.log. [Android] in the /sdcard/android/data/com.cloudifile/files/ folder with the name cloudifile.log. Our specialists will carefully examine all of the reported issues. Thank you for improving Cloudifile! 25