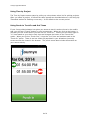
1
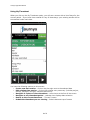
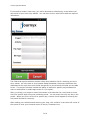
Journyx App for Android v2.0
Journyx App User Manual
Copyright © 2010, Journyx. All Rights Reserved. Journyx ®, the Journyx logo, Journyx Timesheet™ Journyx Timesheet™,
and the other graphics, logos, and service names are trademarks and service marks of Journyx. All other product names,
service names and company names are the property and/or trademarks of their respective owners.
All rights, title and interest in and to the Software, and any Updates or New Releases thereto or derivative works thereof,
including without limitation all intellectual property and other industrial and proprietary rights, at all times remain the
exclusive property of Journyx or Journyx’s licensors. The license granted does not constitute a sale of the Software, or
any portion or copy thereof.
Journyx provides this document "as is" and without warranty of any kind, whether express or implied, to the full extent
permitted under applicable law, the company specifically disclaims the implied warranties of merchantability, fitness for a
particular purpose, title, and infringement. Journyx does not guarantee the accuracy, timeliness, or completeness of any
information in this document or the results of your use of this document.
Printed in the U.S.A
Journyx App User Manual
Table of Contents
Overview ........................................................................................... 2
Introduction .............................................................................................. 2
System Requirements ................................................................................ 2
Installation and Setup.......................................................................... 3
Punch In/Out Time Setup ............................................................................ 4
Using App Features ............................................................................. 5
Using My Timesheet ................................................................................... 6
Using Time by Project................................................................................. 9
Using Punch to Track In and Out Times......................................................... 9
General Usability Notes .............................................................................10
1 of 9
Journyx App User Manual
Overview
Introduction
The Journyx app for mobile time entry on Android allows you to connect to your Journyx site
and manage your timesheets. Version 2.0 of the Journyx app includes options for simple
time entry. Journyx will continue to improve and expand the app to include more time
entry features, expense entry and approvals. If you have a specific feature request for the
Journyx app, please add it to the Journyx UserVoice site: journyx.uservoice.com
System Requirements
1. The Journyx app for mobile time entry on Android connects to your Journyx site.
Your Journyx site must be upgraded to version 8.7m5 or higher in order to test
the mobile app. Contact [email protected] for access to the 8.7m5 upgrade.
Version 9.1 or higher is required in order to access the new project search and punch
time entry features included in version 2.0 of the mobile app.
2. If you host your own site, you may also have to “turn on” the jxAPI if you haven’t
done so already. If you are running version 8.9 or later, this step is not necessary.
Any administrator in your Journyx system can do this. An administrator can login to
the Journyx system, go to mysitename.com/jtcgi/jxapipref.pyc and enable the jxAPI
if it hasn’t been enabled before. In some Windows environments, you may get an
error trying to enable the jxAPI via browser. If it doesn’t work in the browser, you
can enable the jxAPI using the command line by going to the bin directory, entering
the command below and clicking return:
python ..\wtlib\make_jxapi_wsdl.pyc
3. Your Journyx site must be available to your mobile phone like any other web
page. If your site is only accessible when you are connected to an internal network,
you may need to work with your IT Department on VPN access for the mobile app
when you don’t have access to your internal resources.
4. Your login account must also include a time entry ability in order to use the
Journyx app. Provided you have access to the Time or My Assignments menu in
Journyx, you will be able to use the app for time entry.
2 of 9
Journyx App User Manual
Installation and Setup
Installation of the Journyx app for Android works like any other Android app. Simply locate
the app in the Google Play store on your phone and install it. Search for the keyword
“journyx” to locate it quickly. The app is free.
The first time you click on the Journyx app image, you will be directed to the Settings
screen. You will enter your Journyx connection and login information on this screen. You
will not be able to use the app time entry features until you have completed the Username,
Password and Domain settings successfully.
If your Domain (a/k/a site URL or web address) starts with “http://”, you will enter
your domain as follows: http://mysitename.com. If your site starts with “https://”, you will
simply enter mysitename.com.
3 of 9
Journyx App User Manual
The “Minimum Time Entry Increment” setting allows you to set minute increments shown in
the select list when entering the amount of time in your timesheet.
The “Maximum Project Count” setting allows you to decide how many projects to show in
the project select list for time entries before the select list reverts to search only for
projects. If you have access to hundreds of projects on your timesheet and it is slow to
load in the mobile app, you can use this setting to improve load times by limiting project
selection to search only. NOTE: Your mobile app version must be 2.0 (or higher) and your
Journyx server version must be 9.1 (or higher) in order to use project search.
After you have successfully entered your Journyx site connection information, click on Save.
If there are problems with your login information, the app will notify you. Otherwise, it will
notify you that it is loading your projects and settings. The first time you load your time
entry information, it may take several seconds. When loading is complete, it should redirect
you to the Home screen.
Punch In/Out Time Setup
In version 2.0 (and higher) of the mobile app Journyx Administrators can give individual
users access to track in and out times using the mobile app provided your Journyx server
version is 9.1 (or higher). These in and out times are populated in the “allocation” type
time entry screens. There are 2 configuration requirements for giving users access to track
in and out times in the mobile app: 1. The user must be assigned to an “allocation” type
time entry screen in the Journyx system. You can read more about allocation entry screens
under Configuration!Entry Screens!Time Entry Screens while logged into the Journyx
system via browser. 2. The user must have the “Mobile UI Type” custom field set to either
“Punch” or “Punch or Grid”.
In order to give users access to the punch button for in and out time tracking in the mobile
app, a Journyx Administrator must first go to Configuration!Custom Fields and set up a
User Custom Field by the name of “Mobile UI Type”. This field must be a select list, and it
must contain the following values: “Grid”, “Punch” and “Punch or Grid”. Users with the
“Grid” value will not have the option to track in and out times in the mobile app. Users with
the “Punch” value will only be able to track in and out times. They will no longer have
access to the “My Timesheet” and “Time by Project” screens for detailed time entry. Users
with “Punch or Grid” will have the option to track in and out times, as well as enter detailed
time via “My Timesheet” and “Time by Project” screens.
4 of 9
Journyx App User Manual
Using App Features
Unless your Journyx Administrator has limited your access to tracking in and out times only,
the Journyx app for Android provides you with two methods for entering and managing your
time: My Timesheet and Time by Project. If your Journyx Administrator has provided you
with access, you may also have the ability to track in and out times in the app using the
“Punch” button.
The My Timesheet view looks similar to a grid time entry screen and shows a list of days in
the current period as your starting point to enter or edit your time. Time by Project starts
with project selection for the project you are working on. The Punch button tracks in and
out times based on the time on your device clock when you click the button.
5 of 9
Journyx App User Manual
Using My Timesheet
When you click on the My Timesheet option, you will see a screen with a list of days for the
current period. If you have time entered for any of those days, your existing entries will be
summarized under each date.
You have the following options on this screen:
• Create new time entries – click on the plus sign next to the selected date
• Edit existing time entries – click on the existing entry summary (includes project,
activity, pay type, bill type, comment and hours)
• Navigate to a past or future timesheet – arrow icons at the foot of the screen
• Navigate to any timesheet period – calendar icon displays date selection
• Return to the current timesheet – “Current” button
• Submit the timesheet you are viewing – Submit button at top of screen
6 of 9
Journyx App User Manual
If you need to create a new entry, you will be directed to a blank entry screen where you
can add all of your time entry details. You can then click on each field to add the required
information.
The fields that require selection provide a drop down selection list for choosing your time
entry values. As is the case in your browser-based timesheet, the project selections and
dependencies for other time entry fields are specific to your account and what you are able
to see. The project field also includes the ability to search for specific projects based on
name or description in mobile app version 2.0 (or higher).
After you select your project or other field values in the selection list, scroll down to enter
hours for specific days during the timesheet period. You can enter hours for any day in the
period. When you click in a box for a specific day, a select list will appear for entering the
hours and minutes for the entry.
After making your selections and entering your time, click on Save in the lower left corner of
the screen to save your time and return to the My Timesheet view.
7 of 9
Journyx App User Manual
The process for editing existing entries is the same as creation of a new entry except that
you must click on the existing entry itself to make changes to the hours, dates and/or
selections. You can also use existing entries to add hours for the same work on another day
(e.g., clicking on an entry for “Support” on Monday will also allow you to add more hours to
the same project for other days in the period).
The Submit button allows you to submit your timesheet for approval if your timesheet is
subject to period or project approval plans. As is the case with your browser-based
timesheet, you will not be able to edit a timesheet that has been submitted and/or
approved. However, you can view submitted and/or approved timesheets in the app.
If you need to reuse your time entries from a previous timesheet, you can navigate to the
prior timesheet, click on the entry, and click on the Copy Project Options button in the lower
right corner of the entry. It will prompt you to enter a date for copying the entry. Then you
can start entering time against the copied entry in the current period.
8 of 9
Journyx App User Manual
Using Time by Project
The Time by Project screen starts by pulling up a drop down select list for picking projects.
After you select a project, it follows the same process as described above in the Using My
Timesheet section for creating a new entry. It will default to the current period.
Using Punch to Track In and Out Times
If your Journyx Administrator has given you access to track in and out times in the mobile
app, you will see a “Punch” button on your home screen. When you click on the button, it
will take you to a screen where you can click on “Punch In”. Clicking on this button logs an
“in” time based on your device clock time and changes the button to the “Punch Out”
option. When you click on “Punch Out”, it logs the “out” time and switches back to the
“Punch In” option. These in and out times are populated in your allocation time entry
screen and can be viewed in the browser. The punch screen also includes information on
your recent activity.
9 of 9
Journyx App User Manual
General Usability Notes
If you open the Journyx app while you are also logged into your browser-based timesheet,
you will be logged off automatically in the browser. The same thing happens in reverse
when you log into your browser-based timesheet while running the app. Regardless of
where you enter new time, all entries will show up in both views immediately.
10 of 9