1
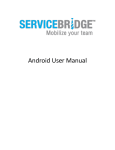
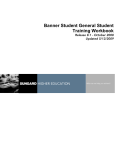
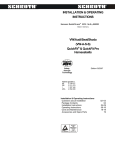
Killeen Independent School District Introduction to eSchoolPLUS Version 3.1 Author: Information Systems Table of Contents Introduction ...................................................................................................................................... 3 Logging In ........................................................................................................................................ 3 My Home Page ................................................................................................................................ 3 Dashboard Settings ..................................................................................................................... 4 Add Widgets ............................................................................................................................. 4 Customize Homepage .............................................................................................................. 5 Default Sections ....................................................................................................................... 6 Additional Sections ................................................................................................................... 6 Changing the color of your Homepage ........................................................................................ 8 Main Toolbar .................................................................................................................................... 8 Student Center................................................................................................................................. 9 Quick Search................................................................................................................................ 9 Advanced Search ....................................................................................................................... 10 Search Favorites .................................................................................................................... 11 Custom Search Criteria .......................................................................................................... 11 List Field Display Section ....................................................................................................... 12 Search Results ........................................................................................................................... 13 Setting up a Watch List .............................................................................................................. 14 Student Summary ...................................................................................................................... 16 Student Alerts............................................................................................................................. 17 Student Notes ............................................................................................................................ 18 Notification Subscription ................................................................................................................ 19 eLearning Center ........................................................................................................................... 20 eLearning Setup ......................................................................................................................... 23 Error Pop-Up Message .................................................................................................................. 24 - 2 of 24 - 2014.11.13 eSchoolPLUS eSchoolPLUS Introduction Version 3.1 Introduction eSchoolPLUS is a web based Student Management System with an Integrated Grade Book (Teacher Access Center), Home Access Center, Enrollment Online, Mobile App and Mobile Access Center. eSchoolPLUS is accessible from outside the district network and will not require a desktop installation. Logging In There are two ways to login to eSchoolPLUS from inside or outside the district by going through the Killeen ISD website (www.killeenisd.org). Go to the Departments link at the top of the screen. Select Information Systems from the Department list. Click eSchoolPLUS. Select login to eSchoolPLUS. -Or- Click Staff at the top of the screen. Click on the eSchoolPLUS link . To log-in, you will be asked to provide your NT username and password. My Home Page This is your homepage which includes your Menu List on the left side, the dashboard in the middle, and the main toolbar in the right upper corner of the page. - 3 of 24 - 2014.11.13 eSchoolPLUS eSchoolPLUS Introduction Version 3.1 Dashboard Settings The Settings link displayed in the top right corner of the page will allow you to change what is displayed on the dashboard. You can customize the page by adding, changing, and deleting widgets. You can also reorganize the page by dragging and dropping widgets. Here are the widgets that can be displayed on ‘My Home’ page. Default widgets are denoted by an asterisk (*). At Risk At Risk Chart Attendance Attendance Chart Calendar Discipline Discipline Chart Enrollment Enrollment Chart Favorites* Lunch Counts News* Reports* Success Plan Success Plan Chart Tasks: Current* Tasks: Scheduled* Today’s Appointment Add Widgets 1. Click the ‘Settings’ link to display the Widget Manager 2. 3. 4. 5. In the Manage Widgets window, select a widget from the list. Click the Add & Save button to place the widget on the home page. Repeat Steps 2-3 for each widget you want to add. Click Close to return to My Home page. - 4 of 24 - 2014.11.13 eSchoolPLUS eSchoolPLUS Introduction Version 3.1 Customize Homepage To edit, delete, or move a widget on your ‘My Home’ page, you must first select the widget by placing the cursor anywhere on the widget (without clicking). A border will display around the widget, and the Change Settings and With the Today’s Appointments widget, the example: Remove icons will display in the top right corner. Add new Appointment icon also displays. For Once you select the widget, you can access the icons for changing or deleting the widget. You also can drag and drop the widget to move it to a new location on the page. Drag and drop Widgets 1. Select the widget using the cursor. 2. Hold down the left mouse button. 3. Drag the widget to the desired location on My Home page. As you move a widget, a shaded area will display. 4. Repeat Steps 1-3 to drag and drop other widgets. 5. Click Save to save your changes. Change Widget Settings 1. Select the widget using the cursor. 2. Click the Change Settings icon to display the widget’s Settings window. 3. Change the widget’s settings. 4. Click Save. Delete Widgets 1. Select the widget using the cursor. 2. Click the Remove icon in the widget’s top right corner. The Reports, Tasks: Scheduled, and Tasks: Current widgets cannot be deleted. 3. Click Yes in the Remove Widget window to delete the widget and return to My Home page. 4. Click Save to save the deletion. If you do not click Save, the widget you deleted will display the next time you visit My Home page. Save Settings After you change any settings you must click Save Settings. Restore Defaults To restore default settings on your My Home page, click the Restore Defaults button from the Widget Manager page. You will lose any changes you have made. - 5 of 24 - 2014.11.13 eSchoolPLUS eSchoolPLUS Introduction Version 3.1 Default Sections The following widgets display on the Home Page by default. Task: Scheduled This section displays information on scheduled reports and tasks, including their descriptions, dates, times, and status. o To disable a task, click Disable. o To enable a task, click Enable. o To remove a task from the list, click the Delete icon, and then click Yes. IMPORTANT NOTE: Please DO NOT schedule tasks to run between hours of 10:00pm and 3:00am. Tasks: Current This section displays information about any task(s) currently running, including their description, dates, times, and progress. Reports This section displays reports that have been run and the date and time at which the reports were modified. 1. To view a saved report, click the report name. 2. To delete a report from this list, click the Delete icon. To delete all displayed reports, click the Delete All Reports icon at the top of the widget, then click Yes. 3. To select the maximum number of reports to display on the My Home page, select the widget using the cursor, click the Change Settings icon to display the Report Settings window. Enter a value up to 99, then click Save. A value of 0 (zero) indicates that all reports will display. 4. To view all available reports, click the Reports heading link to display the My Reports page. NOTE: Any reports older than 14 days will be archived and saved in a file titled ‘Archived Reports’. You may access the reports by clicking the Archived Reports link. Favorites This section displays the menu items you have saved as Favorites. See Favorites on page 8 for instructions on adding and deleting favorites to the widget. News This section displays a list of news items set by the district or campus administration. Click the Change Settings link to select how news items display in this section. o Headline and detail displayed on home page. o Only headline displays. Detail displayed in pop-up window. Additional Sections The following sections are optional. Appointments This section displays students who are scheduled for appointments today. Appointments are highlighted in either blue or yellow. Upcoming appointments are highlighted in blue. - 6 of 24 - 2014.11.13 eSchoolPLUS eSchoolPLUS Introduction Version 3.1 Note: Today’s Appointments entered in eSchoolPLUS will not display in Outlook. At Risk This section displays the count of all students currently At Risk in the district. Attendance This section displays attendance information for the current day and for specific attendance categories. Attendance Chart This section displays pie charts or bar graphs for selected attendance categories. Calendar This section displays the cycle day, membership number day, and days remaining for your building's default calendar. Discipline This section displays the following totals to date in the current school year across all buildings for which you have security. 1. Total Conduct Referrals that have been referred today by teachers or administrators. 2. Total Incidents to Date that you have entered. 3. Today's totals for the number of students receiving suspensions, detentions, and other actions. The actions that display are determined in the Action Duration section of the Discipline District Setup page. Discipline Chart This section displays pie charts or bar graphs for selected discipline incidents. Enrollment This section displays enrollment information for the current day, including total enrollments for today, late enrollments, early withdrawal, and dropouts to date. This information is based on the Drop Out code specified in the Building’s Registration Configuration Update page. Lunch Count This section displays the daily lunch counts entered by teachers on the current date in Teacher Access Center. o The Missing lunch counts field displays the number of staff members who have not yet submitted today's counts for the building selected. Clicking the field's number link opens the Staff Information page, which lists the staff members' IDs and names. o The Lunch Type column displays the lunch types designated as active in Registration's Lunch Type table, for example, Cold Lunch and Hot Lunch. o The Lunch Count column displays the total number of lunches for each lunch type, as entered by staff members for the building selected. Success Plan This section displays the plan types used in Student Success Plans. The total number of success plan referrals displays at the top, followed by the total students who have each type of plan. The plan type counts can be shown as a graphic breakdown, text, or both. o Clicking the Total Success Plan Referrals link opens the Success Plan Referral List page, which lists individual referrals and links to their SSP Referral detail pages. - 7 of 24 - 2014.11.13 eSchoolPLUS eSchoolPLUS Introduction Version 3.1 Success Plan Chart This section displays pie charts or bar graphs for selected plan types. You can set up multiple charts, one for each plan type. Test Scores For each score configured to display on this page, this section displays the most recent test date, the number of students receiving scores within 3 score ranges for that score, and the average score received by all students. Changing the color of your Homepage 1. Click Select Theme from the menu list. 2. Choose the color that you want under the Select Theme drop down menu. 3. Click Save. Main Toolbar Notifications Notifications will alert you of any changes involving your student(s) or specific actions that need to take place on behalf of the student(s). Favorites To add a certain location in eSchoolPLUS as a favorite; go to the page that you would like to add, then click on the Favorite icon in the top right hand corner of page. This is used as a shortcut for your menu items (items on the left hand side). The pages that are made favorites will appear at the top of the menu list on the left side of the page and in your Favorite widget box. Click the Change Settings link to change the sequence and description of the items in this section. To remove a favorite, click the Change Settings link in the Favorites widget, select the delete box next to the item you choose to delete, and then click Save. UserVoice UserVoice is a tool used to collect product enhancement ideas from the end user, YOU! How it works: Each user will get 10 votes. You can either post a new idea or vote on an idea someone else created. In addition to voting, you can add comments to help clarify or add to existing suggestions. Once the idea has been accepted by SUNGARD Product Management, everyone who voted on that idea will get their votes back. If you vote or comment on an idea, you will receive an email when others; comment, vote, or when SUNGARD Product Management changes the status of the item. Help The help link is your source for anything you want to know in eSchoolPLUS. The help link will describe the page on which you clicked Help from. For example, if you click Help while on the Student Summary Page, the Student Summary Page topic will display with a description. In other words, Help is the user manual for eSchoolPLUS! - 8 of 24 - 2014.11.13 eSchoolPLUS eSchoolPLUS Introduction Version 3.1 Home The Home button takes you back to the eSchoolPLUS My Home page. 2014/15 The school year link will direct you to the Set Environment page. You will be able to change the database or school year. Once the desired change is selected, click the OK button to go back to the My Home page. Remember: You need to change the year back to the current year when adding or updating current year records. Student Center Under Student Center you can search for students using the fields on the Quick Search tab or the Advanced Search tab. When you search, students who match your criteria are selected. The system compares your search criteria against the corresponding fields in the records being searched and selects only those records containing data that matches. Quick Search Under this tab, you will be able to search for a student by any of these fields shown below. To change fields like Building or fields with an arrow box next to it, just type the information in the box or click the arrow box next to that field and it will give you all the options for that specific field. Note: When searching for multiple students, or running reports, the other folders under Student Center are where you would do those searches, depending on the criteria by which you want to base your search. (Demographic, Scheduling, Attendance, Mark Reporting, etc.) - 9 of 24 - 2014.11.13 eSchoolPLUS eSchoolPLUS Introduction Version 3.1 To Search for a Student Student Center>Search 1. Enter search information, under the Quick Search tab or the Advanced Search tab. 2. Click Search Note: eSchoolPLUS saves and remembers the last student viewed, so you will not have to search the same student when visiting any module, until you search for another student. Advanced Search On this tab, you can save a favorite search that you want to use repeatedly, and you can select a custom list of fields for displaying results. For example, you may save a search called My Students that returns the students for whom you are the guidance counselor, and you may choose to have the search results include student name, ID, primary homeroom, house/team, and classification. From the Student List page, you can select the My Students favorite from the Search Favorites field to display the results matching your saved search and display fields. - 10 of 24 - 2014.11.13 eSchoolPLUS eSchoolPLUS Introduction Version 3.1 Custom Saved Searches Search Favorites To select a Favorite that you want to edit or delete, select the appropriate favorite. Custom Search—indicates that the current search has not been saved as a favorite. After you select a favorite, the criteria list will display the saved filter and the List Field Display Selection will show custom display fields if a custom display was defined for the favorite. You can edit this information and then re-enter your search name so your changes are saved for the favorite when you click Search. You can delete the favorite by clicking Delete Favorite. In the Custom Search Name field, type a name to identify the search to which you are saving. If you selected a favorite and you made changes that you want to save for the favorite, enter the name of the favorite in the Custom Search Name field. When you click Search, the favorite will be saved and your current search will overwrite your previously saved search. To Create a Favorite: 1. Type a name into the Custom Search Name box that you want to title your search. 2. Fill out the Custom Search Criteria and the List Field Display Selection (Optional). 3. Click Search. Your search will be saved under the name you selected. You can access these favorite searches under the Favorites field. Custom Search Criteria This section is used to create a custom search. You will notice all the different tables in this section, and how each of them has several different options for each to filter the records of your search. - 11 of 24 - 2014.11.13 eSchoolPLUS eSchoolPLUS Introduction Version 3.1 As you can see, you can add several rows to filter out your search. In this example, there was a Custom Search made titled Active students; Last Name ‘H’ that searches for ‘active’ students with a last name that start with ‘H’ and are enrolled in ‘Building 2’. There are more filter options, and you can use any of them depending on how you want to search for students. Filtering Reports Filters allow you to select the records to include in a report or in a process. The system compares your criteria against the corresponding fields in the records being searched and selects only those records containing data that matches. Your filter will be saved as the default filter for the next time you run the report or option. Filtering the records Processed 1. In the criteria lines, define the criteria to select records. Area: The search screen you want to use to filter records. Field Name: Information from the ‘search screen’ to filter records. Condition: Select the condition you want to use to search. The conditions available depend on the selected field's data type. Value: The value you want to use to filter data. If you selected the Is In condition, enter a comma between each delimited list of values. 2. If you defined more than one line of criteria, select the boolean operator for the line and the line above it. And - to limit records retrieved to those matching all criteria specified. Or - to return records that match the criteria line or the criteria line above it. Deleting criteria If you want to start over with a new custom search, click the Clear Criteria button. A dialog box will appear asking you to confirm, to clear your Custom Search Criteria, click Yes. To delete a row in a saved Custom Search, check the Delete box to the right of the search criteria row, then click the Search button at the top or bottom of the page. The row will be deleted from that search and saved. List Field Display Section This is the section where you can adjust the custom search display. You can add more information to reports by selecting Custom. Default or Custom List (unlabeled field) Select whether you want to display the default fields for search results or a custom list of fields. Select: Default - to display Student Name, Student ID, Building, Grade, Gender, House/Team, Counselor. Custom - to select the fields that you want to display for search results. Custom searches always include Student Name, Student ID, and Grade. - 12 of 24 - 2014.11.13 eSchoolPLUS eSchoolPLUS Introduction Version 3.1 Example: This adds the building, birthdate, and gender of the students being searched. This would be the output. The fields you select will also appear on reports you decide to run. Area If you select a field from a table that stores more than one record per student, students will be listed multiple times. For example, if you select to include contact information, a student will be listed twice if the student has two contact records. Field Name Select the field you want to display. The student name, grade, and student ID are always displayed so you do not need to select these fields. Tip: If you select to include fields from the Master Schedule, your filter should include the Master Schedule school year or your results will include scheduling information for prior years. To clear the fields, click the Clear All Fields button. If you want to delete one of the fields, check the Delete box to the right of the search criteria, then click the Search button. That field will be deleted and saved. Search Results In this search, we searched for a fictitious student that we added named Happy Student. Depending on your search criteria, the results will be shown in a table like this. To view that student, click on the name of the student in the Student Name column. - 13 of 24 - 2014.11.13 eSchoolPLUS eSchoolPLUS Introduction Version 3.1 List field display selection chosen Number of records found This is also where if you made changes in the List Field Display Selection section above, then those fields (or changes) will appear here in this table. Search Favorites is where you can use the custom searches that you have already defined. Note: If your search returns several pages of students, mouse over the page number under Number of records found. You will see the first student that appears on that page along with the last student that appears on that page. The names will be separated by a – (hyphen). Setting up a Watch List You can create and update Watch Lists using the Watch List Maintenance processing options on the Student List page. A Watch List is a list of students selected from the search results displayed on the Student List page. You can use a Watch List to create a list to keep track of a certain group of students selected from search results. You can also use a Watch List to further filter a saved Favorites search. For example, if you have a saved Favorites search consisting of all of your students, and a Watch List consisting of students who require additional help, you can select to filter your student list with the Watch List to display a new list consisting of your students who require additional help. Creating a New Watch List 1. Enter search criteria on the Student Search page (Student Center > Search), then click Search. 2. On the Student List page, click the Show Watch List Maintenance link. The page displays the Watch List processing options. 3. In the Save Watch List As fields, select New Watch List in the first field, then enter a name for the new Watch List in the second field. 4. In the Select column of the student list, enter a check in the box for each student you want to add to the Watch List. The Watch List section on the right side of the page displays the selected students. To select all students displayed on the page, click All. To clear all checkboxes, click None. 5. If you are finished adding students, go to step 9. Otherwise, go to step 6. 6. If the search results span multiple pages and you want to add students listed on another page, click the Next link at the bottom of the student list. The application prompts you to save your changes before you can move to the next page. Click Yes. - 14 of 24 - 2014.11.13 eSchoolPLUS eSchoolPLUS Introduction Version 3.1 7. On each subsequent page, select the Watch List you just created, select the option to Append checked students to the existing list, then select the students you want to add to that Watch List. Note: You must select the option to append students on each page. The default option is to replace the students. 8. Repeat steps 6-7 to continue adding students from additional pages. 9. After you have finished adding students, click Save. Adding students to an existing Watch List 1. On the Student List page displaying students you want to add to an existing Watch List, click the Show Watch List Maintenance link. The page displays the Watch List processing options. 2. In the Save Watch List As fields, select the Watch List to which you want to add students. 3. In the On Save field, select the option to Append checked students to the existing lists, then select the students you want to add to that Watch List. 4. If you are finished adding students, go to step 8. Otherwise, go to step 5. 5. If the search results span multiple pages and you want to add students listed on another page, click the Next link at the bottom of the student list. The application prompts you to save your changes before you can move to the next page. Click Yes. 6. On each subsequent page, select the Watch List to which you want to add students, select the option to Append checked students to the existing list, then select the students you want to add to that Watch List. Note: You must select the option to append students on each page. The default option is to replace the students. 7. Repeat steps 5-6 to continue adding students from additional pages. 8. After you have finished adding students, click Save. Removing students from an existing Watch List 1. On the Student List page, select the Watch List from which you want to remove students in the Filter by Watch List field. 2. Click the Show Watch List Maintenance link. The page displays the Watch List processing options. 3. In the Save Watch List As fields, select the same Watch List you selected in step 1. 4. In the On Save field, select the option to Replace List with checked students. 5. In the Select column, click All to select all students currently displayed in the Watch List, then click None to remove the check from the box for each student you want to remove from the Watch List. 6. After you have finished removing students from the Watch List, click Save. - 15 of 24 - 2014.11.13 eSchoolPLUS eSchoolPLUS Introduction Version 3.1 The Search button returns you to the search page. The Report button takes you to the Report Filtering page. Student Summary Student summary page is the page to view demographic, contact, emergency, schedule, and today’s attendance information for a student on a single page. Once you chose and click on a student, this page will appear. - 16 of 24 - 2014.11.13 eSchoolPLUS eSchoolPLUS Introduction Version 3.1 Registration Information This section includes basic registration information, such as homeroom, age, birth date, and calendar. By clicking on this link, the student’s Registration Information page will open. District Registration Information This section includes optional registration information, such as residential district and alternate district. Clicking on this link opens the student's Registration Information page. Personal Information This section includes information such as race, classification, meal status, and social security, as selected using the Customize option. If you do not have access to some fields, they will not display. Clicking on this link will open the student's Personal Information page. Contact Information Included in this section are the contact's name, type, address, and phone numbers, as selected using the Customize option. You may choose to include the student, guardian, emergency contacts, or others. Clicking the Contact Information link opens the student's Contact List page. Clicking the name, address, or phone will open the appropriate tab of the Contact Information page for that contact. Emergency Information Included in this section is the student’s physician, insurance, hospital, and alerts and disabilities information. Clicking on this link will open the student's Emergency page. Schedule Information This section includes the student's schedule for today. Clicking the Schedule Information link opens the student's Student Schedule page. Clicking the course name link opens the corresponding Student Course Detail page. Clicking a course-section number link opens the Class List pop-up window showing students scheduled for the course. If a teacher displays as a hyperlink, you can click the name to open a new email message addressed to that teacher. Attendance Information This section includes any attendance entered for the student for that day. Clicking on this link will open the Attendance Year View page. Programs Includes any programs in which the student is enrolled. Clicking the Programs link opens the Programs page that lists all programs for the district. Clicking a program's description link opens the Programs page for the specified program. To start a new search, click the Search button. To return to the list of students, click the List button. If you want to select what to include on the Student Summary page, click the Customize button. To return to the Student Summary page, or any page, click the Back button or click on the Student Summary link. You may also select the page you want to go back to from the left menu list. Student Alerts You may see one or more yellow triangles in the upper left-hand corner of the Student Summary screen for some students. This indicates that the student you have selected has a Student Alert associated with his/her student record. = Medical Alert - 17 of 24 - 2014.11.13 eSchoolPLUS eSchoolPLUS Introduction Version 3.1 = Personal Alert = Academic Alert If you hover over the alert icon, the alert description will display. If you click on the alert icon, a dialog box will open and give you more specific information about the alert. Student Notes FYI: User must have Registration maintain access to create and update Student Notes. This link is where you can view or setup notes for students. This page lists the student notes for which a user has security access. The notes display in order by Entry Date. Student Notes The Search button allows you to search for a student from the Student Notes page. The List button takes you back to the main student list. The New button lets you add a new note. Adding a New Note 1. On the Student Notes page, click New. 2. On the Student Note page, enter the appropriate information. If you do not have the appropriate security resource to create Sensitive notes, the Sensitive box is inaccessible. If you enter a check in the Personal box, you and any other user who has permission to view other users Personal notes will be able to view the note. Other users with additional security resources may also edit and delete notes you mark as Personal. 3. When you are finished entering note information, click Save. - 18 of 24 - 2014.11.13 eSchoolPLUS eSchoolPLUS Introduction Version 3.1 Notification Subscription The Notification Subscription page allows you to select the types of notifications you want to receive. To setup notifications: Select ‘Notification Subscription’ from the eSchoolPLUS menu list. To receive your notifications in a single email bundle, check the ‘Daily Digest’ box. To navigate between different Notifications select your area from the ‘Jump To’ field. You can choose to receive notifications by subscribing or subscribe with email or Daily Digest (all notifications will be bundled into a single email message). o o o o o Do Not Subscribe: Selected by default Subscribe: To view notification in the PLUS 360 Notifications viewer. Subscribe with Email: To receive notifications by email and also have the notification display in the PLUS 360 Notifications viewer. High Priority: To receive immediate notification as a pop-up message in addition to displaying in the PLUS 360 Notifications viewer. Notification: Description of the event that triggers this notification message to be sent. - 19 of 24 - 2014.11.13 eSchoolPLUS eSchoolPLUS Introduction Version 3.1 o o Home Building Only: Select for home building only. Watch List: This list is populated based on the creation of a watch list. To view all notifications navigate to your home page and click on the icon in the main toolbar. There will be a number displayed indicating the amount of notifications waiting to be viewed. A list of notifications will be listed in this screen. Notifications: The list of emails that are displayed are sent based on the subscription set-up by the user in the Notification Subscription page. With Selected: Choose from Deleted, Mark read, Mark Unread messages Sort By: Application, Category and Date Show All: All, Deleted, Unread eLearning Center The eLearning Center is a help site for the eSchoolPLUS module. It has audio and visual learning sessions on modules that are inside eSchoolPLUS. eLearning allows each individual to work at their own pace and to review modules as needed. Our flexible eLearning modules include the following sessions: - 20 of 24 - 2014.11.13 eSchoolPLUS eSchoolPLUS Introduction Version 3.1 Student Demographics Reports Maintaining Student Data with Geo Code Maintaining Student Data Student Data Overview Attendance Entering Attendance for an Individual Student Scheduling Support Scheduling Individual Students Student Course Requests Reports Student Course Requests Scheduling Administration Building Course Setup District Course Setup Master Schedule Discipline and Referrals Discipline Nurses Medical Records Teachers Teachers - 21 of 24 - 2014.11.13 eSchoolPLUS eSchoolPLUS Introduction Version 3.1 Start Module Demonstration 1. Select the module 2. Select Launch Course 3. Click in the right corner of the screen. 4. To start demonstration select, Click here to Start the Show Me Tutorial button. eLearning Helpful Notes: To open the course menu and change your course selection, click in the top right corner of the screen. - 22 of 24 - located 2014.11.13 eSchoolPLUS eSchoolPLUS Introduction Version 3.1 Once you select your course from the left menu list, you may also switch courses by clicking in the bottom right corner or start the course session by selecting, Click here to Start the Show Me Tutorial button. To view your course history and the sessions you have viewed, click located in the top right corner of the screen. To view your course selection in a document, select located in the top right corner of the screen. Select the course documents you want to view. You may also print the documents. Documentation Documentation is included with each module. Select located in the top right corner of the screen. Select the course documents you want to view. You may also print the documents. Exit eLearning Click located in the top right corner of the screen. You will be given a message box to confirm your request to exit the course. eLearning Setup If you experience difficulties viewing eLearning, open the Adobe Flash Player Global Security Settings Panel and select the Always allow option. Notes for Internet Explorer 8.0 Users: Audio modules require some additional configuration in IE8 1. Open Internet Explorer 2. Select Tools from the Menu Toolbar, and then select Internet Options - 23 of 24 - 2014.11.13 eSchoolPLUS eSchoolPLUS Introduction Version 3.1 3. Click the Security tab at top 4. Choose Custom Level 5. Scroll down until you see “Display video and animation on a webpage that does not use….” And set it to Enable. Error Pop-Up Message This dialogue box may appear when an error occurs while trying to access the eLearning link. If this error occurs: 1. User the direct link (https://espsms.killeenisd.org/eLearning) to log in to eLearning center. 2. Notify Information Systems (x2734) of the error. - 24 of 24 - 2014.11.13