1
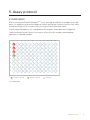
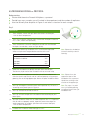
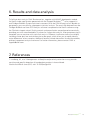
Multiplex 96×96
User Manual
Technical support
For technical support, please contact us at [email protected] or +46 18 444 3970
Table of content
1. Introduction 4
2. Principle of the assay 2.1 Technology and assay format 5
5
3. Reagents and equipment 3.1 Reagents supplied 3.2 Required consumables (not supplied) 3.3 Required equipment (not supplied) 3.4 Downloads 3.5 Software for analysis 6
6
7
7
7
7
4. Assay considerations 4.1 Safety 4.2 PCR Technology 4.3 Pipetting techniques 4.4 Sample preparation 4.5 Sample material 8
8
8
8
8
8
5. Assay protocol 5.1 Plate layout 5.2 PEA Program 5.3 Olink Protein Expression 96×96 program 5.4 Fluidigm instructions 5.5 Proseek Multiplex96×96 protocol 9
9
10
10
10
11
6. Results and data analysis 15
7. References 15
Appendix 1 16
Proseek Multiplex96×96
3
1. Introduction
Proseek® Multiplex96×96 from Olink Bioscience is a diverse product line of
reagents for scalable immunoassays enabling simultaneous measurement
of 92 protein biomarkers in 1 µL sample volume. The Proseek platform
is designed for ease of use and offers enhanced analytical performance,
analysis of complex matrices, as well as improvement in assay throughput
over conventional immunoassays.
To get you started, Proseek Multiplex96×96 reagents come as a convenient
all-in-one kit format with an optimized protocol.
4
Proseek Multiplex96×96
2. Principle of the assay
2.1 Technology and assay format
The Proseek reagents are based on PEA, a Proximity Extension Assay technology1, in which
96 oligonucleotide-labeled antibody pairs are allowed to bind to their respective protein
targets in the sample. A PCR reporter sequence is formed by a proximity-dependent DNA
polymerization event and is subsequently detected and quantified using real time PCR. The
assay is performed in a homogeneous 96-well format with no need for washing steps.
Proseek Multiplex assay procedure employs three core steps:
Incubation
Extension
Allow the 96 antibody probe pairs to
bind to their respective proteins in your
samples.
Create and pre-amplify 96 unique
DNA reporter sequences by proximity
extension.
Detection
Quantify each
biomarker’s DNA
reporter using high
throughput real-time
qPCR instrument.
Fig 1. Assay procedure.
Proseek Multiplex96×96
5
3. Reagents and equipment
3.1 Reagents supplied
Each Proseek Multiplex 96×96 kit contains reagents for 96 wells, sufficient for 92 samples and
4 controls. The reagents are supplied in three individual boxes. Storage temperature and
expiry date for the components are stated on the outer label of each box.
3.1.1 Proseek Multiplex Probe Kit 96×96 (store at +4°C)
Incubation Solution
Contains components needed for the incubation reaction
A-probes
Contains 96 antibody probes labeled with A oligos
B-probes
Contains 96 antibody probes labeled with B oligos
3.1.2 Proseek Multiplex Detection Kit 96×96 (store at -20°C)
PEA Solution
Contains components needed for the extension reaction
PEA Enzyme
For extension of A and B probes which are bound to their target
PCR Polymerase
For pre-amplification of the extension product created by the PEA enzyme
Detection Solution
Contains components needed for the detection reaction
Detection Enzyme
For qPCR amplification
Primer Plate
96-well plate with ready-to-use primers for amplification of extension product
Incubation Stabilizer
For stabilization of the incubation reaction
3.1.3 Proseek Multiplex Controls (store at -20°C)
6
Positive Control
Contains three control assays
Negative Control
For normalization and determination of background levels
Proseek Multiplex96×96
3.2 Required consumables (not supplied)
Pipette tips (filter is recommended)
Microcentrifuge tubes (1-1.5 mL)
Centrifuge tube (> 11 mL)
8-well strips with lids
96-well PCR plate (à 0.2 mL)
Multi-channel pipette reservoir
Adhesive plastic film (heat-resistant)
High purity water (sterile filtered, MilliQ® or similar)
96.96 Dynamic Array™ Integrated Fluidic Circuit (IFC), (Fluidigm Corporation, catalogue
number BMK-M96.96)
3.3 Required equipment (not supplied)
Pipettes (covering the range from 1 μL to 1000 μL)
Multi-channel pipettes (for volumes 1-10 µL, 96 µL)
Vortex
Centrifuge for plates
Microcentrifuge for tubes
Freezing block (-20°C) for enzyme handling
Thermal cycler with heated lid (recommended format;96-well, minimum 0.1 mL)
Refrigerator or cold room (+2°C to +8°C)
Fluidigm BioMark™ System
Fluidigm IFC controller HX
3.4 Downloads
To be able to properly analyse your results, a DetectorTemplate.plt file is recommended to be used
with the Fluidigm Analysis software and availble for download at www.olink.com. If applying the
sample plate layout suggested on page 9, a Default Sample Names file is availble for download.
3.5 Software for analysis
Each Proseek Multiplex 96×96 experiment will generate 9216 data points on the Fluidigm
BioMark real-time PCR instrument. GenEx by MultiD AB offers an easy-to-use plugin Olink
Wizard, for analysis of Proseek Multiplex 96×96 results. The Olink Wizard will guide you through
the different steps of acquiring protein expression data.
Proseek Multiplex96×96
7
4. Assay considerations
4.1 Safety
Follow general laboratory safety procedure such as using gloves, safety goggles and
protective clothing when performing the experiments. Handle and dispose of hazardous
sample material according to local regulations.
4.2 PCR Technology
PCR technology is sensitive to contaminations; perform the Detection step in a post-PCR
room, separate from the room where the Incubation and Extension steps are performed.
Never transfer amplified products to bench or fume hoods.
4.3 Pipetting techniques
It is advisable to use a multi-channel pipette in the reagent transfer steps.
Use filter pipette tips to avoid contamination. Change pipette tips between all sample and
reagent transfer steps to avoid cross-contamination. Maintain and calibrate your pipettes
regularly.
4.4 Sample preparation
To reduce sample-handling time during the experiment, samples can be aliquoted in 8-well
strips or 96-well plate prior to the start of the experiment.
4.5 Sample material
Proseek Multiplex96×96 has been shown to be successful with the following sample types:
Serum
EDTA plasma
Citrate plasma
Heparin plasma
Tissue and cell lysates
Note: Optimization of lysis buffer may be necessary, depending on cell or tissue type. A recipe for the
recommended lysis buffer is available upon request. For more information, please contact [email protected].
8
Proseek Multiplex96×96
5. Assay protocol
5.1 Plate layout
Prior to running the Proseek Multiplex96×96 assay, plan the distribution of samples across the
plate. It is important to place the Negative Control and Positive Control in the first four wells,
according to Figure 2 for a correct analysis using the Olink Wizard by GenEx.
Each Proseek Multiplex96×96 kit is designed for 92 samples, three replicates of Negative
Control and one Positive Control. For analysis of less than 92 samples, please pipette
replicates of selected samples.
1
2
3
4
5
6
7
8
9
10
11
12
A
B
C
D
E
F
G
H
Negative control
Positive control
Samples
Fig 2. Plate layout.
Proseek Multiplex96×96
9
5.2 PEA Program
Create a PEA program on the thermal cycler with the following conditions.
Enable the heated lid function.
Extension
50°C
20 min
Hot start
95°C
5 min
PCR Cycle
Maintain the reaction at
95°C
30 s
54°C
1 min
60°C
1 min
10°C
∞, hold
×17
5.3 Olink Protein Expression 96×96 program
Program the Fluidigm BioMark System with the following steps.
Name the program Olink Protein Expression 96×96 program.
50°C
120 s
70°C
1800 s
25°C
600 s
Hot Start
95°C
300 s
PCR Cycle
95°C
15 s
60°C
60 s
Thermal mix
×40
Verify correct settings:
Application – Gene Expression
Passive Reference – ROX
Assay – single probe
Probes – FAM-MGB
5.4 Fluidigm instructions
For information on the Fluidigm IFC Controller HX and Fluidigm BioMark System,
please read through the following User Guides (www.fluidigm.com)
10
Fluidigm® IFC Controller User Guide - PN 68000112
Fluidigm® Real-Time PCR Analysis User Guide - PN 68000088
Fluidigm® Data Collection Software User Guide - PN 68000127
Proseek Multiplex96×96
5.5 Proseek Multiplex96×96 protocol
Before starting:
Please read the entire Proseek Multiplex96×96 protocol.
Decide how many samples you will include in the experiment and the number of replicates.
Use the 96-well plate template in Figure 2 and select a location for each sample.
Day 1:
INCUBATION
1.
Thaw samples, vortex and spin down the content at 1000 rpm,
1 min at room temperature.
2.
Thaw the Incubation Stabilizer from the Proseek Multiplex Detection
Kit 96×96 box, vortex and spin briefly.
3.
Thaw the Positive Control and Negative Control from the Proseek
Multiplex Controls box, vortex and spin briefly.
4.
Prepare the following Incubation mix in a microcentrifuge tube.
Vortex and spin each reagent before transfer to the mix.
Incubation mix
per 96-well plate (µL)
Incubation Solution
263.0
Incubation Stabilizer
37.5
A-probes
37.5
B-probes
Total
Note: Pipette the Incubation
Solution carefully to avoid
foaming.
37.5
375.5
5.
Vortex the Incubation mix briefly and spin down the content.
Transfer 44 µL per well of the Incubation mix to an 8-well strip.
6.
Use a multi-channel pipette to transfer 3 µL of the Incubation mix
from the 8-well strip to each well of a 96-well plate by using reverse
pipetting. Do not change pipette tips. Name this plate Incubation Plate.
Note: Pipette from the
uppermost part of the
Incubation mix to prevent
liquid from sticking to the
outside of the pipette tip.
7.
Add 1 µL of Negative Control to each well in position A1, B1 and C1
according to the plate layout in Figure 2.
8.
Add 1 µL of Positive Control to well D1.
Note: For steps 7–9; add
the 1 µL liquid by placing
the pipette tip into the 3 µL
Incubation mix.
9.
Add 1 µL of each sample to the Incubation Plate according to your
plate layout.
10. Seal the Incubation Plate with an adhesive plastic film. It is important
that all wells are properly sealed, especially around the edges to
avoid evaporation of samples. Spin down the content 1000 rpm,
1 min at room temperature.
11. Incubate the Incubation Plate overnight at +4°C.
Proseek Multiplex96×96
11
Day 2:
EXTENSION
12. Turn on your thermal cycler and activate the heated lid function.
13. Thaw the PEA Solution, vortex and spin briefly. Prepare the
following Extension mix in a centrifuge tube. Use a freezing block
when removing the PEA Enzyme and the PCR Polymerase from
-20°C and spin down the content briefly before pipetting the
enzymes into the mix.
Extension mix
per 96-well plate (µL)
High Purity Water
9385
PEA Solution
1100
PEA Enzyme
55
PCR Polymerase
Total
22
10 562
14. Vortex the Extension mix.
15. Bring the Incubation Plate to room temperature.
Spin down the content at 1000 rpm, 1 min at room temperature.
16. Pour the Extension mix into a multi-channel pipette reservoir.
17. Carefully remove the plastic adhesive film from the Incubation Plate.
18. Start a timer set for 5 min and transfer 96 µL of Extension mix to
each well of the Incubation Plate using a multi-channel pipette.
19. Add a new plastic adhesive film to the Incubation Plate. It is
important that all wells are properly sealed, especially around the
edges to avoid evaporation of samples.
Note: Perform steps 18–20
within 5 minutes.
5 min
20. Vortex gently and spin down the content at 1000 rpm, 1 min at room
temperature.
21. After the 5 min, place the Incubation Plate in the thermal cycler and
run the PEA program (see section 5.2 for details). The PEA program
takes approximately 1 h 40 min.
22. Continue with the Detection step or store the Incubation
Plate for up to one week at +4°C
12
Proseek Multiplex96×96
Note: If your thermal cycler
requires a silicon cover for
plates covered with plastic
film, please use one to
avoid evaporation.
DETECTION
23. Prepare and prime a 96.96 Dynamic Array IFC according to the
manufacturer’s instructions.
24. Thaw the Primer Plate and spin at 1000 rpm, 1 min at room
temperature.
25. Thaw the Detection Solution, vortex and spin briefly. Prepare the
following Detection mix in a microcentrifuge tube. Use a freezing
block for the Detection Enzyme and PCR Polymerase and spin down
the content briefly before pipetting the enzymes into the mix
Detection mix
per 96-well plate (µL)
Detection Solution
550.0
High Purity Water
230.0
Detection Enzyme
7.8
PCR Polymerase
3.1
Total
790.9
26. Vortex the Detection mix and spin briefly. Transfer 95 µL of the
Detection mix per well to an 8-well strip.
27. Use a multi-channel pipette to transfer 7.2 µL of Detection mix to
each well of a new 96-well plate by reverse pipetting. Name this
plate Sample Plate.
28. Remove the Incubation Plate from the thermal cycler and spin down
the contents.
29. Carefully remove the plastic film and transfer 2.8 µL from each well
of the Incubation Plate to the Sample Plate.
30. Seal the Sample Plate with a new plastic adhesive film, vortex and
spin at 1000 rpm, 1 min at room temperature.
Proseek Multiplex96×96
13
31. Transfer 5 µL from each well of the Sample Plate to the primed 96.96
Dynamic Array IFC by using reverse pipetting. Change pipette tips
after each sample. Samples are loaded into their respective inlets on
the right side of the chip according to Figure 3. See appendix 1 for a
detailed instruction on sample loading.
32. Gently remove the Primer Plate aluminum sealing to avoid
contamination between wells. Transfer 5 µL from each well of the
Primer Plate into the inlets on the left side of the chip according to
Figure 3 by reverse pipetting. Change pipette tips after each transfer.
1
2
3
4
5
6
7
8
9
10
11
12
1
A
A
B
B
C
C
D
D
E
E
F
F
G
G
H
H
2
3
4
5
6
7
8
Primer Plate
9
10
11
12
Sample Plate
Primers
Samples
Fig 3. Loading of samples and primers to the 96.96 Dynamic Array IFC.
33. Remove any visible bubbles.
34. Load the chip in the Fluidigm IFC Controller HX according to
manufacturer’s instructions.
35. Run the Olink Protein Expression 96×96 Program in the Fluidigm
Biomark Reader according to manufacturer’s instructions
(See 5.3 for detailed instructions on the Olink Protein Expression
96×96 Program).
14
Proseek Multiplex96×96
Note: For steps 31 and 32,
make sure not to leave any
inlets empty on the chip.
6. Results and data analysis
To facilitate data analysis Olink Bioscience has, together with MultiD, developed a module
for GenEx to be used for data generated with the Proseek Mutliplex 96×96 assay reagent kit
and Fluidigm BioMark System real-time instrument. With the Olink Wizard you will be able to
pre-process your raw data for subsequent statistical analysis. The result file obtained from the
Fluidigm BioMark real-time PCR Analysis software is exported to the GenEx software using
the Olink data import wizard. Quality controls and normalization are performed automatically,
providing you with normalized delta Cq values for further data analysis. After pre-processing is
complete you can continue with statistical analysis. Different visualization tools are available,
including scatter plot, box and whisker plot or bar graph, which allow you to rapidly identify
major differences across samples. Additional features include hierarchical clustering methods,
principal component analysis and more. For further information, please contact Olink at
[email protected].
7. References
1. Lundberg, M., et.al. Homogeneous antibody-based proximity extension assays provide
sensitive and specific detection of lowabundant proteins in human blood.
Nucleic Acid Res 6 June (2011). doi: 10.1093/nar/gkr424
Proseek Multiplex96×96
15
Appendix 1
Load samples to the right and primers to the left on the 96.96 Dynamic Array IFC.
1
2
3
4
5
6
7
8
9
10
11
12
1
A
A
B
B
C
C
D
D
E
E
F
F
G
G
H
H
2
3
4
Primer Plate
Proseek Multiplex96×96
6
7
8
9
10
11
12
Sample Plate
Primers
16
5
Samples
1. Use reverse pipetting.
Transfer 5 µL from each well
in position 1 A-H (marked in
green) to inlets in the first
column on the right side of
the chip (green). When using
an eight-channel pipette
every other inlet will be filled
according to the image.
1
2
3
4
5
6
7
8
9
10
11
12
A
B
C
D
E
F
G
H
Sample Plate
Samples
Primers
2. Transfer 5 µL from each well
in position 2 A-H (blue) to the
second column of inlets (blue)
according to image. Continue
with columns 3-6.
1
2
3
4
5
6
7
8
9
10
11
12
A
B
C
D
E
F
G
H
Sample Plate
Samples
Primers
3. Transfer 5 µL from each well
in position 7 A-H (red) to inlets
in the first column on the right
side of the chip (red), start on
the second row according to
image. Continue with columns
8-12.
1
2
3
4
5
6
7
8
9
10
11
12
A
B
C
D
E
F
G
H
Sample Plate
Samples
Primers
4. Transfer 5 µL from each well
in the Primer Plate to the inlets
on the left side of the chip in
the same manner as described
in steps 1-3 for Sample Plate.
1
2
3
4
5
6
7
8
9
10
11
12
A
B
C
D
E
F
G
H
Primer Plate
Primers
Samples
Proseek Multiplex96×96
17
18
Proseek Multiplex96×96
Olink Bioscience Dag Hammarskjölds v. 52B SE-752 37 Uppsala, Sweden
www.olink.com
0935, v.1.1, 2013-06-04
This product is for research use only. Not for use in human diagnostic or therapeutic procedures.
This product includes a license for non-commercial use of Proseek products. Commercial users may require additional licenses.
Please contact Olink AB for details.
There are no warranties, expressed or implied, which extend beyond this description. Olink AB is not liable for property damage, personal
injury, or economic loss caused by this product.
The following trademarks are owned by Olink AB: Olink®, Olink Bioscience™, Proseek®, Duolink® and PLA®.
This product is covered by several patents and patent applications including US 6,511,809, US 7,306,904, and related US and foreign patents.
This product is sold under license from PHRI Properties, Inc. and may be used under PHRI Properties patent rights outside the field of
human in vitro diagnostics.
Components in the Proseek Multiplex Probe Kit utilise Lightning-Link™ technology and are provided under license from Innova Biosciences.
© 2013 Olink AB.
All third party trademarks are the property of their respective owners.