1
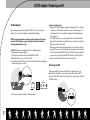
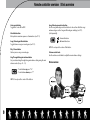
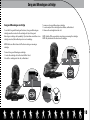
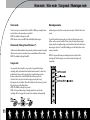
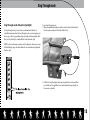
User Manual
Item No. 9005
Ages: 14+
Contents
Table of contents
Introduction
P. 3
About Wowwee Alive™ Elvis®
Package contents
Technical specifications
P. 4
P. 4
P. 4
Battery details
Battery requirements
Elvis bust
Microphone remote controller
Installing and changing the batteries
1
P. 1 - 2
P. 5 - 6
P. 5
P. 5
P. 5
P. 5
AC/DC adaptor
Powering on/off
P. 7
P. 7
Sleep and reset
Sleep mode
Resetting Elvis
P. 8
P. 8
P. 8
Contents
Remote controller overview
Elvis overview
Song and Monologue cartridge
Voice mode
Alive mode (Taking Care of Business™)
Song mode
Monologue mode
Sing Through mode (Share the Spotlight)
External music playback
Vision system
Taking Care of Elvis
Safety and warranty information
Safety tips
Warranty
Support
P. 8 - 9
P. 9
P. 10
P. 11
P. 11
P. 11
P. 11
P. 12 - 13
P. 14
P. 15
P. 16
P. 17 - 18
P. 17
P. 17
P. 18
2
Introduction
Dear Customer,
In 2005, Wowwee entered into a licensing
agreement with Elvis Presley Enterprises to
create the Wowwee Alive™ Elvis®, the first
lifesize, completely realistic looking and
functioning bust of the world’s most loved
entertainer of all time.
Your animatronic Elvis consists of 10 precision
motors housed in an efficiently designed
mechanical bust that conforms to the synthetic
skin likeness of Elvis!
More than two years of intense research and
development were dedicated to this project.
Initial sculptures were developed based upon
archival photo reference and film footage from
Graceland. Forensic reconstruction techniques
3
were relied upon to assist in the creation
process. A total of 18 separate sculptures were
produced before a perfect recreation was
achieved.
Specially-developed motion-capture software,
in conjunction with a joystick system, was used
to finely tune the head and facial movements to
produce all the subtle motions that create a
believable Elvis.
We hope you will experience many enjoyable
and entertaining hours with the Wowwee Alive
Elvis.
With warm regards,
George York
Wowwee Ltd.
About Wowwee Alive™ Elvis®
About Wowwee Alive Elvis
Wowwee Alive Elvis is a lifelike singing and talking bust of the
best-selling solo artist in US history. Motion-captured facial animations
for amazing realism and expression utilizing Wowwee Alive
animatronics, and a leather-like jacket styled from the “Elvis Presley ’68
Comeback Special”, complete the most authentic recreation ever of this
legendary artist. Whether you’re his greatest fan or new to the man and
his music, you can listen to, sing along with, and learn more about the
life of the man they call “The King”.
Package contents
• 1x Alive Elvis
• 1x Microphone-shaped remote control
• 1x 9V AC/DC 2.7A adaptor
• This user manual
Technical specifications
• Measurements: 20”L x 11.5”D x 18.5”H
(50.8cm L x 29.2cm D x 47.0cm H)
• Full-face animatronic design with realistic animated motions
• Infrared vision sensors
• High quality stereo system
• Audio line-in (line-in cable not included)
• 1/4 inch microphone jack plug (microphone not included)
• Memory card slot (for Song and Monologue cartridge, each sold
separately)
• DC power connector socket
e
Voic
e
Aliv
4
Battery details
Battery details
The following section describes the details concerning batteries for Elvis
and his remote controller.
NOTE: For best performance, use Elvis with the provided adaptor.
IMPORTANT: Make sure you align the positive and negative polarities
of the batteries with corresponding markings inside the battery
compartment.
Battery requirements
3. Replace the battery compartment covers and replace the screws.
Elvis bust
Elvis is powered by 8 x 1.5V ‘D’ size batteries (not included). We
recommend you use top-quality alkaline batteries.
Alternatively, Elvis can be powered by an Output 9V AC/DC 2.7A, center
positive adaptor (included).
When you notice Elvis slowing down or stopping any movement, you
might need to change the batteries in the body. Also, if you notice Elvis
not responding well to controller commands, you might need to replace
the batteries in the remote controller.
Microphone remote controller
Your Elvis remote controller is powered by 3 x ‘AAA’ batteries (not
included).
Installing and changing the batteries
The following are steps to follow when installing or replacing the
batteries in Elvis and/or his remote controller.
NOTE: Before installing or changing batteries, make sure that Elvis and/or
his remote controller are turned off (switch is set to the OFF position).
1. Remove the battery compartment covers using a Phillips screwdriver
(not included).
5
2. Insert the batteries (not included) into the battery compartment of
Elvis and/or the remote controller, as illustrated in the diagrams.
Battery details
“Bottom view of
Elvis bust”
1.5V
LR20
UM1
“D”
1.5V
LR20
UM1
“D”
1.5V
LR20
UM1
“D”
1.5V
LR20
UM1
“D”
1.5V
LR20
UM1
“D”
1.5V
LR20
UM1
“D”
1.5V
LR20
UM1
“D”
1.5V
LR20
UM1
“D”
1.5V
LR20
UM1
“D”
1.5V
LR20
UM1
“D”
Attention: important battery information
• Use only fresh batteries of the required size and recommended type.
• Do not mix old and new batteries, different types of batteries
(Standard (Carbon zinc), alkaline, or rechargeable), or rechargeable
batteries of different capacities.
• Remove rechargeable batteries from the Elvis unit and remote control
before recharging them.
• Rechargeable batteries are only to be charged under adult
supervision.
• Please respect the correct polarity, (+) and (-).
•
•
•
•
•
•
•
•
1.5V
LR20
UM1
“D”
1.5V
LR20
UM1
“D”
1.5V
LR20
UM1
“D”
1.5V
LR20
UM1
“D”
1.5V
LR20
UM1
“D”
1.5V
LR20
UM1
“D”
Do not try to charge non-rechargeable batteries.
Do not throw batteries into the fire.
Replace all batteries of the same type/brand at the same time.
The supply terminals are not to be short-circuited.
Remove exhausted batteries from the Elvis unit and remote control.
Batteries should only be replaced by adults.
Remove batteries if your Elvis is not going to be used for some time.
Retain packaging as it contains important information.
6
AC/DC adaptor / Powering on/off
AC/DC adaptor
Elvis can be powered by an output 9V AC/DC, 2.7 A, center positive
adaptor. You can use the adaptor included in this package.
NOTE: For best performance, always use the adaptor as the power
source for Elvis. Battery usage should be limited to the external
music playback function only.
IMPORTANT: Only use an adaptor of the recommended type.
To operate Elvis using an adaptor:
1. Set the power switch on the back of Elvis’ bust to OFF.
2. Open the rubber cover on the DC socket.
3. Insert the jack into the DC socket in the back of Elvis’ bust and plug the
adaptor into a power outlet.
Important safety notice
• Examine the AC/DC adaptor regularly for damage to the cord, plug,
enclosure and other parts, and, in the event of such damage the
product must not be used with the adaptor until the damage has
been repaired.
• The AC/DC adaptor is not a toy and should be operated by adults.
• If you wish to clean Elvis ensure that the power is disconnected first.
Only clean with a damp cloth.
• Elvis may generate some abnormal motion or sound if you directly
change the power source (from batteries to adaptor and vice versa)
without turning the ON/ OFF switch to OFF first. After changing the
power source, please turn the ON/ OFF switch to the ON position.
• Elvis is not intended for children under 14 years old.
Powering on/off
Elvis’ power switch is located on his back, just below his neck, as
illustrated. To turn Elvis on, move the power switch from the OFF
position to the ON position. To turn him off, move the power switch to
the OFF position.
DC IN 9V
9V
4. Set the power switch on Elvis to the ON position.
7
CENTER POSITIVE
Sleep and reset / Remote controller overview
Sleep and reset
Sleep mode
When you leave Elvis unattended for around 10 minutes or more, he
will go into sleep mode, which means he will power down to conserve
energy. To wake him up, move the power switch to the OFF setting and
then ON again.
Resetting Elvis
You can reset Elvis to his default settings by performing a full reset. To
carry out a full reset, move Elvis’ power switch to the OFF setting then
ON again.
Volume Control
knob
Voice mode button
Alive mode button
Song / Monologue
mode button
Play / Pause button
Song / Monologue
selector button
Sing Through / Along
mix volume button
Remote controller overview
The microphone-styled remote controller is based upon one of the many
microphones used by Elvis during the ‘68 Comeback Special. You can use
the six (6) multi-function buttons and the slider on the remote controller
to activate and control various functions of your Elvis unit.
NOTE: The remote controller will work best at distances up to 6 feet
(approx. 2 meters) and closer. You should point the remote controller
towards the front of the bust for optimal response.
8
Remote controller overview / Elvis overview
Voice mode button
Toggle Elvis’ voice ON or OFF.
Alive Mode button
Elvis performs random sequences of animations (see P. 11).
Song / Monologue Mode button
Toggle between songs or monologues (see P. 11).
Play / Pause button
Start or pause a song or monologue.
Sing Through/Along mix volume button
Set your desired sing through/along mix volume setting using the mix
volume control (see p. 12 - 13).
- To mix Volume up press “+”.
- To mix Volume down press “-”.
NOTE: Do not press the center of the button.
9
Song / Monologue selector button
Use the song/monologue selector button to choose from the Elvis songs
and monologues on the Song and Monologue cartridge (see P. 11).
(sold separately).
- Forward direction
- Backward direction
NOTE: Do not press the center of the button.
Volume control knob
Use the volume control knob to adjust the main volume settings.
Elvis overview
Song and Monologue cartridge
Song and Monologue cartridge
To use Elvis’ Song and Monologue functions, a Song and Monologue
cartridge must be inserted in the cartridge slot (each Song and
Monologue cartridge sold separately). If you turn him on and there is no
cartridge inserted, Elvis will ask you to insert a cartridge.
To remove a Song and Monologue cartridge:
1. Locate and press the cartridge release button, as illustrated.
2. Remove the cartridge from the slot.
NOTE: Switch off the power before inserting or removing the cartridge.
NOTE: Pay attention to the direction of cartridge.
NOTE: Make sure Elvis is turned off before inserting or removing a
cartridge.
To insert a Song and Monologue cartridge:
1. Locate the cartridge slot on the back of Elvis’ bust.
2. Insert the cartridge into the slot, as illustrated.
10
Voice mode / Alive mode / Song mode / Monologue mode
Voice mode
Monologue mode
In Voice mode, you can turn Elvis’ voice OFF or ON by pressing the Voice
mode button on the microphone controller.
NOTE: The default setting is voice ON.
NOTE: Even in Voice mode OFF, Elvis will still play Monologue.
In Monologue mode, Elvis recounts various aspects of his life in his own
words.
Alive mode (Taking Care of Business™)
In Alive mode, Elvis animates autonomously, tracks movements using his
IR vision sensors, and even makes the occasional famous Elvis remark.
NOTE: The default setting is Alive ON.
Song mode
In Song mode, Elvis sings the songs on the Song and Monologue
cartridge, with synchronized head and facial movements. To hear him,
put Elvis into Song mode by pressing the Song/Monologue mode
button on the remote controller. Elvis will confirm your mode
selection. Then select your desired song by pressing the Song/
Monologue selector button. Elvis will confirm the selected song. To start
Elvis singing, press the Play button.
NOTE: The default setting is Song mode.
NOTE: A Song and Monologue cartridge must be inserted in the
cartridge slot for Song mode to work (each cartridge sold separately).
11
To put Elvis in Monologue mode, press the Song/Monologue mode
button on the remote controller. Then select your desired monologue
by pressing the Song/Monologue selector button. Elvis will confirm your
monologue selection. To start Elvis talking, press the Play button on the
remote controller.
NOTE: A Song and Monologue cartridge must be inserted in the
cartridge slot for Monologue mode to work (each cartridge sold
separately).
Sing Through mode
Sing Through mode (Share the Spotlight)
In Sing Through mode, you can turn your animatronic Elvis into a
veritable karaoke machine! In Sing Through mode, you can sing along to
the songs on the Song and Monologue cartridge (sold separately), with
Elvis’ vocals (duet style) or without Elvis’ vocals (karaoke style).
To use Sing Through mode:
1. Plug a compatible microphone with a ¼-inch jack (not included) into
the microphone input on the front of Elvis’ bust.
NOTE: For best performance, always use the adaptor as the power source
for Elvis. Battery usage should be limited to the external music playback
function only.
2. Set Elvis to Sing Through mode by pressing the Voice mode and Alive
mode buttons to toggle Elvis’ voice and animations (respectively) on
the remote controller.
12
Sing Through mode
Set the Voice mode to ON if you want to sing along in duet-style with
Elvis’ vocals. Set the Voice mode to OFF if you want to sing along to
the music without the vocals.
3. Select one of the songs on the Song and Monologue cartridge (sold
separately) using the Song/Monologue selector button and press the
Play button.
4. Adjust the volume of the microphone using the Sing Through / Along
Mix
Volume Button on the remote controller to the desired sound level.
To use Sing Through mode with an external audio source:
1. Plug a compatible microphone with a ¼-inch jack (not included) into
the microphone input on the front of Elvis’ bust.
2. Plug your external audio source into the audio line-in connector using
an audio cable (not included).
3. On your external audio source device, select the desired song track
and play the audio file.
If possible, adjust the volume on your external audio source to the
desired level.
4. Adjust the audio volume of the microphone using the Sing Through /
Along Mix Volume Button on the remote controller as required.
Refer to the External music playback section for more details. (see P. 14)
13
External music playback
External music playback
Elvis is equipped with a high-quality stereo system. You can lift the rubber cover and plug an external audio source (such as a portable music
player or a stereo receiver) into the audio Line In jack on Elvis.
NOTE: As soon as you plug an audio cable (not included) Into the audio
input, Elvis will automatically switch to the external music playback
function and override any current actions.
NOTE: If you decide to switch to a different mode after having an
external music source plugged in, you will first have to unplug the cable
connected to the audio line-in jack.
NOTE: If the audio line in cable is left plugged into Elvis, he will power
down automatically to sleep mode after around 30 minutes.
14
Vision system
Vision system
Elvis’ infrared vision system enables him to detect movement in front of
him. In the ON setting of Alive mode, his vision is only ON when he is not
moving or making a sound.
The vision system reacts best to movement in the area just in front of
his chest (see illustration below). While tracking an object, Elvis will keep
his vision locked on it until he loses sight of it. Once he loses sight of the
object, he will begin vocalizing random phrases and moving again, as
long as he is in Alive Mode.
Top view of Elvis
IR sensors range
works at a minimum
of 18 inches / 45 cm
15
NOTE: Elvis’ infrared vision system works at a minimum of 18 inches from
his chest. Infrared functions can be affected by bright sunlight,
fluorescent and electronically dimmed lighting.
NOTE: Elvis’ vision system is automatically disabled when playing a song
or monologue. To re-enable the vision system, do one of the following:
• Press the Alive Mode button twice while Elvis is playing a song or
monologue to stop the current audio playback. Elvis will then enter
Alive mode and activate his vision system.
• Press the Song/Monologue mode button while playing a song or
monologue. This will stop the current audio playback and activate
Elvis’ vision system.
• Press the Song/Monologue selector button while playing a song or
monologue. This will stop the current audio playback and activate
Elvis’ vision system.
Taking Care of Elvis
Taking Care of Elvis
• WARNING: When picking up Elvis, always support him using both
hands from beneath his base. Do not hold him by the hair only. The
hair is not designed to support the overall weight of the Elvis unit.
• Do not hold his head and/or neck during operation or allow his head
to bang into objects or walls as this could do damage to various
internal mechanisms.
• Do not pull on Elvis’ eyebrows, side burns or hair on the head.
• WARNING: Avoid storing Elvis in overhead storage to prevent any
accidental falls.
• Do not put your fingers inside Elvis’ mouth as this could obstruct
normal mechanical operation and damage the motor system. In
addition his teeth could inflict some damage to fingers when he is
animated.
• Do not rub eye area or any of colored areas as this might remove the
painted features.
• Use only a cloth lightly dampened with water to clean the surface of
Elvis. Avoid using cleaning products, soap or chemicals.
• Do not groom or treat Elvis’ hair, such as using hair products (hairsprays, shampoos, or gels) . If necessary, use a cloth lightly dampened
with water to help style the hair if it moves out of place. Be careful
when using water or other liquids on or near electrical devices.
• Use only an electrical adaptor that conforms to the required
specifications with the Elvis unit.
• Retain this instruction manual for future reference.
• Should Elvis perform an unexpected function, please switch him OFF
and then ON again to reset him.
• Do not use a hair dryer on the hair as the heat will damage the hair
fibers.
• Never expose Elvis to extreme heat or cold, nor to direct sunlight and
moisture.
16
Safety and warranty information
Safety tips
This device complies with Part 15 of the FCC Rules. Operation is subject
to the following two conditions: (1) This device may not cause harmful
interference, and (2) This device must accept any interference received,
including interference that may cause undesired operation.
Caution
Changes or modifications not expressly approved by the party
responsible for compliance could void the user’s authority to operate the
equipment.
NOTE: This equipment has been tested and found to comply with the
limits for a Class B digital device, pursuant to Part 15 of the FCC Rules.
These limits are designed to provide reasonable protection against
harmful interference in a residential installation. This equipment generates, uses and can radiate radio frequency energy and, if not installed
and used in accordance with the instructions, may cause harmful interference to radio communications. However, there is no guarantee that
there will be no interference to radio or television reception, which can
be determined by turning the equipment off and on. The user is
encouraged to try to correct the interference by one or more of the
following measures:
- Reorient or relocate the receiving antenna.
- Increase the separation between the equipment and receiver.
- Connect the equipment into an outlet on a circuit different from that to
which the receiver is connected.
- Consult the dealer or an experienced radio/TV technician for help.
17
WARNING: Changes or modifications to this unit not expressly approved
by the party responsible for compliance could void the user’s authority
to operate the equipment.
Please keep these instructions as they contain important information.
WARNING: This equipment may experience difficulty and/or memory
loss when subjected to any electrostatic discharge, radio frequency
interference, or sudden power surge/interruption. The user is
encouraged to reset the equipment should any of these occur.
Warranty
Wowwee Ltd. warrants to the original consumer purchasers that the
Wowwee Alive Elvis “Product” will be free from defects in material and/or
workmanship under normal use for a period of 6 months from the
date of purchase. This Warranty is in lieu of all other express or implied
warranties which might arise with respect to this Product, including the
warranties of merchantability of fitness for a particular purpose.
IN ADDITION, INCIDENTAL AND CONSEQUENTIAL DAMAGES ARE HEREBY
EXCLUDED BOTH FOR PROPERTY AND TO THE EXTENT PERMITTED BY
LAW, FOR PERSONAL INJURY DAMAGE. Some states do not allow the
exclusion of limitation of incidental and consequential damages.
Should you experience any difficulty with your Product, please return
it to the place of purchase, along with an original proof of purchase,
and either the original box or the UPC code label from the box. You will
receive a replacement for the product, or be issued a refund for the
purchase of the product in the event a replacement is not available at
the place of purchase.
Warranty information / Support
Note that this warranty is automatically void for any hardware
modifications (including tampering or disassembly), accidental damage,
damage outside what is considered normal user, or abuse.
This warranty does not cover any hardware, software or other add-on
components installed by the end-user.
Valid only in the U.S.A.
Support
If you have questions or comments, please feel free to contact our
customer service representatives by:
Email: [email protected]
Phone: 1-800-310-3033
@ 2007 Wowwee Limited. Product names, designations, and logos are
trademarks or registered trademarks of Wowwee Limited. All rights
reserved.
© EPE, Reg. U.S. Pat. & Tm. Off.
Wowwee Limited Asia Office – Energy Plaza Unit 301A-C, 92 Granville Rd,
T.S.T. East, Hong Kong
Wowwee Group North America Office – 6600 Decarie, Suite 200,
Montreal, QC H3X 2K4, Canada
Shop online: www.wowweestore.com
Visit www.Wowweealiveelvis.com.
18
Manufactured and distributed by
© 2007 Wowwee Limited.
Product names, designations, and logos
are trademarks or registered trademarks
of Wowwee Limited. All rights reserved.
Wowwee (Asia Office)
Unit 301A-C, 92 Granville Road
T.S.T. East, Hong Kong
Wowwee (North America Office)
Wowwee Group Company
6600 Decarie, Suite 200
Montreal, Quebec
H3X 2K4, Canada
Consumer Hotline: 1-800-310-3033
Customer Service Email:
[email protected]
www.Wowwee.com
We recommend that you retain our
address for future reference.
Product and colors may vary.
Packaging printed in China.
This product is not suitable for children
under 3 years because of small
parts - choking hazard.
MADE IN CHINA.
9005US01TOP
18
© EPE, Reg. U.S. Pat. & Tm. Off.