1
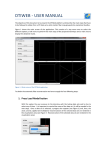
User Manual for Wormfinder
Daniel A. Wagenaar
This user manual describes the “Wormfinder” Matlab user interface, and is meant to be read in
conjunction with the paper that describes the algorithm Wormfinder uses: D. A. Wagenaar and
W. B. Kristan, 2009: “Automated Video Analysis of Animal Movements”, submitted to Neuroinformatics.
Loading images or video sequences
Click the “Load image(s)” button to open the file selection dialog box, which can be used to
navigate directory trees. You can load individual image files in a variety of formats (anything
supported by Matlab, which includes the popular png and jpeg formats) or movies (in avi
format). If you select an image file with a number in its name (e.g., “img-003.jpg”) it is assumed
to be part of a sequence of images that together make up a video clip, and the whole clip
is loaded. Wormfinder can optionally deinterlace video clips transferred from VHS: If the
“De-interlace” toggle is active (indicated by bold face on the button), each image on disk is
automatically split into the odd and even frames.
Setting parameters
The text boxes labeled “σ⊥ ”, “σk ”, “Thresh.”, and “λ” correspond directly with the parameters
described in the paper. It is not required to specify σk and λ explicitly: if left blank, they default
to σk = σ⊥ and λ = 2.5σ⊥ .
You also need to indicate whether your animal is light on a dark background or dark on
a light background by selecting either the “On dark” or the “On light” button. The “Clean
b/g” toggle selects whether the median of all images in the sequence is subtracted to remove
some background clutter (as described in the paper). The “Softmax” toggle selects whether a
weighted average is used to determine local directionality: in that case, the orientation Φ(~x)
1
is calculated as:
Φ(~x) =
1
arg(∑ Fφ2 (~x)e2iφ )
2
φ
and the degree of directionality D(~x) is calculated as
D(~x) =
r
|| ∑ Fφ2 (~x)e2iφ ||
φ
instead of the calculations shown in the paper.
Testing detection
To test whether the parameters are adequate, click the “Detect” button to find an animal in
the currently shown image. The results are displayed in the form of a red curve tracing the
detected animal’s midline. The “|<”, “<<”, “>>” and “>|” buttons may be used to navigate
an image sequence, and frame numbers may also be entered directly in the text box between
these buttons to jump to a specific frame. The menu button next to the navigation buttons selects whether to display display the original image (“Image”), the original image with median
background subtracted (“W/o b/g”), or the extracted direction map (“Dir.map”), which shows
D(~x) as brightness and Φ(~x) as hue for every pixel in the image.
Completing detection
Once you are satisfied that parameters are reasonable, the “Det. all” button can be used to
detect animals in all frames of a video clip at once. The “Animate” button can then be used
to display the results for the whole sequence. Additionally, the navigation buttons (see above)
can be used.
Correcting problems
Problems in individual frames can sometimes be corrected by changing the parameters for
that frame only (and clicking “Detect” to enforce them). Note that if you click “Det. all” after
changing parameters, previously detected animal positions will instantly and irretrievably be
forgotten and the whole image sequence will be re-analyzed with the new parameters.
2
If there are objects in particular frames that lead to spurious detections, you can drag a
rectangle around them and click “Exclude” to force the program to ignore that area. If an
object leads to spurious detections in all frames, use the “Excl. all” button.
Saving results
Click the “Save results” button to save the detected animals into a Matlab file. A file selection
dialog will open which may be used to navigate a directory tree. Normally, saved files will
end in “-skeleton.mat”. These files may be loaded into Matlab at any later time for further
analysis.
Saved files contain the following variables (N is the number of frames):
Name
Size
xxx
100 x N
Description
x-coordinates of 100 points on the detected animal in each
of N frames. xxx(1, :) corresponds to the path of the head;
xxx(end, :) corresponds to the path of the tail.
yyy
100 x N
y-coordinates of 100 points on the detected animal in each of
N frames.
sig perp
1xN
The value of σ⊥ used in each frame.
sig long
1xN
The value of σk used in each frame.
lambda
1xN
The value of λ used in each frame.
thresh
1xN
The value of the detection threshold used in each frame.
scalerect
1x4
The coordinates of any box measured using the “Measure”
button: [xleft , xright , ytop , ybottom ]. (See below.)
ifnbase
(string)
the full pathname of the source of the analyzed data.
vsn
(string)
the version identifier of Wormfinder; currently “1.0.1”.
There are a few other variables, but those are for internal use.
It is also possible to save the results as a movie file (by clicking “Make AVI”); this is mainly
useful for demonstation purposes.
3
Including scale information in saved results
If you drag a rectangle over an image and click “Measure”, the pixel coordinates of that rectangle will be saved along with the detection results. This can be useful to include scale information, e.g., if a ruler or grid was included in the image. Only the coordinates of the most
recently measured rectangle are saved.
Reloading previous results
Should the need arise, previously saved results may be reloaded into Wormfinder by clicking
the “Load results” button. At that point, it is possible to navigate through the detection results, or to change some parameters and refine the detection. Please note that reloading in
this way is only possible if the original image(s) is (are) still in the same location.
Contacting the author
Please use email for all inquiries: [email protected]. I cannot guarantee support, but I do try
to respond to all questions. Should my email address change in the future, the current address
may always be found at http://www.danielwagenaar.net.
4