1
NoteBookMaker
USER MANUAL v 10.0
®
NoteBookMaker®
User Manual
10.x
Table of Contents
Welcome and about the NoteBookMaker®.........................................................2
Video Tutorial Support ........................................................................................3
Installation.............................................................................................................4
Using the Software .......................................................................................... 5-20
User Set-UP ................................................................................................. 5-6
User Login................................................................................................................... 7-8
The Cover........................................................................................................................9
The Page (Text only) no graphics ..................................................................................10
The Page (Text and Graphics)
Page Headers .....................................................................................................12
Value Lists.........................................................................................................12
Scripts and automation.......................................................................................12
Search Layout................................................................................................................13
Table of Contents (TOC) ..............................................................................................14
Export – Import- Formats...................................................................................14
The Librarian............................................................................................................15-17
Card view ......................................................................................................................15
Scripts and automation.......................................................................................16
Table view Card(s) & Book(s).......................................................................................17
The Security Log...........................................................................................................18
Audit Reports.....................................................................................................18
Pasting a Table .........................................................................................................19-20
License ............................................................................................................21-22
Single User ................................................................................................ 21-22
Multi-User ...............................................................................................................21-22
NoteBookMaker®
User Manual
10.0
W
elcome and thank you for selecting
NoteBookMaker® - The World Leader in Electronic Laboratory NoteBooks.
NoteBookMaker™ is a legal notebook system for laboratory professionals. The solution
was produced with FileMaker® Developer database software. It is simple to use and
manage. Unlike other database solutions, this product delivers true “what you see is what
you get”, a key feature for legal defense and support for 21CFR Part 11compliance.
NoteBookMaker™ can be setup in single user, multi-user (pier to pier, or client/server).
The multi-user mode requires the purchase of FileMaker Pro 7.0 or greater and is best
hosted by FileMaker Pro Server. Minimal IT knowledge is required to get started.
It contains 2 main database files a NoteBook, and a Librarian file. The NoteBook file is
where the scientist enters their data. The Librarian is where the IT department or
administrator sets up users via Library Cards. The NoteBook file looks like a book but
has the power of a modern database engine. One can easily create, search, and print
scientific data. It uses 2 layouts: Layout 1 text only, and Layout 2 for text and graphics
(pictures, sounds and movies).
The direction tool bar controls navigation. Use of the bar controls the correct viewing
and printing of data. It was necessary to develop this direction tool bar in order to
properly select the correct layout. The record browser is a good visual tool to guide the
user through the notebook and list of Cards in the Library
Printing will automatically select the appropriate layout. Data that is ready for patent
submission can easily be imaged to pdf, or as a stand-alone data file (similar to this
solution) that requires no additional software. This is critical for 21CFR Part 11
compliance.
The default font is Times New Roman - True Type (12 point). It was selected for its
legibility both on screen and on paper. The font face is used in all fields accept the
graphics field on layout 2. The graphics field can take a paste from any clipboard
compatible program. Sophisticated scans, tables, sound, and movies can be placed. Both
layouts have a text field for scientific data. Because this solution works like paper and
not just a database, it is limited to how many lines of data that can be displayed in an 8.5
x 11 format. In order to provide the legal aspects of an electronic notebook, some pull
down menus were stripped of their normal FileMaker Pro functionality. Button
commands were substituted for the pull down menus to provide specific access & control
for the end user and the IT department. Help files are located on the tabs of each layout:
Edit
Print
Go To
Legal
Tool Tips are available for each button and field label. They can be turned off after the
user is familiar with the software.
Manual-10.0
Page 2 of 23
Imaged: 03/16/2010
NoteBookMaker®
Video Tutorial Support
User Manual
10.0
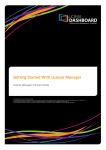
This manual is supported by QuickTime videos that can be found by going to
http://notebookmaker.com. We recommend watching the NoteBookMaker® tutorial
videos to fill in any questions that you may have. The videos can easily be included into
a company’s standard operating procedure training requirements. A list of vides can be
found on the next page.
More videos will be added over time, so visit the site
periodically.
Manual-10.0
Page 3 of 23
Imaged: 03/16/2010
NoteBookMaker®
I
User Manual
10.0
nstallation The program is easy to set up and use. We kept it simple so that it
would work as designed, like a laboratory notebook. So let’s get started.
The installation program NoteBookMakerInstaller will prompt you to install the
application and to read the license agreement. Installation will default to the program
folder directory on the hard drive, and will also place an icon on your desktop. On a
Mac, look inside your applications folder and drag it to your dock for easy access.
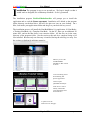
The installation process will install the NoteBookMaker 10.x application, 10 NoteBooks,
a Training-NoteBook, & a Template-NoteBook. On the PC, there are an additional 30
minor files, and on the Mac there is an extension folder. All the files are in the same
directory of the program folder. See the section at the end for a complete listing of all
files installed. Because only one directory is installed, backup & archiving is a snap. See
the sections on backup & archiving strategies.
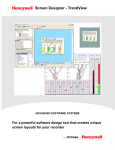
Directory view of the
NoteBookMaker
installation. Mac version
is shown.
A list of Training videos
demonstrating best
practice approaches.
Videos require
QuickTime Pro Player.
Learn how to create a
Library Card, Edit a
card, and manage users
and notebooks.
A quick tour of the
notebook cover and page.
Manual-10.0
Page 4 of 23
Imaged: 03/16/2010
NoteBookMaker®
U
User Manual
10.0
sing the Software
Before we can begin entering data into our 1-Notebook, we must setup the
Librarian with a user and a witness. This is a formal process for each user.
Note: If you are using the demonstration software then you can skip this section for now.
Simply open the 1-NoteBookMaker.fp7 file and when prompted, type in Albert Einstein
for the User and emc2 for the password. This will log you in as Albert Einstein. Latter
you can go to the Card View in the Library and create your own card. When you are
ready to purchase a full license then follow the steps below to gain access to the
Librarian.
User Set-Up (The Librarian)
Typically, the Librarian is a person who manages the system but they may also be a user
as an author, witness or validator . In the single user version, the user is also the
Librarian. The Librarian will administer the notebooks and Library Cards.
First, we must open the Librarian data file. If this is your first attempt, you will see 9
Cards for the Training-NoteBook. You can use their ID to explore the functions of the
NoteBook system.
Simply click the corresponding NoteBook ID,
and when prompted, type in the user name and password, such as Albert Einstein, emc2.
Manual-10.0
Page 5 of 23
Imaged: 03/16/2010
NoteBookMaker®
User Manual
10.0
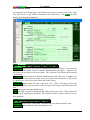
Now that you have familiarized yourself with the NoteBook, you may want to create a
Card for your specific ID. To do this you will need to access the Card layout.
If you have made cards before and want to edit or create new ones, then click the “Create
or Edit Cards” button to gain access to the Card layout:
The system comes with the Librarian in Demo Mode, and thus you will not need to type
in the administrative user name and password. However, once the Librarian has been
registered, then you will need to type in the Librarian user name and password. The
registration license is sent via email at time of purchase. Registering the Librarian
secures access to the Card layout where all passwords are stored.
For the sake of discussion, let us assume you are in Demo Mode and you have access to
the Card layout so you can administer the card system and get familiar with managing the
users for the author, witness and validator roles. Once you click the Create or Edit Cards
button, a Registration dialog is presented. Select Demo as shown below.
Once clicked, the Card layout is displayed as shown on the next page.
Manual-10.0
Page 6 of 23
Imaged: 03/16/2010
NoteBookMaker®
User Manual
10.0
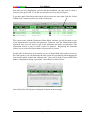
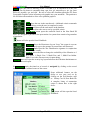
Each system comes with 9 cards that can be edited or deleted. In this case, we will click
the New Card button or just modify an existing card.
Completely fill out the card for the first user. Include a photo to yield a visual ID of the
user. Use a security setting of 3 to allow the new user to witness the first page of the 1NoteBook. Create a second card for 1-NoteBook that will be used for witnessing. This
will be for the person that will review the notebook so here too you will need a security
setting of 3. Create as many cards as you have users. It is a good idea to have all your
photos and user information before beginning this process. The “host” Password should
be changed after the system is set-up. See the section on Passwords and Security. Once
you have made a Library Card, the user can open a book and login.
In multi-user mode, the Librarian administrator will keep the Librarian.fp7 file open for
users to access during their normal login process. It is highly recommended that a
dedicated server host the Librarian, and all notebook files. The server should not be used
for routine data entry of notebooks, but merely hosting and system administration.
Manual-10.0
Page 7 of 23
Imaged: 03/16/2010
NoteBookMaker®
User Login
User Manual
10.0
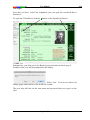
Now that you have your Card completed, you can open the notebook that it
references.
To open the 1-NoteBook, click the > button or the Open Book button.
Alternatively, you click out to the Books layout and select as show page 5.
In either event, you will be prompted by this dialog:
Select User. User access allows for
adding pages and content to the notebook system.
The next step will ask for the user name and password that was typed on the
card.
Manual-10.0
Page 8 of 23
Imaged: 03/16/2010
NoteBookMaker®
User Manual
10.0
When your 1-NoteBook.fp7 file boots up, you will be prompted for:
User Name “your name”
Password “your password”
This is the information that you typed into the Librarian when you set up your card.
During the login process, the Librarian Security table records the information that the
user types. The information typed is compared to the information that was set-up in the
Librarian by the administrator/host. If the information is a complete match, then the user
is presented with their notebook data file (1-NoteBook.fp7). If the information is not a
match, then the user is rejected and has a total of 3 attempts before all the data files are
closed.
Upon successful login, the User will appear on the cover as you are presented with your
1-NoteBook (See next section). Their first assignment should be to witness the initial
page. This tells management that they have read and understood that this is a secure
electronic notebook system.
Click around to get the feel of the application. The user can now start creating and
posting pages. On a routine schedule, the person designated as the witness for this 1NoteBook should review and post their signature to completed pages. The witness will
need a Library Card with a security level of 2, 3 or 10.
Manual-10.0
Page 9 of 23
Imaged: 03/16/2010
NoteBookMaker®
The Cover
User Manual
10.0
The cover displays the photo identification of the current log in user. In upper right hand
corner is a control menu that performs the following functions:
Open will open the notebook to the last page.
TOC opens to the table of contents view.
Library opens the Librarian file.
Help brings up the help information for the cover layout.
Close will close the notebook but keep the application running.
Exit will close all active books and quit the application.
Manual-10.0
Page 10 of 23
Imaged: 03/16/2010
NoteBookMaker®
User Manual
The Page: (TEXT only) no graphics
When you create a new page, you will be prompted to choose between 2 layout styles.
10.0
Header
with
page
inform
-ation
This is the view of a Text Only
page. This type of layout is only
for text and not for graphics.
Body
with
main
Text
field
Footer
with
Dates
&
Photos
From here you will perform the functions that are listed on the button pallets, such as
Copy, Paste, Print, Go To navigation, & most importantly, issue Legal functions such
as New Page, Edit Page, Post Author, Post Witness. The security clearance that was
set up in the librarian will determine what legal functions that are permitted. There are
other constraints as well, such as: an author cannot witness their own page; a witness
cannot witness a page that has not been authorized; a “host” cannot authorize or witness
any pages, but merely browse. These constraints are essential to legal notebook system.
Detailed information can be found in the Help Tabs of each palette.
Manual-10.0
Page 11 of 23
Imaged: 03/16/2010
NoteBookMaker®
The Page: (Text and Graphics)
User Manual
10.0
The first layout only involves a body that has one big text area. This text only layout is
typically used for free form typing and pasting in text from other programs. If one wants
to preserve the
Header
with
page
inform
-ation
Body with
main Text
field
&
Graphic
Legal
(New Page)
(Signatures
)
Footer
with
Dates
&
Photos
formatting or paste in pictures, then Layout 2 “Text & Graphics” is required. The
graphics field above can support many popular formats and thus most popular scientific
and graphic programs. Supported formats include: copy/paste, .tiff, .eps, .pdf, .jpg, .gif,
and many others. Sound (.aiff, .mp3) and Movie formats are also supported.
Manual-10.0
Page 12 of 23
Imaged: 03/16/2010
NoteBookMaker®
Page Headers
User Manual
10.0
As with any page, you should fill out the header fields so you can do proper searches.
For example, the Project ID field can be loaded with default values so all your users
conform to proper language. Attachment can hold file archives of any type of data.
Value List can be Exported and modified in a spreadsheet program and then copied back
into any
notebook. The last item Export
Value Lists is what is used to
export not only Project ID, but
also
Project
Name,
and
Compound Name.
The files created can be found in
the parent folder of your 1NoteBook data file.:
Project Name Value List.tab
Page Type Value List.tab
Project ID Value List.tab
Manual-10.0
Page 13 of 23
Imaged: 03/16/2010
NoteBookMaker®
Search Layout
User Manual
10.0
With the header fields in combination with the footer and main body text fields, a user
can perform very detailed searches.
The buttons to the right, under Search tab: Show
All Find, Re-Find, and others are convenient
ways to conduct searches. Navigational controls
are listed under the Go To tab, while the Edit
functions are listed at the top left.
Enter your search criteria, create multiple
requests, expand, and constrain to get the page
records that are of interest.
After you have completed your search, you can
print, or report on your found set.
It is important to note that only one book can be
searched at one time. If the user wishes to search
multiple books then they have two options. The first option is to use merge existing
notebooks into one notebook. This can be accomplished by importing multiple books
into an empty Template-NoteBook.fp7. You can rename the file before or after the
process as long as you have a library card that grants access. Once all the file(s) are
imported, then a search will be for all the data. Alternatively, you can export each
individual notebook as an Adobe Acrobat Portable Document “.pdf”. The network
version can export directly to this format. Later, you can import each pdf into a master
pdf and use Acrobat’s search routines.
Either way, exporting and importing into a master notebook or master pdf are great ways
to search on all your organizations data. And, you do not need an IT department to
accomplish it. All these functions are straightforward, end user skills.
Manual-10.0
Page 14 of 23
Imaged: 03/16/2010
NoteBookMaker®
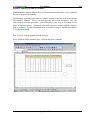
Table of Contents (TOC)
User Manual
10.0
Each notebook will automatically build a table of contents. The Go To tab provides a
great way to perform quick reviews of found data sets. Each field can be sorted to
generate a specific order. The fields displayed are: Project ID, Project Name, Compound
Name, Page #, File Name, Author, Posted Date, Witness and Date Created. The reports
can be output to any device or electronic format.
An advanced technique involves combining several notebooks into one. The text fields
can be exported from each notebook file and imported into a master notebook. This way,
all fields can be searched across all notebooks. The TOC will display a master page
directory for all your entries.
The export can be .TAB, .XML, or .fp7 formats. The .fp7 is the preferred
way to export and import for this feature. It will retain the original
formatting and file names.
Manual-10.0
Page 15 of 23
Imaged: 03/16/2010
NoteBookMaker®
The Librarian (Detail)
User Manual
10.0
As mentioned in the Setup pages, the Librarian is the place to register your users. Each
User shall receive a card with the mandatory fields listed below. The Go To tab shall
display the following information:
Card View button brings the Librarian Administrator to the card layout. Create and edit
cards here. This layout requires Librarian Administration privileges. Normal User
privileges will not allow access to the layout. This is because User Names and Passwords
are kept here.
Cards View button brings the Librarian Administrator to the table view of found set of
cards. Similar to the card view layout, no access is allowed for normal users. This layout
is a great way to view all or some of the cards in the Library.
Book View button brings the user to the book view. This is the entry point to the
Library. From here you can choose a book to open or Re-Login as the Librarian as the
user.
Help button opens the general help layout.
Close will only close the Librarian data file, and not other active files. This will prevent
any user from login into any notebook. The Librarian must be open for others to access
their notebook.
New Card button creates a new blank card that needs to be filled out before using.
Dupe Card button duplicates the existing library card.
Manual-10.0
Page 16 of 23
Imaged: 03/16/2010
NoteBookMaker®
User Manual
Photo allows the user to directory locate a file that is to be imported in to the user
picture. The file format is compatible bmp, cgm, drw, gif, macpaint, pcx, pic, jpg, lotus
SLD, tiff, metafile, eps, and epsf. Be sure to select the document preference for Store
Compatible Graphics before importing each graphic into your notebook. The preference
file will direct the notebook to store cross-platform graphics.
10.0
Find places the user in the search mode. Additional criteria commands
are available to assist the user in completed a search.
Find-All will show all the card entries in the database.
Sort button allows the user to sort by specified criteria
Open Book button opens the notebook listed in the Note Book ID
field. It is designed to provide a fast open routine for systems that contain a large number
of notebooks.
button will also open the listed NoteBook.
Re-Login allows the Librarian to log out “leave” the system in a secure
mode. Securely type at the prompts Account Name and Password.
Password button provides the identification signature in conjunction
with the user’s name.
Sharing allows the Host to change the availability of the Librarian to 1
of 3 states: 1. Single User, 2, Multi-User, and 3, Multi-User hidden.
Multi-User is the state necessary for networking.
Security button will open the security log layout and allow the Librarian administrator to
view the audit trail report.
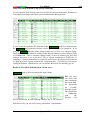
In Card View mode, the found set of records is navigated by clicking on the record
index in the upper left hand corner of the screen.
Some additional features are the
ability to sort your card set by
clicking on the field headers such
as: Library Card #, Note Book ID.
A complete listing of automation
scripts is shown here to the right
above.
button will also open the listed
NoteBook.
Manual-10.0
Page 17 of 23
Imaged: 03/16/2010
NoteBookMaker®
User Manual
Table View Mode in Detail (Card List for Librarian)
10.0
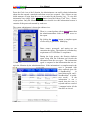
It is obvious that The Librarian is the place to hold all your user information, but there are
some other interesting features that system administrators shall appreciate.
A very useful tool built into The Librarian is the Cards View mode. It is different than
the Card View mode primarily because it shows you all the users in a found set. If we
issue the Find All command before going to table view we will see a complete listing.
The Table view can be sorted by clicking on the individual headers, such as Author Name
or NoteBook ID. This is extremely helpful when you need to identify who and what
someone has access to use or has used. This is a major component of 21CFR Part 11
compliance. System administrators can quickly modify access privileges on the found set
by applying replace content command on a particular field. Care must be given before
issuing the function. Modifications can’t be undone unless they are manually type set.
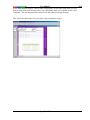
Book List View Mode in Detail (Book List for users)
Books List mode is the main entry point in the Library.
Here the users
can easily find
there notebooks
and open them.
No passwords
are
viewable
from this layout.
The Librarian in
conjunction
with
the
Security
Log
provide full security & audit reporting which are key to 21CFR Part 11.
With these tools, you will easily satisfy your auditor’s requirements.
Manual-10.0
Page 18 of 23
Imaged: 03/16/2010
NoteBookMaker®
The Security Log
User Manual
10.0
From the Card view of the Librarian, the Administrator can readily obtain information
about who has opened a notebook and when access has occurred. Also, if there are any
failed attempts at login, then they too are recorded by the Security Log. To view this
information one simply clicks Security button from the Library Card View – Secure
scripts palette. Only the Librarian administrator should view this information because it
contains all the passwords entered by each user.
The system administrator is shown the cabinet view:
There is a control palette with an Audit button that
the administrator/host clicks on to gain access to
the report.
By clicking the Find-All button, a complete report
of all activity is generated. Modifying
Dates, names, passwords, and sorting too can
customize the report. The audit trail is another key
requirement of 21 CFR Part 11 compliance.
During the login process, the Security database
opens along with the Librarian and records the
information that the user types. The information
typed is compared to the information that was setup in the Librarian by the administrator/host. If the information is a complete match, the
user is presented with
their notebook data file
(1-NoteBook.fp7
in
stand-alone mode, and 1NoteBook.fm7 in multiuser mode).
If the
information is not a
match, then the user is
rejected and has a total of
3 attempts before all the
data files are closed.
Manual-10.0
Page 19 of 23
Imaged: 03/16/2010
NoteBookMaker®
User Manual
Pasting a Table as Text and as a Graphic.
10.0
NoteBookMaker supports Microsoft Excel, Word and PowerPoint files via the clipboard
for easy copy-paste functionality.
The advantage of pasting in the table as a graphic element is that the layout is maintained
and cannot be changed. This too can be copied out and re-used if required. Any size
table can be used in this procedure. Even if the table is very large, it will image out on
paper as magazine quality. Alternately, one could copy/paste sections until the complete
table is produced. Use the magnification for on-screen viewing of detailed spreadsheets
in NoteBookMaker®.
First, you will click the graphic element and copy;
Next, click back on the notebook page, and issue the paste command.
Manual-10.0
Page 20 of 23
Imaged: 03/16/2010
NoteBookMaker®
User Manual
If you want multiple images, such as tables and graphics for the same page, then you will
need to shift-click each element, click copy, then bring them over together on the same
clip board. The will automatically, reduce to fit and center for proper viewing.
10.0
This is how the table looks once you paste it into a graphic/text page.
Manual-10.0
Page 21 of 23
Imaged: 03/16/2010
NoteBookMaker®
L
User Manual
10.0
icense
[NoteBookMaker® SOFTWARE LICENSE]
PLEASE READ THIS LICENSE CAREFULLY BEFORE USING THIS SOFTWARE.
BY USING THIS
SOFTWARE, YOU AGREE TO BECOME BOUND BY THE TERMS OF THIS LICENSE. IF YOU DO NOT
AGREE TO THE TERMS OF THIS LICENSE, DO NOT USE THIS SOFTWARE AND PROMPTLY RETURN IT
TO THE PLACE WHERE YOU OBTAINED IT FOR A FULL REFUND.
The enclosed "NoteBookMaker®" electronic laboratory notebook program ("Software") is licensed,
not sold, to you by the author for use only under the terms of this License, and the author
reserves any rights not expressly granted to you. You own the media on which the Software is
recorded or fixed, but the author and its licensors retain ownership of the Software itself.
1.
License. This License allows you to:
(a)
Use one copy of the Software on a single computer at a time. To use the Software means
that the Software is either loaded in the temporary memory (i.e., RAM) of a computer or installed
on the permanent memory of a computer (i.e., hard disk, etc.).
(b)
Make one copy of the Software in machine-readable form solely for backup purposes. As
an express condition of this License, you must reproduce on each copy any copyright notice or
other proprietary notice that is on the original copy supplied by the author.
(c)
Stand alone single user license (with demonstration data) can be permanently transferred
under this License to another party by providing to such party all copies of the Software licensed
under this License together with a copy of this License and the accompanying written materials,
provided that the other party reads and agrees to accept the terms and conditions of this License.
Transfer of rights only applies to the stand-alone single user version. Transfer of the multi-user
license does not apply, (see next section).
(d)
The Stand-alone single user license (without demonstration) cannot be permanently
transferred under this License to another party. The license requires each unique user to purchase
a separate license. Thus, each unique user must be registered via the Librarian to gain access.
The license is granted per user/company. If a user changes company employment, they must
purchase a new license to use the system in the new company. A license from one company to
another is not permitted. Agreements between NoteBookMaker, LLC and the purchaser must be
made in advance of sale. NoteBookMaker, LLC retains the right to audit the user company once
per year for compliance of the end user license agreement. Contact [email protected] to
initiate the number of licenses required to outfit your organization.
(e)
The multi-user license requires each unique user to purchase a separate license unless
otherwise noted in the sales agreement. Thus, each unique user must be registered via the
Librarian to gain access. The license is granted per user/company. If a user changes company
employment, they must purchase a new license to use the system in the new company. A license
from one company to another is not permitted. Agreements between NoteBookMaker, LLC and
the purchaser must be made in advance of sale. NoteBookMaker, LLC retains the right to audit the
user company once per year for compliance of the end user license agreement. Contact
[email protected] to initiate the number of licenses required to outfit your organization.
2.
Restrictions. The Software contains trade secrets in its human perceivable form and, to
protect them, you may not REVERSE ENGINEER, DECOMPILE, DISASSEMBLE OR OTHERWISE REDUCE
Manual-10.0
Page 22 of 23
Imaged: 03/16/2010
NoteBookMaker®
User Manual
10.0
THE SOFTWARE TO ANY HUMAN PERCEIVABLE FORM.
YOU MAY NOT MODIFY, ADAPT,
TRANSLATE, RENT, LEASE, LOAN OR CREATE DERIVATIVE WORKS BASED UPON THE SOFTWARE
OR ANY PART THEREOF.
3.
Termination. This License is effective until terminated. This License will terminate
immediately without notice from the author or judicial resolution if you fail to comply with any
provision of this License. Upon such termination you must destroy the Software, all accompanying
written materials and all copies thereof, and Sections 6, 7 and 8 will survive any termination.
4. Passwords. The Software licensed to you contains features, which are protected by certain
passwords. You are not authorized to enter, remove or change such passwords, and only the
author is authorized to enter, remove or change such passwords.
5. Export Law Assurances. You agree that neither the Software nor any direct product thereof is
being or will be shipped, transferred or re-exported, directly or indirectly, into any country
prohibited by the United States Export Administration Act and the regulations there under or will
be used for any purpose prohibited by the Act.
6. Limited Warranty. The author warrants for a period of ninety (90) days from your date of
purchase that (i) the media on which the Software is recorded will be free from defects in
materials and workmanship under normal use, and (ii) the Software as provided by the author will
substantially conform to the author's published specifications for the Software. The author's
entire liability and your sole and exclusive remedy for any breach of the foregoing limited warranty
will be, at the author's option, replacement of the media, refund of the purchase price or repair or
replacement of the Software.
THIS LIMITED WARRANTY IS THE ONLY WARRANTY PROVIDED BY THE AUTHOR AND ITS LICENSORS
EXPRESSLY DISCLAIM ALL OTHER WARRANTIES, EITHER EXPRESS OR IMPLIED, INCLUDING BUT NOT
LIMITED TO IMPLIED WARRANTIES OF MERCHANTABILITY AND FITNESS FOR A PARTICULAR
PURPOSE WITH REGARD TO THE SOFTWARE AND ACCOMPANYING WRITTEN MATERIALS. BECAUSE
SOME JURISDICTIONS DO NOT ALLOW THE EXCLUSION OR LIMITATION OF IMPLIED WARRANTIES,
THE ABOVE LIMITATION MAY NOT APPLY TO YOU.
7.
Limitation of Remedies and Damages. In no event will the author, its parent or subsidiaries
or any of the licensors, directors, officers, employees or affiliates of any of the foregoing be liable
to you for any consequential, incidental, indirect or special damages whatsoever (including,
without limitation, damages for loss of business profits, business interruption, loss of business
information and the like), whether foreseeable or unforeseeable, arising out of the use of or
inability to use the Software or accompanying written materials, regardless of the basis of the
claim and even if the author or the author's representative has been advised of the possibility of
such damage. The author's liability to you for direct damages for any cause whatsoever, and
regardless of the form of the action, will be limited to the greater of $500 or the money paid for
the Software that caused the damages.
THIS LIMITATION WILL NOT APPLY IN CASE OF PERSONAL INJURY ONLY WHERE AND TO THE
EXTENT THAT APPLICABLE LAW REQUIRES SUCH LIABILITY. BECAUSE SOME JURISDICTIONS DO
NOT ALLOW THE EXCLUSION OR LIMITATION OF LIABILITY FOR CONSEQUENTIAL OR INCIDENTAL
DAMAGES, THE ABOVE LIMITATION MAY NOT APPLY TO YOU.
8. General. This License will be construed under the laws of the State of Connecticut, except for
that body of law dealing with conflicts of law. If any provision of this License shall be held by a
court of competent jurisdiction to be contrary to law, that provision will be enforced to the
maximum extent permissible, and the remaining provisions of this License will remain in full force
and effect. If the Software is supplied to the United States Government, the Software is classified
as restricted computer software as defined in clause 52.227-19 of the FAR. The United States
Governments rights to the Software are as provided in clause 52.227-19 of the FAR.
Manual-10.0
Page 23 of 23
Imaged: 03/16/2010