1
Each Beacon transponder has unique characteristics and should be implanted
in the recommended region of the prostatic bed. The introducers are uniquely
labeled and color coded to indicate the implant region.
t Beacon transponders must be implanted either using transrectal ultrasound
imaging for guidance at least 2 - 3 weeks after prostatectomy or using direct
visual inspection during open prostatectomy.
t In the event that a Beacon transponder should drop onto the sterile drape
during handling, use only a gloved hand to pick up the transponder and
place it in the hub end of the introducer; do not use metal tweezers to pick
up the transponder as it may damage the transponder surface. If you must
use metal tweezers to pick up the transponder, discard the transponder. If the
transponder drops on a non-sterile surface, do not use the transponder.
t In the event that an introducer is damaged prior to use, do not use the
introducer for implant and dispose of it properly.
t Compatibility with surgical clips has not been evaluated.
t For transrectal implantation of the transponders, the transponders should
be implanted at least 2 - 3 weeks post-prostatectomy to allow for reduction
of edema and initiation of fibrosis in the prostatic bed, in order to avoid
movement of the transponders.
t Implantation through a transperineal approach has not been evaluated.
t Beacon transponders have not been evaluated for implantation via
robotic surgical instrumentation.
t
Beacon Care Package for Prostatic Bed
Instructions for Use
Varian Medical Systems
LBL0090-002 Rev A (2012-2-10)
Caution: Federal law restricts this device to sale by or on the order of a physician.
INTRODUCTION
Before implanting the Beacon transponders contained in this Beacon Care
Package, complete the Calypso training program and carefully read all sections
in this document. This document describes the Beacon Care Package components,
implantation procedure instructions, and transponder placement into the
peri-prostatic tissue following prior surgical removal of the prostate (i.e.,
implantation into the prostatic bed). This document describes postoperative
transrectal and intraoperative direct implantation use.
®
®
Each patient should be evaluated to determine if the patient is a candidate for
implantation, including whether their size limits them to setup for treatment or
setup and tracking during treatment. This must be evaluated prior to Beacon
transponder implant, following the guidelines outlined in the Calypso System
User’s Manual.
PRODUCT DESCRIPTION
Beacon transponders are small, passive, electrical components encapsulated in
biocompatible glass, which are permanently implanted in or near the treatment
target for use during radiation therapy. Beacon transponders were developed
specifically for use with the Calypso System in order to provide a reliable and
accurate method for target localization and continuous, real-time tracking
during radiation therapy treatments. The Calypso System temporarily excites the
implanted Beacon transponders; each Beacon transponder then briefly emits a
unique response signal, which is detected, measured, and used to determine the
location of the patient’s treatment target. The Calypso System works in tandem
with implanted Beacon transponders to continuously report the current position
of the target relative to the treatment isocenter.
This Beacon Care Package contains three single-use 14-gauge introducer needles
(introducers) and Beacon transponders for implantation into a single patient. Each
Beacon transponder is manually loaded into the introducer for implantation.
INDICATIONS FOR USE
The Calypso System is intended for use as an adjunct in treatment planning and
radiation therapy, to align and/or monitor the patient’s position relative to the
isocenter of a radiation therapy system. The Calypso System provides accurate,
precise and continuous localization of a treatment isocenter by using two or
more Beacon transponders.
Implanted Beacon transponders are indicated for use to radiographically and
electromagnetically mark soft tissue for future therapeutic procedures.
Permanent Beacon transponders are indicated for implantation in the prostate
and the peri-prostatic tissue (i.e., prostatic bed) to align and monitor the
treatment isocenter in real time during radiation therapy.
CONTRAINDICATIONS
Prosthetic implants in the pelvic region that contain metal or conductive
materials (e.g., an artificial hip).
t Use of anti-coagulants or anti-platelet drug therapy (not including aspirin).
t
WARNINGS
The effect of the Calypso System operation on active implanted devices, such
as pacemakers and defibrillators, in patients is unknown. Be aware that the
operation of the Calypso System may impact the normal functioning of such
active implanted devices.
t Beacon Care Packages are gamma (radiation) sterilized and are supplied
sterile and non-pyrogenic. Use standard operating procedures to maintain
the sterility of the devices during unpacking and use. Do not use if package
has previously been opened or appears to be damaged.
t Beacon transponders and introducers are for single use only. Do not
re-sterilize or reuse.
t
PRECAUTIONS
When using ultrasound imaging to guide implantation, always follow the
ultrasound transducer manufacturer’s instructions when preparing the
transducer to be used in an implant procedure.
t Non-clinical testing has demonstrated that Beacon transponders are MR
conditional. A patient implanted with Beacon transponders can be safely
scanned under the following conditions:
t Static magnetic field of 1.5T or 3T;
t Static magnetic field gradient of 2.5T/m;
t Maximum whole-body-averaged specific absorption rate of 2.0 W/kg
for 20 minutes, in the normal operating mode of MR scanning
MR artifacts may extend up to, and in some cases more than, 2 cm from
the transponder for a spin echo sequence.
t Use caution when the following additional therapies are required:
brachytherapy treatment (permanent seeds or HDR), electrosurgical
procedures (e.g., harmonic scalpel, transurethral needle ablation, radio
frequency (RF) ablation), cryoablation, lithotripsy, and laser vaporization.
Avoid direct contact with the Beacon transponders when administering
these therapies. Beacon transponder functionality and encapsulation after
administration of these therapies has not been assessed.
t Beacon transponders should be implanted only by physicians who have
received Calypso implant training.
t Beacon Care Packages should be implanted before the sterilization
expiration date on the package.
t Beacon Care Packages should be stored at standard room temperature
(greater than -18 degrees C and less than 55 degrees C) and kept dry.
t Beacon Care Packages contain introducer needles. Handle introducers
according to departmental sharps protocols.
t
COMPONENT DESCRIPTION
Beacon Transponders
Each Beacon transponder consists of a sealed, biocompatible glass capsule
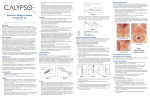
containing a miniature passive electrical circuit (Figure 1). The Beacon
transponders are visible on kilovoltage radiographs, CTs, and ultrasound
images. Each Beacon transponder is packaged in a transfer capsule (Figure 2).
The transfer capsule is color coded and labeled A, L, or R to indicate the implant
site for the Beacon transponder. The transfer capsule is used to load the Beacon
transponder into the introducer.
Introducers
A separate introducer is used to implant each Beacon transponder into a
region in or near the treatment target. Each introducer consists of a customized,
14-gauge needle assembly and an internal removable stylet. A color mark on
the hub indicates where the distal tip of the needle bevel is located.
t Each pouch contains one introducer and one Beacon transponder. The Beacon
transponder must be loaded into the introducer prior to implant (see the section
titled “Preparing the Introducers for Implantation” for complete instructions).
t A clip secures the extended stylet to the needle hub (see Figure 3). The clip
should be reattached after the Beacon transponder is loaded in the introducer
and should be left in place until the time of implant to prevent accidental
premature deployment of the Beacon transponder.
t
Area of detail
Clip
Needle Hub
Figure 3
t
1.8 m
Electrical
Components
8.7 mm
Figure 1
Figure 2
Using transrectal ultrasound imaging, determine the optimal target implant sites for
each of the 3 Beacon transponders before beginning the implantation procedure.
It is important to consider the following criteria when selecting target implant sites
for the Beacon transponders to ensure optimal localization accuracy:
Each Beacon transponder has unique characteristics, and the individual
Beacon transponders are to be placed in the regions of the prostatic bed
indicated by the label and color coding of the introducer.
t Two Beacon transponders will be placed between the bladder and rectal
wall, one on the right side and one on the left side, behind the trigone. One
Beacon transponder will be placed on the right side of the anastomosis site.
t Avoid implanting the Beacon transponders in the urethra or bladder wall.
t Implant the Beacon transponders so that they are equidistant and in a
triangular pattern in the prostatic bed.
t The recommended distance between the Beacon transponders is 1 cm
(recommended minimum distance is 1 cm and recommended maximum
distance is 7.5 cm). If the prostatic bed is too small to accommodate this
spacing, select target implant sites so that the Beacon transponders will be as
far apart from each other as possible (refer to Figure 8).
t
Each Beacon transponder has a unique frequency associated with a specific
region of the treatment target (A, L, and R). The introducer stylets and hubs
are color coded (blue, white, and green) to distinguish them (see Figure 4).
Figure 4
A: Anterior/Posterior View
PREPARING THE INTRODUCERS FOR IMPLANTATION
Each Beacon Care Package consists of three pouches. Each pouch contains one
introducer and one Beacon transponder packaged in a Beacon transponder
transfer capsule. Open one pouch at a time to ensure the correct Beacon
transponder is loaded in the corresponding introducer.
To load the Beacon transponder into the introducer:
1. Place a sterile drape on a flat surface.
2. Remove the transfer capsule and introducer from the pouch.
3. Remove the stylet from the introducer, leaving the clip attached to the stylet,
and place both the stylet and the introducer on the sterile drape.
4. Hold the transfer capsule upright and unscrew the cap from the transfer
capsule, making sure that the Beacon transponder does not fall out of the
capsule (see Figure 5).
5. Continue to hold the transfer capsule upright and screw the hub of the
introducer needle onto the transfer capsule (see Figure 6). This should be a
snug not tight fit.
6. Turn the introducer tip downward so that the Beacon transponder drops into
the end of the introducer. If the transponder does not drop on its own, gently
tapping the center of the capsule with your finger will cause the transponder
to drop into the introducer (see Figure 7). A slight crimp in the end of the
introducer prevents the Beacon transponder from falling out.
C: Transverse View
B: Sagittal View (Right)
Figure 8:
Optimal Transponder
Implantation Locations
TRANSPONDER IMPLANTATION INSTRUCTIONS: POSTOPERATIVE TRANSRECTAL
IMPLANTATION INTO PROSTATIC BED SOFT TISSUE
Patient Preparation Prior to Day of Implantation
The Beacon transponders should be implanted at least 2 - 3 weeks following
prostatectomy surgery to allow for reduction of edema and initiation of fibrosis
in the prostatic bed, in order to avoid shifting of the transponder position.
t Patients should be fully healed from the prostatectomy surgery as determined
by the urologist prior to transponder implantation.
t Per institutional guidelines, consider antibiotic prophylaxis for fiducial
implantation of the prostatic bed and use of local anesthesia.
t
Preparation on Day of Implantation
A
Have the patient perform routine bowel preparation to enable transrectal
ultrasound (TRUS) imaging prior to the procedure.
t Load the Beacon transponders into the introducers and place them on a
sterile drape prior to patient arrival as described in the “Preparing the
Introducers for Implantation” section of this document.
t Prepare the patient for transrectal ultrasound (TRUS) examination.
t Ensure that the patient and a sterile field have been prepared for placement
of the introducers, as is normally done for a gold marker fiducial implantation
or prostate biopsy procedure.
t If necessary, attach a sterile needle guide that will accommodate the
14-gauge introducers to the transrectal ultrasound probe.
t
Figure 5
Glass Capsule
Stylet
IMPLANT SITE RECOMMENDATIONS: POSTOPERATIVE TRANSRECTAL IMPLANTATION INTO
PROSTATIC BED SOFT TISSUE
Figure 6
Figure 7
7. Holding the introducer tip pointed downward, unscrew the transfer capsule
from the introducer hub.
8. Ensure the clip is attached to the stylet before reinserting the stylet into
the introducer.
9. Continue to hold the introducer pointed downward and slowly insert the stylet
into the introducer until the clip securely anchors the stylet, being careful not
to accidentally advance the Beacon transponder out of the needle.
10. Place the loaded introducer on the sterile drape and repeat this procedure
for the remaining introducers.
Identify Target Implant Sites
11. Insert the transrectal ultrasound probe.
12. Per institutional guidelines, administer local anesthetics early in the
procedure to provide time to take effect.
13. Perform the TRUS study of the prostatic bed. Using both sagittal and
transverse TRUS planes, survey the prostatic bed.
3
14. Determine the three target implant sites (refer to Figure 8). Two Beacon
transponders should be placed between the bladder and rectal wall, one
on the right side and one on the left side, behind the trigone. One Beacon
transponder will be placed on the right side of the anastomosis site.
15. Select target implant sites to ensure best use with the Calypso System
(see Figure 8).
Color
Implantation Position in Prostatic Bed - Postoperative Transrectal
White (Apex)
On the right side of anastomosis of the urethra
Blue (Left)
Between bladder and rectal wall, left side (behind trigone)
Green (Right)
Between the bladder and rectal wall, right side (behind trigone)
Prepare and Insert First Introducer
16. Select the appropriate introducer device for the first target implant site (see
above table), as indicated by the label and color of the introducer’s clip
and stylet.
17. Remove the protective plastic sheath from the introducer, but leave the clip
in place until the introducer is positioned within the prostatic bed to prevent
premature deployment of the Beacon transponder. Insert the introducer into
the needle guide.
18. While holding the ultrasound transducer still, position the introducer needle
within the prostatic bed so that the tip of the needle is positioned at the first
target implant site and the entire beveled tip of the needle is seen. In the
ultrasound image, the needle and bevel tip may be seen at the end of two
bright parallel lines (refer to Figure 9). If two bright lines are not visible, the
needle bevel may be seen as two bright points representing the proximal
and distal tips of the bevel.
Figure 9
The entire beveled tip of the introducer needle must be seen at the target implant
site prior to deployment of the Beacon transponder. Avoid implantation in the
bladder wall (see Figure 10 A) and the rectal wall (see Figure 10 B).
Implant Remaining Beacon Transponders
Repeat steps 16 through 21 to implant the second and third Beacon transponders
using the appropriate introducer for each implant region of the prostatic bed.
After-Implantation Procedure
Survey the prostatic bed with TRUS and locate the Beacon transponders.
t Follow standard practice for subsequent patient care following fiducial
implantation or biopsy of the prostate.
t Instruct the patient on post-operative care and potential complications.
t Wait 4 to 14 days after the implantation procedure to allow the region
and Beacon transponders to stabilize.
t Acquire treatment planning CT images, using either 1.0-mm or 1.5-mm
slice spacing throughout the prostatic bed.
t Perform treatment planning for external beam radiation therapy per standard
institutional protocol.
t Perform external beam radiation therapy per standard institutional protocol.
t The implanted Beacon transponders can either be used as radiographic
markers with kV x-ray imaging or be used with the Calypso System to
facilitate and optimize target localization and tracking during radiation
therapy. Refer to the Calypso System User’s Manual.
t
IMPLANT SITE RECOMMENDATIONS: INTRAOPERATIVE DIRECT IMPLANTATION INTO
PROSTATIC BED SOFT TISSUE
Using direct inspection of the surgical bed, determine the optimal target implant
sites for each of the 3 Beacon transponders before beginning the implantation
procedure. It is important to consider the following criteria when selecting target
implant sites for the Beacon transponders to ensure optimal localization accuracy:
Each Beacon transponder has unique characteristics, and the individual
Beacon transponders are to be placed in the regions of the prostatic bed
indicated by the label and color coding of the introducer.
t Possible implantation sites include the following:
t
Color
Implantation Position in Prostatic Bed - Intraoperative Direct Surgical
White (Apex)
The tissue adjacent to the anastomosis of the urethra
Blue (Left)
The left prostate pedicle adjacent to the removed seminal
vesicle superiorly
Green (Right)
The right prostate pedicle adjacent to the removed seminal
vesicle superiorly
Note: The tissue available for implant after radical retropubic prostatectomy
may be limited; thus, the following areas may also be used as alternate
implant sites: (See Figure 12 B):
t The peri-rectal fat medial to the neurovascular bundle in front of the rectum
t The remnants of Denonvilliers’ fascia along the rectum
t Avoid implanting the Beacon transponders in the urethra, bladder wall, or
levator ani muscle.
t Avoid rectal perforation.
t Implant the Beacon transponders so that they will be equidistant and in a
triangular pattern in the prostatic bed.
t The recommended distance between the Beacon transponders is 1 cm
(recommended minimum distance is 1 cm and recommended maximum
distance is 7.5 cm). If the prostatic bed is too small to accommodate this
spacing, select target implant sites so that the Beacon transponders will be as
far apart from each other as possible.
t
Figure 10 A
Figure 10 B
Deploy the Beacon Transponder
19. Remove the clip from the introducer. Once the clip has been removed,
hold the introducer hub until the needle tip is positioned at the target site
to prevent premature deployment of the Beacon transponder.
20. While continuously holding the introducer in a stable position, so that the
tip remains stationary at the target site, gently but steadily push the stylet
forward while slightly retracting the cannula (Figure 11) until the Beacon
transponder is completely released from the introducer and seen on the
ultrasound image.
TRANSPONDER IMPLANTATION INSTRUCTIONS: INTRAOPERATIVE DIRECT IMPLANTATION
INTO PROSTATIC BED SOFT TISSUE
Patient Preparation Prior to Day of Implantation
Per institutional guidelines, consider antibiotic prophylaxis for open radical
retropubic prostatectomy surgery.
Preparation on Day of Implantation
Load the Beacon transponders into the introducers and place them on a sterile
drape prior to patient arrival as described in the “Preparing the Introducers for
Implantation” section of this document.
Identify Target Implant Sites
1. Directly inspect the prostatic bed to identify possible implant sites.
Prepare and Insert First Introducer
2. Select the appropriate introducer device for the first target implant site
(see above table), as indicated by the label and color of the introducer’s
clip and stylet.
3. Remove the protective plastic sheath from the introducer, but leave the clip
in place until the introducer is positioned within the prostatic bed to prevent
premature deployment of the Beacon transponder.
4. The entire beveled tip of the introducer needle must be completely within
the tissue prior to deployment of the Beacon transponder.
Deploy the Beacon Transponder
5. Remove the clip from the introducer. Once the clip has been removed,
hold the introducer hub until the needle tip is positioned at the target
site to prevent premature deployment of the Beacon transponder. While
continuously holding the introducer in a stable position, so that the tip
remains stationary at the target site, gently but steadily push the stylet
forward while slightly retracting the cannula (see Figure 11) until the
Beacon transponder is completely released from the introducer.
21. Withdraw the introducer needle. Dispose of the used introducer needle
in an appropriate sharps biohazard waste container.
Alternate Transponder
Implantation Locations
2
STERILIZE
Description
Visually inspect the prostatic bed and locate the Beacon transponders.
t Follow standard practice for subsequent patient care following open
radical retropubic prostatectomy.
t Instruct the patient on post-operative care and potential complications.
t Wait 4 to 14 days after the implantation procedure to allow the region
and Beacon transponders to stabilize.
t Acquire treatment planning CT images, using either 1.0-mm or 1.5-mm
slice spacing throughout the prostatic bed tissue.
t Perform treatment planning for external beam radiation therapy per
standard institutional protocol.
t Perform external beam radiation therapy per standard institutional protocol.
t The implanted Beacon transponders can either be used as radiographic
markers with kV x-ray imaging or be used with the Calypso System to
facilitate and optimize target localization and tracking during radiation
therapy. Refer to the Calypso System User’s Manual.
Use by
Do not re-sterilize
Batch code
The following adverse events also have been documented in the literature
following transrectal biopsy; however, they occur in <1% of patients:
STERILE R
55C/131F
Do not reuse
-18C/0F
Sterile using
irradiation
Temperature
limitation
80
Humidity
limitation
Consult operating
instructions
20
Caution, consult
accompanying
documents
t
Other observed adverse events include:
t Urinary retention
t Urinary obstructive symptoms (e.g., urinary frequency, weak stream, etc.)
t Implant migration
Description
Symbol
MR conditional
Do not use if
package is
damaged
After-Implantation Procedure
Bleeding (e.g., hematuria, hematochezia)
Pain (e.g., procedural, anal, perineal, bowel movements, unspecified)
t Dysuria
t Infection (e.g., urinary tract infection)
t Fever
Optimal Transponder
Implantation Locations
Symbol
Repeat steps 1 through 6 to implant the second and third Beacon transponders
using the appropriate introducer for each implant region of the prostatic bed.
t
Dispose of Used Introducer Needle
The following symbols are used in association with the Calypso System and
Beacon transponders.
Implant Remaining Beacon Transponders
Beacon transponders are implanted in the prostatic bed using standard
introduction techniques for gold marker implantation and biopsy of the prostate
(e.g., transrectal). The most frequent adverse events include:
Figure 12 B:
SYMBOLS AND DESCRIPTIONS
6. Withdraw the introducer needle. Dispose of the used introducer needle
per institutional guidelines for sharps biohazard waste.
ADVERSE REACTIONS
Figure 12 A:
t
Dispose of Used Introducer Needle
t
Figure 11
Nausea or sickness
Allergic reaction to antibiotic prophylaxis
t Perineal swelling
t Sepsis
t Epididymitis
t Temporary fecal incontinence
t Urethral perforation
t Deep venous thrombosis
t Vascular embolization of the implant (e.g., pulmonary embolism)
t Vasovagal episode
t Cardiac arrhythmia
t
Keep dry
REFERENCES
Jones, SJ. Prostate Biopsy: Indications, Techniques, and Complications, Totowa,
NJ: Humana Press, 2008.
Kupelian PA, Langen KM, Willoughby TR, Wagner TH, Zeidan OA, Meeks SL.
Daily variations in the position of the prostate bed in patients with prostate cancer
receiving postoperative external beam radiation therapy. Int J Radiat Oncol Biol
Phys. 2006;66(2):593-596.
Schiffner DC, Gottschalk AR, Lometti M, et al. Daily electronic portal imaging of
implanted gold seed fiducials in patients undergoing radiotherapy after radical
prostatectomy. Int J Radiat Oncol Biol Phys. 2007;67(2):610-619.
Beacon and Calypso are registered trademarks of Varian Medical Systems, Inc.
Varian Medical Systems Worldwide Headquarters
3100 Hansen Way
Palo Alto, CA 94304
USA
Technical Assistance: 888-488-7225
www.calypsomedical.com
Patents pending
Varian Medical Systems - Seattle
2101 4th Ave, Suite 100
Seattle, WA 98121 USA
EC
REP
0413
VMS-UK Ltd.
Gatwick Road
Crawley
West Sussex, RH10 9RG
United Kingdom
4