1
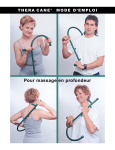
TheraCane®
Owner's Manual
THERA CANE 411
Thera Cane®is a therapeutic massager that allows you
to apply pressure to treat muscle dysfunction.
Benefits of using the Thera Cane
• Eliminate painful knots in your muscles on your own
• Easily apply deep pressure massage on hard to reach muscle groups
• Precision control facilitates stress and tension relief without drugs
• Soothing, penetrating massage helps muscles recover faster
from overexertion
• Empowers the user to achieve effective pain management independently
Applying adequate pressure will help to keep the ball in contact with the muscle you're
working on and prevent the ball from slipping off. Begin with light pressure and short periods
of use as your muscles will require a breaking in period. Start off with just a minute or two
of use a few times a day. If you do overdo it, you will likely hurt more than you did to begin
with. This discomfort will normally always go away after a restful sleep or within 12-36 hours.
In addition to this, a long hot shower will usually make you feel better and speed up your
recovery. With experience you'll be able to use all the pressure you want for extended periods
of massage.
If a tender point on the muscle seems extra sensitive, massage the surrounding area before
working on the more tender spot. Back muscles are thicker and deeper than other muscles
(forearms for instance) and will require more pressure.
Try different methods when applying pressure to determine which suits you and/or the muscle
you're massaging the best. For example, you can apply steady pressure for 5 or 10 seconds,
release, relax and repeat. Some prefer maintaining direct pressure while moving the ball
slowly over a small area of the muscle, gradually going in deeper. A gentle wiggle can help
you to burrow into the sore area.
Features of the Thera Cane
• Fits easily in your luggage for travel
• Lightweight and durable
• Ergonomic design optimizes leverage
• 6 strategically located treatment balls
• Safe to use in a hot tub or shower
Have fun while you experiment with new techniques. Be aware that some muscles will likely
require repeated massage sessions over an extended period of time. Be patient and enjoy the
progressive realization of the potential for a pain free life.
STRETCHING 101
It is never too late to start stretching. In fact, the older we get, the more important it .
becomes to stretch on a regular basis. The basic method of stretching is the same
regardless of differences in age and flexibility. Stretching properly means that you do
not go beyond your own comfortable limits.
Benefits of Stretching
Improves
Increases
Reduces
Flexibility
Balance
Posture
Circulation
Range of motion
Feeling of well-being
Stress
Tension
Blood pressure
lOW BACK, HIPS & GROIN
Relax with knees bent and
soles of your feet together.
Hold for 20 seconds.
Let the pull of gravity do
the stretching.
HIP, GROIN & BUTTOCKS
Move leg forward until the
knee of the forward leg is
directly over the ankle. Your
other knee rests on the floor.
Next, lower the front of your
hip downward for the stretch.
Hold for 20 seconds, alternate
and repeat.
MID-lOW BACK & lEGS
Keep your head down and
your lower back flat. Pull your
knee to your chest and hold
for 20 seconds.
Variation: Pull your knee
across your body toward
opposite shoulder. Hold for 20
seconds, alternate and repeat.
Stretching for 5-10 minutes in the evening is a good way to keep your muscles tuned, so
you feel good the next morning. If you have any tight areas or soreness stretch these areas
before bed and you'll feel the difference in the morning. Use short periods of stretching,
maybe 5 minutes every few hours, to help make you feel good throughout the day.
Remember to always be at a point where you can stretch further, and never where you have
gone as far as you can go. Learn to stretch your body without force.
Reprinted with permission of Stretching, Inc., Copynght 2010.
N
E
C
K
#1 NECK
#3 NECK
FOR ALL NECK EXERCISES
Lean your neck into the ball while keeping
your hands and the Cane still
Move your neck side to side and up and down
while you apply pressure
Experiment while in the supine position with
your head slightly elevated
Use your fingers for the muscles in the front
of your neck
Watch Allen and Kate demonstrate these exercises in the Thera
Cane interactive DVDavailable online or through your provider.
Push R hand forward
for pressure.
#5 NECK
#6 NECK
FOR BEST RESULTS LIMIT HAND & ARM MOVEMENT
S
H
o
U
L
o
E
R
S
#1 SHOULDER
#1 SHOULDER
#1
FOR ALL SHOULDER EXERCISES
Push down in the direction of the
arrows for pressure
Each ball is
numbered
as shown
Move arms back and forth, 1-2 inches
across the muscle
Keep your arms in close to your sides
to avoid fatigue
#4
#1 SHOULDER
FOR MAXIMUM
#1 SHOULDER
LEVERAGE & STABILITY REFER TO THE ILLUSTRATIONS
FOR All BACK EXERCISES
• Push down in the direction of the arrows
B
A
C
K
• When using against a chair stabilize the Cane,
then move side to side for cross friction massage
loop over L shoulder
to work on R
shoulder blade.
Tilt the Cane
upward for
best leverage
and push L
hand down
for pressure.
Push L hand down
while pushing R
hand forward
for pressure.
#1 UPPER BACK
#1 UPPER & MID-BACK
#1 LOW BACK
FOR All ARM EXERCISES
• Stabilize the Cane as shown in the illustrations
• Shift body weight into ball for more pressure
A
R
M
S
\
#5 UPPER ARMS
#6 MID-ARMS
lEAN INTO OR AGAINST THE BAll FOR PRESSURE
• The supine position is very versatile, experiment and see which methods you like best
Lean back in chair
directly against
ball and keep L arm
locked in position.
Push R arm
forward for pressure.
#6 UPPER & MID-BACK
Also try using the
#5 ball for the back
of your neck while
sitting in a recliner
#1 BACK
\
#5 UPPER & MID-BACK
• Lean into or against the ball for pressure, always minimize hand and arm movement
Push legs
outward to
stabilize.
#3 UPPER ARMS
#6 FOREARMS & HANDS
CONCENTRATED PRESSURE WILL GIVE THE BEST RESULTS
FOR ALL LEG EXERCISES
• Position the Cane as shown in the illustrations
to help develop your skills
• Keep the upper half of the Cane still, and let
it act as the pivot point
The Cane fits over legs,
push legs outward
for pressure.
L
E
G
S
"
loop the Cane around
lleg and hold it
in place
#3 OUTSIDE OF LEGS
#6 LOWER LEGS
Hook the Cane around lleg,
hold it firmly and do not
move it. The hook acts
as the pivot point. Only
move your R arm
to massage.
#6 LOWER LEGS
Place #2 ball shaft
under armpit then
lean into ball
#4 INSIDE OF LEGS
FOR ALL TORSO EXERCISES
• Lean into the ball for pressure
• Take advantage of the leverage whenever possible
Cane is tilted
up for leverage.
To adjust the
position raise
or lower R arm.
Also try the
#1 ball while
supine.
T
o
R
S
o
Also try this
exercise while
pushing in from
the wrist or
forearm.
#2 CHEST & ABDOMEN
lean R buttock
back and into
the ball
#6 BACKSIDE
FOCUS ON THE MUSCLE YOU ARE WORKING ON
• Massage across the muscle and lengthwise when possible
Use a short stool for this
exercise and keep the Cane
stabilized in place. lower
your leg onto the ball for
pressure and then move
it side to side for cross
friction massage.
#2 BACK OF LEGS
Sit sideways
in chair and
position lleg
slightly forward
to stabilize.
#6 TOP OF LEGS
Stabilize the Cane
against foot
#5 FEET
#3 FEET
• Vary hand and arm grip to avoid fatique
~~gr~
,
#1 HIPS
l arm is wrapped
around hook. Push
L arm inward and
back and forth
for pressure.
Stabilize firmly
against the back
of the chair.
Also try while
sitting sideways
in chair.
#1 RIBS
REFER TO THE ILLUSTRATIONS OFTEN
TRIGGER POINTS
Trigger points develop as a result of muscular injuries,
strains and trauma. Additionally, structural imbalances,
improper body mechanics, poor nutrition and mental or
emotional stress are all factors. When muscle fibers, fascia,
ligaments or tendons become weakened, overstretched
or inflamed, tiny tears in the associated soft tissue can
occur. As the muscle tissue heals it contracts, becoming
twisted and knotted. The knotted fibers restrict the fresh
blood supply needed by the muscle cells. In addition,
there is often a shortening of the muscle fiber to
protect itself from further injury. In effect, the muscle
learns to avoid pain and guards against it by limiting
its movement. This results in a loss of range of
motion of the joint and the probability that the
muscle and associated structures will develop
trigger points.
Skeletal muscle is the largest single organ of
the human body and accounts for 40% or
more of body weight. As reported there are
200 paired muscles, anyone of which can
develop myofascial trigger points.
Acute pain may result from one time
sudden physical trauma including auto
accidents (whiplash), falls, improper lifting,
sudden twisting or turning movements and
excessive or unusual exercise. These types of
injuries if minor, will usually resolve themselves
with a few days of rest and avoidance of further
aggravation. Once the injuries have healed, stretching
and strengthening exercises are necessary to recondition
and restore the strength and flexibility of the injured
muscle or joint. The associated trigger point(s) must also
be inactivated once the injury has healed. If not treated
effectively, a cycle of increasing pain, muscle spasm and loss
of function can occur and develop into a chronic condition.
Body form outline reprinted with permission
of Williams & Wilkins.
•
•
•
•
•
Trigger points are found within a hard, rope like or knotted
~
.,
..
~·t·• y.r
~..••..
v·. •
v
v
••
v
••
v
•••••
\J
••••
v
band of muscle. You will know when you have found one as it
will be very sensitive to the touch. By sensing this tenderness
you are given an opportunity to become aware of it and to
consider its cause. Muscles involved in past surgeries tend
to have painful trigger points as do muscles located
around the joints. Some points, particularly
those between the shoulder blades will be
instinctively located, while others may
require a bit of detective work on
your part. Gentle stretching of
your muscles on a regular
basis will provide you
with the clues needed to
help you help yourself.
Make the necessary
commitment to personal
wellness today.
The circles
represent common
points located on
the body,
Most muscles and trigger
points are paired. A point
on the right side of your body
has a corresponding point
on the left side. Normally the
tenderest of these parallel points
or muscles will be on the same side
that's painful. Pressure applied to this
side will usually give the most relief. For
best results, however, pay equal attention to
muscles on both sides of your body.
Chronic pain may be the result of past
injuries and from numerous, uncorrected and
underlying causes. Usually it is the initial trauma
that initiates trigger point activity in a muscle while
other factors work together to prolong it. Poor sitting and
standing posture, nutritional inadequacies (often vitamins B1 ,
B6 and B12) and postural and mechanical stress allow pain to
continue for months and even years. The description of chronic
pain is unique to each individual and may be described as burning,
throbbing, stabbing, deep, dull and achy with varying intensities of
discomfort. Evaluation and treatment by your medical practitioner
will be necessary to help unravel chronic cycles of pain.
T
R
I
G
G
E
R
p
o
I
N
T
S
PRECAUTIONS
Do not attempt to use the Thera Cane for treatment of serious medical ailments,
or injuries. Thera Cane Co. and their affiliates will not be held liable for misuse of the
Thera Cane in attempted treatment of unknown origins. Please consult with a
qualified medical practitioner for treatment of any serious medical condition.
In addition these precautions are emphasized:
• Limit your sessions to short periods when you first begin using the
Thera Cane. Overuse will likely result in soreness for a day or two.
• Do not press directly on or against the spinal column or sciatic nerve.
• Avoid massaging any areas of inflammation.
• Discontinue
use if bruising occurs.
• Do not allow children to play with or attempt to use the Thera Cane.
GUARANTEE
This product is guaranteed for life against breakage. If it does break, the cost to return the
product to Thera Cane Co. is the responsibility of the consumer. The cost to return a new
Thera Cane will be the responsibility of Thera Cane Co.
This warranty does not cover damage resulting from intentional abuse.
Contact [email protected] for return authorization.
Please do not return the product to the store you purchased it from.
DISTRIBUTED BY:
7
Ijlllll~~lUllll1
© 2013 Thera Cane Co., POB 9220, Denver, CO 80209
US and International patents pending * Made in America
www.theracane.com
0
9