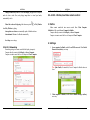
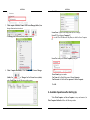
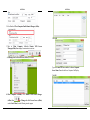
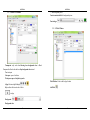
1
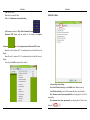
LedStudio Table of Contents ChapterI Introduction .................... 1 1.1 Features............................................... 1 1.2 System Requirements ................................ 1 ChapterII Installation&Uninstallation ..... 2 2. 1 Installation ........................................... 2 2. 2 Uninstallation ....................................... 2 Chapter III How to Run LedStudio ............ 4 3. 1 LedStudio Interface ................................. 4 3. 2 LedStudio Menus ................................... 9 3. 2. 1 File Menu..................................................................9 3.2.1.1 New ........................................................................................... 9 3.2.1.2 Open .......................................................................................... 9 3.2.1.3 Save ........................................................................................... 9 3.2.1.4 Save as ....................................................................................... 9 3.2.1.5 Open Demo FIle ........................................................................ 9 3.2.1.6 Open recent files ...................................................................... 10 3.2.1.7 Logoff ...................................................................................... 10 3.2.1.8 Exit .......................................................................................... 10 3. 2. 2 Control Menu.......................................................... 11 3.2.2.1 Play .......................................................................................... 11 3.2.2.2 Play Last .................................................................................. 11 3.2.2.3 Play Next ................................................................................. 11 3.2.2.4 Pause ........................................................................................ 11 3.2.2.5 Stop .......................................................................................... 11 3.2.2.6 Notify....................................................................................... 11 3.2.2.7 Score Manager ......................................................................... 12 3.2.2.8 Play PowerPoint File ............................................................... 14 3.2.2.9 Stop PowerPoint File ............................................................... 14 1 LedStudio 3.2.2.10 Play VCD/DVD ..................................................................... 14 3.2.2.11 Backup Program .................................................................... 14 3.2.2.12 Manager for LED Screen Sever ............................................. 14 3. 2. 3 Tool Menu...............................................................15 3. 2. 4 Option Menu...........................................................15 3. 2. 4. 1 Screen Combination/synchronism ........................................ 15 3. 2. 4. 2 Set Screen Brightness/ Contrast/ Color ................................ 18 3. 2. 4. 3 Screen Area ........................................................................... 19 3. 2. 4. 4 Play background/foreground ................................................ 21 1. How to enable Play Background ......................................... 21 2. How to exit Play Background mode: ................................... 22 3. 2. 4. 5 Lock/Unlock LED Screen Properties ................................... 22 3. 2. 4. 6 Turn on/off LED Screen power ............................................ 23 3. 2. 4. 7 Schedule Table ...................................................................... 23 3. 2. 4. 8 Schedule Hide Setup............................................................. 29 3. 2. 4. 9 Language .............................................................................. 30 3. 2. 4. 10 Hide/Show Play Window.................................................... 31 3. 2. 4. 11 LED Screen Monitor........................................................... 32 3. 2. 4. 12 Hardware Setup .................................................................. 37 3. 2. 4. 13 Software Setup.................................................................... 38 3.2.4.13.1 Play Window............................................................... 39 3.2.4.13.1.1 Lock to LED Screen ........................................ 41 3.2.4.13.1.2 Floating ............................................................ 42 3.2.4.13.1.3 Multi-LED Combination/synchronism ............ 42 3.2.4.13.2 Auto ............................................................................ 44 3.2.4.13.3 Networking ................................................................. 45 3.2.4.13.3.1 Online/real time remote control ....................... 46 3.2.4.13.3.2 FTP Server ................................................... 52 3.2.4.13.3.3 Play Manager ................................................... 56 3.2.4.13.4 Other ........................................................................... 58 2 LedStudio 3. 2. 4. 14 User Setup .......................................................................... 59 3. 3. 5 Test Menu ...............................................................60 3. 3. 5. 1 Grey Test1............................................................................. 61 3. 3. 5. 2 Grey Test1............................................................................. 61 3. 3. 5. 3 Grid Test ............................................................................... 61 3. 3. 5. 4 Dot Test................................................................................. 62 3. 3. 5. 5 Color Bar Test ....................................................................... 62 3. 3. 5. 6 Color Bar Test2 ..................................................................... 63 3. 3. 5. 7 Check Position ...................................................................... 63 3. 3. 5.8 Check Color ........................................................................... 63 3. 3. 6 Help Menu ..............................................................64 3. 3. 6. 1 Help ...................................................................................... 64 3. 3. 6. 2 Knowledge ............................................................................ 64 3. 3. 6. 3 Check IP Address .................................................................. 64 3. 3. 6. 4 About LedStudio ................................................................... 64 3. 3. 6. 5 Play File List......................................................................... 65 LedStudio 3. 3. 3. 2 Text Window......................................................................... 76 3. 3. 3. 3 Single Line Text Window ..................................................... 78 3. 3. 3. 4 Static Text Window............................................................... 79 3. 3. 3. 5 Table Window ....................................................................... 80 3. 3. 3. 6 Timer Window ...................................................................... 82 3. 3. 3. 7 Database Window ................................................................. 85 Table Properties ........................................................................... 86 Column Properties ....................................................................... 88 3. 3. 3. 8 VCD/DVD Window ............................................................. 90 3. 3. 3. 9 External Exe Window ........................................................... 91 3. 3. 3. 10 Video Window .................................................................... 92 3. 3. 3. 11 Date/Time Window ............................................................. 93 3. 3. 3. 12 Terperature/Humidity Window ........................................... 95 3. 3. 3. 13 Copy Window ..................................................................... 96 3. 4. 4 Save Program..........................................................96 3. 4. 5 Play Program ..........................................................96 3. 3 How to make a .lsd file ............................66 3. 3. 1 Setup Playing Window ...........................................66 3. 3. 2 Open a New Page of Program ................................67 3. 3. 2. 1 Add Step, Add Universal Display ......................................... 67 3. 3. 2. 2 Step Settings ......................................................................... 68 3. 3. 2. 3 Unversal Display Settings .................................................... 68 3. 3. 3 Add New Window ..................................................69 3. 3. 3. 0 Important Notes: ................................................................ 71 3. 3. 3. 1 File Window ......................................................................... 73 3. 3. 3. 1.1 File(s) Showing Area Settings ................................... 73 3. 3. 3. 1.2 File(s) Adding & Listing Window ............................. 73 3. 3. 3. 1.3 File Playing Settings .................................................. 74 3.3.3.1.3.1 Photo Playing Settings ....................................... 74 3.3.3.1.3.2 Video Playing Settings ....................................... 75 3 4 LedStudio LedStudio ChapterII Installation&Uninstallation ChapterI Introduction 2. 1 Installation 1.1 Features Follow the following steps to install and run LedStudio. LedStudio is LED Display management software for Linsn LED Display Control System. 1. Download LedStudio from http://www.linsn.com/LED/LEDStudio10.exe or get from the CD-Disk. LedStudio functions in two ways: To setup Linsn LED Display Control System; To edit and play programs on LED Display. 2. Double-click the LEDStudio.exe finish installation. and flowing on-screen instruction to 3. LedStudio program shortcut ICON on desktop. Supported media file formats: Document: .txt .doc etc. Photo: .BMP .JPG .GIF .PCX .PNG etc. Video: .MPG .MPEG .MPV .MPA .AVI .VCD .SWF .RM .RA .RMJ .ASF etc. 2. 2 Uninstallation 1.2 System Requirements 1. Click Start ,find LedStudio folder, click Uninstall Or go to Control Panel, click Microsoft Windows XP/Windows Vista/Windows 7 1024*768 display (or higher) 64MB of Disk Space A DVI-D port provided by Graphics Card or Motherboard A USB port 1 , find and select Led Software to uninstall 2. Select Automatic, click Next till finish uninstallation. 2 LedStudio LedStudio Chapter III How to Run LedStudio 3. 1 LedStudio Interface Play Window: Simulated screen. Contents played by LedStudio show on Play Window. 3 4 LedStudio New, Open, Save LedStudio : Short-cut icons of New, Open…, Save in File Menu Play, Pause, Stop, Remote LED Screen Manager (online), Remote LED Screen : short-cut icons from Control menu (see Manager (offline) following picture) : short-cut icon of Hide/Show Play Hide/Show Play Window Window Lock/Unlock Screen Properties Turn on/off Led Screen : short-cut icon of Lock/Unlock LED Screen : short-cut icon of Turn on/off screen power Play in Background : set the Graphic card in extended mode; work with Play background/foreground 5 Allow Edit : collapse/extend the edit window. 6 LedStudio LedStudio Change Face Change Face. : change LedStudio appearance. Normally DO NOT Play Current Program Page : Start playing from the selected Step For example, select Step4, and click Play Current program page, it means step4, then step1, then step2… 7 8 LedStudio LedStudio 3. 2 LedStudio Menus File Menu, Control Menu, Tool Menu, Option Menu, Test Menu and Help Menu 3.2.1.6 Open recent files Open recent files: open the recently .lsd files. 3. 2. 1 File Menu 3.2.1.7 Logoff Logoff: log off LedStudio to prevent further operation. 3.2.1.1 New New: create a new .lsd program file. 3.2.1.2 Open Open: open an existed LedStudio program file (.lsd file). 3.2.1.3 Save Save: save an .lsd file. 3.2.1.4 Save as Save as: to save current program file as a new .lsd file. 3.2.1.5 Open Demo FIle Open Demo File: open LedStudio demo file (when downloading LedStudio software, choose the With demonstration file one) 9 3.2.1.8 Exit Exit: exit LedStudio. 10 LedStudio LedStudio 3. 2. 2 Control Menu 3.2.2.1 Play Play: Start playing program file (step by step). 3.2.2.2 Play Last Play last: play previous Step. 3.2.2.3 Play Next Play next: play next Step. 3.2.2.4 Pause Pause: pause playing file. 3.2.2.5 Stop Stop: stop playing. 3.2.2.6 Notify Notify: insert notice, when ledstudio is playing programs. 11 Screen: choose which LED Screen to show Notify Message Play time: Not yet put into use Transparent: only work when Background color is Black. Transparent the black background color. Left/Right/Bottom: adjust the Notify Message position Play: start showing Notify Message Stop: stop showing Notify Message Action: how the Notify Message come into Play Window Effect: Effects for Notify Message Background: background color for Notify Message Speed: Notify Message coming in speed. The larger value, the slower speed Stay: time duration for Notify Message to stay before next Action is taken place Font: Font settings for Notify Message 3.2.2.7 Score Manager Score manager: display scores for competition games when ledstudio is playing programs. 12 LedStudio LED Screen: choose which LED Screen to show the score Play time: Not yet put into use Show All: show time and show score Reset: reset the time to count/countdown Start: start counting/countdown time Stop: stop time counting/countdown Font: font setting of time Inver time: countdown Minutes: time duration for count/countdown Top/Right: set position of time 13 LedStudio Score settings: Player1: Team/Player name, in two languages Player2: Team/Player name, in two languages Score: input score Lan1 Space: (language1) the distance of two players’ names in showing Lan2 Space: (language2) the distance of two players’ names in showing Picture: add pictures Font: font settings Bottom: set the position of score contents (player name, score) Bottom display: display Team/player pictures below score. 3.2.2.8 Play PowerPoint File Play Power point file: play PowerPoint file. 3.2.2.9 Stop PowerPoint File Stop PowerPoint file: stop PowerPoint File. 3.2.2.10 Play VCD/DVD Play VCD/DVD: play VCD/DVD in CD/DVD-ROM Drive. 3.2.2.11 Backup Program Backup program: backup all files of current program/.lsd file. 3.2.2.12 Manager for LED Screen Sever Manager for LED Screen Sever: to manage remote screen, please refer to Option Menu, Software Setup, Networking for details. 14 LedStudio LedStudio SIDE BY SIDE to form A bigger led display, etc. Go to Software Setup, select Multi-LED Combination/synchronism, Click Combination/synchronism Setting 3. 2. 3 Tool Menu Short-cuts of Microsoft Word, Excel, Paint, Notepad, Calculator. Click to open quickly. 3. 2. 4 Option Menu 3. 2. 4. 1 Screen Combination/synchronism Screen Combination/synchronism: This is quick-Profiles-switch function. First, Profile the led display combinations. When more than one led display is controlled by LedStudio, these led displays can be set as INDEPENDENT, CLONE, 15 16 LedStudio Name: Profile name Update Name: change the Profile name and click update name to refresh Add: add one Profile Del: delete the selected Profile Exit: Exit Combination/synchronism Setting LedStudio 3. 2. 4. 2 Set Screen Brightness/ Contrast/ Color Screen Brightness/ Contrast/ Color: manually adjust the selected Display brightness, Contrast, Color Soft Screen: set numbers of Play Window/Simulated Screen Hardware LED Screen: read the numbers of Led display from Display Connection (one Red rectangle means one Hardware LED Screen) Start X: set the X position of (X, Y) coordination for the selected Soft Screen of Display Start Y: set the Y position of (X, Y) coordination for the selected Soft Screen of Display Now, the preset Profiles can be quickly switched. 17 18 LedStudio Brightness: 0-100, total 101grades manual brightness adjustment Contrast: 0-100, total 101grades manual contrast adjustment Color: User Color, each color of RGB has 0-100, total 101grades manual color adjustment; and three preset color choices. Enable Adjust Bright Auto: Enable if a Function Board is applied for automatic brightness adjustment Virtual Display: switch between virtual and none-virtual mode for virtual led display. Note: For virtual led display, if Virtual Display does not enable, the virtual led display will be considered as real pixel led display, and only has 1/4 of visual size working. For example, a 384*256 virtual led display, will work as 192*128. 3. 2. 4. 3 Screen Area Screen Area is the area copied to led display. Contents inside the Screen area will be copied to led display. Note: if the Screen Area is gray color, go check 3.2.4.12 Hardware Setup Note LedStudio Display width: the selected led display width of Play Window Display height: the selected led display height of Play Window Screen width: the width of selected led display Screen height: the height of selected led display Always display screen area: enable this; the screen area/red rectangle will be always visible. Zoom Display: enable Zooom Display, the Display width and Display height will change from gray color to editable. Set the display width and display height larger than the screen width and screen height. For example: 1. enable Zoom Display 2. set display width 300, and display height 300 3. disable Zoom Display, and eable Zoom Display again, the red rectangle is now 300, 300 4. Click save to screen, the 300, 300 red rectangle contents will be copied and resize to fit the led display of 256,192. Display1/Display2/Display3/Display4: led display name Start X: set the X position of (X, Y) coordination for screen area Start Y: set the Y position of (X, Y) coordination for screen area The arrow icon: adjust the strart X, start Y, by 1 pixel at a time. 19 20 LedStudio LedStudio 3. 2. 4. 4 Play background/foreground (1281,0). The Play Window will not be seen in the computer monitor. Important: when proceeding Play Background, choose Floating in Option Menu, Software setup, Play Window. If Lock to LED Screen is selected, Play Window cannot be moved. 2. How to exit Play Background mode: 1. cancel desktop extends to Monitor 2 2. reopen graphic card CLONE function 3. 2. 4. 5 Lock/Unlock LED Screen Properties Play background/foreground play: Play background/foreground. 1. How to enable Play Background Take a 1280*768 computer monitor for example: 1. set the Graphic card in extended mode 2. execute foreground play/play foreground is to set the ( X,Y ) of Screen Area to the Start X and StartY of Screen Area preset setting. 3. Exit foreground play/Play background: set the (X,Y)of Screen Area 21 Lock: freeze-frame on led display, and Play Window continues playing. Unlock: led display continues playing synchronously with Play Window to 22 LedStudio LedStudio 3. 2. 4. 6 Turn on/off LED Screen power Turn on/off LED screen power: with Function Board remote power control applied, remote turn on/off LED screen power from LedStudio Without Function Board remote power control applied, turn on/off the sending card signals. 3. 2. 4. 7 Schedule Table To schedule commands to be carried out. For example, set the led display brightness to a lower value at night time. Or play curtain programs at preset time. Start up scheduled command: select to enable Scheduled Command Send to Server: applied in Remote LED Screen Manager Online mode Note: Send to Server details, please refer to Page49 23 24 LedStudio LedStudio Send current only: send the Scheduled Command Table to the current selected led display Send by select: select the led display(s) to send the Scheduled Command Table to Send to all: send to all led displays listed in Remote LED Screen Manager Online Edit: modify the selected Scheduled Command Add: add a Scheduled Command Delete: delete a selected Scheduled Command Delete all: delete all listed Scheduled Command Exit: Exit Scheduled Command Table Window Serial number: the Scheduled Command list number Command property: the Scheduled Command Name Screen Number: the led display that the Scheduled Command will take effect on Program file/value: contents of the Scheduled Command Execution time: time for the Scheduled Command to take effect Valid date: time period that the Scheduled Command will take effect Valid day: day (Monday to Sunday) the Scheduled Command will take effect To create a Scheduled Command: 1. Choose a command 2. Choose a LED Screen(led display) that the Scheduled Command will take effect on 3. Set Time, Date and Days. Click OK. 25 Turn on/off LED screen power: with Function Board remote power control applied, remote turn on/off LED screen power from LedStudio Without Function Board remote power control applied, turn on/off the sending card signals. Play program file: .lsd file 26 LedStudio LedStudio Pause, stop: pause or stop at the execution time Exit foreground play/Play background: set the (X,Y)of Screen Area Show/Hide play window: show or hide the Play Window Lock LED screen property: freeze-frame on led display, and Play Window continues playing. Unlock LED screen property: led display continues playing synchronously with Play Window Execute/close external program: run or quite external .exe program in LedStudio Play Window (the .exe program should be tested and it works in LedStudio) Play/close PowerPoint file: start or close powerpoint file Shutdown computer: turn off the computer Execute/Exit foreground play: Play background/foreground. Take a 1280*768 computer monitor for example: Set the Graphic card in extended mode; execute foreground play/play foreground is to set the ( X,Y ) of Screen Area (1281,0). The Play Window to will not be seen in the computer monitor. LED Screen Brightness: adjust the led display brightness. 0-100, total 101grades manual brightness adjustment All LED Screen Brightness: adjust all the led display brightness 0-100, total 101grades manual brightness adjustment LED Screen Contrast: adjust the led display contrast. 0-100, total 101grades manual contrast adjustment LED Screen Color: switch among the color temperature of User Color(0) , 9300K(1), 6500K(2), 5000K(3). Please refer to Set Brightess/Contrast/Color to the Start X and StartY of Screen Area preset setting. Change to Virtual/Real Image: switch between virtual and none-virtual mode for virtual led display (when playing letters on virtual led display, better visual quality in real mode) refer to Virtual Display in Option, Set Brightess/Contrast/Color 27 28 LedStudio LedStudio Hide Time: hidden time duration for Play Window Align by: time moment to trigger Hide Time. For example, Align by 11 Minutes means 0, 11, 22, 33, 44, 55minute within an hour will activate the Hide Time. After Hide Time, it is Play Time. 3. 2. 4. 9 Language Change the LedStudio interface language. Ledstudio supports 15 interface languages, including: Simplified Chinese, Traditional Chinese, English, French, Japanese, Korean, Russian, Thai, Spanish, Polish, Italian, Portuguese, Turkish, Dutch, and Greek. Note: For virtual led display, if Virtual Display does not enable, the virtual led display will be considered as real pixel led display, and only has 1/4 of visual size working. For example, a 384*256 virtual led display, will work as 192*128. Power on: turn on computer Update program: update program from server Sleep computer: put the computer in sleep mode Wake up computer: wake up the computer from sleep mode 3. 2. 4. 8 Schedule Hide Setup Enable Scheduled Hide: enable/disable Scheduled Hide Play Time: show-up time duration for Play Window 29 Note: For Windows 7, to change the interface language of LedStudio, First, change the system display language to the target language, for example, English; Sceond, choose English in Language of LedStudio. 30 LedStudio LedStudio Hide Play Window: Hide the Play Window , led display will show the according computer desktop (desktop within the Screen Area) 3. 2. 4. 11 LED Screen Monitor LED Screen Monitor is Function Board/Card control panel. 3. 2. 4. 10 Hide/Show Play Window 31 32 LedStudio Monitor: Settings LedStudio value. Level of fan:Set the temperature value to activate the fan relays of Function Board. Temperature is detected by internal temperature sensor Status of fan: on/off Humidity: Inner: Internal Humidity Value Outdoor: External Humidity Value Fog (Function not ready) Current: Current value Warning Level: warning value Statues: on/off Power off when warning: if enable, power relays on Function Board will be disconnected when warning level reaches warning value. Save on files: save settings as a .dat file Load from files: load the settings from saved .dat file Switch Control Manual: Manually switch on/off the power relays Rename: rename the power relays names Delay: when switch on/off the power relays, it delays 1 to 4 seconds. Turn off LED screen power: Turn on/off relays (Power1, Power2, Power3) together Brightness: Current Bright: the brightness read by external light sensor in Function Board Min Bright: set the minimum brightness for auto brightness adjust. Sensitivity: set the sensitivity for light sensor Temperature: Inner: the temperature detected by internal temperature sensor Outdoor: the temperature detected by External temperature sensor Amend: if detected temperature differs to the environment temperature, amend the 33 34 LedStudio LedStudio Note: when Manual Switch Control enabled, the Turn off LED screen power will automatically disable. Monitor card/box (function not ready): read and show feedback data from every receiving card V&S: version number Temp: Temperature value Fan1/Fan2/Fan3/Fan4: status of fan. 0 for off, 1 for on Unit: show value of temperature in Celsius or Fahrenheit Monitor Level: set temperature value for monitoring 35 36 LedStudio LedStudio 3. 2. 4. 12 Hardware Setup Save to Led Screen/led display: test before saving the .CON is required. If test result is correct, save to flash memory of receiving cards Target: activate the window for uploading .RCG file Hardware Setup: to send .CON file (Display Connection setting file) and .RCG file (led display Driver for receiving card) to receiving cards Password: Password: Load: to select the correct .CON file Test: test the selected .CON file on receiving cards Enable Change Screen Area: allow the .CON file to change the size of Screen Area Load: to select the correct .RCG file Test: test the selected .RCG file on receiving cards Save to Led Screen/led display: test before saving the .RCG is required. If test result is correct, save to flash memory of receiving cards 3. 2. 4. 13 Software Setup Note: if Enable Change Screen Area is not ticked. The Screen Area will be Gray color as following screen shot. 37 38 LedStudio LedStudio 3.2.4.13.1 Play Window Play Window Setting: Always on top: enable and Play Window will always on top Frames: Set frames per second Accelerator: enable accelerator Save Setup: save settings of Play Window 39 40 LedStudio LedStudio cannot be dragged by mouse. 3.2.4.13.1.2 Floating Floating: Play Window can be adjusted at 1. The quantity of Play Windows, in LED Numb, set Play Window quantity, click Update LED Numb 2. Start X, Start Y, of each Play Window (Screen1/Screen2…) 3. Size of each Play Window 4. Enable Change by Mouse: the Size, Position of each Play Window can be adjusted by mouse 3.2.4.13.1.3 Multi-LED Combination/synchronism Standard: Right (90cw): Inverted (180): Multi-LED Combination/synchronism: set Profiles for Screen Combination/synchronism. Please refer to Screen Combination/synchronism (3.2.4.1 page15). Note: Display QDY in Display Connection should be 2 or more. Select Multi-LED Combination/synchronism. Click Combination/synchronism Setting Left (90cw): 3.2.4.13.1.1 Lock to LED Screen Lock to LED Screen: different from Lock LED Screen Properties. It sets: 1. all Play Windows at (0, 0) position, cannot be edited 2. Size same as Display Connection setting. All Play Windows are locked so 41 Name: Profile name Update Name: change the Profile name and click update name to refresh 42 LedStudio Add: add one Profile Del: delete the selected Profile Exit: Exit Combination/synchronism Setting LedStudio 3.2.4.13.2 Auto Soft Screen: set numbers of Play Window/Simulated Screen Hardware LED Screen: read the numbers of Led display from Display Connection (one Red rectangle means one Hardware LED Screen) Start X: set the X position of (X, Y) coordination for the selected Soft Screen of Display Start Y: set the Y position of (X, Y) coordination for the selected Soft Screen of Display Now, the preset Profiles can be quickly switched. Software Setup Auto settings: Start when Windows Starts up: open LedStudio when Windows starts up Load File when Starting: Load .lsd file automatically when open LedStudio Play Document when starts up automatically: start playing files of .lsd file automatically Play Document when starts up manually: start playing files of .lsd file when click play 43 44 LedStudio LedStudio Change virtual/real by auto: for virtual led display, playing letters in real-pixel mode for better visual effect, and playing image/video in virtual pixel mode; automatically switch. Mouse hide when soft is playing: hide the mouse pointer in Play Window when Play Window is playing. Auto update new software: automatically update LedStudio software Auto minimize: Minimize LedStudio automatically Receive Net Order (add in version11.72): not put into common usage 3.2.4.13.3.1 Online/real time remote control 1. Define Online remote control/real time remote control: allow Client Computer LedStudio to fully control Server Computer LedStudio. Computer directly connects the led display is Server Computer Computer to remote control the Server Computer is Client Computer Save Setup: save settings 2. Settings 3.2.4.13.3 Networking Networking setting is to remote control the led display (computer). Computer directly connects the led display is Server Computer Computer to remote control the Server Computer is Client Computer 1. Server computer LedStudio, enables Local LED screen and Client Enable Remote Server(online), save setup Note: Quite Enable, if untenable it, Server Computer LedStudio does not close. 2. Client computer LedStudio, enables Server Remote Manager (online), save setup 45 46 LedStudio LedStudio Click Add 3. Client compute LedStudio, Remote LED Screen Manager(Online) Icon changes from inactivate to activate And Manager for Led Screen Server (online) is activated. Screen Name: Type in the led display name (or leave it empty) Server IP: Type in Server Computer IP. Tip: use the Check IP Address in Help Menu, to check the Server Computer IP Server Port: same port as Server Computer preset port 4. Client Computer LedStudio, Click Remote LED Screen Manager (Online) Icon , or Manager for Led Screen Server (online) under Contrl Menu, then the following window appears Screen Numb: type in a number User Name: the LedStudio User name of Server Computer User Password: the LedStudio User password of Server Computer Click Ok 3. Available Operations after Setting Up When Client Computer and Server Computer is setup and connected, in Client Computer LedStudio will have the following window. 47 48 LedStudio LedStudio Send current only: send the Scheduled Command Table to the current selected Server Computer Send by select: select the Server Computer(s) to send the Scheduled Command Table to Send to all: send to all Server Computers listed in Remote LED Screen Manager Online 3. Send Files Send Files: send files from Client Computer to Server Computer 1. Reconnect/Add/Delete/Edit/Control Reconnect: try reconnecting to the added Server Computer Add: add another Server Computer Delete: delete a selected Server Computer Edit: change info of selected Server Computer Control: access to the Server Computer Desktop, realize Remote Desktop Control. 2. Schedule Table Schedule Table: set Schedule Command Table (refer to 3. 2. 4. 7 Schedule Table) and send to Server Computer LedStudio 49 Target DIR: Server Computer Path to store incoming files from Client Computer Source File: the outgoing files list Send: send listed Source File to Target DIR Exit: quite Send File window Add: add a file to Source File Del: delete a selected Source File Delete All: delete all Source File Same file name Overwrite: if Target DIR has a file with the same name of Source File, Source File replaces the Target DIR file Same file name Skip: if Target DIR has a file with the same name of Source File, Source File skips transmitting to Target DIR. Send current only: send the Source File to the current selected Server Computer Send by select: select the Server Computer(s) to send the Source File to Send to all: send Source File to all Server Computers listed in Remote LED Screen Manager Online 50 LedStudio LedStudio Same file name Skip: if Dest has an .lsd file with the same name of Source, Source .lsd File skips transmitting the .lsd file Send current only: send the Source .lsd file to the current selected Server Computer Send by select: select the Server Computer(s) to send the Source .lsd file to Send to all: send Source .lsd file to all Server Computers listed in Remote LED Screen Manager Online 3.2.4.13.3.2 FTP Server 4. Send Program Send Program: send .lsd file from Client Computer to Server Computer 1. Define: Source: the outgoing .lsd file Dest: Destination. Server Computer Path to store incoming .lsd file from Client Computer Browse…: browse the Client Computer to select the .lsd file Send: send Source to Dest Exit: quite Send Program window Synchronization for time: set Server Computer time synchronous with Client Computer Pause playing when is sending: Pause Server Computer LedStudio playing when Server Computer is receiving .lsd file from Client Computer Auto Play after receive the program: Server Computer LedStudio load and play the incoming .lsd file immediately when finishing receiving. Same file name Overwrite: if Dest has an .lsd file with the same name of Source, Source .lsd File replaces the Dest .lsd file 51 Client Computer LedStudio uploads settings and files to FTP Server, then Server Computer LedStudio downloads and carries out. Computer directly connects the led display is Server Computer Computer edits settings and files for Server Computer is Client Computer Before Settings, the FTP Server should be setup and ready. 2. Settings: 1. In LedStudio of Server Computer Enable Remote Server (offline) Type in the FTP info: FTP IP, Port, FTP User (name), FTP Password 10 Minute: means every 10 minutes Server Computer LedStudio will fetch updates from FTP server 52 LedStudio LedStudio 2. In LedStudio of Client Computer Enable Remote Manager (offline) Click Add 3. Then in Client Computer LedStudio Remote LED Manager(offline) Icon changes from inactivate to activate Screen And Manager for Led Screen Server (offline) is activated. Type in the same FTP Server info as the Server Computer Screen Name: Name for the Server Computer Led Display Cick OK 4. Client Computer LedStudio, Click Remote LED Screen Manager (offline) Icon , or Manager for Led Screen Server (offline) under Contrl Menu, then the following window appear 53 54 LedStudio Add: add another FTP server Delete: delete the selected FTP server Edit: edit the selected FTP server 3. Available Operations LedStudio Computer Send by select: select the FTP Server Computer(s) to send the Source .lsd file to Send to all: send Source .lsd file to all FTP Server Computers listed in Remote LED Screen Manager (offline) 3.2.4.13.3.3 Play Manager 1. Send Program Send Program: send .lsd program from Client Computer to FTP Server Computer Play Manager: works with Online/real time remote control Source: the outgoing .lsd file Dest: Destination. FTP Server Computer Path to store incoming .lsd file from Client Computer Browse…: browse the Client Computer to select the .lsd file Send: send Source to Dest Exit: quite Send Program window Synchronization for time: set Server Computer time synchronous with Client Computer Pause playing when is sending: Pause Server Computer LedStudio playing when Server Computer is receiving .lsd file from FTP Server Computer Auto Play after receive the program: Server Computer LedStudio load and play the incoming .lsd file immediately when finishing receiving. Same file name Overwrite: if Dest has an .lsd file with the same name of Source, Source .lsd File replaces the Dest .lsd file Same file name Skip: if Dest has an .lsd file with the same name of Source, Source .lsd File skips transmitting the .lsd file Send current only: send the Source .lsd file to the current selected FTP Server 55 1. Define: Computer directly connects the led display is Server Computer Computer to remote control the Server Computer is Client Computer Purpose: Set all the listed Server Computers Play/ Stop synchronously 2. Settings: Note: Server Computers are set online remote control/real time remote control 1. Server Computers Enable Play Manager 56 LedStudio LedStudio 3.2.4.13.4 Other 2. Client Computer Enable Play Mnager Add: add the Server Computes to the list Del: Delete the selected Server Computer(s) 3. Save Setup. Click Play/Stop, all the listed Server Computers will Play/Stop synchronously 57 Auto Restart when error: automatically restart LedStudio when encounter error Restart every day: schedule restarting LedStudio everyday Auto Restart Software: restart LedStudio every preset minute(s) Auto Backup: automatically back up files of .lsd file Enable Play log: enable Play log, in LedStudio Installation Folder, there is a playlog.txt listing play info of media files played by LedStudio Disable Message when error: does not allow error message prompt Prompt when quit: ask before quit Usb Disk Play: LedStudio load and play .lsd program from USB disck as priority Play all: all Screens Play/Pause/Stop together 58 LedStudio LedStudio Password: 888 Normal Display: For No-Sending Card Mode Only. LedStudio capture the contents of Screen Area and send directly to receiving cards. 3. 2. 4. 14 User Setup Add: add a new user account for LedStudio Delete User: delete a selected User account Edit User: Edit the selected User account info Use Password when StartUp: when open LedStudio, it asks password to unlock. 3. 3 Features introduction 4. 3. 3. 5 Test Menu 59 60 LedStudio 3. 3. 5. 1 Grey Test1 Grey Test1: test Grey level from 0-255 in sequence of Red, Green, Blue, White 3. 3. 5. 2 Grey Test1 Grey Test2: select a color, a value (0-255) for testing LedStudio Grid: Time: in millisecond; the running speed of testing grid Gap: the pixel numbers between two testing lines Horizontal: testing line runs horizontally Vertical: testing line runs vertically Left Diagonal: testing line runs in bias way Right Diagonal: testing line runs in bias way 3. 3. 5. 4 Dot Test Auto Increase: continue testing next grey level up to 255. Then test again from 0 to 255. Enable Dot Correction: Enable the effects of Screen Area Color Correction (refers to Screen Area Color Correction) Dot Test: check for bad pixels 3. 3. 5. 3 Grid Test Grid Test: Select three colors for testing and one static color as Background 3. 3. 5. 5 Color Bar Test Color Bar Test1: Color Change: No Change: only the first color (Red color in the upper picture) runs in testing Two Color: the first two colors run in testing (Red and Green) Three Color: all three colors run in testing 61 62 LedStudio LedStudio 3. 3. 5. 6 Color Bar Test2 Color Bar Test2: Choose color for color bar test 3. 3. 6 Help Menu 3. 3. 5. 7 Check Position Check Position: get coordination of Mouse Pointer 3. 3. 6. 1 Help Help: activate the LedStdio manual 3. 3. 6. 2 Knowledge Knowledge: some simple tips for LedStudio 3. 3. 5.8 Check Color Check Color: get RGB info 3. 3. 6. 3 Check IP Address Check IP Address: get the IP Address of computer 3. 3. 6. 4 About LedStudio About LedStudio: show LedStudio Version License: manage license 63 64 LedStudio 3. 3. 6. 5 Play File List Play file list: a log file for all the played files by LedStudio LedStudio 3. 3 How to make a .lsd file 3. 3. 1 Setup Playing Window File: type in the File Name for search Date From TO: select a time period for search Show file path: show the played file path in the computer Search: start searching and get result listed File: file name Degree:how many times the file has been played Time: total time the file played Begin time: the starting playing time Time: time duration the file has been played for Export: export the search result to Microsoft Excel file format Print: print the search result Display detail: when export or print the search result, including the info of Begin time and Time Empty Log File: Delete log file Log File save as: Save log file. 65 Usually, set the Play Window the same size as that of led display. Select Lock to LED Screen. LedStudio will set the Play Window size according to .CON file and Start X and Start Y is (0, 0) Or Select Floating to adjust Play Window manually. (Refer to Software Setup Play Window) page 39 66 LedStudio LedStudio 3. 3. 2 Open a New Page of Program 3. 3. 2. 1 Add Step, Add Universal Display Click Allow Edit icon, then New Page of Program 3. 3. 2. 2 Step Settings icon Add Step: Steps are played in order, from Step 1 to Step 2 to last Step then back to Step 1. It is Step1 to Step Last to Step1 circle loop play. Add Universal Display: this kind of Step have loop play independently. Universal Display is always at an upper layer of Add Step. Usually for Company Logo,etc. Note: only one Unversal Display in an .lsd file Time Window usually put in Universal Display page, if Time Window put under Step2 for example, then Step 3 and following Steps will not be played, because Time will never stop. Then Step2 will always be played. Program: Change the Step name (Default from Step 1, Step 2, Step 3…) Time (second): deselect Waiting to End, set time durations for the Step. For example, 60, means the Step1 will be played in 60 seconds, then play Step2. Hide Window (Second): Hide Play Window for preset seconds when Step1 is finished. In the same time, Step 2 is playing. Background: Background color of Play Window Background: Background picture of Play Window Picture: Center/Zoom/Stretch/Title the background picture Background: background music, loop play. 3. 3. 2. 3 Unversal Display Settings Universal Display Setting: only adding Background Music is available. Normal program page plays in order, while overall program page plays continuously, without any time limits. (Such as time display) 67 68 LedStudio LedStudio Click: New Window icon To delete a program page, use the delete button . To change the order of page, use the moving button , . 3. 3. 3 Add New Window After a Step or Universal Display is added, the New Window icon icon , Paste icon , Delete icon , are activated. 69 , Copy , 70 LedStudio LedStudio 3. 3. 3. 0 Important Notes: The above window appear in every New Window, it is File Showing Area Setting Widnow File(s) Showing Area Settings: the Showing Area (the green rectangle) is inside the Playing Window. All files of File Window will show inside the Showing Area. Name:Change the default name File Frame: Frame of Showing Area; None, no frame line; Single line, one frame line; Double lines, two frame lines; Three lines, three frame lines Color: Frame line color Right (90cw): Left (90cw): Start X: set the X position of (X, Y) coordination for Showing Area in Play Window Start Y: set the Y position of (X, Y) coordination for Showing Area in Play Window Width/Height: Set the size of Showing Area Lock: when lock, mouse pointer cannot drag to move or drag to resize the Showing Area inside the Play Window Timer: designed for Time Window. From Computer Time: By 30 Minute 30 Sec means every 30 minutes of computer clock, Time Window appears for 30 seconds. Time Window is hidden besides that every 30 seconds. Front half: start hiding Time Window earlier. For example, From Computer Time By 1 Minute 10(X) Sec, Without Front half enable, Time Window start hiding when second reaches 59 second With Front half enable, Time Window start hiding when second reaches 54(59-X/2) second From Play Time by 30 Second 5 seconds means every 30 seconds of playing time, show Time Window for 5 seconds then hides Time Window Standard: Inverted (180): 71 72 LedStudio 3. 3. 3. 1 File Window File window: play various files like documents, pictures, video etc. LedStudio Add Homepage: add a web link to show web page in Showing Area Edit File: edit the selected file. Open and edit Delete: delete the selected file Move Up/Down: move the selected file up/down Same Mode for all file: make all files apply the same Playing Settings Find: find file(s) in the list 3. 3. 3. 1.3 File Playing Settings 3.3.3.1.3.1 Photo Playing Settings File Playing Settings: settings for the selected file in the File(s) Adding & Listing Window Note: All the settings only effects on the selected file 3. 3. 3. 1.1 File(s) Showing Area Settings File(s) Showing Area Settings: refers to Important Notes 3. 3. 3. 1.2 File(s) Adding & Listing Window Display Path: Showing the file path in the computer Add File: click Add File icon to add a media file. 73 The above File Playing Settings is for Pictures. Background: background color of Showing Area Center/Zoom/Stretch/Tile: effects for background picture Background picture: background picture for Showing Area Background music: background music when playing the selected file Transparent: Enable Transparent. The selected color will be filtered. Alpha: 0-255, 0 is 100% transparent, means the selected file will disappear from Showing Area, Showing Play Window Background or contents of below layer 74 LedStudio Showing Area. Action: how the pictures come in Effect: zoom, stretch, center, tile Text: add text Speed: file coming in speed. The larger value, the slower speed Stay: time duration for file to stay Clear: how the file is cleared out Clr speed:clear out speed. The larger value, the slower speed. LedStudio Sound: 0-100. Adjust the sound of the video Pos: show current playing time of video Action: how video come in Speed: the coming in speed. The larger value, the slower speed 3. 3. 3. 2 Text Window 3.3.3.1.3.2 Video Playing Settings Transparent: Transparent the Showing Area background color Add Text , Background: background color of Showing Area Center/Zoom/Stretch/Tile: effects for background picture Effect: the Center/Zoom/Stretch/Tile effect : test play Alpha: 0-255, 0 is 100% transparent, means the selected file will disappear from Showing Area, Showing Play Window Background or contents of below layer Showing Area. 75 76 LedStudio LedStudio 3. 3. 3. 3 Single Line Text Window Single line text window: to play single line text window Edit Open Save : show/hide the text window : open a .txt file : save as .txt file Font settiings: Name: default as Text Background color Pict: picture, background picture. Center/zoom/stretch/tile effects for background picture Action: action for background picture Speed: background picture coming in speed. The larger value, the slower speed Stay: time duration for background picture to stay 77 Transparent: only work when Showing Area background color is Black. Transparent the black color and show the Step background color instead. External File: open a .txt file Text: input text Action: how the text comes in Showing Area Style: add effects to the text. And the color for the effect. : test play Background: background color for the text Speed: Text coming in speed. The larger value, the slower speed Stay: time duration for text to stay Font: Font settings for text Text invert: abc ---- cba Repeat: abc---abcabcabcabcabc 78 LedStudio LedStudio …: add background picture Center/zoom/stretch/tile for background picture 3. 3. 3. 4 Static Text Window Font settings: 3. 3. 3. 5 Table Window Transparent: only work when Showing Area background color is Black. Transparent the black color and show Step background color instead. Text: text input Line space: space of text lines Word space: space of neighboring words Table Window: Used to edit the play list data. Align: left/center/right/left&right Style: add text effects and color of effect Add Table : test play Background: Background color 79 80 LedStudio LedStudio Font color: title font color Show Title: Show/hide Title Lock title: when title is locked. Title stays still while Action effect taking place. Action: table effects Speed: table coming in speed. The larger value, the slower speed Stay: time duration for table to stay Lock row: for example, Lock Row 2, the second row will stay. This only works in Up/Down Action effects. Lock Column: for example, Lock Column 2, the second column will stay. This only works in Left/Right Action effects. Ctrl+Enter: start a new line within a single table Table Properties: 3. 3. 3. 6 Timer Window Timer window: Used for countdown Name: Title name of the table Font settings: Title font settings Grid: the table grid color 81 82 LedStudio LedStudio Font settings for Text. End Date: Date for timer to countdown to End Time: Time for timer to countdown to Days/Hours/Minutes/Seconds: show/hide when countdown Multi Line: enable or disable multi line showing No negative sign: when countdown pass the End Time, do not show the – in the timer. Zero stop: stop when Timer finish countdown Customize: customize the time format for countdown Bkg: background color for Timer Center/zoom/stretch/tile for background picture …: background picture for Timer Transparent: only work when Showing Area background color is Black. Transparent the black color and show Step background color instead. Static Text: text input Style: add effects to text and color for effect 83 84 LedStudio LedStudio 3. 3. 3. 7 Database Window Database window: Used to play ACCESS database and ODVC driver data base. Add Database Table Properties Set Table Inquire: read which part of the Database Scripti-: Scripting 85 86 LedStudio LedStudio Action: effects for how the table comes in Showing Area Speed: table coming-in speed. The larger value, the slower speed Stay: time duration for table to stay Row (in pixels): the height for a row Font: Table1 color Grid: table grid color Backgr: background color of table …: add background picture for table Center/zoom/stretch/tile for background picture Column Properties Font settings for Table1: Name: column name Width: column width in pixels No Show: hide the selected column Show title: hide/show Table title Lock title: when title is locked. Title stays still while Action effect taking place. Show header: show/hide the Column header Background odd: background color of column header Background even: background color of column data Text odd: column header font color Text even: column data font color Define: define a rule to apply color 87 88 LedStudio LedStudio 3. 3. 3. 8 VCD/DVD Window DVD/VCD window: play DVD/VCD in Showing Area Font settings of selected column: 89 90 LedStudio 3. 3. 3. 9 External Exe Window External Program Window: run a .exe program inside Play Window LedStudio 3. 3. 3. 10 Video Window Video Window: Read Video/audio source from capture card and show on Play Window LedStudio will detect what video/audio sources are available from the computer. Select a source and show on Play Window. Browse: browse to select an .exe program Window Name: Select a .exe listed to run in Play Window Top/Bottom/Left/Right Margin: set the position of the .exe program 91 92 LedStudio LedStudio Font: font settings for static text 3. 3. 3. 11 Date/Time Window Background color for Time Center/zoom/stretch/tile for background picture …: background picture for Timer Transparent: only work when Showing Area background color is Black. Transparent the black color and show Step background color instead. Time Day Ahead/Behind: adjust the Time Ahead or Behind computer time Hour X, Y: width and height for Hour Minute X, Y: width and height for Minute SH: shape Clock: shapes for Analog clock Hour Font: font setting when SH (shape) is Digit Date/Day: show/hide Date/Day Date Font/Day Font: font settings Style: Time style Style: effects for Time (not for Analog clock) and effect color Static text: text show together withTime 93 94 LedStudio 3. 3. 3. 12 Terperature/Humidity Window Temperature/Humidity window: this is used to display temperature and humidity. LedStudio Font settings for Text. Multi-line: show between multi-line and single line Show temperature in different unit Add text before/after Temperature/Humidity Value 3. 3. 3. 13 Copy Window StartX, StartY: set position of Copy Window Width, Height: set size of Copy Window Frame Extracting: for example: Per 10 extracting 5 pixels means in every 10 pixels, extract the last 5 pixels. 3. 4. 4 Save Program Background color for Temperature/Humidity Center/zoom/stretch/tile for background picture …: background picture for Temperature/Humidity Transparent: only work when Showing Area background color is Black. Transparent the black color and show Step background color instead. After Click on the saving button or select File Menu, save. 3. 4. 5 Play Program To play current program files, click the button select from Control Menu. to start; To play a saved .lsd program file, click Open button Style: add effects to text and color for effect 95 END. 96 . to pause; to stop, or