1
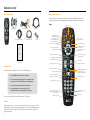
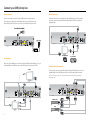
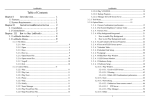
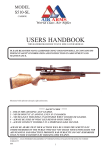
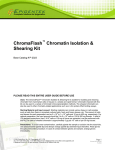
Spring 2014
Consolidated Communications
DVR MANUAL
Advanced Digital TV
Whole Home DVR
Consolidated
Communications (CCI)
Whole Home DVR
Take control with CCI Advanced Digital TV and
Whole Home DVR.
CCI Advanced Digital TV with Whole Home DVR makes your TV experience, a better TV
experience. Our Advanced Digital TV service with Whole Home DVR allows you to record
your favorite programs on any TV in your home with just one DVR! And, you can record
up to 4 programs all at one time! In the middle of watching a recorded program and
need to finish watching it in another room? No problem, just press stop and start it up
in another room. Can’t decide which show to record? Record them all and don’t forget
to record every episode with the Series Record feature. Want to pause live TV in your
other rooms? No problem. Our whole home DVR provides you with the ability to pause,
rewind or fast forward live TV on any TV in your home connected to a CCI set-top box.
Want HD? We’ve got you covered! If you subscribe to TrueHD service all of the Set-top
boxes and your Whole Home DVR are HD capable. Advanced Digital TV with Whole
Home DVR allows you to watch what you want, when you want from anywhere in your
home. We’ll change the way you watch TV!
CCI Advanced Digital TV… a better experience!
c
Contents
Let’s Get Started. . . . . . . . . . . . . . . . . . . . . . . . . . . . . . . . . . . . . . 2
• Get to know your Whole Home DVR and Set-top box . . . . . . . . . . . . . . . . 2
• Front Panel. . . . . . . . . . . . . . . . . . . . . . . . . . . . . . . . . . . . . . . 2
• Rear Panel. . . . . . . . . . . . . . . . . . . . . . . . . . . . . . . . . . . . . . . 3
Remote Control. . . . . . . . . . . . . . . . . . . . . . . . . . . . . . . . . . . . . . 4
• Included Accessories . . . . . . . . . . . . . . . . . . . . . . . . . . . . . . . . . 4
• Remote Control . . . . . . . . . . . . . . . . . . . . . . . . . . . . . . . . . . . . 4
• Batteries. . . . . . . . . . . . . . . . . . . . . . . . . . . . . . . . . . . . . . . . 4
• Remote Control Functions. . . . . . . . . . . . . . . . . . . . . . . . . . . . . . . 5
Connect your DVR/Set-top box . . . . . . . . . . . . . . . . . . . . . . . . . . . . . 6
• Basic Connections. . . . . . . . . . . . . . . . . . . . . . . . . . . . . . . . . . . 6
• TV Connections . . . . . . . . . . . . . . . . . . . . . . . . . . . . . . . . . . . . 6
• Audio Connections . . . . . . . . . . . . . . . . . . . . . . . . . . . . . . . . . . 7
• VCR, DVD Recorder Connections . . . . . . . . . . . . . . . . . . . . . . . . . . . 7
Set up your DVR/Set-top box . . . . . . . . . . . . . . . . . . . . . . . . . . . . . . 8
• DVR/Set-top box Initial Boot Up. . . . . . . . . . . . . . . . . . . . . . . . . . . . 8
• HDTV Set Up. . . . . . . . . . . . . . . . . . . . . . . . . . . . . . . . . . . . . . 8
• ADTV Shortcut: . . . . . . . . . . . . . . . . . . . . . . . . . . . . . . . . . . . . 8
DVR/Set-top box Functions. . . . . . . . . . . . . . . . . . . . . . . . . . . . . . . . 9
• Audio. . . . . . . . . . . . . . . . . . . . . . . . . . . . . . . . . . . . . . . . . . 9
• Control Live TV Programming and Recording. . . . . . . . . . . . . . . . . . . . 10
• Controlling live TV on a Set-top box. . . . . . . . . . . . . . . . . . . . . . . . . 10
• Record and Replay Programs. . . . . . . . . . . . . . . . . . . . . . . . . . . . . 12
• Replay a Recorded Program. . . . . . . . . . . . . . . . . . . . . . . . . . . . . 13
• Series Recording. . . . . . . . . . . . . . . . . . . . . . . . . . . . . . . . . . . 13
• Favorites. . . . . . . . . . . . . . . . . . . . . . . . . . . . . . . . . . . . . . . 14
• ADTV Shortcut:. . . . . . . . . . . . . . . . . . . . . . . . . . . . . . . . . . . . 14
• Conflict Management . . . . . . . . . . . . . . . . . . . . . . . . . . . . . . . . 15
• Series Priority. . . . . . . . . . . . . . . . . . . . . . . . . . . . . . . . . . . . . 15
• Online DVR Manager . . . . . . . . . . . . . . . . . . . . . . . . . . . . . . . . . 16
• Helpful hints for your Online DVR Manager: . . . . . . . . . . . . . . . . . . . . 19
Frequently Asked Questions. . . . . . . . . . . . . . . . . . . . . . . . . . . . . . . 20
• Questions about your DVR/Set-top box. . . . . . . . . . . . . . . . . . . . . . . 20
• Questions about Recording and Replaying Programs. . . . . . . . . . . . . . . . 21
• Questions about Managing your Recordings. . . . . . . . . . . . . . . . . . . . . 22
d
1
Let’s Get Started
Get to know your Whole Home DVR and Set-top box
Rear Panel
Your CCI Whole Home DVR/Set-top box is a Motorola VIP 1232/1216/1200. It supports all of
CCI’s advanced digital TV services including Pay Per View, Video on Demand and HD.
Your DVR and Set-top box must be handled much in the same way as a computer to reduce
potential for damage.
1
• Position it in an open space to allow airflow around the DVR/Set-top box
2
3
4
5
6
7
8
9
10 11
• Do not place the DVR/Set-top box in an enclosed entertainment unit or cabinet
• Do not place the DVR/Set-top box on a soft surface such as a rug, sofa, bed or other
similar surface
Item
Description
Function
• The DVR/Set-top box should not be next to an external heat source that could raise
the temperature of the unit
1
To Wall (Video In)
Coax input for home video network
• Connection into a surge protector along with your other audio/video equipment is
highly recommended
2
HDMI
Input for high-definition TV or home theater
receiver with HDMI connections
3
Network
Ethernet port
4
Y PB PR
Components to connect video output to an HDTV
5
S-Video
Video output for VCR or TV with S-Video connections
Front Panel
1
2
2
3 4 5
6
7 8
Item
Description
Function
1
Power
The power button will turn the DVR/Set-top box on and off.
When held for more than 5 seconds the DVR/Set-top box is restarted.
Green lighting indicates the power is on
2
USB Port
USB 2.0 connector, not supported at this time, reserved for future use
3
Link LED
Green lighting indicates data or programming stream is being received
4
HD LED
Blue lighting indicates the DVR/Set-top box is in HD mode
(720p or 1080i setting mode)
5
Record
Red lighting indicates program recording
6
Menu
Press the Menu button to activate the on-screen menu
7
Up, down,
left and right
arrow keys
Up and down arrows allow you to change channels. Left and right
arrow keys allow you to navigate through the guide and menu
8
OK
Confirms channels or menu options
6
Optical
S/PDIF audio output to a digital home theater receiver
7
Video Out
RCA output to connect to TV, VCR, DVD recorder or other device
8
Audio Out L and R
Left and Right RCA stereo audio output
9
To TV (Video Out)
Coax output for TV or VCR
10
USB
USB 2.0 connector, not currently supported, reserved for future use
11
Power +12V DC
DC power adaptor connection
3
Remote Control
Included Accessories
Remote Control Functions
Use your remote to access programs, adjust volume, control your DVR/Set-top box and On
Demand selections as well as scroll through and confirm actions within the on-screen menus.
Eclipse
Power Adaptor
RCA (composite) jacks
Power TV on or off
HDMI cable
Mode buttons to control
TV and additional devices
RGB (component) cables
Audio SPDIF cable
Batteries
Reserved for future use
Turn your PIP feature on or off
Turn CC on or off
Reserved for future use
Go to the On-Demand menu
Access your on screen program
guide
Remote control
Use your cursor keys to navigate
guide and menu screens
Return to previous menu screen
Display program information
Go to the main menu screen
Jump back or ahead 24 hours
while in the guide
OK confirms your menu and
guide selections
Exit out of menus, On Demand
or recorded programs
Review last 5 channels viewed
Programming Remote
Control Guide
Browse channels
At A Glance Manual
Increase/Decrease audio volume
Mute the sound on your TV
Remote Control
Go to list of your recorded programs
To view your Advanced Digital TV service, complete the following steps:
1. Press the STB button on your remote control
2. Press the Power button on your remote control, this will
power on your TV and DVR/Set-top box simultaneously
Pause your programming
Record TV by pressing this button
Start or resume playing On
Demand or recorded programs
Rewind/Fast-forward controls
Skip back in 7-second increments
Skip forward in 30-second
Stop recording or replay modes
3. Press the Menu button to display the main menu
4. Use the arrow keys to select an option: Live TV,
Recorded TV, Video On Demand, Extras or Settings
Edit text on the search screen/
PIN fields and erase recordings in
Recorded TV screen
Customize guide, channel and
viewing options
Return to live TV
You are now ready to sit back, relax and enjoy a better TV experience!
Select viewing options
Batteries
To change the batteries, open the cover on the back of the remote. Press the cover tab
gently and lift the cover up. Other ways of opening the cover may result in breaking the cover.
The batteries should be installed observing the polarity presented on the inside of the
battery compartment.
4
5
Connect your DVR/Set-top box
Basic Connections
Audio Connections
These are the required connections for your DVR/Set-top box to operate properly.
Choose one of the three types of audio connections available. If you have a home theater
system you can connect it to your DVR/Set-top box using the S/PDIF connector and the
appropriate cable.
Connect the power supply via the Power Adaptor. Next connect the Ethernet port on
your DVR/Set-top box to the Ethernet socket on your wall with the Ethernet cable.
TV
Hi-Fi Equipment
Home Cinema
TV Connections
Choose one of the available types of connections for your DVR/Set-top box with your TV. Keep in
mind that HDMI and Y PB PR connectors are for HDTV and other connectors are for SDTV.
HDTV
VCR, DVD Recorder Connections
As an option you can connect your DVR/Set-top box to your VCR or DVD recorder to record
programs outside of the DVR/Set-top box . Choose one of the two possible connections.
Note: To record sound, you need to connect your VCR or DVD recorder to the audio output of your DVR using an
RCA composite cable.
SDTV
DVD Recorder
DVD Recorder
VCR
VCR
6
7
Set up your DVR/Set-top box
DVR/Set-top box Functions
DVR/Set-top box Initial Boot Up
Audio
Once you have completed connecting your DVR/Set-top box to your TV, turn on your DVR/
Set-top box. The DVR/Set-top box will boot up and communicate with the SureWest server in
order to download all programming information. This process can take up to 5 minutes.
To set up the language preference settings follow the steps below .
1. Press the Menu button on your
remote control
HDTV Set Up
The default setting for your DVR/Set-top box is 4:3 standard definition TV, if you will be
connecting your DVR/Set-top box to a standard definition TV or would prefer to view your
programming in 1080i format, please follow the steps below:
1. Press the Menu button on your
remote control
2. Scroll to Settings
3. Scroll to Television and press OK
on your remote control
4. Scroll to Screen Aspect Ratio
and High Definition and press
OK on your remote control
5. Select the aspect ratio preferred
for your television
6. Scroll to Continue and press OK, choose Start Test. You
will receive a confirmation screen with a count down. Scroll
to Keep Setting and press OK. You will see a confirmation
bar appear across the top of the screen confirming your
selection. If no selection is made, your DVR/Set-top box will
revert back to the original setting.
2. Scroll to Settings
3. Scroll to Audio and press OK
on your remote control
4. Scroll to Audio Language and
press OK on your remote control
5.Select English
6. Scroll to the Save option and press
OK on your remote control
To activate the Secondary Audio feature:
1. Press the Menu button on your remote control
2. Scroll to Settings
3. Scroll to Audio and press OK on your remote control
4. Scroll to Secondary audio and press OK
5.Select Use secondary audio if available
6. Scroll to Save and press OK on your remote control
ADTV Shortcut:
To further customize your viewing options while watching live TV,
recorded programming or on demand content, press the Zoom/
Enter button on your remote control.
8
9
DVR/Set-top box Functions
Control Live TV Programming and Recording
With CCI Whole Home DVR you will be able to control your TV like never before. Pause, fastforward or rewind as many times as you want – all with a push of a few buttons on your remote
control. When you pause or rewind a live TV program, you can choose to either watch
the buffered program or catch up to live TV by pressing Fast-Forward on your remote. Pause,
rewind and fast-forward of live TV can also be performed by any CCI connected Set-top box in
your home.
Pause a Live Program
Use Pause to freeze the program you are watching. Programs will remain in pause for up to
1.5 hours.
1.Press Pause to freeze the program.
2.Press Play to resume watching at normal speed.
Controlling live TV on a Set-top box
In order to control live TV on a set-top box a program must be available for use. If the maximum
amount of programs are watched and recorded on other TVs then you will not be able to control
live TV on that set-top box. You can resolve this through Conflict Management. See page 14 for
information on Conflict Management.
Each Set-top box when in use or powered on counts as a program being watched. If you see
a message that displays “Too many devices in use” on your TV screen, ensure that the Set-top
boxes not in use are powered off by pressing the power button.
Buffered Programs (feature also available on all CCI Set-top boxes)
Your DVR will create a temporary recording of the channel you are watching. This feature is
referred to as a buffer and your DVR will automatically buffer the program you are watching.
Your DVR will buffer up to 1.5 hours of programming, the buffer process will continue until you:
• Switch to another channel. Switching channels will cause your DVR/Set-top box to begin
buffering the program you just turned to and remove the previous program stored
in the buffer.
• Turn off your DVR. When you turn off your DVR/Set-top box, it clears the buffer.
Rewind or Fast-Forward a Live Program
You can rewind or fast-forward at three different speeds: 15X, 60X or 300X which are
indicated by 2, 3 or 4 arrows.
1.Press Rewind or Fast-Forward up to three times to
increase the speed. The status bar at the bottom of your
screen will indicate where you are in the program.
2. You can only fast-forward up to the point of the live TV
program. You cannot fast-forward ahead of live TV.
3.Press Play to resume watching at normal speed.
Catch up to the live TV program
When you pause or rewind a live TV program, you can choose to either watch the buffered
program or catch up to live TV by pressing fast-forward or the skip forward button on your remote
control. See remote control functions on page 5.
To record all of your currently buffered programming, just press the record button. This will record
all of the content that is currently in the buffer for the current program up to 90 minutes.
Status Bar
The Status Bar appears whenever you use a replay control such as pause, fast-forward or
rewind. The status bar also provides you details about the program you are watching.
10
11
DVR/Set-top box Functions
Record and Replay Programs
Replay a Recorded Program
Your CCI DVR can record up to 200 hours of SD programming or up to 80 hours of HD
programming. Storage space will depend on the type of content you are recording, (HD or SD).
To replay one of the programs you have recorded on your DVR, press the Recorded TV
button on your remote control. Scroll to the program you want to watch and press OK on your
remote control. A Program Info menu appears, select the Play option and press OK.
Recorded TV Menu
From the Recorded TV menu you can access recorded content to View, Edit, Delete and schedule
recordings. To access the Recorded TV menu options, press Recorded TV on your remote control.
Series Recording
The following actions are available through your Recorded TV menu:
• View Recordings. You can view a list of your recordings sorted by dates or title by scrolling to
date or title in the Menu header. Grey coloring of the program title indicates the program has
been watched while white coloring indicates the program has not been watched.
• Scheduled. On the Scheduled option you can Manage, Edit and Cancel your scheduled
recordings and series recordings.
SureWest DVR makes it easy to record every episode of your favorite program. With the Record
Series feature you can schedule recordings of your favorite program by title, date or time. You
can choose to have all episodes record or just new episodes. Series Record gives you the ability
to choose which channels to record, whether to record in SD or HD and whether to start the
recording early or end the recording late.
• Add Recording. The Add Recording option allows you to schedule new recordings
manually by the program channel, date and time.
To record a program:
1. While watching TV. Press Record on
your remote control. The red record
LED will light up on the front of the
DVR/Set-top box.
2. While in the Program Guide. Highlight a
program and press Record on your remote
control. A red dot will appear next to
the selected program title verifying
your recording selection.
3. Record a future single program. Press
Recorded TV on your remote control.
Scroll to Add Recording, scroll down to
Search and press OK on your remote
control. Type in the title, actor or director’s
name for the program you want to record.
Once the program you are searching for
appears on the right hand side of the screen
scroll to the program and press OK on
your remote control. Select your recording
preferences.
1. Schedule a Series Recording
while in the program guide. Scroll
to the program you would like
to schedule a Series Recording
for and press the Record button
on your remote control twice.
Three red dots will appear next
to the program indicating a series
recording of that program has been scheduled.
2. Edit a Series Recording. Press the Recorded TV button
on your remote control. Scroll to Scheduled, all scheduled
recordings are listed by date.
3. Cancel a Series Recording. Press the Recorded TV button
on your remote control. Scroll to Scheduled and select a
recording to cancel and press OK. Choose the Don’t Record
option and confirm the cancellation.
4. Record multiple programs at the same
time. Your DVR has the ability to record
multiple streams at one time. Use the steps
above to select multiple recordings even if they are scheduled for the
same or overlapping times.
12
13
DVR/Set-top box Functions
Favorites
Series Priority
In addition to the default channel list, you can create up to five Favorites lists per set-top box.
To create your Favorites list(s), follow the steps below:
The Series Priority feature enables you to prioritize your series recordings that you have
scheduled on your DVR. The prioritization feature lets you tell your DVR which series recordings
are the most important should a recording conflict occur.
1. Press the Menu button on your remote control
To prioritize your Series Recordings:
2. Scroll to Settings
3. Scroll to Television and press OK on your remote control
4. Scroll to Set up Favorites and press OK on your remote control
5.Click OK on Set up.
6. Name your Favorites list and press Continue.
7. In the list of channels, press OK on each channel that you
would like to add/remove from your Favorites list. You can
either scroll through the channel list or input the channel
number directly.
1. Press the Recorded TV button on your remote control
2. Scroll to Series
3. Scroll to Series priority and press OK on your remote control
4. Using your arrow cursor keys scroll to the arrow buttons to the right of
each series title and press OK to move the priority up or down until the
Series has been moved to your preferred priority level. As you press the
OK button you will see the Series title move up or down in the list.
5. Scroll to Save and press OK on your remote control
Your Favorites list has now been created.
Within your Favorites list you also have the option to Check/Uncheck all channels, view checked
channels only or delete the list entirely.
To access your Favorites list press the Menu button on your remote control, select Live TV,
scroll down to Favorites and press OK on your remote control. You can then choose to either
view all channels or a specific Favorites list.
ADTV Shortcut:
While in the on screen program Guide press the ENTER button on
your remote control and scroll to Favorites lists to select an option to
view all channels or a Favorites list.
Conflict Management
Your DVR has a Conflict Management feature. If you attempt to record more programs than
your DVR will allow the Recording Conflict screen will appear alerting you of the conflict.
To resolve the conflict:
1. On the Recording Conflict screen select the Resolve Conflict
option to choose which recording to cancel.
2. To cancel the newly selected program recording choose the
Don’t Record option on the Recording Conflict screen.
3. If a recording conflict occurs during a recording that is already
in progress a message will appear stating “All TV Services
are in use”. You can choose to Try again later or Select a
recording to be cancelled.
Note: If you choose to cancel a recording of one episode in a series recording due to a conflict,
all future episodes will remain as originally scheduled.
14
15
DVR/Set-top box Functions
The conflict management feature also includes a Series Recording Conflict Management
option. When multiple Series Recordings are scheduled at the same time and a conflict arises,
you will be notified by a Series Conflict screen. To resolve the Series Conflict choose from
the options below:
•
Record all episodes of title – Selecting this option will take you to a
recordings option screen which will enable you to set your recording
preferences for this series
•
Record this series only when no conflict occurs – This option will
prompt your DVR to only record episodes of a series when no other
conflicts occur, however, when a conflict does occur this program will
not record, this option assigns the selected series a low priority
•
Choose which shows to record – This option will enable you to select
the programs that you would prefer to record
Online DVR Manager
CCI’s Advanced Digital TV with whole home DVR now offers an Online DVR Manager.
This means you can access your DVR manager and recordings from anywhere with internet
access! Online DVR Manager enables you to schedule recordings, manage existing recordings,
view your program guide and channel line up right from your PC.
It’s simple, just log in to MyCCI (mycci.net), click on the My Services link and choose Online
DVR Manager.
To schedule recordings with the Online DVR Manager:
1. While in the program Guide screen click on a program title
that you would like to record
2. In the pop up dialogue box that appears choose to Record
this episode only or Record Series. If you choose Record
Series the following options will be available:
a. Time: this will enable you to choose if you would like episodes to record any day around the same time, any day any time, or any day anytime only once per day
b. Episode: This drop down enables you to select First run and rerun or First run only
3. Next choose when you would like to stop the recording, you
can choose to stop it On Time as scheduled in the guide or
extend the recording past the scheduled end time in case
the program runs over. You may choose from the extended
recording times listed below:
a. 15 minutes after
b. 30 minutes after
c. 1 hour after
d. 2 hours after
e. 3 hours after
4. Choose how long you would like to keep the recording from the Keep Until drop down. The keep options available are:
a. Keep until space is needed
b. Keep until you delete
5. Click on the Record button,
red dots will appear next to
the programs indicating that
the recording is scheduled.
Your program will now be
scheduled to record on your Whole Home DVR and will be
accessible from all Set-top boxes in your home.
16
17
DVR/Set-top box Functions
To Manage your scheduled programs:
1. Click on the Scheduled Shows header, a list of all programs
scheduled to record will appear on the screen.
2. From the Scheduled Shows
screen you may choose
Delete to delete a single
recording or Delete Series
to delete an entire series.
Please note: No confirmation
box will be displayed once
Delete or Delete Series is
selected, recordings will be
automatically cancelled.
3. You may also choose to edit the recording end time from
the Scheduled Shows screen by clicking on the program title.
Once you click on a title and the dialogue box appears, select
your preferred Stop time and click Update.
You may also choose to Search for programs using your Online DVR Manager.
1. To search for a program to record, click on the Search header.
2. From the Search screen type the program title you would like
to search for in the search box and click on the Go button.
3. All available programs that match your search criteria will be
displayed below the search box. Click on a title to record
one episode only or to record the series, a dialogue box
will appear. Choose your recording preferences then click
on the Record button. Your preferences for this recording
will be saved and will be
recorded on your SureWest
Whole Home DVR and will
be viewable from all Set-top
boxes in your home.
To Manage your recorded programs:
1. Click on the Recorded Shows header, a list of all programs
stored on your DVR will appear.
2.To Delete a recorded program
click the red delete button to
the right of the program title
and information. Please note:
No confirmation box will
be displayed once Delete
is selected, recordings will be
automatically deleted.
3. From the Recorded Shows screen you may view your
recording preferences for a particular recording. Just click
on the title, a dialogue box displays reflecting your Stop
and Keep Until preferences. From this dialogue box you
can only view your Stop and Keep Until preferences;
however, you may choose to Delete a recording from
this dialogue box. Please note: No confirmation box will
be displayed once Delete is selected, recordings will be
automatically deleted.
18
Helpful hints for your Online DVR Manager:
• To navigate to different time blocks while in the program
guide, click the blue left or right arrows at the top of the
program guide grid on each side of the time slots.
• To jump to a different date or time in the program guide
click on the Date or Time drop down menus at the top of
the screen and select the date or time that you would like
to jump to.
• Parental controls are not applied to nor are they accessible
through the Online DVR Manager.
• The program guide reflects all CCI channels even
those that you may not subscribe to, prior to scheduling a
recording you may want to confirm that you subscribe to
the applicable channel.
19
Frequently Asked Questions
Questions about your DVR/Set-top box
Questions about Recording and Replaying Programs
Where can I find details on how to install my DVR/Set-top box?
How many channels can I watch and record at the same time?
Depending on your service area you may be able to record up to 4 programs at once.
Installation information is found in the Let’s Get Started section of your DVR/Set-top box manual.
I have questions about my DVR/Set-top box and would prefer to speak with a Technical
Support representative.
Please call 844.YOURCCI and follow the prompts for current customers.
How many hours of programming can I store in my DVR/Set-top box?
The total number of recording hours will depend on the mix of SD (standard-definition) or HD
(high-definition) programs you have recorded. With the standard Whole Home DVR (Motorola
1216) you can store up to 40 hours of HD programming or up to 100 hours of SD programming.
With the Whole Home DVR Plus (Motorola 1232) you can store up to 80 hours of HD
programming or up to 200 hours of SD programming.
Can I view and record HD programming with my DVR/Set-top box?
Yes. Your DVR/Set-top box supports both SD and HD formats. A subscription to SureWest
True HD and Digital Choice or higher is required to view and record HD programming.
Do I need to have my DVR/Set-top box connected to a telephone line?
No. Your DVR/Set-top box updates through the Ethernet connection.
Can I watch a show I’m recording before the recording has completed?
Yes. You can either watch the program live as it is being recorded, or you can access the
program through the recorded TV menu as it continues to be recorded.
Can I record On Demand programs?
No. Your DVR/Set-top box does not record On Demand (VOD and SVOD) programs. Keep in
mind that On Demand programming can be watched over a specified period of time and you
have the ability to start it any time you choose.
If I have a home theater will my DVR record a program in Dolby Digital 5.1®?
Yes. If the program is broadcast in Dolby Digital 5.1® the program will be recorded with
Dolby Digital 5.1®. If the program is broadcast in analog sound, the recording will also be
in analog sound despite your home theater’s audio connection to your DVR/Set-top box.
What picture format will my DVR record programs in?
Your DVR will record the programs in the same format they are broadcast.
What happens if my DVR/Set-top box temporarily loses power?
All recordings saved prior to the power loss will be saved, as well as your future recording
schedules. Recordings that are set to record during the power loss will be missed.
Can I increase the rewind and fast-forward speed?
Yes. Your DVR and Set-top box have the ability to rewind and fast-forward at three speeds when
viewing live TV or recorded programming: 15X indicated by two arrows, 60X indicated by three
arrows or 300X indicated by four arrows. The indicator arrows appear in the status bar on the
screen while in rewind or fast-forward mode.
If the power goes out, will my Parental Control, Favorites and Users Settings be lost?
No. These settings should not be lost if your DVR/Set-top box loses power.
You may also skip back in 7-second increments by pressing the Replay button or skip ahead
in 30-sceond increments by pressing the FWD button on your remote control.
Why do I see “too many devices in use” message when only one Set-top box is in use?
Each Set-top box when in use or powered on counts as a program being watched. If you see the
“too many devices in use” message on your TV screen ensure that Set-top boxes not in use are
powered off by pressing the power button.
Does my DVR/Set-top box record any of the menu bar, on-screen program guide, audio
volume changes or anything else that appears on the screen when I am using my remote
control?
No. Your DVR only records the audio and video of the program you are recording.
A recording may start a minute or more after the program has begun. Why is this?
Your DVR is synced with the TV listing and if a network starts a program earlier than on the
program guide the DVR will miss that time unless you program your DVR to record earlier.
Only a part of my program was recorded. Why?
If the beginning of the program did not record, you may have tuned in after the program had
begun. If the end of the program did not record, it could be your DVR has reached its content
storage capacity. Another reason could be loss of power or digital TV signal during the recording.
20
21
Frequently Asked Questions
Questions about Managing your Recordings
How long can I keep my recordings?
You can keep them as long as you want. Lock the programs you do not want auto-deleted. You
may need to erase some locked recordings to make room for others if storage capacity becomes
an issue.
Does my DVR automatically erase programs to make room for new ones?
Yes. Your DVR will automatically erase programs when space is needed. Your DVR will delete
the oldest recordings first.
Can I erase part of a recorded program?
No. Your DVR can only erase the program in its entirety.
How many future recordings can I schedule?
You can set as many future recordings as you want provided you have the necessary
storage capacity.
Do Parental Controls work with my DVR/Set-top box?
Yes. Your Parental Controls will restrict what is viewed or recorded. If you schedule a recording
for a program or channel that is blocked the program will record but the video will not appear
and the audio will be muted. You will need to disable your parental lock feature to view the
program while it is being recorded.
For more information on Parental Controls please see the Parental Controls section on page 15
of your CCI Service Guide.
Where do I find the available capacity on my DVR?
The Disk Space Availability is listed at the bottom of the System Resources page. To navigate
to the System Resources page press the Menu button on your remote control and scroll to
Settings. Choose General then System where you will find the System Resources tab.
22
23
844.YOURCCI
150_00928 DVR24
Manual update_March 2014
I consolidated.com