1
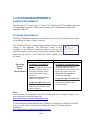
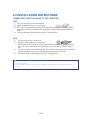
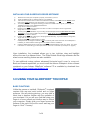
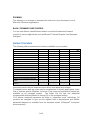
Browser Cat Easy Cat Smart Cat Smart Cat Pro USER’S MANUAL TABLE OF CONTENTS 1.0 SYSTEM REQUIREMENTS............................................................................................................. 1 HARDWARE REQUIREMENTS ........................................................................................................ 1 SOFTWARE REQUIREMENTS......................................................................................................... 1 2.0 INSTALLATION INSTRUCTIONS ................................................................................................... 2 CONNECTING YOUR TOUCHPAD TO THE COMPUTER .............................................................. 2 INSTALLING YOUR GLIDEPOINT DRIVER SOFTWARE................................................................ 3 ® 3.0 USING YOUR GLIDEPOINT TOUCHPAD .................................................................................. 3 BASIC FUNCTIONS .......................................................................................................................... 3 ADVANCE FUNCTIONS.................................................................................................................... 4 HORIZONTAL SCROLL..................................................................................................................... 4 ZOOMING .......................................................................................................................................... 5 BACK / FORWARD PAGE CONTROL .............................................................................................. 5 PRODUCT FEATURES ..................................................................................................................... 5 4.0 CUSTOMIZING YOUR TOUCHPAD FEATURES ........................................................................... 6 USING THE GLIDEPOINT® CONTROL CENTER............................................................................ 6 5.0 CUSTOMER SERVICE .................................................................................................................... 6 TROUBLESHOOTING ....................................................................................................................... 6 FREQUENTLY ASKED QUESTIONS ............................................................................................... 7 CUSTOMER SERVICE ASSISTANCE.............................................................................................. 7 6.0 WARRANTY INFORMATION .......................................................................................................... 8 7.0 FCC REGULATORY NOTICE ......................................................................................................... 8 1.0 SYSTEM REQUIREMENTS HARDWARE REQUIREMENTS The Browser Cat™, Smart Cat Pro™, Smart Cat™ and Easy Cat™ Touchpads require a PC-compatible computer. USB versions require a PC-compatible computer with available USB port. SOFTWARE REQUIREMENTS GlidePoint® touchpads operate as a standard mouse on the PC platform and require no additional software for basic functions. The GlidePoint® driver software adds additional features and ® control to the touchpad. The GlidePoint driver is only available for the Windows operating systems. Look up your operating system and connection type in the following table to determine the version of the GlidePoint® driver software you will need. ® USB Operating System Driver Requirements For Windows Vista/XP/2000 users: Touchpad supports most of the advanced features such as, Horizontal Scrolling, Zoom In/Out, Back and Forward functions (Glidepoint Touchpad driver version 3.3 required) For Windows ME and 98 users: It is Plug and Play and acts as a basic mouse functions with vertical scrolling. The USB version of the Easy Cat also runs on Apple Macintosh computers with available USB ports. ™ ® ® PS2 For Windows Vista/XP/2000 users: Touchpad supports most of the advanced features such as, Horizontal Scrolling, Zoom In/Out, Back and Forward functions (Glidepoint Touchpad driver version 3.3 required) For Windows ME, 98 and NT users: It is Plug and Play and acts as a basic mouse functions with vertical scrolling. Note: Driver version 3.3 is available on the CD included with your touchpad. Version 3.3 is also available for download online at http://www.adesso.com/drivers/glidepoint.zip For the additional advanced features of Glidepoint Touchpad for Windows 98 & ME users, you will need to download the Glidepoint Version 2.6 driver which is available at: http://www.adesso.com/drivers/glidepoint2.6.zip 1 of 8 2.0 INSTALLATION INSTRUCTIONS CONNECTING YOUR TOUCHPAD TO THE COMPUTER USB 1) 2) 3) 4) Turn your computer on and start Windows. Attach the USB connector to your computer. If you see the “New Hardware Found” dialog box after connecting the touchpad, follow the prompts (insert your Windows CD if prompted) to install a standard HID compliant mouse. Test the touchpad; it should operate with your existing drivers. PS/2 1) 2) 3) 4) Turn the power to your computer off. Attach the PS/2 adapter to your computer NOTE: Because the PS/2 ports for both touchpad and keyboard may appear identical, look for an icon or description next to each port on your computer to identify which to use. Turn your computer on and start Windows. If you see the “New Hardware Found” dialog box after Windows starts, select CANCEL and continue with the next step. Test the touchpad; it should operate with your existing drivers. For Macintosh® installation (USB version only) 1) Turn your computer on. 2) Attach the USB connector to your computer. Your Macintosh should detect the touchpad immediately when you plug it in. ® 2 of 8 ® INSTALLING YOUR GLIDEPOINT DRIVER SOFTWARE 1) 2) 3) 4) 5) 6) 7) 8) 9) Please be sure that your touchpad is properly connected to your PC. Insert the Glidepoint ® 3.3 software CD into your CDROM. If the Auto Run feature does not launch the Windows Installer, select RUN from the START menu and type D:\setup (where d is the drive letter of your CD-ROM) The setup wizard will now appear advising you that “The installer will now guide you through the installation process of your Glidepoint® Software”. Single Click on next to continue Read the end user license agreement and click on button to accept the terms of agreement. Single click on next to continue. Choose your type of installation. If you’re using a PS/2 touchpad, select “install driver for a ps/2 touchpad. If you’re using a USB touchpad select, “install driver for a USB touchpad”. Single click on next to continue. Installer will automatically install you’re the program files directory. If you don’t wish to change this, single click on next to continue. Confirm installation by single clicking on next. Glidepoint® will now begin to install on your PC. This may take a few moments. Once Glidepoint is installed, you will be notified and single click on close to exit the installation. Open the GlidePoint® Control Center and adjust the touchpad settings to suit your needs. (For more information on customizing your touchpad, refer to “How can I customize my touchpad” on page 6) Upon installation, the touchpad allows you to tap, right-tap, drag and highlight without the use of an Adesso driver. The Glide Extend virtual edge extender and the wheel mouse scrolling feature are also available. To use additional custom options, advanced Horizontal scroll, zoom In, zoom out, Back and forward capabilities you must install the Adesso Glidepoint driver software contained on your Adesso GlidePoint software CD or available by download from http://www.adesso.com/drivers/glidepoint.zip ® ® 3.0 USING YOUR GLIDEPOINT® TOUCHPAD BASIC FUNCTIONS Unlike the mouse or trackball, Glidepoint® touchpad requires little arm and wrist motion and no finger pressure. Like all pointing devices, you may take a short time to become familiar with the operation of your touchpad. Yet you will soon find that using your finger is a more natural and intuitive way to control your computer. Simply glide your finger across the surface of the pad to move the cursor and tap your finger to “click”. It’s easy! 3 of 8 • To click, lightly and quickly tap the surface of the pad once. Or, press the left button once. • To double-click, tap twice on the pad or click the left button twice. Remember, the touchpad responds to a very light, crisp tap. • To right-click for sub-menus, tap the tap zone in the upper right corner of the touchpad or click the right button once. • To drag, draw, or highlight, double-tap rapidly and hold your finger down on the second tap, then glide to move. You may also hold the left button as you glide your finger. • GlideExtend®. To drag further than the pad surface, lift and reposition your finger after reaching the textured edge. GlideExtend® will virtually eliminate the edge of the pad while you drag. In other words, if you are dragging an item and you reach the textured edge, GlideExtend® will hold the drag function active for three seconds while you reposition and complete the drag. Right-click and scroll features require third To shut off GlideExtend® earlier than three seconds, simply party software on tap or click a button. Macintosh systems (see ® • Vertical Scroll, place your finger down the right edge of the touchpad and glide up or down. side note below). ADVANCE FUNCTIONS Your Adesso touchpad represents the latest in “capacitive touch” technology. All products are designed to give you the highest level of performance and include advanced features not available from the standard mouse. (For more information on customizing your touchpad, refer to “How can I customize my touchpad” on page 6.) ® HORIZONTAL SCROLL Horizontal Scrolling will allow you to move around in a scrollable document from left to right for fast browsing. 4 of 8 For Macintosh , right-click submenu access and wheel-mouse scrolling require the installation of third party software named *USB Overdrive. If interested in these features, you may download the latest version at www.usboverdrive.com. *Adesso does not support USB overdrive and is not responsible for any problems related to or caused by the software. Contact USB Overdrive for technical assistance and support regarding the software. ZOOMING This allows you to increase or decrease the view size of your document in most Microsoft Windows applications. ® ® BACK / FORWARD PAGE CONTROL You can use Adesso’s back/forward feature to activate the back and forward controls of various applications such as Microsoft Internet Explorer and Netscape Navigator . ® ® ® PRODUCT FEATURES The following table summarizes the features available in your product. Features Standard size touchpad Extra-large size touchpad Middle mouse button Vertical scroll Left / Right mouse buttons Taps Taps & Drag Horizontal scroll Zoom control Back / Forward page control Touchpad rotation Tapping control Cursor movement control Number of mechanical buttons Number of programmable touchpad zones Number of programmable hot buttons ™ Browser Cat X ™ Easy Cat X ™ ™ Smart Cat Smart Cat PRO X X X X X X X X X X X X 3 X X X X X X X X X X 2 X X X X X X X X X X 2 X X X X X X X X X X X X 3 1 1 1 1 0 0 0 4 Please Note: Features within the shaded area require the use of the Adesso driver software. Touchpad buttons and tap zones can be programmed to launch applications, open files or execute specific Windows functions. A tap zone and mechanical buttons are available on all touchpad models. The Smart Cat Pro has four additional programmable buttons (labeled A through D) on the touchpad surface. Your Adesso touchpad represents the latest in “capacitive touch” technology. All products are designed to give you the highest level of performance and include advanced features not available from the standard mouse. (Glidepoint® touchpads driver required!) ® 5 of 8 4.0 CUSTOMIZING YOUR TOUCHPAD FEATURES USING THE GLIDEPOINT® CONTROL CENTER Your GlidePoint® touchpad settings, such as speed or button assignments, may be customized through the GlidePoint® Control Center. The GlidePoint® Control Center is ® only available if you have installed the GlidePoint driver software (see “Installing your GlidePoint® driver software” pg. 3.) ® The GlidePoint Control Center can be accessed through the start menu by going to: Start > (All) Programs > GlidePoint > Glidepoint® Control Center or you can access it through the Control Panel as displayed below. (Refer to your Microsoft documentation for information on accessing Control Panel for your version of Windows) ( Please Note: These instructions only apply for Windows Vista, XP and 2000.) 5.0 CUSTOMER SERVICE ® ™ To customize settings on a Macintosh for your CyberCat , go to the Apple menu > Control Panel > Mouse. TROUBLESHOOTING ® Your GlidePoint touchpad should work immediately when connected to your computer. If you have trouble: • Check all connections to be sure they are secured to the correct ports and then restart the computer. • Check Questions and Answers at http://www.adesso.com/touchpad_faq.htm • Check the following list of frequently asked questions to see if your questions can be easily answered. • Should you need additional help, call Adesso’s toll-free technical support at 1-800-467-1195. Support hours are Monday through Friday 9:00 am – 5:30 pm PST. 6 of 8 FREQUENTLY ASKED QUESTIONS What if I have trouble tapping or dragging on the touchpad? If you have difficulties clicking or using highlight operations by tapping on the touchpad’s surface: • A light, quick tap will work best. The touchpad does not require pressure, and hard taps may actually slow your typing. What if using the touchpad is causing discomfort in my hand or wrist? If you experience discomfort while using your touchpad: • Try to relax your hand while pointing and tapping. Arching or flexing your hand over the touchpad will cause unnecessary strain. • Your touchpad responds to the lightest touch, so you can use your index finger, your middle finger, or even your thumb to point and tap. If you find it uncomfortable to reach toward the device on your desktop, hold it in your other hand or on your lap. How can I customize my touchpad settings? The GlidePoint® Control Center is complete with context sensitive help. • You must install the GlidePoint® software driver in order to customize your touchpad features. (Refer to “Installing your GlidePoint® driver” on page 3) • To access the GlidePoint® Control Center go to: Start > (All) Programs > GlidePoint® > Glidepoint® Control Center. • Once inside the GlidePoint® Control Center you will click on the appropriate tab that matches the features you want to customize. • Click on the help button on any tab to get information on customizing those features. CUSTOMER SERVICE ASSISTANCE ® To learn more about operating your GlidePoint touchpad or if you need further assistance, contact Adesso at: • Web site: www.adesso.com • E-mail address: [email protected] (please use a return e-mail address) • Support line: 800-467-1195 Monday through Friday 9:00 am – 5:30 pm PST. • Fax line: 909-839-2930 • 7 of 8 6.0 WARRANTY INFORMATION ADESSO provides a limited warranty against defects in materials and workmanship for a period of ONE YEAR from the date of original retail purchase. If you discover a defect, Adesso will, at its option, repair or replace the product at no charge to you, provided you return it during the warranty period with transportation charges pre-paid to Adesso. You must contact Adesso at [email protected] for a Return Merchandise Authorization number (RMA) prior to returning any product. For each product returned for warranty service, please include your name, shipping address (no P.O. Box), telephone number, copy of the bill of sale as proof of purchase and have the package clearly marked with your RMA number. This warranty does not apply if the product has been damaged by accident, abuse, misuse or improper freight handling. The warranty will not cover products that have been modified without the written permission of Adesso, or if the serial number has been removed or defaced. 7.0 FCC REGULATORY NOTICE This device complies and Part 15 of the FCC Rules. Operation is subject to the following two conditions: (1) this device may not cause harmful interference, and (2) this device must accept any interference received, including interference that may cause undesired operation. Warning: Changes or modifications to this unit not expressly approved by the party responsible for compliance could void the user’s authority to operate this equipment. Note: This equipment has been tested and found to comply with the limits for a class B digital device, pursuant to Part 15 of the FCC Rules. These limits are designed to provide reasonable protection against harmful interference in a residential installation. This equipment generates, uses, and can radiate frequency energy, and, if not installed and used in accordance with the instructions, may cause harmful interference to radio communications. However, there is no guarantee that interference will not occur in a particular installation. If this equipment does cause harmful interference to radio or television reception, which can be determined by turning equipment off and on, the user is encouraged to try to correct the interference by one or more of the following measures: Reorient or relocate the receiving antenna. Increase the separation between the equipment and receiver. Connect the equipment into an outlet on a circuit different from that which the receiver is connected. 8 of 8