1
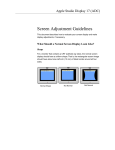
Setting Up Your Studio Display 17-inch CRT (16-inch diagonal viewable image size) K Apple Computer, Inc. © 1998 Apple Computer, Inc. All rights reserved. Under the copyright laws, this manual may not be copied, in whole or in part, without the written consent of Apple. Your rights to the software are governed by the accompanying software license agreement. The Apple logo is a trademark of Apple Computer, Inc., registered in the U.S. and other countries. Use of the “keyboard” Apple logo (Option-Shift-K) for commercial purposes without the prior written consent of Apple may constitute trademark infringement and unfair competition in violation of federal and state laws. Every effort has been made to ensure that the information in this manual is accurate. Apple is not responsible for printing or clerical errors. Apple Computer, Inc. 1 Infinite Loop Cupertino, CA 95014-2084 408-996-1010 http://www.apple.com Apple, the Apple logo, ColorSync, Mac, Macintosh, PowerBook, and Power Macintosh are trademarks of Apple Computer, Inc., registered in the U.S. and other countries. Adobe and Acrobat are trademarks of Adobe Systems Incorporated or its subsidiaries and may be registered in certain jurisdictions. ENERGY STAR is a U.S. registered mark. Helvetica is a registered trademark of Linotype-Hell AG and/or its subsidiaries. NuBus is a trademark of Texas Instruments. PANTONE® and other Pantone, Inc. trademarks are the property of Pantone, Inc. Portions © Pantone, Inc. 1995 Simultaneously published in the United States and Canada. PowerPC is a trademark of International Business Machines Corporation, used under license there from. Mention of third-party products is for informational purposes only and constitutes neither an endorsement nor a recommendation. Apple assumes no responsibility with regard to the performance or use of these products. Contents Communications Regulation Information 4 Your Display at a Glance 6 Setting Up 7 Getting Ready to Set Up 7 Do You Need a Graphics Card? 7 Using More Than One Monitor 8 Accessing the Electronic User’s Manual 8 Connecting the Display to Your Computer 9 Turning the Display On 11 Installing the Apple Displays Software 12 Using Manual Controls and the On-Screen Display 13 Using Manual Controls on Your Monitor 14 Accessing and Adjusting the On-Screen Display Controls 14 Adjusting the OSD Time and Exiting the OSD 17 Safety Instructions 20 Troubleshooting 21 If the Screen Image Is Dim, Flickers, or Does Not Appear 22 Problems With the Energy-Saving (Sleep) Mode 23 Problems With Picture Quality or Placement 23 Problems With Changing the Resolution 24 Problems Finding the Control Strip 24 Obtaining Information and Updated Apple Software 25 3 Communications Regulation Information FCC statement This equipment has been tested and found to comply with the limits for a Class B digital device in accordance with the specifications in Part 15 of FCC rules. See instructions if interference to radio or television reception is suspected. Radio and television interference The equipment described in this manual generates, uses, and can radiate radio-frequency energy. If it is not installed and used properly—that is, in strict accordance with Apple’s instructions—it may cause interference with radio and television reception. This equipment has been tested and found to comply with the limits for a Class B digital device in accordance with the specifications in Part 15 of FCC rules. These specifications are designed to provide reasonable protection against such interference in a residential installation. However, there is no guarantee that interference will not occur in a particular installation. You can determine whether your computer system is causing interference by turning it off. If the interference stops, it was probably caused by the computer or one of the peripheral devices. If your computer system does cause interference to radio or television reception, try to correct the interference by using one or more of the following measures: m Turn the television or radio antenna until the interference stops. m Move the computer to one side or the other of the television or radio. m Move the computer farther away from the television or radio. m Plug the computer into an outlet that is on a different circuit from the television or radio. (That is, make certain the computer and the television or radio are on circuits controlled by different circuit breakers or fuses.) If necessary, consult an Apple-authorized service provider or Apple. See the service and support information that came with your Apple product. Or, consult an experienced radio/television technician for additional suggestions. Important Changes or modifications to this product not authorized by Apple Computer, Inc., could void the FCC certification and negate your authority to operate the product. This product was tested for FCC compliance under conditions that included the use of Apple peripheral devices and Apple shielded cables and connectors between system components. It is important that you use Apple peripheral devices and shielded cables and connectors between system components to reduce the possibility of causing interference to radios, television sets, and other electronic devices. You can obtain Apple peripheral devices and the proper shielded cables and connectors through an Apple-authorized dealer. For non-Apple peripheral devices, contact the manufacturer or dealer for assistance. IC statement IC Class B Compliance This digital apparatus does not exceed the Class B limits for radio noise emissions from digital apparatus as set out in the interference-causing equipment standard entitled “Digital Apparatus,” ICES-003 of the Department of Communications. Observation des normes—Classe B Cet appareil numérique respecte les limites de bruits radioélectriques applicables aux appareils numériques de Classe B prescrites dans la norme sur le matériel brouilleur : “Appareils Numériques”, NMB-003 édictée par le ministre des Communications. 4 Communications Regulation Information VCCI statement Communications Regulation Information 5 Your Display at a Glance ® Power button ¤ Brightness controls On-Screen Display controls O Contrast controls Power cord receptacle Recessed area for lifting the monitor Recessed area for lifting the monitor Security lock port Monitor cable 1 Setting Up Read this booklet to learn how to set up and connect the Apple Studio Display to your computer. This booklet also contains important safety information and troubleshooting tips. Getting Ready to Set Up Before you unpack the carton, choose an appropriate location to place your display. Here are some key factors to consider when determining where to place your monitor: m Be sure that the desk or table can support the display’s weight—48 pounds (21.8 kg). m Make sure that the monitor cable reaches your computer. The cable should be unobstructed when you swivel and tilt the monitor. m Allow at least 6 inches (15 cm) of clearance in the back. If you don’t allow enough clearance, the monitor connector might be damaged when the cable hits an obstruction. Before you connect your monitor, read the following section to determine if you need any additional items. Do You Need a Graphics Card? Your monitor works with any Mac OS–based PowerPC™ computer, except the PowerBook Duo 2300, with either a built-in monitor port adapter or a compatible graphics card. If you’re not sure whether your computer or graphics card will work with the monitor, check whether its video circuitry operates within the ranges specified here. Your monitor works with video circuitry that operates within these ranges: m horizontal scan rate of 30–85 kilohertz m vertical refresh rate of 48–160 hertz If no image appears on your monitor after you have completed the instructions in this booklet, your graphics card may not be compatible with your display. You may need to purchase a compatible graphics card. Your Apple-authorized dealer can help you select a compatible graphics card. 7 Ranges of supported modes Resolution Vertical Refresh Rate1 (Hertz) 640 x 480 60–85 800 x 600 60–85 832 x 624 75 1024 x 768 60–85 1152 x 870 75 1280 x 1024 75 1600 x 1200 60 1 These are ranges only; the actual resolutions and vertical refresh rates that are available to you depend on your computer or graphics card. See the manual that came with your computer or graphics card for more information. Some NuBus™ graphics cards and some third-party PCI cards are not fully compatible with your monitor. Note: This monitor is preadjusted at common resolution and vertical refresh rate settings. See “Factory Adjusted Video Modes” in the electronic user’s manual. (The electronic user’s manual is in either a Portable Document Format (PDF) or an HTML document depending on the version of the Apple Displays Software that came with your monitor.) For details about accessing these documents, see the following section. Using More Than One Monitor If your computer has expansion slots, you can connect multiple monitors (including this display) to your computer. You may need a graphics card for each additional monitor you are using. See the manual that came with your computer for information on working with multiple monitors. Accessing the Electronic User’s Manual The user’s manual is either an Adobe™ Acrobat (PDF) file or an HTML document, depending on the version of the Apple Displays Software you have. Check the version of the Apple Displays Software on the label of the CD-ROM disc that came with your monitor. Software Version 1.6.2 If you have version 1.6.2 of the software, you can access the PDF version of the user’s manual. To open the manual: 1 Insert the CD-ROM disc that came with your monitor into the computer’s CD-ROM drive. The CD-ROM disc icon appears on the desktop. 8 2 Double-click the CD-ROM disc icon. The CD window opens and displays its contents: the Apple Displays Software, TCO 95, the User’s Manual, and Adobe Acrobat Reader. 3 Double-click the User’s Manual. The manual opens. Note: If you have not installed Adobe Acrobat Reader on your system, first install the software and then open the user’s manual. Software Version 1.7 or later If you have version 1.7 or later of the software, you can access the HTML version of the user’s manual: “About Your Studio Display.” To open the manual: If you have Mac OS 8.5 installed on your computer, open the Help Menu in the Finder and choose Mac OS Help, then choose “About Your Studio Display.” If you have Mac OS 8 or 8.1 installed on your computer, double-click the “About Your Studio Display” icon on your desktop. Connecting the Display to Your Computer Warning This equipment is intended to be electrically grounded. This is a safety feature. Ensure that the computer you are connecting to is grounded. If you use a power cord with a plug, be sure to connect it only to a grounded outlet. If the outlet is not grounded, contact a licensed electrician to replace it with a properly grounded outlet. Do not defeat the purpose of the grounding plug! The monitor weighs approximately 48 pounds. To move the monitor, make sure the monitor is facing you. Then lift the monitor by placing your hands on the recessed areas on the bottom of the monitor. Important Before you connect any cords or cables, make sure that your computer is turned off and unplugged. Important 9 1 Connect the socket end of the monitor power cord to the power cord receptacle on the back of the display. Recessed area for lifting the monitor Recessed area for lifting the monitor Power cord 2 Plug the other end of the monitor power cord into the power socket on your computer. 3 Insert the monitor connector into the monitor port (marked with ™) on the back of the computer and tighten the thumbscrews. Monitor port icon Monitor connector If you installed a graphics card in your computer, connect the monitor cable to the graphics card’s port instead. For information about installing graphics cards, see the manual that came with your computer or graphics card. 10 Turning the Display On To turn on the monitor for the first time: 1 Plug your computer’s power cord in the power outlet. 2 Press the power button on the front-right side of the display and start up your computer. Power button The monitor’s green power indicator light goes on. (It may turn amber until your computer comes on.) If the green light does not go on, press the monitor’s power button again. If this doesn’t work, shut down and unplug your computer and make sure you’ve connected the monitor to your computer properly (see “Connecting the Display to Your Computer” on page 9). Note: When you start up your computer or when your system wakes up from sleep, you may notice a shimmering effect on the screen for a few moments. This is normal. Your monitor automatically degausses (magnetically adjusts) the screen when it turns itself on. If you are using any of the following computer models or graphics cards, you will need to turn off the DDC (Data Display Channel) control to make the maximum number of resolution settings available. m Power Macintosh 6100, 7100, and 8100 series m PowerBook 1400 and 5300 m Power Macintosh 9500, 6200, 6300, and 6400 series m Some third-party video cards Important For instance, if you are using any of the above computer models, or a third-party video card, and you are able to access only the 640 x 480 resolution setting, you will need to turn off the DDC control to access the rest of the resolution settings. For instructions on turning off the DDC control, see the table “ETC” and “Accessing and Adjusting the On-Screen Display Controls” in Chapter 3 of the electronic user’s manual. If you are not using any of the computer models or graphics cards listed here, you do not need to reset the DDC control. You are finished setting up your display. 11 Installing the Apple Displays Software This section explains how to install the Apple Displays Software on your Mac OS–based computer. You need the following to be able to install and use the Apple Displays Software: m a PowerPC-based Macintosh computer m Mac OS version 8.0 or later If you do not have Mac OS 8.0 or later, you can purchase the software from an Appleauthorized dealer or service provider. Important Make sure you use the Installer to install the software. Do not install the software by dragging files. If you do, the software will not work. To install the Apple Displays Software, follow these steps: 1 Insert the CD-ROM disc that came with your monitor into the computer’s CD-ROM drive. The CD-ROM disc icon appears on the desktop. 2 Double-click the CD-ROM disc icon. The Apple Displays Software window opens. 3 Double-click the folder that contains the language you want the software to use. 4 Double-click the Apple Displays Software folder. 5 Double-click the Apple Displays Software Read Me file and read the document that appears. The Read Me file contains important information about the files included with your software. 6 Choose Quit from the File menu when you’re finished reading. 7 Double-click the Upgrader/Installer icon to start the Installer program. A Welcome screen appears. Note: If you are installing version 1.6.2 of the Apple Displays Software, the installation instructions are slightly different from steps 8–10 listed here. Follow the onscreen instructions and click Install to install the software. Then skip to step 11. The Install Apple Displays Software dialog box appears. 12 8 Make sure the destination disk named is the startup disk of your computer. If it isn’t, select it from the Destination Disk list. 9 Click Select. The software license agreement dialog box appears. Be sure you’re acting within the terms of the software license agreement before you agree to install this software on your computer. The license agreement specifies how many copies of the program you can make for yourself and others. Important Click Continue and then click Agree once you’ve read and agreed to the terms in the license agreement. 10 Click Start. The Upgrader/Installer takes a few moments to calculate what needs to be done and then begins to copy files. If other applications are open, a message asks you to quit them. Click Continue to quit the applications and continue with the installation. 11 Follow the instructions on the screen until the installation is complete. The Upgrader/Installer checks whether you have the system software you need to use the monitor. If anything is missing, a message tells you what you need. You won’t be able to install the software until you correct the problem. If a message says you don’t have the correct system software, you can purchase a new version from an Apple-authorized dealer. After the installation, the Upgrader/Installer tells you to restart your computer. 12 Click Restart. The software is now installed and the monitor is ready for use. (To adjust your monitor, use the Monitors & Sound control panel, available from the Control Panels folder in the Apple [K] menu. For help using the Monitors & Sound control panel, open the Help menu and choose Show Balloons. If you ever reinstall system software on your computer, you must also reinstall the Apple Displays Software. Important Using Manual Controls and the On-Screen Display You can adjust the picture on your monitor by using the brightness and contrast buttons under the front bezel of your monitor, and by adjusting the controls in the On-Screen Display. The On-Screen Display lets you fine-tune the picture on your monitor. In most cases, you won’t need to make any adjustments to your picture. But if you do, follow the instructions in this chapter. 13 Using Manual Controls on Your Monitor You use the buttons under the front bezel of your monitor to adjust the brightness and contrast, and to control the OSD (On-Screen Display). Power button OSD enter button Left and right arrow buttons OSD exit button Contrast decrease button Contrast increase button Brightness decrease button Brightness increase button The following table describes the function of each control. Control Function Power button Use this button to turn the monitor on or off. A green light indicates the monitor is on. An amber light indicates the power-saving mode (sleep). When the monitor is in sleep, move your mouse or press a key to return the monitor to its normal display operation. Contrast control Use these buttons to increase or decrease the contrast of the picture. Brightness control Use these buttons to increase or decrease the brightness of the picture. OSD Exit button Use this button to exit the OSD and the OSD windows. The left and right arrow buttons Use these buttons to move between the OSD controls. OSD Enter button Use this button to enter the OSD and to enter choices. Accessing and Adjusting the On-Screen Display Controls To make adjustments in the On-Screen Display, follow these steps: 1 14 Press the OSD Enter button on the left of the monitor. The main menu of the OSD, the Basic Adjustments menu, appears. Basic adjustment Image Geometry BASIC OSD adjust Color ETC Language ADJUSTMENTS SEL: ENTER: This menu contains the seven main control icons of the On-Screen Display: Basic Adjustments, Geometry, Image, Color, OSD Adjust, Language, and ETC. These icons represent controls that you use to adjust the picture and the On-Screen Display window. 2 To access a control, use the left or right arrow buttons to highlight icons. When the icon you want becomes highlighted, press the Enter button. Selection bar IMAGE ENTER: Description of highlighted control SEL: For instance, move the selection bar over the Geometry icon and press the Enter button. 15 The control’s menu opens. GEOMETRY SEL: ENTER: 3 Using the left and right arrow buttons, select the subcategory icon you want, and then press Enter. In this case the Tilt icon has been selected. GEOMETRY 1024X768/75Hz TILT ENTER: SEL: ENTER: SEL: The Tilt adjustment window appears. GEOMETRY 1024X768/75Hz TILT ENTER: SEL: MIN MAX EXIT: 16 ADJ: 4 Use the arrow buttons to adjust the level from minimum to maximum. 5 Accept the changes by pressing the Enter button. 6 Exit the OSD by pressing the OSD Exit button. Adjusting the OSD Time and Exiting the OSD The On-Screen Display turns itself off after a few seconds of inactivity. You can change the number of seconds by selecting the OSD Adjust control icon in the main window and then selecting the subcategory OSD Time. Use the arrow buttons to increase or decrease the number of seconds. BASIC ADJUSTMENTS 1024X768/75Hz OSD TIME ENTER: SEL: ENTER: SEL: When you are finished adjusting a control, press the Enter button. The new settings are automatically saved. To exit the On-Screen Display menu, press the Exit button. The following tables describe the settings you can make with the On-Screen Display. Basic Adjustments Icon Control Function Horizontal Position Adjusts the horizontal position of the screen. Horizontal Size Adjusts the width of the screen image. Vertical Position Adjusts the vertical position of the screen image. Vertical Size Adjusts the height of the screen image. 17 Icon Control Function Side Pincushion Adjusts the shape of the image sides, changing from convex to concave. Trapezoid Corrects geometric distortion. Recall Restores the factory settings for Basic Adjustments. Geometry Icon Control Function Side Pincushion Balance Adjusts the shape of the screen, to curve the sides of the image in one direction or the other. Parallelogram Adjusts the slant of the image. Pin S Adjust Modifies the right and left edges of the screen image. Pin W Adjust Modifies the right and left edges of the screen image. Tilt Rotates the screen image. Zoom Adjusts the height and width of the screen image simultaneously. Recall Restores the factory settings for Geometry. Control Function Moire Adjusts the horizontal moire of the screen. Horizontal Convergence Adjusts the red and blue vertical fields. Vertical Convergence Adjusts the red and blue horizontal fields. Image Icon 18 Color Icon K Control Function 9300K Sets the display’s color temperature. The color at this temperature is bluish white. 6500K Sets the display’s color temperature. The color at this temperature is pale pink. 5000K Sets the display’s color temperature. The color at this temperature is beige. Custom Color Manually adjusts the color temperature of the display. The range is between 5000K to 10,000K. OSD Adjust Icon Control Function OSD Horizontal Adjusts the horizontal position of the On-Screen Display window on your screen. OSD Vertical Adjusts the vertical position of the On-Screen Display window on your screen. OSD Time Sets the amount of time the On-Screen Display remains on the screen after you stop making adjustments. Language Icon Control Function Language Selects the language for the On-Screen Display. 19 ETC Icon Control Function Degauss Degausses (magnetically adjusts) the screen to improve picture quality. Information Gets information about the factory preset and the 25 user selectable video modes. Video Selects the monitor’s input signal level to change the overall brightness and contrast. DDC Turns ON and OFF the Data Display Channel. The default setting is ON. Note: Changes to the magnetic field around a monitor can distort the picture on the screen. The magnetic field may change whenever you tilt or swivel the monitor dramatically, or when you bring a magnetized object close to the monitor. Your monitor has a feature called automatic degaussing that immediately counteracts the effects of sudden changes in the magnetic field. However, most monitors degauss only when they are first turned on so if you leave your monitor turned on over long periods (more than 3 days), it’s a good idea to degauss the monitor yourself. This ensures that you are getting the best quality picture possible. To degauss your monitor, select the Degauss icon and press the Enter button. The monitor may make a crackling sound when you degauss it; this is normal. Safety Instructions Warning Do not clean any part of your display with a cleaner that contains alcohol or acetone, and never spray cleaner directly onto the screen. For more information about cleaning your display, see “Cleaning Your Monitor” in the “Maintenance” section of the electronic user’s manual. For your own safety and that of your equipment, always take the following precautions. Disconnect the power plug (by pulling the plug, not the cord) if any of the following conditions exists: m the power cord or plug becomes frayed or otherwise damaged m you spill something into the case m your display is exposed to rain or any other excess moisture m your display has been dropped or the case has been otherwise damaged m you suspect that your display needs service or repair 20 m you want to clean the case or screen The only way to disconnect power completely is to unplug the power cord from the main power supply. Make sure at least one end of the power cord is within easy reach so that you can unplug the display when you need to. Important Be sure that you always follow these instructions: m Keep your display away from sources of liquids and moisture. m Don’t set anything on top of the display. m Keep the display’s vents free from obstruction. m Read all the installation instructions carefully before you plug your display into a power source. Never remove the case from the monitor! You could come in contact with hazardous voltage. Warning Electrical equipment may be hazardous if misused. Operation of this product, or similar products, must always be supervised by an adult. Do not allow children access to the interior of any electrical product and do not permit them to handle any cables. Troubleshooting Warning If you have a problem with your monitor and nothing presented in this booklet solves it, consult the service and support information that came with your monitor for instructions on how to contact an Apple-authorized service provider or Apple for assistance. If you attempt to repair the monitor yourself, any damage you cause to the monitor will not be covered by the limited warranty on your monitor. Contact an Appleauthorized dealer or service provider for additional information about this or any other warranty question. Solutions to common display problems are described here. Problems related to the computer are covered in the manuals that came with your computer. Note: When you start up your computer or when your system wakes up from sleep, you may notice a shimmering effect on the screen for a few moments. This is normal. Your monitor automatically degausses (magnetically adjusts) the screen when it turns itself on. 21 If the Screen Image Is Dim, Flickers, or Does Not Appear First try these basic checks: m Make sure that the power cord is plugged in properly. If the monitor power cord is plugged into your computer, make sure your computer is on and the computer’s cord is firmly plugged into the computer and an electrical outlet or power strip. If you are using a power strip, make sure it is turned on. m Make sure the monitor cable is properly plugged into your computer monitor port or graphics card. m Make sure the thumbscrews on the monitor cable are tightened securely into the port connector. m Make sure that your computer and monitor are turned on. If you still have problems, look for your problem on the following pages and follow the instructions. No image appears on the screen, or the screen is dim, and the monitor’s power indicator light is on. m The monitor may have gone to sleep, or a screen saver that darkens your screen may be activated. Move the mouse or press a key to restore the image. m Make sure the brightness (¤) and contrast (O) controls are set correctly. The brightness and contrast controls are located on the underside of the front of the monitor. m If the monitor cable is properly connected and the amber light is on, the monitor may not be compatible with your computer or graphics card. You may need to install a different graphics card in your computer or use an adapter. See “Do You Need a Graphics Card?” on page 7. The screen flickers. m The flickering could be caused by interference from a nearby power line, a fluorescent light, or an electrical device—for example, a radio, a microwave oven, or other computer equipment. Try relocating nearby electrical devices, or moving your computer and monitor. m If you have more than one monitor attached to your computer, the monitors might be interfering with one another. Move the monitors farther apart or set the monitors at an angle, so their screens are close and their back panels are farther apart. If you still see flickering after moving the monitors more than 16 inches apart, contact an Appleauthorized dealer or service provider. m Your monitor may flicker if you have chosen a resolution with a refresh rate of 60 hertz or below. You may be able to change to a resolution with a higher refresh rate using the Monitors & Sound control panel. 22 m When you start up your computer or when your system wakes up from sleep, you may notice a shimmering effect on the screen for a few moments. This is normal. Your monitor automatically degausses (magnetically adjusts) the screen when it turns itself on. Problems With the Energy-Saving (Sleep) Mode Some computers and graphics cards do not support the Energy Saver feature. See the documentation that came with your computer and graphics card for more information. Problems With Picture Quality or Placement No colors appear on the screen, or the colors don’t look right. m Make sure that the number of colors is set correctly in the Monitors & Sound control panel or in the Control Strip. For more information, see “About the Monitors & Sound Control Panel” in Chapter 2 of the electronic user’s manual, or Mac OS Help, or Monitors & Sounds Help when the Monitors & Sound control panel is active. m If you have already changed the number of colors displayed on the screen, try one of the following: m Quit the application you’re using and start it again. m Go back to the number of colors you were using previously. The screen has colored patches and video jitters. m Move your display away from any external magnetic fields such as other monitors, video systems, printers, scanners, fluorescent lights, metal cabinets or desks, and electric clocks. The external fields may interfere with or disrupt the monitor’s internal field, causing the screen image to jitter, distort, drift, or lose color quality. The screen image is off-center. m Try using one of the preset resolutions listed in the section “Factory Adjusted Video Modes” in the electronic user’s manual. m Try changing to another resolution using the Monitors & Sound control panel or the Control Strip. For more help, open the Help menu and choose Show Balloons when the Monitors & Sound control panel or the control strip is active. m Adjust the vertical or horizontal position. See “Accessing and Adjusting the On-Screen Display Controls” on page 14. (Keep in mind that you may have to adjust the picture again if you change resolutions.) The screen image is too large or too small. m Try changing to another resolution using the Monitors & Sound control panel or the Control Strip For more help, open the Help menu and choose Show Balloons when the Monitors & Sound control panel or the control strip is active. 23 m Adjust the horizontal or vertical size of the picture. See “Accessing and Adjusting the OnScreen Display Controls” on page 14. (Keep in mind that you may have to adjust the picture again if you change resolutions.) The screen appears greenish, the screen image is unreadable, or there is “snow” on the screen. m Make sure the monitor cable is connected firmly to the monitor port or graphics card on the back of the computer. Problems With Changing the Resolution After you change the screen resolution, a window is partly off the screen or missing, or you can’t see the whole screen. If your window is missing: m Quit the application whose window is missing and then open it again. m Go back to the resolution you were using, close the window, change the resolution, and then reopen the window. If you cannot see the whole screen: m Try one of the preset resolutions. m Adjust the vertical or horizontal position. See “Accessing and Adjusting the On-Screen Display Controls” on page 14. (Keep in mind that you may have to adjust the picture again if you change resolutions.) If you have problems with a particular application, contact the publisher of that application. After you change the screen resolution, icons move. Changing the screen resolution affects how information can be displayed on your screen. The display software may automatically reposition icons after you change the screen resolution. When you select a different resolution, the monitor goes blank, and the resolution does not change. Your monitor may go blank for 10 seconds if you select a resolution that does not work with your monitor. Try selecting another resolution. Problems Finding the Control Strip You may have hidden the Control Strip. Open the Control Strip control panel and click the button labeled “Show Control Strip.” 24 Obtaining Information and Updated Apple Software Where to get more information When you have questions about using your monitor, there are several places where you can get more information. This Booklet Use this setup booklet and the electronic user’s manual to set up your monitor, install software, use the On-Screen Display, and find solutions to common problems. Mac OS Help If you need help or experience a problem while using the Apple Displays Software, open the Help menu and choose Help. The Help menu is the main source for information about the Apple Displays Software and your Mac OS–based computer. Apple technical support information and software updates are available from online services. You can get troubleshooting and other important information by using these services. You can also get the latest versions of Apple software, including most printer drivers, system enablers, and updates to utilities and networking and communications software. Support information and Apple software updates are available via Apple’s World Wide Web site: m http://www.info.apple.com 25