1
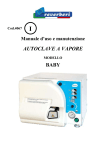
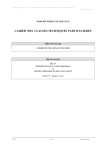
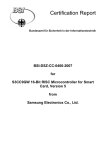
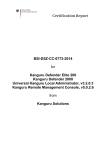
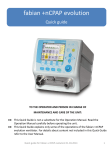
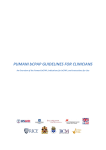
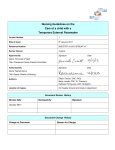
Dento Air Plus - User Manual 2010 Dento Air Plus Vienna, September 2010 DDr. Klaus Kotschy Goldeggasse 2/4 1040 Vienna Austria www.dentoairplus.com [email protected] Tel: +43 (699) 1405 3316 Dento Air Plus As dry as a dental dam! 1 Dento Air Plus - User Manual 2010 CONTENTS 1 SAFETY PRECAUTIONS 2 DEVICE DESCRIPTION 3 CONNECTION OPTIONS, AIR 4 SETTING UP YOUR DENTO AIR PLUS 5 CONNECTING YOUR DENTO AIR PLUS TO YOUR DENTAL UNIT 6 MOUNTING YOUR DENTO AIR PLUS ONTO YOUR DENTAL UNIT on the unit bracket or arm unit 7 MOUNTING YOUR DENTO AIR PLUS TO YOUR MOBILE OR TABLETOP DENTAL UNIT or to an external ultrasound or sonic handpiece 8 FASTENING YOUR DENTO AIR PLUS TO YOUR ULTRASOUND or SONIC HANDPIECE 9 CLINICAL APPROACH – WARNING: TOOTH OVERHEATING 10 GENERAL NOTES ON STERILISATION, STORAGE AND USE FOR OLIVE-TIPPED CANNULAE 2 Dento Air Plus - User Manual 2010 3 Dento Air Plus - User Manual 2010 SAFETY PRECAUTIONS – Important precautions you should read through before you use your Dento Air Plus Read though this user manual carefully to prevent any risks or problems from the start. Air embolism and air emphysema: Connected to an air supply supporting pressures of three bars or more, Dento Air Plus will blow at a constant pressure of three bars. Heavy gingivitis, deep gingival recession or minimal or absent gingiva fixa (gingiva firmly anchored to the crown of the tooth) may result in air embolism or air emphysema in the tissues. Where you should or should not use Dento Air Plus is subject to your discretion. Ask about the air pressure in bars for your air syringe when connected to your dental unit to gain a rough idea of the pressure you have been using on your patients so far. As a general rule, the deeper the gingival pockets, the heavier the inflammation, the less gingiva propria, the higher the risk of emphysema. Symptoms of air embolism: Pain while breathing Heavy coughing Heavily accelerated breathing (tachypnoea) Syncope Fear and panic, or even fear of death from the feeling of suffocation Heavy sweating (hyperhidrosis) How to deal with an air embolism: Call the rescue services immediately, and apply first aid procedures. The most important step is to stop Dento Air Plus treatment at once. Depending on the symptoms, you may need to perform artificial respiration on your patient. Place your patient onto the left-lateral position with the head lowered to prevent further lung embolism (Durant's manoeuvre); this should keep the air in the right-hand ventricle and away from your patient's pulmonary circulation. 4 Dento Air Plus - User Manual 2010 Symptoms of air emphysema: Rapid swelling of the soft tissues around the site of treatment Rapid pain development in your patient Air emphysemas that develop in the lower jaw may spread through the base of the tongue into the throat, and on to lungs. Air emphysemas that develop in the upper jaw may spread through the cheeks of the patient to below the eyes. How to deal with air emphysema: Send the patient to an outpatient oral, maxillary and facial surgery immediately for further treatment. Reassure your patient that the air will definitely be reabsorbed into the body within the next two to four days; until then, the patient may experience some pain and a crackling sensation in the tissues involved. Eye protection Protect your patients' eyes from injury from the air stream – have them wear eye protection. Clinical approach – Warning: tooth overheating Your Dento Air Plus is only an additional device to be fitted to your ultrasound handpiece on the outside using the firm rubber O-rings supplied. ALWAYS WORK WITH WATER AS YOU ALWAYS HAVE DONE USING YOUR ULTRASOUND HANDPIECE FOR REMOVING PLAQUE. The air from your Dento Air Plus will serve you in drying the site of treatment to reveal plaque when you are NOT working with ultrasound. 5 Dento Air Plus - User Manual 2010 DEVICE DESCRIPTION On delivery, check your package for completeness according to the parts list below; report any missing parts at once. 1 3 2 5 4 Qty Number Description 1 1 Pneumatic foot pedal, steel casing, powder-coated, grey, 106300ARJ3 with integrated pressure control, permanently configured to 3.0 bar/45 PSI (+/- 10%) with a two-metre twowhole PU hose, grey, male/female Luer connectors (not autoclavable; use wiping and spray disinfectant) 1 2 Stainless-steel olive-tipped cannula, outer diameter 1.2 mm, inner diameter 0.8 mm, length 160 mm, autoclavable up to 135°C 1 3 2.5 m PU hose, 2.2 x 1, blue, female Luer connector (not autoclavable; use wiping and spray disinfectant) 1 4 2.5 m PU hose 6x4, grey, connector w/ catch and male Luer connector (not autoclavable; use wiping and spray disinfectant) 5 O-rings for handpiece fastening (not autoclavable; use wiping and spray disinfectant) 6 Dento Air Plus - User Manual 2010 CONNECTING OPTIONS, AIR Unfortunately, there is no global standard air connector, and we cannot include the right connector for every customer. You may send us a photo with the air outlet you use in your dental surgery by eMail before ordering to [email protected], or contact a local technician. Air pressure should lie between 45 psi (3 bar) min and 125 psi (8.3 bar) max. The air pressure will be throttled to 45 psi (3 bar) in the foot control. The air supply should be dry and clean. Never connect the hose to a water supply. SETTING UP YOUR DENTO AIR PLUS A. Connect the grey hose fitted with the air connector 4 for the air outlet in your dental practice with the grey hose for the control pedal 1 by twisting the two white Luer connectors together on the two hoses 6-8. 1 1 4 4 6 7 8 7 Dento Air Plus - User Manual 2010 B. Connect the grey hose to the foot control 1 with the thin blue hose 3, again twisting the white Luer connectors together 9-11. 8 9 3 1 1 10 11 3 3 1 1 C. After that, insert the thin stainless-steel cannula with the thin end into the blue hose 12-14. 11 12 12 13 14 8 Dento Air Plus - User Manual 2010 CONNECTING YOUR DENTO AIR PLUS TO YOUR DENTAL UNIT D. Have you sent us a photo of your dental surgery's air connector to us on ordering your Dento Air Plus? If so, you should have received the right connector in the packaging. If not, the air connector on your Dento Air Plus may not fit onto the outlet in your dental surgery. You may contact a technician serving your surgery, or send us a photo with your air outlet connectors (male and female – that is, both the fixed outlet in your floor or unit and an air connector part that you would normally plug into the fixed outlet. Take a photo of the outlet in your surgery where you intend to connect your Dento Air Plus.) The figure below shows two examples of the various types of air connector: E. You can now test your Dento Air Plus by connecting the air connector to the air outlet on your dental unit 15-17. Press the foot control; air should flow out of the stainless-steel cannula. Release the foot control, and the air stream should stop. 15 16 17 9 Dento Air Plus - User Manual 2010 MOUNTING YOUR DENTO AIR PLUS ONTO YOUR DENTAL UNIT on the unit bracket or arm unit After connecting to the air supply, place the foot control next to the foot control for your dental unit. Lead the grey cable from the foot control behind the patient's chair – on the side facing away from where treatment is administered to prevent the patient seeing it – onto the unit arm 18-20 . 18 19 20 10 Dento Air Plus - User Manual 2010 21 22 Fig. 21 shows the importance of leaving around half a metre slack on the arm mounted device to ensure enough freedom to move the arm towards the patient during treatment. Fig. 22 shows how the hose should lead to the ultrasound handpiece. Small rubber O-rings are included in the package for fastening. MOUNTING YOUR DENTO AIR PLUS TO YOUR MOBILE OR TABLETOP DENTAL UNIT or to an external ultrasound or sonic handpiece Mobile unit: Place the Dento Air Plus foot control next to your dental unit's foot control. Guide the grey cable from the foot control behind the patient chair – on the side facing away from where you would treat the patient to keep it out of the patient's view – to the mobile unit. Connect the blue hose from the mobile unit to the ultrasound handpiece. You can also use the small O-rings included in the package to fasten the blue hose to the hose on your ultrasound handpiece. External ultrasound: Place the Dento Air Plus air starter next to the starter on your ultrasound unit, and guide the blue hose along the ultrasound foot control directly to the ultrasound handpiece. 11 Dento Air Plus - User Manual 2010 FASTENING YOUR DENTO AIR PLUS TO YOUR ULTRASOUND or SONIC HANDPIECE. Note There is a wide range of ultrasound tip shapes – short, long, thin, thick, wide and sharp-angled, and you will need to bend your connector piece to match. The most important point is that the air tip on the stainless-steel olive-tipped cannula blows parallel to the ultrasound tip, as this is the only way of benefitting from opening gingival sulci and drying plaque. In rare cases, you may need to change the stainless-steel cannula from one side of the ultrasound tip to the other in order to make the best of air supply conditions: F. Screw the ultrasound tip into your ultrasound handpiece. You can of course mount your Dento Air Plus onto your sonic handpiece; the procedure is the same as on an ultrasound handpiece. G. Slide the four rubber rings included in the package directly over your ultrasound handpiece with the four rings regularly spaced in their final position, one fastened as far forward as possible on your ultrasound handpiece. H. Thread the stainless-steel cannula with the olive first underneath the rubber rings from back to front along the handpiece. 12 Dento Air Plus - User Manual 2010 I. Pull the stainless-steel olive-tipped cannula with the olive towards the ultrasound tip until the olive 23 protrudes somewhat over the curve 24 of the ultrasound tip. After that, the olive should finally remain in the lower third of the ultrasound tip after you have bent it (see below). Olive 23 Upper third Middle third Curve Lower third 24 J. Now use a suitable pair of pliers to bend the stainless-steel cannula until the bent part runs parallel to the ultrasound tip. I. Your Dento Air Plus is now ready to use! 13 Dento Air Plus - User Manual 2010 CLINICAL APPROACH 1. WARNING: TOOTH OVERHEATING Your Dento Air Plus is only an additional device to be fitted to your ultrasound handpiece on the outside using the firm rubber O-rings supplied. ALWAYS WORK WITH WATER AS YOU ALWAYS HAVE DONE USING YOUR ULTRASOUND HANDPIECE FOR REMOVING PLAQUE. The air from your Dento Air Plus will serve you in drying the site of treatment to reveal plaque when you are NOT working with ultrasound. 2.ULTRASOUND OR SONIC TIP: As already described for fastening your Dento Air Plus to your ultrasound or sonic handpiece, you can work with your preferred ultrasound or sonic tips as before. The larger your ultrasound or sonic tip, the greater the risk of damaging your patient's cementum. Without Dento Air Plus, you would have to follow your intuition and hope to remove plaque WITHOUT destroying the surface of the tooth. Dento Air Plus dries the site of treatment to reveal plaque for you to remove with accuracy. That eliminates the uncertainty as to whether there is still plaque present in the gingival pocket. 3.DO YOU NEED A MAGNIFIER OR MICROSCOPE? NO, you do not need to magnify the view to remove plaque. However: The larger the magnification, the more effectively your view of the treatment site. This does not mean that you now need a microscope to remove plaque, but if you want to, you can – as we all know, plaque starts at a tiny scale on the surface, and steadily increases in size. If you only remove 98% of your patient's plaque in your first session with the patient and you would only be able to see the rest with a microscope in combination with Dento Air Plus, you would be in a position to slow down the growth of plaque in the future. Even if your patient does develop plaque in the future, it would have to mineralise; this takes time, and the plaque will not be nearly as firm as you would normally find in six months. 14 Dento Air Plus - User Manual 2010 4.TREATMENT APPROACH. Dento Air Plus is an extension to your ultrasound or sonic device to help you or a hygienist or prevention specialist assistant administer oral hygiene or plaque removal treatment. In the following, we will be referring to ultrasound devices, but this applies just as much to sonic devices. First benefit: In treating your patient, you will no doubt be familiar with the regular problem that the dental surface of your patient is very often covered by a film of moisture. This severely limits your view of the site of treatment, meaning frequent switching between ultrasound handpiece and air syringe. To dry the site again, you need to put your ultrasound handpiece down and pick up your air syringe after plaque removal. Dento Air Plus eliminates this constant switching, as the air from Dento Air Plus fastened to your ultrasound handpiece dries the site. Second benefit: As you are no doubt aware from the literature as well as your own experience, it is not possible to remove more than 95% of the plaque from the cementum, as it has not been possible to see the plaque and remove it under visual control – up to now. Dento Air Plus has changed all that: a. You can see small plaque deposits inside gingival pockets down to 6 mm depth b. You can gently open the dental pockets to see plaque in pockets down to 6 mm depth. You can also dry and reveal plaque deposits without a magnifier or microscope using the air from Dento Air Plus. Approach: Remove coarse plaque as before; as soon as you are no longer certain as to whether there is still plaque present on the cementum, stop using ultrasound and dry the site using air from Dento Air Plus. Once the plaque has dried, it will take on a visible whitish colour. Position the ultrasound tip to the exact position of the plaque, and remove it as you normally would with your ultrasound or sonic handpiece. After that, dry it again as described above 15 Dento Air Plus - User Manual 2010 and check to see whether you have removed all of the plaque, and remove any remaining plaque as necessary. GENERAL NOTES ON STERILISATION, STORAGE AND USE FOR OLIVE-TIPPED CANNULAE Cannulae are supplied in non-sterile recycled cardboard boxes and are classified as reusable medical equipment, and are good for five years of service if kept properly in closed original packaging. Storage: +10°C to +40°C in dry and dark surroundings in the original packaging. Always pre-clean each cannula before sterilising it – even if you are using it for the first time; use a cleaning agent approved for medical-grade instrument sterilisation with a pH value of 6–8. After that, rinse any remaining cleaning fluid away thoroughly using fully demineralised water. Note: Always clean and sterilise your stainless-steel cannulae after each patient. Stainless-steel cannulae can be detached from the blue air hose, and must be pre-cleaned with the cleaning wire included. STERILISATION: Sterilise your cannulae in a needle case or other suitable stainlesssteel container in an approved autoclave (Class B autoclave) at damp heat according to EN ISO 15424 under suitable conditions. Never autoclave your cannulae together with plastics, rubber or silicon materials as these may leave deposits on your cannula. Reuse: Carefully check your cannulae for damage. Do not reuse products that have visible signs of damage. Cannulae are intended for medical use only, and should be kept out of children's reach and safe from access by unauthorised persons. It is the user's responsibility to ensure compliance with other regulations for handling medical products, such as in handling medical products that have come into contact with Creuzfeld-Jakob patients. Cannulae are categorised as Critical B according to the Anforderungen an die Hygiene bei der Aufbereitung von Medizinprodukten (hygiene standards in medical equipment handling) of the Robert Koch Institute (Bundesgesetzblatt [Federal Law Gazette] 44 ( 2001): 1115-112) as applies to cannulae; also observe all of the requirements on staff training and instruction in handling devices with regard to regular monitoring. 16 Dento Air Plus - User Manual 2010 17 Dento Air Plus - User Manual 2010 18