1
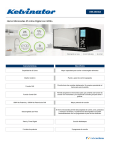
Window Wall (Manual) Room Air Conditioner
User Manual
KWH15CME
Refrigerant R32
Congratulations
Contents
Congratulations and thank you for choosing our Manual
Window Wall room air conditioner. We are sure you will find
your new air conditioner a pleasure to use. Before you use
the air conditioner, we recommend that you read through
the entire user manual, which provides the description of
the air conditioner and its functions.
Safety precautions ............................................................................. 3
To avoid the risks that are always present when you use an
electrical appliance, it is important that the air conditioner
is installed correctly and that you read the safety instructions
carefully to avoid misuse and hazards.
We recommend that you keep this instruction booklet
for future reference and pass it on to any future owners.
After unpacking the air conditioner please check it is not
damaged. If in doubt, do not use the air conditioner but
contact your local Electrolux Customer Care Centre.
environmental tip
Information on disposal for users
• Most of the packing materials are recyclable.
Please dispose of those materials through your local
recycling depot or by placing them in appropriate
collection containers.
• If you wish to discard this air conditioner, please contact
your local authorities and ask for the correct method
of disposal.
• This product contains refrigerant which must be
reclaimed by a licensed refrigeration mechanic before the
product can be disposed of.
warning
This unit uses refrigerant R32 and must be disposed of
by a licensed refrigeration mechanic with knowledge of
appropriate gas reclamation methods.
caution
• The air conditioner is not intended for use by young
children or infirm persons without supervision.
• Young children should be supervised to ensure that they
do not play with the air conditioner.
• Contact an authorised installer for installation of this unit.
• Contact an authorised service technician for repair or
maintenance of this unit.
• If the power cord is to be replaced, replacement work
must be performed by authorised personnel only.
• Installation work must be performed in accordance
with the national wiring Standards by authorised
personnel only.
2 Contents Kelvinator Air Conditioning
Prior to operation.............................................................. 4
Unit parts identification.................................................................... 5
Air conditioner features ................................................................... 5
Care and cleaning ............................................................................... 7
Specifications ........................................................................................ 8
Installation ............................................................................................. 8
Troubleshooting ................................................................................ 10
Safety precautions
caution
•Contact an authorised service technician for repair or
maintenance of this unit.
•Contact an authorised installer for installation of this unit.
•
This air conditioner is not intended for use by young children or infirm persons without supervision.
•Young children should be supervised to ensure that they
do not play with the air conditioner.
•This air conditioner should be installed in accordance with
AS/NZS 3000:2000 and your electricity suppliers rules.
warning
Do not use means to accelerate the defrosting
process or to clean, other than those recommended
by the manufacturer.
Do not store the appliance in a room with continuously
operating ignition sources (for example open flames,
an operating electric heater or an operating gas
appliance with a continuously lit pilot flame).
Do not pierce or burn.
•Abide by local council rules regarding maximum
allowable noise levels emitted by air conditioners.
Be aware that the refrigerant may be odourless.
•If the power cord is to be replaced, replacement work
must be performed by authorised personnel only.
Connect with power properly.
Otherwise, it may cause electric shock or fire due to
excess heat generation.
•Installation work must be performed in accordance with
the national wiring standards by authorised personnel
only. Wrong connection can cause over heating or fire.
Safety precautions
Inside you will find many helpful hints on how to use and
maintain your air conditioner properly.
Just a little preventative care on your part can save you
a great deal of time and money over the life of your air
conditioner. You'll find many answers to common problems
in the chart of troubleshooting tips. If you review the chart
of Troubleshooting Tips first, you may not need to call
for service.
Meanings of symbols used in this manual are shown below:
warning
This symbol indicates information concerning your
personal safety
caution
This symbol indicates information on how to avoid
damaging the appliance
tips and information
This symbol indicates tips and information about
use of the appliance
environmental tip
This symbol indicates tips and information about
economical and ecological use of the appliance
This symbol indicates never to do this
This symbol indicates always do this
Do not operate or stop the unit by switching on or
off the power.
It may cause electric shock or fire due to heat generation.
Do not damage or use an unspecified power cord.
It may cause electric shock or fire.
If the power cord is damaged, it must be replaced by
the manufacturer or an authorised service centre or a
similarly qualified person in order to avoid a hazard.
Do not modify power cord length or share the outlet
with other appliances.
It may cause electric shock or fire due to heat generation.
Do not operate with wet hands or in damp environment.
It may cause electric shock.
Do not direct airflow at room occupants only.
This could damage your health.
Always ensure effective earthing.
No earthing may cause electric shock.
Do not allow water to run into electric parts.
It may cause failure of machine or electric shock.
For products with a current demand of greater than
10amp always install circuit breaker and a dedicated
power circuit.
No installation may cause fire and electric shock.
Disconnect the power if strange sounds, smell,
or smoke comes from unit.
It may cause fire and electric shock.
Do not use the socket if it is loose or damaged.
It may cause fire and electric shock.
Do not open the unit during operation.
It may cause electric shock.
Do not use the power cord close to heating appliances.
It may cause fire and electric shock.
Do not use the power cord near flammable gas or
combustibles, such as gasoline, benzene, thinner, etc.
It may cause an explosion or fire.
Ventilate room before operating air conditioner if
there is a gas leakage from another appliance.
It may cause explosion, fire and, burns.
Do not disassemble or modify unit.
It may cause failure and electric shock.
Kelvinator Air Conditioning important safety instructions 3
Safety precautions
caution
Prior to Operation
Preparing for operation
1
Contact an installation specialist for installation.
2
Plug in the power plug properly.
3
Do not use a damaged or non-standard power cord.
4
Do not share the same outlet with other appliances.
Do not clean the air conditioner with water.
Water may enter the unit and degrade the insulation.
It may cause an electric shock.
5
Do not use an extension cord.
Ventilate the room well when used together with
a stove, etc.
An oxygen shortage may occur.
Usage
When the air filter is to be removed, do not touch the
metal parts of the unit.
It may cause an injury.
Do not put a pet or house plant where it will be
exposed to direct air flow.
This could injure the pet or plant.
Do not use for special purposes.
Do not use this air conditioner to preserve precision
devices, food, pets, plants, and art objects. It may
cause deterioration of quality, etc.
Stop operation and close the window in storm
or hurricane.
Operation with windows opened may cause wetting of
indoor and soaking of household furniture.
Hold the plug by the head of the power plug when
taking it out.
It may cause electric shock and damage.
Turn off the main power switch when not using
the unit for a long time.
It may cause failure of product or fire.
6Do not start/stop operation by plugging /unplugging
the power cord.
1Exposure to direct airflow to occupants, pets or plants
for an extended period of time could be hazardous to
your health.
2Due to the possibility of oxygen deficiency, ventilate
the room when used together with stoves or other
heating devices.
Cleaning and maintenance
1Do not touch the metal parts of the unit when removing
the filter. Injuries can occur when handling sharp
metal edges.
2Do not use water to clean inside the air conditioner.
Exposure to water can destroy the insulation, leading to
possible electric shock.
3When cleaning the unit, first make sure that the power
and circuit breaker are turned off.
Service
For repair and maintenance, contact your authorised
service dealer.
Do not place obstacles around air-inlets or inside
of air-outlet.
It may cause failure of appliance or accident.
Ensure that the installation bracket of the outdoor
appliance is not damaged due to prolonged exposure.
If bracket is damaged, there is concern of damage due
to falling of unit.
Always insert the filters securely. Clean filter once
every two weeks.
Operation without filters may cause failure.
Do not use strong detergent such as wax or
thinner but use a soft cloth.
Appearance may be deteriorated due to change
of product colour or scratching of its surface.
Do not place heavy object on the power cord and
ensure that the cord is not compressed.
There is danger of fire or electric shock.
If water enters the unit, turn the unit off and
disconnect the power, contact a qualified
service technician.
Use caution when unpacking and installing.
Sharp edges could cause injury.
Do not drink water drained from air conditioner.
It contains contaminants and could make you sick.
4 important safety instructions Kelvinator Air Conditioning
Operating temperature
Cooling Mode
Outdoor
Indoor
Max.
Min.
Max.
Min.
32°C
17°C
43°C
17°C
Note: O
ptimum performance can be achieved within these
operating temperatures.
Unit parts identification
Air conditioning features
1
Front panel
The operation panel of your unit will look like the following:
2
Air filter
3Frame
4Cabinet
5
Air inlet grille (outdoor side)
6
Air outlet grille
7
Operation knob
8
Power supply cord and plug
1
2
3
4
5
NOTE: The outline of the operation panel is based on
typical model, the function is the same with your
air conditioner while some difference may exist
in appearance.
6
7
Selector
The controls featured in this manual are representative
of many available models. Your model may offer slightly
different features.
8
Cool Mode
Accessories
drain pan (optional)
The desired cool setting is selected by rotating the knob to
the right to the appropriate location.
screw (for fastening
the front panel)
"HIGH COOL" – has maximum cooling effect and airflow.
"LOW COOL" – has minimum cooling effect and airflow.
2
1
"OFF" – will completely shut off the unit.
Electrical work
Under normal circumstances there is no reason to modify the
electrical connection. In case it is required, a qualified service
technician should perform this task.
"HIGH/LOW FAN" – Permits HIGH/LOW fan speed
operation without cooling (heating).
Note: When selecting a fan speed, the compressor will not run.
1Power cord conductors are distinguished according to
colour as follows (see Fig.1)
2For your safety and protection, this unit is earthed
through the power cord (see Fig.2)
Please contact the Kelvinator Customer Care
department or a qualified service agent or a similar
qualified person if you want to replace it.
3Be sure that the unit is correctly grounded. The wall
outlet (ensure that the circuit breaker for the power
outlet used for this product has suitable current rating)
should be provided with reliable earth wire.
Fig. 1
power
cord
Fig. 2
A
E
N
E- earthwire, yellow/green
N- neutral wire, blue
A - active wire, brown
wall outlet
air break switch
Kelvinator Air Conditioning unit part identification/air conditioning features 5
Air conditioning features
Note: W
hen turning the SELECTOR knob from "LOW COOL"
to "HIGH COOL", change as slowly as possible. Do not
change the operation mode between "LOW COOL"
and "HIGH COOL" too often.
Adjusting the air flow direction
Horizontal air flow adjustment
For the units with AIR SWING feature (automatic):
When the AIR SWING switch is turned to ON position, the
vertical louvres automatically oscillate right and left sweeping
the cold air around to obtain comfortable cooling. The
vertical louvres may be stopped at any position when the AIR
SWING switch is turned OFF.
Thermostat
To set the desired room temperature, rotate the thermostat
switch to the desired setting. After the set temperature is
achieved the thermostat will automatically start and stop the
compressor in order to maintain the desired set temperature.
AUTO SWING
OFF
(On somemodels)
Rotate the thermostat selector clockwise for higher cool
settings. Higher cool settings will provide lower room
temperature. Rotate the thermostat selector counter
clockwise for lower cool settings. Lower cool settings will
provide higher room temperature.
The thermostat is used to set the desired room temperature
when the unit is being operated in the COOL MODE.
NOTE: D
uring the cooling operation of the unit, when the
thermostat knob is rotated clockwise, allow at least
three minutes before turning back the knob to the
COOLER direction. Otherwise the fuse may blow due
to an overload of the unit.
ON
For the units without AIR SWING feature (manually ):
To adjust horizontal air flow direction, move the lever gently
to the left or right by hand until the desired horizontal air flow
direction is obtained.
Vertical air flow adjustment (manually)
To adjust vertical air flow direction, adjust any one of the
horizontal louvre blades. When turning up or down the
horizontal louvre blades, always keep horizontally the top
or bottom blades. This can effectively prevent water drops
condensed on the front panel of the unit.
6 air conditioning features Kelvinator Air Conditioning
NT
Care and cleaning
Vent control
The vent control is located above the control knobs.
The operation method is different on different models
(see the following figures).
For maximum cooling efficiency, CLOSE the vent.
This will allow internal air circulation.
OPEN the vent to discharge stale air.
caution
Clean your air conditioner occasionally to keep it looking
new. Be sure to unplug the unit before cleaning to prevent
shock or fire hazards.
Air filter cleaning
The air filter should be checked at least once a month to
see if cleaning is necessary. Trapped particles in the filter
can build up and cause an accumulation of frost on the
cooling coils.
•Hold the slot under the front panel, then uplift it
onwards, and remove the front panel.
OPEN
close
CLOSE
open
OPEN
To open the vent, push the lever to the right.
To close it, push the lever to the left.
•Pinch the handle under the air filter and make the air filter
arched, remove it from the underside to upside.
•Wash the filter using liquid dishwashing detergent and
warm water. Rinse filter thoroughly.
•Gently shake excess water from the filter. Be sure the
filter is thoroughly dry before replacing. Or, instead of
washing you may vacuum the filter clean.
Note: N
ever use hot water over 40 oC(104 F) to clean the air
filter. Never attempt to operate the unit without the
air filter.
Cabinet Cleaning
•Be sure to unplug the air conditioner to prevent shock
or fire hazard. The cabinet and front may be dusted with
an oil-free cloth or washed with a cloth dampened in
a solution of warm water and mild liquid dishwashing
detergent. Rinse thoroughly and wipe dry.
•Never use harsh cleaners, wax or polish on the
cabinet front.
•Be sure to wring excess water from the cloth before
wiping around the controls.
•Excess water in or around the controls may cause
damage to the air conditioner.
•
Plug in air conditioner.
NOTE: Never use water over 50 oC, alcohol, gasoline, acid,
solvent or brush to clean the front panel as this will
damage the surface of the part.
Winter Storage
If you plan to store the air conditioner during the winter,
remove it carefully from the window according to the
installation instructions. Cover it with plastic or return it to
the original carton.
Kelvinator Air Conditioning air conditioning features/care and cleaning 7
Specifications
Unit dimensions:
Model (kW)
< 1.5kW
452x342x550
5-10mm
less than 220mm
Body dimension (mm)
(WxHxD)
Suggest minimum wire size (AWG:American Wire Gage):
Appliance Amps
AWG Wire Size
10
18
more than
60mm
wall thickness is less than 220mm
Installation
Select the best location
1To avoid vibration and noise, make sure the unit is
installed securely and firmly.
make rear of the airconditioner (outside)
lower than the front of the airconditioner
(inside) to allow water to drain
less than 220mm
more
than
150mm
2Install the unit where the sunlight does not shine directly
on the unit.
more
than
150mm
more than 500mm
If the unit receives direct sunlight, build an awning to
shade the cabinet.
3There should be no obstacle, such as a fence or wall,
within 50cm from the back of the cabinet because it will
prevent heat radiation of the condensor.
Restriction of outside air will greatly reduce the cooling
and heating efficiency of the air conditioner.
4Install the unit a little obliquely outward not to leak the
condensed water into the room (about 10mm or 1/4
bubble with level).
5Install the unit with its bottom portion 75~150cm above
the floor level.
6 The power cord must be connected to an independent
circuit. The yellow/green wire must be grounded.
7 Based on calculations in compliance with AS60335.2.40
there is no minimum safe floor area for the installation of
the air conditioners described in this manual.
8 After installation the power plug should be easily accessible.
8 specifications/installation Kelvinator Air Conditioning
scrape
4 5°
if the wall thickness is more than 220mm
scrape the wall as shown above
Installation
The treatment of condensed water
Step 2 Removing the front panel
1
Take out the drain pan and screws (provided within your
air conditioner accessories bag)
1
2
Install the drain pan at the bottom of the unit and secure
it with the screws provided.
3
Connect a suitable sized drain hose (not supplied) to the
drain outlet located on the underside of the drain pan.
Remove the screw from the frame. (see Fig.3)
2Grasp the left corner in the frame's underside, then
loosen the frame. (see Fig.4)
Step 3 Installation
1Remove the screw, fix the chassis-fixing board and
cabinet.
2Grasp the handle on the chassis and carefully slide the
air conditioner out of the cabinet. (see Fig.6)
screw
drain drain
pan outlet
3When you need to drain off the water, install the drain
plug on the frame. Then fix the cabinet onto the support,
(provided by the installer unless you elect to install
yourself) (see Fig.7).
rubber
plug
4
Push the unit chassis into the cabinet. (see Fig.8)
5
Fix the chassis and cabinet. (see Fig.5)
Installation Steps
Step 4 Installing the frame
Step 1 Remove the front panel and the air filter
1
Install the frame. (see Fig.9)
1Hold the slot under the front panel, then uplift it
outwards, and remove the front panel (See Fig.1).
2
Fix the screws on the frame. (see Fig.3)
2Pinch the handle under the air filter and make the air filter
arched, remove it from the slot from underside to upside
(See Fig.2).
1Install the air filter into the frame's slot from upside to
underside. (see Fig.2)
2Hang the front panel on the frame's buckle, then press
the front panel into the frame's slot until hear a click.
(see Fig.10)
wall
cabinet
supporter
Fig. 1
Fig. 2
screws
Fig. 7
Fig. 3
Fig. 4
Fig. 9
Fig. 5
Fig. 8
Fig. 10
Fig. 6
Kelvinator Air Conditioning installation 9
Troubleshooting tips
Before calling for service, review this list. It may save you
time and money. This list includes common occurrences that
are not the result of defective workman-ship or materials in
this appliance.
Problem
Solution
Wall plug disconnected. Push plug firmly into
wall outlet.
House fuse blown or circuit breaker tripped.
Replace fuse with time delay type or reset
circuit breaker.
Air
conditioner
does not start
Problem
Solution
Air
conditioner
cooling, but
room is too
warm- ice
forming
on cooling
coil behind
decorative
front.
Outdoor temperature below 18°C(64°F).
To defrost the coil, set selector to FAN position.
Then, set thermostat to warmer position.
Unit turned off and then on too quickly. Turn unit
off and wait 3 minutes before restarting.
Thermostat set too low. Adjust thermostat to
higher number for cooling.
Turn selector to a higher COOL position.
Air
conditioner
cooling, but
room is too
warm- NO
ice forming
on cooling
coil behind
decorative
front.
Room temperature below 18°C(64°F). Cooling
may not occur until room temperature
rises above 18°C(64°F).
Temperature sensing tube touching cold coil,
located behind air filter. Straighten tube away
from coil.
Thermostat set too warm. Turn thermostat
clockwise to a colder setting.
Air directional louvres positioned improperly.
Position louvres for better air distribution.
Front of units is blocked by drapes, blinds,
furniture, etc. - restricts air distribution. Clear
blockage in front of unit.
Doors, windows, registers, etc. Open-cold air
escapes. Close doors, windows, registers.
Unit recently turned on in hot room. Allow
additional time to remove Stored heat from
walls, ceiling, floor and furniture.
Thermostat set too warm. Set thermostat to
colder temperature.
Air from unit
does not feel
cold enough
Thermostat set too cold for night-time cooling.
To defrost the coil, set selector to a FAN position.
Then, set thermostat to a warmer position.
Dirty air filter- air restricted. Clean air filter.
Refer to Care and Cleaning section.
Selector Control in OFF position. Turn selector
to the desired FAN or COOL setting.
Unit turned off by moving thermostat to a higher
number and then immediately turning back to a
colder number. Wait approximately 3 minutes.
Listen for compressor to start.
Air filter may be dirty. Clean filter. Refer to
Care and Cleaning section. To defrost, set
selector to FAN.
Air
conditioner
turns on and
off rapidly
Dirty air filter- air restricted. Clean air filter.
Outside temperature extremely hot. Set to
high cool to bring air past cooling coils
more frequently
Air movement sound. This is normal . If too loud,
turn selector to lower FAN setting.
Noise when
unit is cooling
Sound of fan hitting water-moisture removal
system. This is normal when humidity is high.
Close doors, windows and registers.
Window vibration - poor installation. Refer to
installation instructions or check with installer.
10 troubleshooting Kelvinator Air Conditioning
Water
dripping
INSIDE when
unit is cooling.
Improper installation. Tilt air conditioner slightly
to the outside to allow water drainage. Refer to
installation instructions - check with installer.
Water
dripping
OUTSIDE
when unit is
cooling.
Unit removing large quantity of moisture from
humid room. This is normal during excessively
humid days.
Warranty
FOR SALES IN AUSTRALIA
APPLIANCE: KELVINATOR WINDOW WALL AIR CONDITIONER
This document sets out the terms and conditions of the product
warranties for Electrolux Appliances. It is an important document.
Please keep it with your proof of purchase documents in a safe place
for future reference should you require service for your Appliance.
1. In this warranty:
In all instances, unless the Appliance is transported by Electrolux or an
Electrolux authorised representative, the Appliance is transported at the
owner’s cost and risk while in transit to and from Electrolux or its ASC.
6.Proof of purchase is required before you can make a claim under
this warranty.
7.You may not make a claim under this warranty unless the defect claimed
is due to faulty or defective parts or workmanship. Electrolux is not liable
in the following situations (which are not exhaustive):
(a)‘acceptable quality’ as referred to in clause 10 of this warranty has
the same meaning referred to in the ACL;
(b)‘ACL’ means Schedule 2 to the Competition and Consumer
Act 2010;
(c)‘Appliance’ means any Electrolux product purchased by you and
accompanied by this document;
(i)
accident
(d) ‘ASC’ means Electrolux authorised service centres;
(ii) misuse or abuse, including failure to properly maintain or service
(e)‘Electrolux’ means Electrolux Home Products Pty Ltd of 163
O’Riordan Street, Mascot NSW 2020, ABN 51 004 762 341 in
respect of Appliances purchased in Australia;
(iii) normal wear and tear
(iv) power surges, electrical storm damage or incorrect power supply
(v) incomplete or improper installation
(vi) incorrect, improper or inappropriate operation
(vii)insect or vermin infestation
(viii)failure to comply with any additional instructions supplied with the
Appliance;
(f)‘major failure’ as referred to in clause 10 of this warranty has the
same meaning referred to in the ACL and includes a situation when
an Appliance cannot be repaired or it is uneconomic for Electrolux, at
its discretion, to repair an Appliance during the Warranty Period;
(g) ‘Warranty Period’ means the Appliance is warranted against
manufacturing defects in Australia for the period of 24 months,
subject to this warranty and to the customer meeting the Warranty
Condition.
(h) ‘Warranty Condition’ means:
(i) evidence by the customer that the Appliance was installed in
accordance with Electrolux installation guidelines as set out in
the installation manual;
(ii the Appliance rating is correct for the size and thermal characteristics of the room;
(iii) the Appliance has been regularly maintained in accordance
with Electrolux guidelines as set out in the user manual;
(iv) the Appliance is designed for providing human comfort and
should be used under ambient conditions as set out in the
product specifications and general air quality conditions.
(i) ‘you’ means the purchaser of the Appliance not having purchased
the Appliance for re-sale, and ‘your’ has a corresponding meaning.
2.This warranty only applies to Appliances purchased and used in Australia
in normal domestic applications and is in addition to (and does not
exclude, restrict, or modify in any way) any non-excludable statutory
warranties in Australia.
3.During the Warranty Period Electrolux or its ASC will, at no extra charge
if your Appliance is readily accessible for service, without special
equipment and subject to these terms and conditions, repair or replace
any parts which it considers to be defective. Electrolux or its ASC may
use remanufactured parts to repair your Appliance. You agree that
any replaced Appliances or parts become the property of Electrolux.
This warranty does not apply to light globes, batteries, filters or similar
perishable parts.
4.Parts and Appliances not supplied by Electrolux are not covered by
this warranty.
5.To the extent permitted by law, you will bear the cost of transportation,
travel and delivery of the Appliance to and from Electrolux or its ASC. If
you reside outside of the service area, you will bear the cost of:
(a)travel of an authorised representative;
(b)transportation and delivery of the Appliance to and from Electrolux
or its ASC.
(a) the Appliance is damaged by:
(b) the Appliance is modified without authority from Electrolux in writing;
(c)the Appliance’s serial number or warranty seal has been removed
or defaced;
(d)the Appliance was serviced or repaired by anyone other than
Electrolux, an authorised repairer or ASC.
8.This warranty, the contract to which it relates and the relationship
between you and Electrolux are governed by the law applicable where
the Appliance was purchased.
9.To the extent permitted by law and subject to your non excludable
statutory rights and warranties, Electrolux excludes all warranties and
liabilities (other than as contained in this document) including liability for
any loss or damage whether direct or indirect arising from your purchase,
use or non use of the Appliance.
10.For Appliances and services provided by Electrolux in Australia, the
Appliances come with a guarantee by Electrolux that cannot be
excluded under the ACL. You are entitled to a replacement or refund
for a major failure and for compensation for any other reasonably
foreseeable loss or damage. You are also entitled to have the
Appliance repaired or replaced if the Appliance fails to be of acceptable
quality and the failure does not amount to a major failure. The benefits
to you given by this warranty are in addition to your other rights and
remedies under a law in relation to the Appliances or services to which
the warranty relates.
11.At all times during the Warranty Period, Electrolux shall, at its discretion,
determine whether repair, replacement or refund will apply if an
Appliance has a valid warranty claim applicable to it.
12.To enquire about claiming under this warranty, please follow these steps:
(a)carefully check the operating instructions, user manual and the terms
of this warranty;
(b) have the model and serial number of the Appliance available;
(c) have the proof of purchase (e.g. an invoice) available;
(d) telephone the numbers shown below.
13.You accept that if you make a warranty claim, Electrolux and its ASC
may exchange information in relation to you to enable Electrolux to meet
its obligations under this warranty.
Important Notice
Before calling for service, please ensure that the steps listed in clause 12 above have been followed.
FOR SERVICE
or to find the address of your nearest
state service centre in Australia
Please call 13 13 49
For the cost of a local call (Australia only)
SERVICE AUSTRALIA
ELECTROLUX HOME PRODUCTS
www.electrolux.com.au
FOR SPARE PARTS
or to find the address of your nearest
state spare parts centre in Australia
Please call 13 13 50
For the cost of a local call (Australia only)
KWWAC_Warr_Aug13
Kelvinator Air Conditioning warranty 11
If you’d like further information about Kelvinator
appliances, please visit your retailer, phone or email
our Customer Care team or visit our website.
telephone: 1300 363 640
fax:
1800 350 067
email:[email protected]
web:www.kelvinator.com.au
Kelvinator. We are part of the Electrolux family.
Share more of our thinking at www.electrolux.com.au
P/No. 1452635
© 2013 Electrolux Home Products Pty Ltd ABN 51 004 762 341
KMAN_KAIR_WWM_Oct13