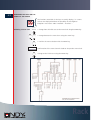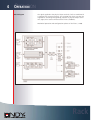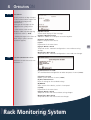
1
User Manual for Rack Monitoring System
Rack Monitoring
System
Monitoring
System
SAFE WORKING
Important passages which must be observed are
highlighted with the following symbols:
Danger
Calls attention to safety measures to prevent
personal injury
Note
Recommends actions and provides tips for
trouble-free operation
Caution!
Highlights what must be done or not done in order
not to damage material assets.
RMS
LITE
Attention
The Rms LITE will be delivered without LCD-display
and front console
Rack
CONTENTS
C
ONTENTS
3
VALIDITY
RMS
This user manual applies exclusively to the RMS Rack
Monitoring System.
Software version: 2.0
OF THIS MANUAL
PERFORMANCE FEATURES
RMS
LITE
– Illuminated LCD display for plain text displays
– 4 keys on the front of the device
– Measurement and monitoring of temperature, humidity,
door contact (access), vibration, movement (infrared room
surveillance), smoke, mains voltage
– Flexible filter structure for uncomplicated realisation of
even complex signal conditions
– Operation and display of alarms via LCD display,
RMS
LITE
serial interface or network (Telnet and SNMP)
Different interfaces for sensors, data transmission, digital
inputs and switching outputs
LINDY-Elektronik GmbH • LINDY Electronics Ltd.
LINDY Italia S.r.l. • LINDY France Sarl
LINDY-Elektronik AG • LINDY Computer Connection
LINDY Australia Pty Ltd • LINDY International Ltd.
E-MAIL: [email protected]
Internet: http://www.lindy.com
Rack Monitoring
System
Monitoring
System
CONTENTS
C
ONTENTS
3
1
Please note
1.1
1.2
1.3
1.4
1.5
2
Technical description
2.1 Rack monitoring
2.2 Sensors
08
09
3
Installation and
commissioning
3.1 Preparations
3.2 19" installation
3.3 Electrical installation
3.3.1 Connections and cabling
3.3.2 Fuse
3.4 Commissioning
11
12
13
13
16
16
Operation
4.1 Operator control elements
4.2 Initial state
4.3 Operation via keys on the front of the device
4.4 Operation via Telnet or serial interface COM
4.5 Network configuration
4.5.1 SNMP configuration
4.5.2 Log service
4.6 System configuration and update
4.6.1 Configuration via TFTP
4.6.2 Update via TFTP
4.7 User administration
4.8 I/O configuration
4.8.1 Digital outputs
4.8.2 Digital inputs
4.8.3 Temperature inputs
4.8.4 Humidity inputs
4.8.5 Mains monitoring
4.8.6 Connect external devices via serial interface
4.8.7 AUX device selection
4.9 Filters
4.10 Message log
17
17
18
20
23
24
25
25
26
26
27
28
29
30
30
31
31
32
33
34
39
General information
Safe working
Warranty
Service
Standards, regulations and licence
05
06
06
07
07
1
1 4
1
5
6
7
8
Example configuration
Malfunctions
Technical data
Glossary
Appendices
40
45
46
47
A1
A2
A3
A4
Conformity, EMC, CE, FCC
Documentation of the system configuration
Explanation of the MIB for RMS
GNU General Public Licence
48
49
50
57
Rack
PLEASE
1 P
LEASENOTE
NOTE
1.1
GENERAL INFORMATION
0The RMS is supplied in flawless condition in terms of safety.
Normal use
LINDY can only guarantee the safety, reliability and performance
of the device if:
• modifications, conversions or repairs are carried out only by persons
authorised by the manufacturer,
• the electrical installation of the installation room conforms with the
general requirements according to IEC,
• the device is operated in an office environment (class 3K2 according
to EN 60721). More stringent requirements apply to rooms with a higher degree of pollution.
• the device is operated at a maximum ambient temperature of +35°C.
Copyright
All rights to this manual are held by LINDY. The reproduction
and reprinting even of parts of this Manual are permitted only if
the source is stated.
Technical status
Technical status 07/2004
LINDY reserves the right, without prior notice,
– to make changes to the design and components and, instead of the
stated components, to use equivalent other components in the pursuit
of technical progress,
– to change the performance features of the software,
– to change the information in this manual.
Liability
LINDY accepts no liability for the complete correctness of the
information. In particular, no liability whatsoever is accepted for
damage or injury caused as a result of the use of the device.
SAFE WORKING
Important passages which must be observed are highlighted as
follows in these instructions:
Danger
Calls attention to safety measures to prevent personal injury.
Cauntion
Highlights what must be done or not done in order not to damage
material assets.
Note
Recommends actions and provides tips for trouble-free operation.
Attention
RMS
LITE
The RMS LITE will be delivered without display and front console.
Rack Monitoring
System
Monitoring
System
5
1 PPLEASE
LEASE
NOTE
NOTE
1.2.2
General Saftey Information
For safe operation of the RMS please ensure you read all of this user
manual and that you observe the instructions and information contained
in it. Please also observe other documentation by manufacturers of
connected devices.
• Always keep the user manual within reach of the device.
• Ensure the rack monitoring is in perfect technical condition.
Have damage and faults remedied immediately by authorised persons.
• Only use the supplied mains cable.
• When plugging in and unplugging the mains plug,
– never pull the cable
– never touch the plug with wet hands
• When connecting devices to the cable clamps, always observe the VDE
regulations!
• Do not convert or repair the device yourself!
• Use only original accessories.
• If liquids are spilled on the device, immediately unplug the mains cable
from the mains and contact your dealer.
• Protect from heat.
Heat can damage both parts of the outside of the device and internal
circuits and components.
• To clean the device, use only cloths moistened with water or washingup liquid. Alcohol, thinners or similar chemicals damage the surface of
the enclosure.
1.2.3
Disposal
The device contains a lithium battery on the circuit board and
toxic substances in the LCD display.
• The device must be disposed of properly
1.3
WARRANTY
LINDY offers a warranty of 2 years for this products.
For further details, please see the General Terms of Business of LINDY.
The warranty is void if improper modifications are made to the device.
Lapse of warranty
Rack
PLEASE
1 P
LEASENOTE
NOTE
1.4
SERVICE
In the event of malfunction, please first follow the instructions in the
relevant section (> 5). For all other questions, please do not hesitate to
contact LINDY technical support.
HOTLINE
E-MAIL
DE:
UK:
IT:
FR:
CH:
USA:
Australia:
0621 / 47 005 - 0
01642 754040
031 48 40 11
0 825 825 111
061 335 97 00
(256) 771-0660
07 3262 9033
[email protected]
• To receive a speedy reply, please provide the following information:
– Device type
– Serial number
– Software version
– Configuration file
– Description of problem
• Please also leave your telephone number.
You will receive a qualified reply by e-mail or telephone.
1.5
1
STANDARDS, REGULATIONS
AND LICENCE
The LINDY RMS has been built and tested in accordance with the relevant guidelines. In connection with installation in a terminal (for example, a rack), the additional requirements in accordance with IEC 950
must be observed and complied with.
The RMS conforms to the safety requirements of the EU Directive on
electromagnetic compatibility (EMC) (89/33/EEC) and the low voltage
Directive (73/23/EEC).
Below is a list of the standards and regulations on which the RMS is
based:
EN 55 022/Class B
EN 60 950 (IEC 950)
EN 61 000-4-2
EN 61 000-4-3
LICENCE
All LINUX source codes which were used to produce the product and
are subject to the GPL (see GNU Public Licence ä A4 ) can be obtained
for a service charge. This does not include the source codes of the RMS
software itself. However, the LINUX sources are freely available, for
example at URL: “http://metalab.unc.edu/pub/Linux”.
Rack Monitoring
System
Monitoring
System
7
ECHNICAL
DESCRIPTION
TECHNICAL
DESCRIPTION
2 T
2.1
RACK MONITORING
The RMS monitors, protects and controls all the installations in network, switch cabinet and server racks and their environment.
RMS LITE
RMS ADVANCED
Sensors
Local ambient conditions (for example, temperature or humidity) or
operational status (for example fluctuations in mains voltage) can be
detected via various sensors and inputs (> 2.2 ).
Display
RMS
LITE
Inputs and outputs
Operation and
configuration
Signals are transmitted and data displayed via an LCD display, serial
interface or Ethernet (Telnet or SNMP).
Digital inputs and switching outputs make it possible to continuously
monitor the operating status and ambient conditions in the rack, and
to react to events.
The RMS is operated locally via 4 keys on the front.
RMS
LITE
RMS inputs and settings can be made remotely via the serial interface
or via Telnet and SNMP.
The entire configuration of the system is permanently saved. Settings
are retained even after a power failure or transportation.
Software
The operating software of the RMS is subject to continuous improvement and expansion. Updates can be loaded quickly and easily at any
time. The latest version is available on the Internet (> 1.4).
Rack
2 T
TECHNICAL
DESCRIPTION
ECHNICAL
DESCRIPTION
Connection options
The RMS has a wide variety of connection options (> 3.3.1):
Three mains monitoring connections (6-pole plug connector)
Four digital, potential-free switching outputs (8-pole plug connector)
C Eight digital, potential-free inputs with 12 V auxiliary voltage (16-pole plug
connector)
D Four digital, potential-free alarm inputs for the connection of differential
signal lines (8-pole plug connector))
E Four modular jacks for temperature or humidity sensor (RJ11)
F Two potential-free UPS switching inputs (4-pole plug connector)
G Ethernet network connection (RJ45 – 10 base T)
H AUX serial interface (SUB-D, 9-pole) to control and monitor external devices (for example, chipcard reader, UPS, …)
I COM serial interface (SUB-D, 9-pole) as terminal connection
A
B
RMS
LITE
2.2
SENSORS
Temperature (digital)
1
–
–
–
–
–
–
Temperature range: 0 °C to 60 °C
Measuring accuracy: ±1 °C
Recalibration not necessary
Cable length: 4 m
Maximum cable length: 20 m
With mounting hardware
Humidity (digital)
- Humidity range: 10 % to 90 %
relative humidity at 0 °C to 60 °C
– Measuring accuracy: ±3 %
relative humidity
– Recalibration not necessary
– Cable length: 4 m
– Maximum cable length: 20 m
– With mounting hardware
Combined Humidity and
Temperature sensor (digital)
Combination of temperature and
humidity sensor, equipment as
above.
Vibration
Detects movements and vibrations
of varying intensity.
– Ajustable sensitivity
– Cable length: 4 m
– Maximum cable length: 20m
– With mounting hardware
Smoke alram
Optical smoke alarm with German
insurance accreditation (VdS) for
early detection of fires
(producing light smoke).
– Temperature range for
deployment: -20 °C to 75 °C
– Cable length: 4 m
– Maximum cable length: 20 m
– With mounting hardware
Rack Monitoring
System
Monitoring
System
9
2 T
TECHNICAL
DESCRIPTION
ECHNICAL
DESCRIPTION
Door Contact
Chipcard reader
Monitors access using a magnetic bridge
sensor which responds to
any magnetic material (no contact
required).
– Also for monitoring side panels
or cover
– Cable length: 4 m
– Maximum cable length: 20 m
– With mounting hardware
The chipcard reader is integrated in
the door frame of the server cabinet.
– It reads chipcards.
– It controls an electrical door
opener using DIGITAL OUT 4 if the
card is valid.
– It is connected to the AUX serial
interface.
Infrared room surveillance
Detects movements in the
surveillance area.
– Adjustable sensitivity
– Sabotage protection
– Cable length: 4 m
– Maximum cable length: 20 m
– With mounting hardware
Extension cable
– RJ11 cable for temperature or
humidity sensors
Length: 5 m; 10 m; 15 m; 20 m
– 4-core sensor cable (for all other
sensors)
Length: 5 m; 10 m; 15 m; 20 m
Water sensor
Watersensor to detect
floods / water
Mains Power Strips
Switchable mains power strips can be managed
by the RMS
– by RS-232 (IP versions
also available)
– 4 out / 1 in (19" 1U)
– 8 out / 2 in (redundant
power supply support)
Note
Other sensors can be connected to DIGITAL IN, ALERT IN or UPS IN
according to the requirements in 3.3.1.
Rack
3 IINSTALLATION
AND COMMISSIONING
NSTALLATION
AND COMMISSIONING
3.1
PREPARATIONS
Check the supplied items
Transport Damage
Danger
3.1.2
Necessary Accessories
Note
3.1.3
– RMS
– Power cable
(for the country in question)
– User‘s Manual
– 6 plug connectors
– Serial communication cable
(RJ11 connector to 9-pole subD socket)
– 10 cable links, stripped
– CD-ROM
If the device has visible transport damage, it must not be
taken into operation as its safety is no longer guaranteed.
• Immediately report transport damage to the carrier and the
manufacturer.
• Only use original accessories.
If other sensors are used , pay attention to the specification of the
inouts and outputs (> 3.3.1) !
Necessary Tools
For 19" installation of the RMS
(> 3.2):
– 3mm flat-blade screwdriver
for fixing the cable
– 4 mounting screws
(with washers and nuts)
for the 19" rack
– A screwdriver suitable for
the mounting screws
Rack Monitoring
System
Monitoring
System
11
3 IINSTALLATION
AND AND
COMMISSIONING
NSTALLATION
COMMISSIONING
3.2
19'' installation
When installing the RMS in a rack, the additional requirements in
accordance with IEC 950 must be observed and complied with!
• Determine the position in which the RMS is to be located within the
19" rack. Observe the existing number of blanking plates for a uniform rack appearance.
Caution!
Note
Danger of overheating!
Allow sufficient space from built-in fans or air-conditioners to
ensure an unimpeded flow of air in the rack.hten.
• Mount the RMS on sliding rails if possible.
This makes handling the device easier and reduces wear on the rack.
If the RMS is mounted freely suspended, hold the device horizontally
when tightening the screws and start with the two bottom screws.
• Mount the RMS in the desired position with 4 mounting screws,
washers and nuts.
Rack
3 IINSTALLATION
AND AND
COMMISSIONING
NSTALLATION
COMMISSIONING
3.3
3.3.1
ELECTRICAL INSTALLATION
Connections and cabling
1 Fuse plug > 3.3.3
2 Mains Connections > 3.3.2
3 MAINS MONITORING
Mains monitoring connections
4 DIGITAL OUT
Digital switching outputs 1 - 4
5 DIGITAL IN
Digital inputs 1 - 8
6 ALERT IN
Alarm inputs 1 - 4
7 TEMPERATURE/HUMIDITY
RMS ADVANCED
1
1
2
3
4
2
3
4
RMS LITE
Connection
Cabling
5
temperature or humidty sensor
connections 1-4
8 UPS IN
UPS connections 1 - 2
9 10 BASE T
RJ45 Ethernet network connection
10 AUX
Serial interface for the control
and monitoring of external devices
11 COM
Serial interface for terminal connection
6
6
7
8 9
8 9
10 11
10
• Before connecting the RMS to the mains, properly connect all the
components to the rear of the device. Observe VDE regulations!
• Only have mains voltages connected by authorised skilled persons.
• Use wire end ferrules when connecting litz cables!
• Observe the information on documentation (> A2)!
• Avoid tensile loads, serious kinking and damage to the cables as a
result of sharp edges or unsuitable tools (optional cable protection available).
Mains montoring
– 3 terminal pairs L1, L2 and L3 for the connection of 3 mains voltages
– Potential-free, no common earth reference
– UIN 50 … 255 V AC
– Only have mains voltages connected by authorised skilled persons.
Observe VDE regulations!
Digital Out
- 4 terminal pairs for the connection of 4 consumers
– Potential-free relay switch contacts
– Relay 108 cycles purely mechanically, 105 cycles at maximum loadswitched
– Maximum load switched 1.5 A at 230 V AC, 2 A at 30 V DC
Rack Monitoring
System
Monitoring
System
13
3 IINSTALLATION
AND AND
COMMISSIONING
NSTALLATION
COMMISSIONING
DIGITAL IN
IN+
+12V
IN
GND
– IIN maximum 5 mA
– With auxiliary +12 V supply, maximum current draw of 200 mA
– Auxiliary voltage interruption in connection with overload or short circuit in the sensor cable:
Enter
06 12S Overload
“Fault” LED lights up.
Confirm the "overload" message in the LCD display using the ENTER key,
then switch back on in the menu “Aux.Volt.” with the ENTER key (> 6 ).
In the event of interruption of auxiliary voltage, all auxiliary voltages
(and thus all sensors) are switched off!
Note
ALERT IN
RMS
LITE
{
TEMPERATURE/HUMIDITY
UPS IN
RMS
LITE
10BASET
– 8 terminal groups (of 4 terminals) for connecting 'break contact/make
contact' type devices, or devices with switching output
– Potential-free, digital
– Left terminal pair “IN+” AND “IN-” digital input
– For the connection of a break contact/make contact, an auxiliary voltage of +12 V (top terminal) and an earth reference GND (bottom terminal) can be connected from the right terminal pair using the enclosed
cable links (see connection examples below).
– UIN +5 V…+25 V
– 4 terminal pairs for the connection of 4 differential signal lines or
break contact/make contact type devices (only connect passive
components)
– Maximum drawable alarm current approximately 20 mA
– For differential signal lines, ensure that the closed-circuit current of
the entire signal line does not exceed a total of 900 µA.
– 4 RJ11 modular jacks for the connection only of the Infratecplus sensors available in the delivery programme (temperature sensor, humidity
sensor or combined temperature/humidity sensor)
– digital
{
–
–
–
2 terminal pairs for the connection of UPS switching outputs
Potential-free, digital
UIN +5 V…+25 V
– IIN maximum 5 mA
– RJ45 modular jack for connection to a 10 Mbit Ethernet
Rack
3 IINSTALLATION
AND AND
COMMISSIONING
NSTALLATION
COMMISSIONING
COM
1
2 3 4
6 7
8
5
9
Pin
– Serial interface – directly
connected to the COM connection 1
2
on the front of the device.
Never connect both COM
interfaces at the same time!
AUX
1
2 3 4
6 7
8
5
9
– Serial interface for the
connection of external devices
(for example, UPS, fans, airconditioners, chipcard reader
heating, …)
– Specific protocols on request.
Please contact your RMS dealer.
Signal
Pin Signal
-
6
-
3
4
5
RXD
TXD
GND
7
8
9
-
Pin
Signal
Pin
Signal
1
DCD
6
DSR
2
3
4
5
RXD
TXD
DTE
GND
7
8
9
RTS
CTS
-
Cable protection (optional)
• Mount the cable clamp
bracket
• Fix the cables with suitable
aids (cable binders, etc.) to the
sheet metal lugs (serves as a
cable grip).
• Insert the cover in the slots
on the device, close the cover
and snap it into the embossed
areas.
Rack Monitoring
System
Monitoring
System
-
{
RMS
LITE
15
3
IINSTALLATION
AND COMMISSIONING
NSTALLATION
AND COMMISSIONING
3.3.2
Fuses Double -pole fuse / fuse
of the neutral wire
Caution!
Danger!
Fire risk.
Only replace fuses with fuses
of the same type (250 V, 1 A,
slow-acting, high switching
• Switch off the device and unplug the
mains plug.
• Remove the fuse plug and replace
the fuse.
The device is supplied from
several power sources.
• The device may only be
opened by trained personnel.
To disconnect the device from
the voltage supply before
opening:
• Disconnect the mains plug.
• Disconnect the MAINS
MONITORING inputs.
• Open the cover of the device.
• Replace the fuse and close the device again.
Fuse for the auxiliary voltage
supply
Only replace fuse F1 on the +12 V auxiliary voltage supply (marked in
the device) with a fuse of the same type (250 V, 400 mA, fast-acting, 5
x 20 mm, UL-listed).
COMMISSIONING
• Check that the RMS and the connected components are correctly
cabled (> 3.3.1).
Mains Socket
The mains socket is on the rear of the device.
• Use only the supplied power cable.
3.4
RMS ready
After connection, wait for the
message in the LCD display.
• Input the network parameters via
Telnet, the COM interface (> 4.4)
or by hand via the keys (> 4.3).
If function problems should arise: (> 5)
All functions and displays indicated in
the manual depend on the version of
the operating software.The latest version
is available on the Internet (> 1.4).
Rack
4 O
OPERATION
PERATION
4.1
OPERATOR CONTROL ELEMENTS
1
RMS
2
ADVANCED
3
4 5 6 7
RMS ADV. & RMS LITE
1 Reset
Resets the RMS to a defined
standard state (> 5).
2LED
"Fault" (red) lights, up in connection
with reset,overload or a serious system fault. “Warning“ (yellow) lights
up if the conditions of an appropriately
configured filter apply (> 4.9), when
booting and in connection with Reset.
“Power“ (green) lights up when the
device is supplied with voltage.
9 “COM” communication socket
for connection to a PC or
terminal (serial communication
cable included).
RMS LITE
1
Note
4.2
8
9
RMS ADVANCED
3 Illuminated LCD display. Plain
text display of inputs, messages
and alarms.
4 Contrast controller for the LCD display
5 Left key
Page back in the menu, reduce
values
6 Right key
Page forward in the menu,
increase values
7 MENU key
Change to menu level
8 ENTER key
Menu selection of confirm
values
2
9
Never connect both COM interfaces at the same time!
INITIAL STATE
In the initial state, various status messages are displayed cyclically in the
LCD display. Each message is displayed for approximately 2 seconds.
LINDY RMS
N: RMS
L:Rechenzentrum
C: Fred Clever
I192.168.018.103
N255.255.255.000
B192.168.018.255
G192.168.018.200
Device name
SNMP Information (> 4.5.1)
– Name (N)
– Location (L)
– Contact (C)
Network Information (> 4.5)
– IP Address (I)
– Netmask (N)
– Broadcast Address (B)
– Gateway Address (G)
Rack Monitoring
System
Monitoring
System
17
4.3
OPERATION VIA KEYS ON THE
FRONT OF THE DEVICE
{
RMS
LITE
The functions accessible via the keys are mainly displays, i.e. current
statuses are displayed without the possibility of entering data.
Exception: menu items under “Network – Interface”.”
Menu
Selecting a menu item
• Change from the initial state to the menu level using the MENU key.
• Change between the menu items using the arrow keys
Enter
• Confirm the menu selection with the ENTER key.
EXIT
Confirmation of the menu item Exit leads to the previous menu level.
Menu
Change to the initial state using the MENU key.
Rack
Filter messages
Filter messages are displayed on the LCD display as follows:
08 17s temperatu
Enter
<Message number> (2-digit)
blank
<Time> (2-digit)
<Unit of time> (s; m = min; h; d)
Blank
<Filter-designation> (9-digit)
• Confirm filter messages with the ENTER key.
In the “Message Log” (> 4.10) the message is marked accordingly in
the “Ack” column with an “x”.
For the filter message to be displayed, it is necessary for the “Message
Priority” other than “none” to be assigned in the “Filter
Configuration” menu (> 4.9.2).
Display in the “Confirm“ menu
F03:*off humidit
<Filter-Number> („F“; 2-digit; “:“)
* (only with confirmed filter)
<Current filter result > (3-digit: “off“ or “on“)
Blank
<Filter-designation> (9-digit)
F03: no confirm
For the display, it is necessary for “Confirmation” “yes” to be assigned
in the “Filter Configuration” menu (> 4.9.2). Otherwise, the message
"no confirm" appears.
Entering network parameters
If a connection via the COM interface is not possible, the following
four network parameters must be entered via the keys before the
device can be operated with Telnet:
– IP address
– Netmask
– Broadcast
– Gateway
Enter
If one of these menu items is selected in the LCD display, the first
position flashes after confirmation.
I192.168.018.103
IP: 192.168.018.103 OK
Enter
• Select the desired parameter with the arrow keys (the position
selected flashes) and confirm with the ENTER key.
Enter
• Change the value of the selected parameter using the arrow keys
(the parameter flashes) and confirm with the ENTER key.
Enter
Leave the numerical input:
• Select "OK" with the arrow keys and confirm with the ENTER key.
Rack Monitoring
System
Monitoring
System
19
4 O
OPERATION
PERATION
4.4
OPERATION VIA TELNET OR
SERIAL INTERFACE COM
Note
All the settings in the RMS can easily be made via Telnet or via the
serial interface (COM).
COM parameters: 9600 baud, 8 data bits, no parity, 1 stop bit, software handshake.
Never connect both COM interfaces at the same time!
Create a Telnet connection on the computer:
• Input:
Example: #telnet 192.168.18.103 <Return>
The Login screen appears
• Log in with an entered user name (> 4.7).
On first startup: rms <Return>
• Enter password.
On first startup: rms <Return>
After successfully logging in, the main menu appears (see over).
Note
Letters in square brackets designate keys with which individual menu
items can be selected.
Rack
4
O
OPERATION
PERATION
MAIN
MENU
From the main menu it is
possible to switch to the
various submenus.
References to sub-menus are
marked with “>”
[N] NETWORK CONFIGURATION
Network and SNMP settings (> 4.5).
[S] SYSTEM CONFIGURATION ANDUPDATE
Load and save system configuration and update operating software
via TFTP (> 4.6).
[U] USER ADMINISTRATION
User administration settings and their rights (> 4.7).
[I] I/O CONFIGURATION
Setting input/output parameters (> 4.8).
[F] FILTER CONFIGURATION
Setting filter parameters (> 4.9).
[M] MESSAGE LOG
Display and confirmation of system messages (> 4.10). Unlike the
system log (> 4.5.2), only filter messages are logged here.
[?] HELP
Explanation of the menu items.
[Q] QUIT SESSION
Quit session.
Rack Monitoring
System
Monitoring
System
21
4
O
OPERATION
PERATION
Block diagram
The signals applied at the physical input terminals (left) are combined in
a complex filter structure (centre). The resulting filter result can then be
supplied for switching and signalling purposes at physical output terminals (right) or be used to influence other filters (feedback).
Method of operation and configuration options of the filters. (> 4.9).
Rack
4
O
OPERATION
PERATION
4.5
Network Configuration
The Ethernet interface makes it possible to integrate the RMS into a local
network (10 Mbit Ethernet), thus making the following functions
available:
–
–
–
–
SNMP support, thus integration into network management platforms
Log book functional capabilities (syslog service)
Loading and saving the system configuration (TFTP)
Updating the system (TFTP)
• If the RMS is not operated in an Ethernet network, the settings described in this chapter can be ignored.
Note
If you are unclear about the conditions of the local network, please ask
your network administrator for assistance.
Incorrect settings can have the effect that the device is isolated from the
network and/or is no longer capable of sending messages to the desired
destination addresses (see also > 4.5.1).
23
Central input mask for settings
for the Ethernet interface.
References to sub-menus are
marked with “>”.
1
[I] IP ADDRESS
IP address of the Ethernet interface.
[N] NETMASK
Netmask of the Ethernet interface.
[B] BROADCAST
Broadcast address of the Ethernet interface.
[G] GATEWAY
Gateway to adjacent networks of the local network, which may be required.
[S] SNMP CONFIGURATION
All SNMP-specific settings of the device (> 4.5.1).
[L] LOG SERVICE
System log settings (> 4.5.2).
[?] HELP
Explanation of the menu items..
[Q] QUIT WITHOUT SAVING
Jump back to the main menu without saving changes.
[RETURN] QUIT WITH SAVING
Jump back to the main menu and save changes.
Rack Monitoring
System
Monitoring
System
OPERATION
O
PERATION
4.5.1
(SNMP CONFIGURATION)
Complete control of the RMS via
SNMP with alarm (trap function)
and support of separate
communities for read and write
operations.
SNMP V1 in accordance with RFC
1213 is implemented. MIB-II
including RMS private MIB is
supported.
The complete MIB file of the RMS
is on the supplied CD-ROM.
Explanation of the MIB variables
> A3.
Visualised integration in management platforms on request.
LINDY
LINDY Rack Monitoring System
see www.lindy.com
[S] SEND AUTHTRAPS
[N] NAME
Administrative name of the device. Send trap with unauthorised
access with invalid or incorrect
For example: “RMS”
Community String (authority trap)..
[L] LOCATION
[M] SNMP ACCESS
Description of the location of the
Enable or disable access via SNMP.
device.
– Trap Destinations –
[C] CONTACT
List of a maximum of 8 IP
Name of the person responsible
addresses to which SNMP traps
for this device and contact inforare sent.
mation. For example:
“LINDY support,
[A] ADD NEW TRAP DESTINATION
Tel. +49 (0) 621 / 47 005 - 0”
Add an IP address to the list of
[R] READ COMMUNITY
Name of the community with the
right to read SNMP variables.
For example: “public”
[W] WRITE COMMUNITY
Name of the SNMP community
with the right to write SNMP
variables.
For example: “private”
[T] TRAP COMMUNITY
Name of the SNMP community
with the right to receive traps from
this device.
For example: “alarm”
trap receivers..
[D] DELETE TRAP DESTINATION
Delete IP address from the list of
trap receivers.
[?] HELP
Explanation of the menu items.
[Q] QUIT WITHOUT SAVING
Jump back to the “Network
Configuration” menu without
saving changes..
[RETURN] QUIT WITH SAVING
Jump back to the “Network
Configuration” menu and save
changes
Rack
4 O
OPERATION
PERATION
4.5.2
LOG SERVICE
Specify receivers of log messages
in the network which support the
standardised syslog service
(UNIXServer).
Two types of messages can be
logged via the syslog service:
– Filter results similar to the
displays under [M] Message Log
in the main menu (> 4.10).
[M] MESSAGE LOG
Switch on/off display of filter messages.
[A] ADD A NEW DESTINATION
– Debug messages in the event of Add the IP address of a computer to receive log data.
error analysis (please contact
[D] DELETE A DESTINATION
technical support).
Delete a computer from the list.
[?] HELP
Explanation of the menu items.
[Q] QUIT WITHOUT SAVING
Jump back to the “Network Configuration” menu without saving
changes.
[RETURN] QUIT WITH SAVING
Jump back to the “Network Configuration” menu and save changes.
4.6
SYSYTEM CONFIGURATION UPDATE
Reference to sub-menus are marked with “>”.
[C] CONFIGURATION VIA TFTP
Save and load device configuration on other computers via TFTP (>4.6.1)
[U] UPDATE VIA TFTP
Update system software via TFTP (>4.6.2).
[E] ERASE CONFIGURATION
Reset all settings to the standard settings.
[R] Reboot
Warm restart of the device, session is interrupted.
[?] Help
Explanation of the menu items.
[Q] QUIT WITHOUT SAVING
Jump back to the main menu without saving changes.
[RETURN] QUIT WITH SAVING
Jump back to the main menu and save changes.
Rack Monitoring
System
Monitoring
System
25
4
O
OPERATION
PERATION
4.6.1
CONFIGURATION VIA TFTP
Tool for saving the system
configuration in the network and
thus capturing it in a central data
backup.
The loading allows rapid startup
without reparameterisation, for
example after a system failure.
F] FILENAME
This requires that the TFTP service
Complete file name related to the exported TFTP directory
is running on the computer stated
[T] TFTP-SERVER
(TFTP server).
IP address of the TFTP server.
[S] SAVE CONFIG
• Please contact your network
Save the system configuration. The configuration can only be saved in
administrator.
an existing file! This prevents overflow on the server hard disk as a
result of the uncontrolled saving of configurations.
[L] LOAD CONFIG
Load the system configuration.
Status:
Display of the current or last TFTP process.
[?] HELP
Explanation of the menu items.
[Q] QUIT
Jump back to the previous menu
4.6.2
UPDATE VIA TFTP
Tool for simple updating of the
operating software via the network. This requires that the TFTP
service is running on the computer
stated (TFTP server)..
[F] FILENAME
File name of the operating software.
[T] TFTP-SERVER
IP address of the TFTP server.
[U] UPDATE SYSTEM
Update system software.
Status:
Display of the last or current TFTP
update.
[?] HELP
Explanation of the menu items.
[Q] QUIT
Jump back to the previous menu.
Rack
4
4.7
O
OPERATION
PERATION
User Administration
Input mask to set up users with
access rights.
All users are displayed with their
user names, passwords and rights
as well as their chipcard code, if
applicable.
[A] ADD USER
Add new user.
[D] DELETE USER
Delete selected user (-->)
[-] PREVIOUS USER
Selection pointer to previous user.
[+] NEXT USER
Selection pointer to next user.
[L] LEARN CHIPCARD
Assign a chipcard to the selected user.
[U] UNLEARN CHIPCARD
Withdraw the chipcard from the selected user.
[?] HELP
Explanation of the menu items..
[Q] QUIT WITHOUT SAVING
Jump back to the main menu without saving changes.
[RETURN] QUIT WITH SAVING
Jump back to the main menu and save changes..
Note
A maximum of 12 users (RMS Advanced 99) can be created.
Reading or writing/reading rights can be assigned to each user. Users
with reading rights cannot save changes and do not have access to
user administration.
The name and password are case-sensitive. If the chipcard reader has
been activated (> 4.8.7), the DIGITAL OUT 4 output is assigned exclusively to the door opener, in other words it is not possible to influence
this output with the filters.
Rack Monitoring
System
Monitoring
System
27
4 O
OPERATION
PERATION
4.8
I/O CONFIGURATION
Input mask for the digital input
and output settings.
References to sub-menus are
marked with “>”.
[O] DIGITAL OUTPUTS
Configure digital outputs.
[I] DIGITAL INPUTS
Configure digital inputs.
[T] TEMPERATURE INPUTS
Configure temperature (sensor) inputs.
[H] HUMIDITY INPUTS
Configure humidity (sensor) inputs.
[M] MAINS MONITORING
Configure mains monitoring input.
[A] AUX
Configure serial interface AUX.
[?] HELP
Explanation of the menu items.
[Q] QUIT WITHOUT SAVING
Jump back to the main menu without saving changes.
[RETURN] QUIT WITH SAVING
Jump back to the main menu and save changes.
Rack
4 O
OPERATION
PERATION
4.8.1
DIGITAL OUTPUTS
Input mask for the DIGITAL OUT
digital outputs settings.
Digital outputs are displayed with
the number, description, combined filters, logic operation and
effect.
[D] DESCRIPTION
Description of the digital output.
[F] FILTER
Specify the filter(s) (> 4.9) which act(s) on a digital output.
[L] LOGIC
Specify the logic operation with which the filters are combined.
[E] EFFECT
State how the logic result acts on the digital output.
ON
permanently switched on (independent of settings in Filter and
Logic)
OFF
switched off (independent of settings in Filter and Logic)
THRU switched through
INVERT switched through in inverted fashion
[-] PREVIOUS OUTPUT
Selection pointer to previous output.
[+] NEXT OUTPUT
Selection pointer to next output.
[?] HELP
Explanation of the menu items.
[Q] QUIT
Jump back to the previous menu.
FOR
CONFIGURATION WITH THE
CHIPCARD READER ONLY
If the chipcard reader has been
activated (> 4.8.7), the DIGITAL
OUT 4 output is assigned
exclusively to the door opener, in
other words it is not possible to
influence this output with the filters.
The menu points [D], [F], [L] and [E] are disabled for DIGITAL OUT 4
whilst, the current status of the output is displayed in the column
headed “State”.
Rack Monitoring
System
Monitoring
System
29
4 O
OPERATION
PERATION
4.8.2
DIGITAL INPUTS
Displays the DIGITAL IN, ALERT IN
and UPS IN digital inputs with the
number, description, status
(on/off), number of status changes and time of the last change.
[D] DESCRIPTION
Description of the digital input.
[R] RESET ALERT IN
Reset the sensors connected to the
ALERT IN inputs (deletes the alarm status in the sensor).
[-] PREVIOUS INPUT
Selection pointer to the previous input.
[+] NEXT INPUT
Selection pointer to the next input.
[?] HELP
Explanation of the menu items.
[Q] QUIT
Jump back to the previous menu..
TEMPERATURE INPUTS
4.8.3
Displays the
TEMPERATURE/HUMIDITY
digital temperature inputs
with the number, description and
current value.
[D] DESCRIPTION
Description of the temperature input.
[-] PREVIOUS TEMPERATURE
Selection pointer to the previous input.
[+] NEXT TEMPERATURE
Selection pointer to the next input.
[?] HELP
Explanation of the menu items.
[Q] Quit
Jump back to the previous menu.
Rack
4 O
OPERATION
PERATION
4.8.4
HUMIDITY INPUTS
Displays the TEMPERATURE/
HUMIDITY digital humidity inputs
with the description and current
value.
[D] DESCRIPTION
Description of the humidity sensor.
[-] PREVIOUS HUMIDITY
Selection pointer to the previous input.
[+] NEXT HUMIDITY
Selection pointer to the next input
[?] HELP
Explanation of the menu items.
[Q] QUIT
Jump back to the previous menu.
31
4.8.5
MAINS MONITORING
Displays the MAINS MONITORING
digital inputs with the number,
description and current value.
[D] DESCRIPTION
Description of the mains.
[+] NEXT MAINS
Selection pointer to the next mains.
[-] PREVIOUS MAINS
Selection pointer to the previous mains.
[?] HELP
Explanation of the menu items.
[Q] QUIT
Jump back to the previous menu.
Rack Monitoring
System
Monitoring
System
4 O
OPERATION
PERATION
4.8.6
CONNECT EXTERNAL DEVICES
VIA SERIAL INTERFACE (AUX)
Devices with a serial interface (for example chipcard reader, UPS, etc.)
can be connected to the AUX port on the rear of the RMS.
Software version 1.4 can support a chipcard reader to implement an
access control system.
[U] UPDATE SCREEN
Update the screen..
[D] AUX DEVICE SELECTION
Select a different device.
[L] LOGIC
Set the logic for the door opener contact.
make The contact is made if successful (default status open)
break The contact is broken if successful (default status closed)
[T] OPEN TIME
Set the open time.
[O] OPEN DOOR MANUALLY
Open the door.
[?] HELP
Explanation of the menu points.
[Q] QUIT
Return to the previous menu.
Rack
4 O
OPERATION
PERATION
4.8.7
AUX DEVICE SELECTION
[-] Previous Device
Set the selection pointer to the previous device.
[+] Next Device
Set the selection pointer to the next device.
[?] Help
Explanation of the menu points.
[Q] Quit
Return to the previous menu.
[Return] Quit With Saving
Save the changes and return to the previous menu.
Note
These settings affect the display and function in the menus “User
Configuration” (> 4.7), “Digital Outputs” (> 4.8.1) and “AUX
Configuration” (> 4.8.6).
Rack Monitoring
System
Monitoring
System
33
4 O
OPERATION
PERATION
4.9
FILTER
The filters are the central elements of the RMS. They make it it possible
to logically combine the results recorded at the inputs, and to supply
the result to the digital outputs or to generate various signals.
It is possible to configure a total of 12 filters (RMS Advanced 40) with
an identical structure. In this case, all inputs are available to each filter.
Mode of operation
Depending on the type of input signal (measured value, status, filter
feedback), in principle there are three different function blocks for processing the results.
The results of all the function blocks are combined via a common, logical OR element to form the filter result.
This filter result can then, depending on requirements, be used to generate alarm messages (SNMP Trap, LED Warning, Buzzer), to control
digital outputs, or for feedback to other filters.
Rack
4 O
OPERATION
PERATION
4.9.1
FILTER SELECTION
All filters are displayed with the
number, description, status, result,
reactivation time and confirmation
status.
[D] DISABLE
Deactivate the selected filter without changing the filter settings.
[C] CONFIRM FILTER
Confirm selected filter. The confirmation deactivates the filter for the
duration of the reactivation time (> 4.9.2).
[F] FILTER CONFIGURATION
Configure selected filter.
[-] PREVIOUS FILTER
Selection pointer to the previous filter.
[+] NEXT FILTER
Selection pointer to the next filter.
[?] HELP
Explanation of the menu items.
[Q] QUIT
Jump back to the main menu without saving changes.
4.9.2
FILTER CONFIGURATION
References to sub-menus are
marked with “>”.
A “(*)” before the “>” indicates
that at least one of the inputs is
applied to this filter.
[D] DESCRIPTION
Description of the filter.
[E] EFFECT
Effect of the filter result after the
OR element.
thru
switched through
off
switched off
invert switched through in
inverted fashion
[S] SNMP TRAP
In connection with an event,
send traps to all entered trap
receivers (> 4.5.1).
no
No trap
once
Trap if the filter event
occurs repeat Repeated traps
(every 60 seconds) until the filter
event occurs
Rack Monitoring
System
Monitoring
System
35
4 O
OPERATION
PERATION
[L] LED WARNING
In connection with an event switch
the LED on "Warning"
[B] BUZZER WARNING
In connection with an event,
switch on the buzzer.
[M] MESSAGE PRIORITY
Characterises the priority of the
filter event.
none no entry in the message
critical
warning
[C] CONFIRMATION
Enable or disable confirmation of a
filter result.
[R] REACTIVATION TIME
Specify the time after which a
confirmed filter is reactivated.
4.9.3
[I] DIGITAL/ALERT/UPS INPUTS
Configure general digital inputs..
[T] TEMPERATURE INPUTS
Configure temperature inputs.
[H] HUMIDITY INPUTS
Configure humidity inputs.
[M] MAINS INPUTS
Configure mains monitoring inputs
[F] FEEDBACK INPUTS
Configure feedback inputs.
[?] HELP
Explanation of the menu items.
[Q] QUIT WITHOUT SAVING
Jump back to the previous menu
without saving changes.
[RETURN] QUIT WITH SAVING
Jump back to the previous menu
and save changes.
DIGITAL/ALERT/UPS INPUTS
The inputs are displayed with the
type, number, description and
effect.
[-] PREVIOUS DIGITAL/ALERT/UPS INPUT
Input
Selection pointer to the previous input.
[+] NEXT DIGITAL/ALERT/UPS INPUT
Selection pointer to the next input.
[E] EFFECT
Effect of the input signal on the
OR element.
thru switched through
off switched off
invert switched through in
inverted fashion
[?] Help
Explanation of the menu items.
[Q] QUIT
Jump back to the previous menu.
Rack
4 O
OPERATION
PERATION
4.9.4
TEMPERATURE/MAINS/HUMIDITY
INPUTS
The filter inputs for measured
values are displayed with the
threshold, mode and effect.
They have a flexible structure for
the creation of larger/smaller
comparisons or window comparisons.
Thus the following filter conditions can easily be realised:
1) Simple larger/smaller comparison (switch if the input variable is
smaller/larger than the
threshold). Example 1 – Switch if
temperature 1 > 35 °C: mode A
“>”; threshold A 35; mode B
“off”; threshold B any value;
effect “thru”.
37
2) “Window comparison” (switch
if the input variable is inside/outside a defined range) Example 2 –
Switch if voltage 1 is between
210 V and 240 V: Mode A “>”;
threshold A 210; Mode B “<”;
threshold B 240; effect "thru"
Example 3 – Switch if humidity 1
is less than 30 % or greater than
80 %: Mode A “>”; threshold A
30; Mode B “<”; threshold B 80;
effect “invert”
[A] MODE-A [B] MODE-B
Set comparison module..
[1] THRES-A [2] THRES-B
Set threshold.
[E] EFFECT
State how the input acts on
the OR element.
thru
switched through
off
switched off
invert switched through in
inverted fashion
[-] PREVIOUS INPUT
Selection pointer to previous input.
[+] NEXT INPUT
Selection pointer to next input.
[?] HELP
Explanation of the menu items.
[Q] QUIT
Jump back to the previous menu..
Rack Monitoring
System
Monitoring
System
4 O
OPERATION
PERATION
4.9.5
FEEDBACK INPUTS
To realise complex filter conditions, each filter has two feedback
inputs where filter events can be
further processed.
The special feature here is the
possibility of delay (delay time),
conditional evaluation (pass
condition) and hold time.
F1: Filter 1
F2: Feedback input of filter 2.
f1: F1 output event, input event
of F2
f2: Output of the feedback input
of F2
[-] Previous Feedback Input
Selection pointer to previous input.
[+] NEXT FEEDBACK INPUT
Selection pointer to next input.
[F] FILTER
Origin of the feedback.
[D] DELAY TIME
Set the delay time after the
operation of the input event f1 in s.
[H] HOLD TIME
Set the hold time of f2 after the
release of f1 in s.
[P] PASS CONDITION
Set the pass mode.
thru
pass
conditional
pass if input condition is still met
[E] EFFECT
State how the input acts on
the OR element.
thru
switched through
off
switched off
invert
switched through
in inverted fashion
[?] HELP
Explanation of the menu
items.
[Q] QUIT
Jump back to the previous
menu.
With a pass condition = thru,
the effective hold time of f2 can
be extended by any time by subsequent events of f1 (retriggering).
f2 in this case is not released
until thold after the last falling
edge of f1.
Rack
4 O
OPERATION
PERATION
4.10
MESSAGE LOG
The messages are displayed with
the number, priority, acknowledgement, spent time and filter
description.
A maximum of the 15 last
messages can be displayed.
[A] ACKNOWLEDGE
Select message acknowledged (mark with x).
[-] PREVIOUS MESSAGE
Selection pointer to previous message.
[+] NEXT MESSAGE
Selection pointer to next message.
[?] HELP
Explanation of the menu items.
[Q] QUIT
Jump back to the previous menu.
39
Rack Monitoring
System
Monitoring
System
5 E
EXAMPLE
CONFIGURATION
XAMPLE
CONFIGURATION
Preconfigured filters with an
example of terminal assignment.
When the RMS is delivered, the most common applications (described in part in the following) have been preconfigured so that commissioning involves setting fewer parameters.
• Connect sensors to the
suggested terminals.
Example of filter configuration
using filter 1 (temperature).
• Activate the filter by setting the
respective effect to “thru” or
“invert” (preset: “off”).
• Make individual settings (effect,
warnings, …) for each filter
required. See also > 4.9.2.
Examples of filter settings
TEMPERATURE/HUMIDITY input 1
with simple comparison:
Alarm if temperature > 35 °C.
TEMPERATURE/HUMIDITY input 2
with window comparison:
Alarm if temperature < 5 °C or
> 45 °C. See also > 4.9.4.
Rack
5 E
EXAMPLE
CONFIGURATION
XAMPLE
CONFIGURATION
TEMPERATURE/HUMIDITY input 3
with window comparison:
Alarm if humidity < 35 % or >
60% relative humidity.
See also > 4.9.4.
MAINS inputs 1 to 3 with window
comparison: Alarm if U < 200 V
or U > 245 V.See also > 4.9.4.
ALERT IN inputs 1 and 2:
Alarm if smoke detector or vibration sensor operate.
See also > 4.9.3.
41
UPS IN inputs 1 and 2:
Alarm if UPS 1 or 2 reports power
failure. See also > 4.9.3.
Rack Monitoring
System
Monitoring
System
5 E
EXAMPLE
CONFIGURATION
XAMPLE
CONFIGURATION
DIGITAL IN input 1:
Alarm if passive infrared sensor
operates. See also > 4.9.3.
DIGITAL IN input 2:
Alarm if door is open for longer
than 60 s.
In the Filter Configuration menu,
set effect to “thru” for filter 7.
In the Feedback Input menu, set
effect to “thru” for filter 8.
See also > 4.9.5.
Rack
5
XAMPLE CONFIGURATION
EEXAMPLE
CONFIGURATION
Limited alarm duration for filter 4:
Internal buzzer active for 5
seconds if filter 4 (smoke and
shock sensor) is active
Set input for filter 10 Effect to
“thru” in the Feedback menu..
Specimen output
configuration
Additional fan on DIGITAL OUT 1:
activated if filter 1 trips
(temperature).
Signal horn on DIGITAL OUT 2:
activated if filter 4 (smoke or
shock) or filter 6 (passive infra
red) trip. Second fan on DIGITAL
OUT 3 with hysteresis for temperature 1: switch on fan if temperature 1 > 37 °C and do not
switch off until temperature 1 <
25 °C.
Rack Monitoring
System
Monitoring
System
43
5 E
EXAMPLE
CONFIGURATION
XAMPLE
CONFIGURATION
Two filters are required for this
(copy of an RS flip-flop using
NOR gate array).
Rack
6 M
MALFUNCTIONS
ALFUNCTIONS
Caution
If, during operation, the “Power” LED goes out or smoke or an abnormal smell is ascertained,
• Unplug the power cable.
• Please contact your dealer.
In the event of malfunctions
• Check whether your system is properly set up (> 3).
System no longer starts.
Cause: Current operating software faulty.
Remedy:
• Ensure that a correctly configured (> 4.1.2 ) terminal is connected to
the COM interface on the front of the device or on the back.
• Press the Reset key on the front of the device with a pointed object.
The device will reboot.
The following boot messages appear on the terminal screen:
RMS-BIOS version 1.0.03
(c) LINDY-Elektronik GmbH 1998
Memory Test : 00004096k Ok
Status of IDE : Ok
Drive 0 : MZX023157, (C/H/S) : 123/2/32
Drive 1 : Not detected.
Probing...[NE*000]
NE*000 base 0x0300, addr 00:10:6C:00:04:41
LILO
------------------------------------------------RMS - Rack Monitoring System
System is ready to boot. You may choose your old image
by pressing 'o'.
------------------------------------------------boot: <TAB>
r
RMS-Boot o RMS-Old
boot: o <ENTER>
Loading o
Linux version 2.1.97 (root@PC14) (gcc version 2.7.2.1) #7
SMP Tue May 5 10:26:58
Calibrating delay loop... 3.70 BogoMIPS
The “Fault” LED lights up, the
sensors do not work, “Overload”
is displayed in the LCD display.
If the malfunction still occurs after
performing the remedial measures
• If, during the boot: display, the keys o and Return on the terminal
keyboard are pressed, the system boots with the last valid operating
software (otherwise it boots again with the current version, which is
faulty here).
• Load the current operating software from the Internet and update
the system(> 4.4.3).
Cause: Auxiliary voltage interruption in connection with overload or
short circuit in the sensor cable.
Remedy:
• Confirm the “Overload” message in the LCD display with the ENTER key.
• Remove the overload or short circuit.
• Switch the auxiliary voltage back on in the “Aux.Volt.”(>4.3) menu
with the ENTER key.
• Please contact technical support (> 1.4) or your dealer.
Rack Monitoring
System
Monitoring
System
45
7 TECHNICAL
TECHNICAL DATADATA
RMS dimensions
External (WxDxH): 483 x 223 x 43.6mm
Mounting dimensions (WxDxH): 445 x 218 x 43.6mm
Weight
3.5 kg
Rated voltage
AC 110 – 230 V
Rated frequency
50/60 Hz
Rated current
200 mA
Protection class
I
Rated ambient temperature
5 . . . 35 °
Rack
8 G
GLOSSARY
LOSSARY
19" Construction
19-inch construction is the common name for a standardised modular
system for electronic devices and system parts. It specifies the width of
the front panel of plug-in units and subracks.
Broadcast
General, network-wide information.
EMC
Abbreviation for Electromagnetic Compatibility.
FAQ
Abbreviation for Frequently Asked Questions.
The most frequent questions and problems on a subject are listed
under FAQ on the Internet.
Gateway
Junction between network segments or networks, also with different
protocols.
HE
Height classification dimension of 44.45 mm = 1 HE (1 U).
From 19" technology.
IP
Abbreviation for Internet Protocol.
Standardised protocol for data transmission and on the Internet for
addressing computers. An IP address consists of a combination of 4
Bytes written as follows: A.B.C.D (for example, 192.168.0.88). For
more information, see RFC.
MIB
Abbreviation for Management Information Base.
Data structure which contains information on the SNMP agent.
Netmask
Used to divide the IP address into network address and interface
address.
RFC
Abbreviation for Request For Comment.
RFCs are the official form of publication of Internet standards and other
technical documents on the Internet. Rules for formatting and publishing RFCs themselves are laid down in RFC 1543.
SNMP
Abbreviation for Simple Network Management Protocol.
Established protocol for the exchange of management information.
Standard RFCs on SNMP are RFC 1155, RFC 1157 and RFC 1213.
TFTP
Trivial File Transfer Protocol
Simple protocol in IP-based networks for sending and receiving files.
Trap
(Alarm) message from an SNMP agent to the management environment.
URL
Abbreviation for Universal Resource Locator.
Full Internet address.
VDE
Abbreviation for Verband Deutscher Elektrotechniker
(Association of German Electrotechnical Engineers).
Rack Monitoring
System
Monitoring
System
47
APPENDICES
A
PPENDICES
A1
Conformity
Manufacturer
Product designation
Model
LINDY-Elektronik GmbH
Markircher Str. 20
D-68229 Mannheim, Germany
Data Terminal Equipment
Remote Managment System
The product conforms to the regulations of the following EU Directive:
73/23/EEC.
The conformity of the product to the requirements of Directive
89/336/EEC was tested using the following standards: EN 55022/Kl. B;
EN 55024; EN 61000-4-2; EN 61000-3; EN 61000-4; EN 61000-6.
Tested to Comply With FCC Standards
For Commercial Use Only
FCC Compliance Statement (United States)
This equipment generates, uses and can radiate radio frequency energy and if not installed and used properly, that is, in strict accordance with the manufacturer’s instructions,
may cause interference to radio communication. It has been tested and found to comply
with the limits for a class A computing device in accordance with the specifications in Part
15 of FCC rules, which are designed to provide reasonable protection against such interference when the equipment is operated in a commercial environment. Operation of this
equipment in a residential area may cause interference, in which case the user at his own
expense will be required to take whatever measures may be necessary to correct the
interference. If this equipment causes interference, what can be determined by turning
the equipment on and off, the user is encouraged to try to correct the interference by
one or more of the following measures:
a)
Reorient or relocate the receiving antenna.
b)
Increase the separation between the equipment and receiver.
c)
Connect the equipmment to an outlet on a circuit different from that
to which the receiver is connected.
d)
Consult the dealer or an experienced radi/TV technician
FCC WARNING
Changes or modifications not expressly approved by the manufacturer could void the
user’s authority to operate the equipment under FCC Rules.
Canadian Department of Communications RFI statement
This equipment does not exceed the class A limits for radio noise emissions from digital
apparatus set out in the radio interference regulations of the Canadian Department of
Communications.
Le présent appareil numérique n’émet pas de bruits radioélectriques dépassant les limites
applicables aux appareils numériques de la classe A prescrites dans le règlement sur le
brouillage radioélectriques publié par le ministère des Communications du Canada
Rack
APPENDICES
A
PPENDICES
A2
DOCUMENTATION OF THE
SYSTEM CONFIGURATION
• Mark the cables of your RMS at both ends clearly with meaningful
markings.
Use cable binders with marking areas or labels with sealing film.
• The following block diagram (master) can be used for documentation of the filter configuration
49
Rack Monitoring
System
Monitoring
System
APPENDICES
A
PPENDICES
A3
EXPLANATION OF THE MIB
FOR RMS
The RMS can be accessed under the OID 1.3.6.1.4.1.1909. 10
(iso.org.dod.internet.private.enterprises.infratec.rms)
10
Structure of the MIB
Key to
INT
CNT
DS
OS
TT
RO
RW
the following Tables:
Integer
Counter
Display String
Octet String
TimeTicks
Read Only
Read Write
Objects under RMS system
(1.3.6.1.4.1.1909.10.1)
for example
Reset RMS
1.3.6.1.4.1.1909.10.1.4.0 := 1
rms
1 rmssystem
2 input
1 digitalInTable
2 alertInTable
3 upsInTable
3 output
1 outputTable
2 outputLogicTable
4 temp
1 tempTable
5 humid
1 humidTable
6 mains
1 mainsTable
7 filter
1 filterTable
2 filterDigitalInTable
3 filterAlertInTable
4 filterUPSINTable
5 filterTempTable
6 filterHumidityTable
7 filterMainsTable
8 filterFeedbackTable
8 message
1 messageTable
9 user
1 userTable
20 aux
21 icc
Variable
Type
1 systemVersion
2 systemSNMPsave
DS
INT
3 systemMsgToSyslog
INT
4 systemReset
INT
5 systemSNMPaccess
INT
The complete MIB in ASN.1Notation is on the enclosed
CDROM as the file “RMS MIB”
Value
Access
{ default (1),
save (2) }
{ msglog-off (1)
msglog-on (2) }
{ default (1),
reset (2) }
{ readonly (1),
readwrite (2) }
RO
RW
RO
RW
RO
Rack
APPENDICES
A
PPENDICES
Objects under
digitalInTable
(1.3.6.1.4.1.1909.10.2.1)
Variable
Type
Value
Access
1 digitalInEntry
1 digitalInIndex
INT
RO
2 digitalInDescr
DS
RW
3 digitalInState
INT
{ off (1), on (2)} RO
4 digitalInLastChange
TT
RO
5 digitalInChanges
CNT
RO
Variable
Type
for example:
number of changes of input 9:
1.3.6.1.4.1.1909.10.2.1.1.5.9
Objects under
alertInTable
(1.3.6.1.4.1.1909.10.2.2)
Value
Access
1 alertInEntry
1 alertInIndex
INT
RO
2 alertInDescr
DS
RW
3 alertInState
INT
{off (1), on (2)} RO
4 alertInLastChange
TT
RO
5 alertInChanges
CNT
RO
6 alertInReset
INT
{default (1)
RW
alertIn-reset (2)}
for example :
Reset sensors on Alert In 2
1.3.6.1.4.1.1909.10.2.2.1.3.2 := 1
Object under ups INTABLE
(1.3.6.1.4.1.1909.10.2.3)
Variable
Type
Value
Access
1 upsInEntry
1 upsInIndex
INT
RO
2 upsInDescr
DS
RW
3 upsInState
INT
{off (1), on (2)} RO
TT
RO
CNT
RO
4 upsInLastChange
5 upsInChanges
Rack Monitoring
System
Monitoring
System
51
APPENDICES
A
PPENDICES
Objects under outputTable
(1.3.6.1.4.1.1909.10.3.1)
Variable
1 outputEntry
1 outputIndex
2 outputDescr
3 outputEffect
4
5
6
7
outputLastChange
outputChanges
outputLogic
outputState
Type
INT
DS
INT
TT
CNT
INT
INT
Value
Access
{off (1), on (2),
thru (3), invert (4)}
RO
RW
RW
{and (1), or (2)}
{open (1), short(2)}
RO
RO
RW
RO
Type
Access
for example:
Read put description DIGITAL OUT 4:
1.3.6.1.4.1.1909.10.3.1.1.2.4
Objects under
outputLogicTable
(1.3.6.1.4.1.1909.10.3.2)
Variable
Value
1 outputLogicEntry
1 outputLogicOutputIndex INT
RO
2 outputLogicFilterIndex INT
RO
3 outputLogicFilter INT
Objects under tempTable
(1.3.6.1.4.1.1909.10.4.1)
for example:
Read out current temperture of
temperature sensor 1:
1.3.6.1.4.1.1909.10.4.1.1.3.1
Objects under humidTable
(1.3.6.1.4.1.1909.10.5.1)
Variable
Type
{off(1),on(2)}
Value
RW
Access
1 tempEntry
1 tempIndex
INT
RO
2 tempDescr
DS
RW
3 tempValue
INT
{no-sensor (665)}
RO
Type
Value
Access
Variable
1 humidEntry
1 humidIndex
INT
RO
2 humidDescr
DS
RW
3 humidValue
INT
{ no-sensor (255) }
RO
Rack
APPENDICES
A
PPENDICES
Objects under mainsTable
(1.3.6.1.4.1.1909.10.6.1)
Objects under filterTable
(1.3.6.1.4.1.1909.10.7.1)
Variable
1 mainsEntry
1 mainsIndex
2 mainsDescr
3 mainsValue
Type
Value
INT
DS
INT
Variable
1 filterEntry
1 filterIndex
2 filterDescr
3 filterResult
4 filterEffect
RO
RW
RO
Type Value
Access
INT
DS
INT
INT
RO
RW
RO
RW
{false (1), true (2)}
{off (1), thru (2),
invert (3)}
{no (1), once (2),
repeat (3) }
{no (1), yes (2)}
{no (1), yes (2)}
{no-message (1),
priority-warning (2),
priority-critical (3)}
{disabled (1), RW
enabled (2) }
{no-timeout (1)}
{not-confirmed (1),
confirmed (2) }
INT
5 filterTrap
Access
6 filterLED
INT
7 filterBuzzer
INT
8 filterMessagePriority INT
9 filterConfirmation
INT
10 filterReactivationTime
11 filterConfirm
INT
INT
RW
RW
RW
RW
RW
RW
for example:
allow confirmation for filter 4
1.3.6.1.4.1.1909.10.7.1.1.9.4 := 1
53
Objects under
filterDigitalInTable
(1.3.6.1.4.1.1909.10.7.2)
Variable
Type
1 filterDigitalInEntry
1 filterDigitalInIndex INT
2 filterDigitalInPort INT
for examle :
3 filterDigitalInEffect INT
Make DIGTIAL INPUT 2 act on filter 6:
1.3.6.1.4.1.1909.10.7.2.1.3.6.2
Value
{off (1), thru (2),
invert (3) }
Rack Monitoring
System
Monitoring
System
Access
RO
RO
RW
APPENDICES
A
PPENDICES
Objects under
filterAlertInTable
(1.3.6.1.4.1.1909.10.7.3)
Objects under
filterUPSInTable
(1.3.6.1.4.1.1909.10.7.4)
Objects under
filterTempTable
(1.3.6.1.4.1.1909.10.7.5)
for example:
Exclude TEMPERATURE/HUMIDITY
input from Filter 1
1.3.6.1.4.1.1909.10.7.5.1.3.1.2 := 0
Objects under
filterHumidityTable
(1.3.6.1.4.1.1909.10.7.6)
Variable
1 filterAlertInEntry
1 filterAlertInIndex
2 filterAlertInPort
3 filterAlertInEffect
Type
INT
INT
INT
Access
{off (1), thru (2),
invert (3) }
Variable
1 filterUPSInEntry
1 filterUPSInIndex
2 filterUPSInPort
3 filterUPSInEffect
Type
Variable
1 filterTempEntry
1 filterTempIndex
2 filterTempSensor
3 filterTempEffect
Type
INT
INT
INT
INT
INT
INT
4 filterTempAThres
5 filterTempAMode
INT
INT
6 filterTempBThres
7 filterTempBMode
INT
INT
Variable
1 filterHumidityEntry
1 filterHumidityIndex
2 filterHumiditySensor
3 filterHumidityEffect
Value
Value
RO
RO
RW
Access
RO
RO
{off (1), thru (2), RW
invert (3) }
Value
Access
RO
RO
{off (1), thru (2), RW
invert (3) }
RW
{off (1), greater (2), RW
less (3) }
RW
{off (1), greater (2),RW
less (3) }
Type Value
Access
INT
RO
INT
RO
INT {off (1), thru (2), RW
invert (3) }
4 filterHumidityAThres INT
RW
5 filterHumidityAMode INT {off (1), greater (2), RW
less (3) }
6 filterHumidityBThres INT
RW
7 filterHumidityBMode INT {off (1), greater (2), RW
less (3) }
Rack
APPENDICES
A
PPENDICES
Objects under
filterMainsTable
(1.3.6.1.4.1.1909.10.7.7)
Variable
Type
1 filterMainsEntry
1 filterMainsIndex
INT
2 filterMainsSensor INT
3 filterMainsEffect INT
4 filterMainsAThres INT
5 filterMainsAMode
INT
6 filterMainsBThres INT
7 filterMainsBMode
INT
Objects under
filterFeedbackTable
(1.3.6.1.4.1.1909.10.7.8)
Variable
1 filterFeedbackEntry
1 filterFeedbackIndex
2 filterFeedbackInput
3 filterFeedbackInFilter
4 filterFeedbackDelay
5 filterFeedbackPassCond
6 filterFeedbackHold
7 filterFeedbackEffect
Type
INT
INT
INT
INT
INT
INT
INT
Value
Access
RO
RO
{off (1), thru (2), RW
invert (3) }
RW
{off (1), greater (2), RW
less (3) }
RW
{off (1), greater (2),RW
less (3) }
Value
{ thru (1),
conditional (2) }
{ off (1), on (2),
invert (3) }
Access
RO
RO
RW
RW
RW
RW
RW
For example:
Feedback input 1 of filter 8 is only
to operate if the event is still
applied:
1.3.6.1.4.1.1909.10.7.8.1.5.8.1 := 1
Objects under
messageTable
(1.3.6.1.4.1.1909.10.8.1)
For example:
Read out filter description from
message 5:
1.3.6.1.4.1.1909.10.8.1.1.3.5
Variable
1 messageEntry
1 messageIndex
2 messageFilter
3 messageFilterDescr
4 messageTime
5 messagePriority
Type
Value
INT
INT
DS
TT
INT
RO
RO
RO
RO
{no-message (1), RO
warning (2),
critical (3) }
{not-acknow- RW
ledged (1),
acknowledged (2) }
6 messageAcknowledged INT
Rack Monitoring
System
Monitoring
System
Access
55
APPENDICES
A
PPENDICES
Objects under userTable
(1.3.6.1.4.1.1909.10.9.1)
Variable
1 userEntry
1 userIndex
2 userName
3 userRight
Type
INT
DS
INT
4 userChipcardKey
DS
5 userChipcardAccess INT
Objects under aux
(1.3.6.1.4.1.1909.10.20)
Variable
1 auxDevice
2 auxDeviceName
Objects under icc
(1.3.6.1.4.1.1909.10.21)
Type
INT
Access
{ readonly (1),
read-write (2)}
{ denied (1),
granted (2) }
Value
{ no-device (1),
chipcardreader (2) }
INT
INT
INT
RO
RO
RO
RO
RO
Access
RO
DS
Variable
Type
1 readerConnected INT
2 readerCardInside INT
3 readerCardKey
DS
4 readerLEDcolor INT
5 openerLogic
6 openerOpenTime
7 openerState
Value
RO
Value
{ no (1), yes (2) }
{ no (1), yes (2) }
{ red (1), green (2)
yellow (3) }
{ break (1), make (2) }
{ closed (1), open (2) }
Access
RO
RO
RO
RO
RO
RO
RO
Rack
APPENDICES
A
PPENDICES
A4
GNU GENERAL
LICENSE
PUBLIC
TERMS AND CONDITIONS FOR COPYING, DISTRIBUTION AND MODIFICATION
Version 2, June 1991, Copyright (C) 1989, 1991
Free Software Foundation, Inc., 59 Temple Place Suite 330, Boston, MA 02111-1307, USA
0 This License applies to any program or other work which contains a notice placed by the copyright
holder saying it may be distributed under the terms of this General Public License. The "Program",
below, refers to any such program or work, and a "work based on the Program" means either the
Program or any derivative work under copyright law: that is to say, a workcontaining the Program or a
portion of it, either verbatim or with modifications and/or translated into another language. (Hereinafter,
translation is included without limitation in the term"modification".) Each licensee is addressed as
"you". Activities other than copying, distribution and modification are not covered by this License; they
are outside its scope. The act of running the Program is not restricted, and the output from the Program
is covered only if its contents constitute a work based on the Program (independent of having been
made by running the Program). Whether that is true depends on what the Program does.
Everyone is permitted to copy and distribute verbatim copies of this license document, but changing it is not allowed.
Preamble
The licenses for most software are designed to
take away your freedom to share and change it.
By contrast, the GNU General Public License is
intended to guarantee your freedom to share and
change free software-to make sure the software
is free for all its users. This General Public License
applies to most of the Free Software Foundation's
software and to any other program whose authors commit to using it. (Some other Free
Software Foundation software is covered by the
GNU Library General Public License instead.) You
can apply it to your programs, too.
When we speak of free software, we are referring
to freedom, not price. Our General Public Licenses
are designed to make sure that you have the freedom to distribute copies of free software (and
charge for this service if you wish), that you receive source code or can get it if you want it, that
you can change the software or use pieces of it in
new free programs; and that you know you can
do these things.
To protect your rights, we need to make restrictions that forbid anyone to deny you these rights
or to ask you to surrender the rights. These
restrictions translate to certain responsibilities for
you if you distribute copies of the software, or if
you modify it.
For example, if you distribute copies of such a
program, whether gratis or for a fee, you must
give the recipients all the rights that you have.
You must make sure that they, too, receive or can
get the source code. And you must show them
these terms so they know their rights.
We protect your rights with two steps:
(1) copyright the software, and
(2) offer you this license which gives you legal
permission to copy, distribute and/or modify the
software.
Also, for each author's protection and ours, we
want to make certain that everyone understands
that there is no warranty for this free software. If
the software is modified by someone else and
passed on, we want its recipients to know that
what they have is not the original, so that any
problems introduced by others will not reflect on
the original authors' reputations.
Finally, any free program is threatened constantly
by software patents. We wish to avoid the danger
that redistributors of a free program will individually obtain patent licenses, in effect making the
program proprietary. To prevent this, we have
made it clear that any patent must be licensed for
everyone's free use or not licensed at all. The precise terms and conditions for copying, distribution
and modification follow.
1 You may copy and distribute verbatim copies of the Program's source code as you receive it, in any
medium, provided that you conspicuously and appropriately publish on each copy an appropriate copyright notice and disclaimer of warranty; keep intact all the notices that refer to this License and to the
absence of any warranty; and give any other recipients of the Program a copy of this License along with
the Program. You may charge a fee for the physical act of transferring a copy, and you may at your option offer warranty protection in exchange for a fee.
2 You may modify your copy or copies of the Program or any portion of it, thus forming a work based
on the Program, and copy and distribute such modifications or work under the terms of Section 1 above,
provided that you also meet all of these conditions:
a) You must cause the modified files to carry prominent notices stating that you changed the files and
the date of any change.
b) You must cause any work that you distribute or publish, that in whole or in part contains or is derived from the Program or any part thereof, to be licensed as a whole at no charge to all third parties
under the terms of this License.
c) If the modified program normally reads commands interactively when run, you must cause it,when
started running for such interactive use in the most ordinary way, to print or display an announcement
including an appropriate copyright notice and a notice that there is no warranty (or else, saying that you
provide a warranty) and that users may redistribute the program under these conditions, and telling the
user how to view a copy of this License. (Exception: if the Program itself is interactive but does not normally print such an announcement, your work based on the Program is not required to print an announcement.) These requirements apply to the modified work as a whole. If identifiable sections of that
work are not derived from the Program, and can be reasonably considered independent and separate
works in themselves, then this License, and its terms, do not apply to those sections when you distribute them as separate works. But when you distribute the same sections as part of a whole which is a work
based on the Program, the distribution of the whole must be on the terms of this License, whose permissions for other licensees extend to the entire whole, and thus to each and every part regardless of
who wrote it.
Thus, it is not the intent of this section to claim rights or contest your rights to work written entirely by
you; rather, the intent is to exercise the right to control the distribution of derivative or collective works
based on the Program. In addition, mere aggregation of another work not based on the Program with
the Program (or with a work based on the Program) on a volume of a storage or distribution medium
does not bring the other work under the scope of this License.
3 You may copy and distribute the Program (or a work based on it, under Section 2) in object code
or executable form under the terms of Sections 1 and 2 above provided that you also do one of the following:
a) Accompany it with the complete corresponding machine-readable source code, which must be
distributed under the terms of Sections 1 and 2 above on a medium customarily used for software
interchange; or,
b) Accompany it with a written offer, valid for at least three years, to give any third party, for a charge
no more than your cost of physically performing source distribution, a complete machine-readable copy
of the corresponding source code, to be distributed under the terms of Sections 1 and 2 above on a
medium customarily used for software interchange; or,
c) Accompany it with the information you received as to the offer to distribute corresponding source
code. (This alternative is allowed only for noncommercial distribution and only if you received the program in object code or executable form with such an offer, in accord with Subsection b above.) The source code for a work means the preferred form of the work for making modifications to it. For an executable work, complete source code means all the source code for all modules it contains, plus any associated interface definition files, plus the scripts used to control compilation and installation of the executable. However, as a special exception, the source code distributed need not include anything that is
normally distributed (in either source or binary form) with the major components (compiler, kernel, and
so on) of the operating system on which the executable runs, unless that component itself accompanies
the executable. If distribution of executable or object code is made by offering access to copy from a
designated place, then offering equivalent access to copy the source code from the same place counts
as distribution of the source code, even though third parties are not compelled to copy the source along
with the object code.
4 You may not copy, modify, sublicense, or distribute the
Program except as expressly provided
Rack Monitoring
System
Monitoring
System
57
APPENDICES
A
PPENDICES
under this License. Any attempt otherwise to copy, modify, sublicense or distribute the Program is void,
and will automatically terminate your rights under this License. However, parties who have received
copies, or rights, from you under this License will not have their licenses terminated so long as such parties remain in full compliance.
5 You are not required to accept this License, since you have not signed it. However, nothing else
grants you permission to modify or distribute the Program or its derivative works. These actions are prohibited by law if you do not accept this License. Therefore, by modifying or distributing the Program (or
any work based on the Program), you indicate your acceptance of this License to do so, and all its terms
and conditions for copying, distributing or modifying the Program or works based on it.
6 Each time you redistribute the Program (or any work based on the Program), the recipient automatically receives a license from the original licensor to copy, distribute or modify the Program subject to these
terms and conditions. You may not impose any further restrictions on the recipients' exercise of the rights
granted herein. You are not responsible for enforcing compliance by third parties to this License.
7 If, as a consequence of a court judgment or allegation of patent infringement or for any other reason
(not limited to patent issues), conditions are imposed on you (whether by court order,agreement or
otherwise) that contradict the conditions of this License, they do not excuse you from the conditions of
this License. If you cannot distribute so as to satisfy simultaneously your obligations under this License
and any other pertinent obligations, then as a consequence you may not distribute the Program at all.
For example, if a patent license would not permit royaltyfree redistribution of the Program by all those
who receive copies directly or indirectly through you, then the only way you could satisfy both it and this
License would be to refrain entirely from distribution of the Program. If any portion of this section is held invalid or unenforceable under any particular circumstance, the balance of the section is intended to apply and the
section as a whole is intended to apply in other circumstances.
It is not the purpose of this section to induce you to infringe any patents or other property right claims or to
contest validity of any such claims; this section has the sole purpose of protecting the integrity of the free software distribution system, which is implemented by public license practices. Many people have made generous
contributions to the wide range of software distributed through that system in reliance on consistent application of that system; it is up to the author/donor to decide if he or she is willing to distribute software through
any other system and a licensee cannot impose that choice. This section is intended to make thoroughly clear
what is believed to be a consequence of the rest of this License.
8 If the distribution and/or use of the Program is restricted in certain countries either by patents or by
copyrighted interfaces, the original copyright holder who places the Program under this License may add
an explicit geographical distribution limitation excluding those countries, so that distribution is permitted only in or among countries not thus excluded. In such case, this License incorporates the limitation
as if written in the body of this License.
9 The Free Software Foundation may publish revised and/or new versions of the General Public License
from time to time. Such new versions will be similar in spirit to the present version, but may differ in
detail to address new problems or concerns.
Each version is given a distinguishing version number. If the Program specifies a version number of this
License which applies to it and "any later version", you have the option of following the terms and conditions either of that version or of any later version published by the Free Software Foundation. If the
Program does not specify a version number of this License, you may choose any version ever published
by the Free Software Foundation.
10 If you wish to incorporate parts of the Program into other free programs whose distribution conditions are different, write to the author to ask for permission. For software which is copyrighted by the Free
Software Foundation, write to the Free Software Foundation; we sometimes make exceptions for this.
Our decision will be guided by the two goals of preserving the free status of all derivatives of our free
software and of promoting the sharing and reuse of software generally.
NO WARRANTY
11 BECAUSE THE PROGRAM IS LICENSED FREE OF CHARGE, THERE IS NO WARRANTY FOR THE PROGRAM, TO THE EXTENT PERMITTED BY APPLICABLE LAW. EXCEPT WHEN OTHERWISE STATED IN WRITING
THE COPYRIGHT HOLDERS AND/OR OTHER PARTIES PROVIDE THE PROGRAM "AS IS" WITHOUT WARRANTY OF ANY KIND, EITHER EXPRESSEDOR IMPLIED, INCLUDING, BUT NOT LIMITED TO, THE IMPLIED
WARRANTIES OF MERCHANTABILITY AND FITNESS FOR A PARTICULAR PURPOSE. THE ENTIRE RISK AS TO
THE QUALITY AND PERFORMANCE OF THE PROGRAM IS WITH YOU. SHOULD THE PROGRAM PROVE
DEFECTIVE, YOU ASSUME THE COST OF ALL NECESSARY SERVICING, REPAIR OR CORRECTION.
12 IN NO EVENT UNLESS REQUIRED BY APPLICABLE LAW OR AGREED TO IN WRITING WILL ANY COPYRIGHT
HOLDER, OR ANY OTHER PARTY WHO MAY MODIFY AND/OR REDISTRIBUTE THE PROGRAM AS PERMITTED
ABOVE, BE LIABLE TO YOU FOR DAMAGES, INCLUDING ANY GENERAL, SPECIAL, INCIDENTAL OR CONSEQUENTIAL DAMAGES ARISING OUT OF THE USE OR INABILITY TO USE THE PROGRAM (INCLUDING BUT NOT
LIMITED TO LOSS OF DATA OR DATA BEING RENDERED INACCURATE OR LOSSES SUSTAINED BY YOU OR
THIRD PARTIES OR A FAILURE OF THE PROGRAM TO OPERATE WITH ANY OTHER PROGRAMS), EVEN IF SUCH
HOLDER OR OTHER PARTY HAS BEEN ADVISED OF THE POSSIBILITY OF SUCH DAMAGES.
Remo
Rack
PP RODUCT
RODUCTM ATRIX
MATRIX
Type
Feature
Speed
Flash
Housing
Front LCD Display
Front Keypad
Status LED’s
Buzzer
Power supply range
DC, optional
Internal voltage supply for all sensors
Ethernet-Port
DHCP
Telnet
SSH
HTTP
HTTPS
SNMP (get , set, trap)
TFTP
Mains Voltage measurement
Digital Out
Digital In
Alert In
Temperature / humidity
UPS In / Digital In 9 & 10
Com port Front
Com port Rear
VT 100
AUX port
Free programmable filters
Number of users
Email function
Time server function
Syslog function
Chipcard function
Proximity reader
USV support
activation of external power socket outlets
RMS LITE
RMS ADVANCED
25 mhz
8mb
19” IHE
no
no
yes
yes
110/230 V AC
48 V DC
yes
10 Mbit
no
yes
no
yes
no
yes
yes
1
4
8
4
1
yes
1
12
12
no
no
yes
yes
no
no
yes
33 mhz
32mb
19” IHE
yes
yes
yes
yes
110/230 V AC
48 V DC
yes
10 Mbit
yes
yes
no
yes
no
yes
yes
3
4
8
4
4
2
1
1
yes
1
40
99
yes
yes
yes
yes
yes
yes
yes
Remote
Management
System
Rack
Monitoring
System
ote
Managemnet
System
Monitoring
System
59
Deutschland
Italia
LINDY-Elektronik GmbH
Markircher Str. 20
68229 Mannheim
Tel: 0621.47 00 5-0
Fax: 0621.47 00 5-0
E-Mail: [email protected]
LINDY Italia S.r.l.
Via Varesina, 126/B
22079 - Villa Guardia (CO)
Tel: 031 48 40 11
Fax: 031 48 06 52
E-Mail: [email protected]
Supporto Tecnico:
[email protected]
Schweiz / Suisse / Svizzera
LINDY-Elektronik AG
Florenzstrasse 9
CH-4023 Basel
67451Mundolsheim Cedex
Services clients
Tel: 061 335 97 00
Fax: 061 335 97 09
E-Mail: [email protected]
USA
LINDY Computer Connection
Technology Inc.
16214 Phillips Road
Athens, AL 35613
Tel: (256) 771-0660
Fax: (256) 771-0460
E-Mail: [email protected]
Great Britain
LINDY Electronics Ltd.
Sadler Forster Way
Teesside Industrial Estate, Thornaby
Stockton-on-Tees TS17 9JY, England
Tel: 01642 - 754000
Sales Fax: 01642 - 765274
General Fax: 01642 - 754027
E-Mail: [email protected]
Australia
LINDY Australia Pty Ltd
Unit 2, 43-49 Sandgate Road
AU- 4010 Albion Qld
Tel: 07 3262 9033
Fax: 07 3262 9055
E-Mail: [email protected]
France
International & Eire
LINDY France Sarl
6 rue Rapp
CS 31015
67451Mundolsheim Cedex
Services clients
Tél: 0 825 825 111
Fax: 03 88 20 57 74
Services administratifs:
Tél: 03 88 20 04 66
E-Mail: [email protected]
LINDY International Ltd.
Sadler Forster Way
Teesside Industrial Estate, Thornaby
Stockton-on-Tees TS17 9JY, England
Tel: +44 1642 - 754020
Fax: +44 1642 - 754029
E-Mail: [email protected]
Rack