1
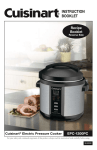
USER MANUAL __________________________________________ FairWind FWPC6L Pressure Cooker Contact Us: 1-844-528-2566 www.fairwindglobal.com Read and Save These Instructions TABLE OF CONTENTS SPECIFICATIONS ............................................................................................................................................ 2 Parts List ........................................................................................................................................................ 3 Important Safety Instructions ....................................................................................................................... 4 Installation And Adjustments........................................................................................................................ 5 PREPARATION BEFORE Cooking .................................................................................................................... 5 Cooking Preperation ..................................................................................................................................... 6 Care & Cleaning............................................................................................................................................. 9 MAINTENANCE ............................................................................................................................................ 10 Troubleshooting .......................................................................................................................................... 11 Limited Manufacturer’s Warranty .............................................................................................................. 12 SPECIFICATIONS Model Number: Voltage: Power: Frequency: Volume: Wash Time: Caliber of Cooling Pot: Operating Pressure Temperature Range FWPC6L 120 V 1000 W 60 Hz 6L 4-15 Minutes 22cm 70KPA 140°F - 180°F Packing List Name User’s Manual Power Cord Inner Pot Outer Pot Rice Measuring Cup Serving Spoons Quantity 1 Piece 1 Piece 1 Piece 1 Piece 1 Piece 2 Pieces www.fairwindglobal.com 2 PARTS LIST Instruction Symbols Warning Prohibited You must operate this machine strictly per these instructions, whenever you see this symbol. It could be a safety hazard, damage the machine or harmful to the user if instructions are not followed. It is strictly forbidden to operate this machine whenever you see this symbol. It could be a safety hazard, damage the machine or harmful to the user if instructions are not followed. *The appliance is not intended to be used by children or people with reduced physical, sensor or mental capabilities, or a lack of experience and knowledge, unless they are under supervision or have been instructed on the use of the appliance by a responsible person. www.fairwindglobal.com 3 IMPORTANT SAFETY INSTRUCTIONS Please use a 120V / 60Hz Socket. Fire or electric shock may occur if either of these are not used. Do not insert foreign objects into the electrical outlet, as it may cause electrical shock or unusual action. Do not operate this appliance if the power cord or plug is damaged, if the unit has malfucntion or if the unit has been damaged in any manner. Do not attempt to modify any part of this pressure cooker in any way. A socket shall be used independently. Please use an individual socket with earthed wire of more than 10A rate current. Joint use of the same socket with other appliances may cause excessive heat or fire. It is strictly prohibited to modify or repair the unit yourself. Please send it to certified technician or repair agency. Do not make any unauthorized replacement of any spare part, as this may cause electrical shock, fire or injury. Regularly inspect the exhaust valve, float valve and antiblock shield to make sure they are unobstructed. Always check the pressure release valve for clogging before use. Never cover the pressure valves. Do not wash or immerse in water, as this may cause electrical shock or short circuit. Do not insert or pull the plug with wet hands, as this may cause an electrical shock. During opertion, do not open the lid until pressure is completely discharged, do not put you’re hand or face near the exhaust vent and do not touch the outside housing as you may run the risk of scalding. When not in use, remove the plug from the socket. If you leave it in the socket when not in use, it may cause creepage, fire or malfunction. Only place food in the internal pot, only cook in the provided removable container. Do not exceed the MAX level of the internal pot as it may lead to half cooked or un-cooked food. Make sure the handles are assembled and fastened properly before each use. Exetreme cauntion must be used when moving the unit containing hot liquids, always use the handle, this avoids spilling and scalding. Never use this appliance in the following places: Unstable Surfaces, Near Water or Fire, Adjacent to Walls, Under Direct Sunlight or Oil Splash. Do not place this unit on or near a hot gas or electrical burner. Close supervision is nescessary when this appliance is used near children. This unit should not be used by people with disabilities. An extension cord may be used, the electrical rating of the cord must be at least 20 amps and 120 volts. Do not let the cord touch hot surfaces or hang over the edge of the table or counter where it can be pulled by children. This appliance has a polarized plug. As a safety feature, it will only fit in a polarized outlet one way. If it does not fit, contact a qualified electrician. Do not open the pressure cooker until it has cooled and all internal pressure has been released. If handles are difficult to push apart, this indicates that it is still pressurized. www.fairwindglobal.com 4 INSTALLATION AND ADJUSTMENTS Before first use, please take out all accessories from the unit and read the user manual carefully. Directions and cautions must be carefully followed to avoid any damage to property or human injury. Operation Section Disassembly and installation of anti-block shield and gasket PREPARATION BEFORE COOKING When using electrical appliances, basic safety precautions should always be followed. 1. This appliance is for household use only. Do not use outdoors. 2. Do not use this appliance for other than intended use. www.fairwindglobal.com 5 3. The use of accessory attachments, not included with this appliance are not recommended by the manufacturer. 4. Always inspect the exhaust value, float valve and anti-block shield to make sure they are not obstructed. Make sure the exhaust valve is in sealing location. 5. Always check the pressure release valve for clogging before use. Never cover the pressure valves. 6. Wipe the surface clean of the inner pot and the heating plate to confirm they are free of any foreign objects. 7. Be aware that certain food, such as applesauce, cranberries, pearl barley, oatmeal butter, cereals, split peas, noodles, macaroni, rhubarb, or spaghetti can foam, froth, and sputter clog the pressure release device (steam vents). These foods should only be cooked cautiously in the unit with no more than ½ full and using natural release. 8. Never fill the unit over 2/3 full (MAX level). Foods such as rice or dried vegetable expand during cooking; do not fill the unit above ½ with such foods. Over filling may cause a risk of clogging the pressure release device. Please see “Cooking Preparation”. 9. This unit cooks under pressure. Improper use may result in scalding injury. Make sure the unit is properly closed before operating. Please see “Cooking Instructions”. 10. Never deep fry or fry under pressure using oil in the unit. It is dangerous and may cause a fire or serious injury and damage. 11. Do not move this unit with force to remove the lid when the unit is in operation. This may cause scalding. After cooking, use extreme caution when removing the lid. Always open the lid away from you to avoid skin contact with any hot vapors. Serious burns can result. 12. Exetreme cauntion must be used when moving the unit containing hot liquids, always use the handle, this avoids spilling and scalding. 13. Do not touch the inner pot and cover the top with gloved hands to prevent hot vapors from scalding face. 14. Do not open the pressure cooker until the unit has cooled and all internal pressure has been released. If the handles are difficult to push apart, this indicates that the cooker is still pressurized – do not force open. Any pressure in the cooker can be hazardous. Please see “Cooking Preparation”. COOKING PREPERATION 1. 2. 3. 4. Open the cover correctly. Hold the cover handle and rotate counter-clockwise 30 degrees until the down arrow is aligned with the marking “Open”, then lift the cover Check whether parts on the cover are mounted properly. Check the float valve and exhaust valve for obstruction, and confirm if gasket and anti-block shield are installed properly. Remove the stainless steel inner pot then put food and water in the inner pot. Total amount of food and water shall not exceed the MAX level of the inner pot Put the inner pot in the unit. Before that be sure to remove debris and water from the exterior of the inner pot and inside of the housing; After putting in, rotate the inner pot slightly left to right to ensure a good contact between the inner pot and heating plate www.fairwindglobal.com 6 5. 6. Close the cover completely. Before closing, check whether the gasket has been put in the steel rim inside the cover. Hold the cover handle and rotate clockwise approximately 30 degrees until the down arrow is aligned with the marking “closed”. Position the exhaust valve properly. While in operation, align the small handle of the exhaust valve with the sealing small icon, indicating that the unit is airtight; When manual exhausting is needed, align the small handle of the exhaust valve with the exhaust small icon, indicating that the pressure cooker is in exhausted condition; Move the sealing zone and inspect whether the float valve has fallen (the float vale falls before heating). Function Selection 1. 2. 3. 4. 5. Finish cooking preparation according to page 6 Switch on. The nixie tube flashes and displays a red horizontal line “On”, indicating that the electric pressure cooker is operational. Select required function level. Once a function key is pressed, the corresponding indicator will illuminate red. The rice and slow cook function are only applicable to products with function level cooking, time varies with different function levels. The bigger the amount of food, the longer the cooking time. Press a function key and 10 seconds later the electric pressure cooker will perform the corresponding cooking function. Within 10 seconds you can reselect preset time and function level and confirm that the unit will start work in 10 seconds after the selection. The red horizontal line “On” should be bright, indicating that the unit is operational. During operation, you can cancel current function and return to standby by pressing the “Keep Warm Cancel” key. After cooking, enter the keep-warm state automatically. After cooking, a corresponding function indicator goes out, the warm indicator illuminates, the display screen shows “Hot”, and gives out the prompt sound (10 beeps) with the unit going into a warm state. In standby mode, press the “Keep Warm Cancel” key. The warm indicator illuminates and gives out the prompt sound (1 beep), indicating that the unit is in a warm state Safe Cover Opening 1. Disconnect the power or remove the power plug from the socket 2. Exhaust method Quick opening method - Slide the exhaust valve to the exhausted position until the valve falls (no fluids). Put a wet towel on the cover to quicken cooling until valve falls (no fluids) General opening method - Have the pressure cooker to cool naturally, until the float valve falls 3. Open the cover. Hold the cover handle firmly, turn the cover clockwise to the spacing edge, and pull up the cover. Do not open the cover until pressure inside the unit is release adequately. Never pull out the exhaust valve when it is exhausting. For fluids (ex. porridge) do not slide the exhaust valve when cooking is just finished, otherwise food will eject from the exhaust valve. Be sure to disconnect the power cord and have the unit naturally cool down or put a wet towel around the cover to speed up the cooling process and until the float falls. Then open cover. When large quantities of food is cooked, do not exhaust immediately after cooking. It is recommended to open the cover and have the food sit on keep-warm mode. www.fairwindglobal.com 7 Texture Selection 1. Finish cooking preparation according to page 6 2. Select a corresponding function. When any function key is pressed after cooking preparation, a corresponding function indicator illuminates, and the pressure cooker will perform the cooking procedure of the corresponding function level. Texture default is “standard” level. Once a function is selected, you can also select another function within 10 seconds. The unit will perform the cooking procedure of the selected function. If selection of another function is not possible after the unit becomes operational, you can cancel the operation by pressing the “Keep Warm Cancel” key. 3. Select texture by pressing “Texture” key. After the “texture” key is pressed, the screen displays Fragrant, Standard or Full cyclically. When one texture is selected, corresponding text appears on the screen. (ex. “Meat/Chicken” etc. have Texture Function) 4. After cooking, the unit will go into keep-warm state automatically. Timer Function 1. Finish cooking preparation according to Page 6 2. Select a corresponding function level. When any function key is pressed after preparation, a corresponding function indicator illuminates; you also can select another function within 10 seconds ( to cancel operation, press “Keep Warm Cancel” key) 3. Press “Timer” key to Set end time of cooking. This product is equipped with 24 hour default function, it can be used as an operation as follows. Within the first 10 seconds after function selection, press “timer” key to set cooking time. First the key is pressed; the screen displays “Timer End Time 2.0”. To press the “+” or “-“ key to adjust the appointed time. Timer shall not be more than 24h, if so, it will return to “2”. After completion of setting, the time displayed on the screen is the set time on the timer for the unit. (to cancel operation, press the “Keep Warm Cancel” key) 4. After cooking, the unit enters the warm state automatically. After preset time elapses, the warm indicator illuminates and the unit will enter warm-keeping state. Long time warm-keeping is not recommended. Cooking Example: Porridge 1. Complete cooking preparation according to page 6. See rice-water contrast table (page 9) for making porridge with the cooker. The proportion of porridge to water can be adjusted to personal taste. 2. After power-on, press the “Porridge” function key. Once pressed the porridge indicator should illuminate, while others remain dim. Press the “Timer” key within 10s after pressing the “Porridge” functional key, and adjust preset cooking time. 3. Press the “Timer” key. Press and hold the “Timer” key successively until the figure “10.5” appears on the display screen, indicating that the unit will end the current operation in 10.5 hours. Within 10 seconds after selection, the unit will confirm the selection (Please press www.fairwindglobal.com 8 “Keep Warm Cancel” to cancel operation. 4. The time required for making porridge is about 45 minutes. The cooking time may vary with voltage, rice amount, water amount and rice quality. After cooking, the corresponding function indication goes out, and the warm indicator (yellow) illuminates, and gives out a prompt sound (10 beeps). This means the unit is now going into warm mode. 5. Open the cover according to “Safe Cover Opening” on Page 7. If the float valve has fallen, you can simply open the cover to serve yourself. If the float valve has not fallen, put a wet towel onto the cover to quicken the cooling and open the cover after the float valve drops. Long time warm-keeping is not recommended. Rice amount (Measuring Cup) Water amount (Scale) Rice-water amount Little 0.5 2-3 Moderate 1 4-5 High 1.5 7 -8 Keep Warm Function After cooking, the unit goes into warm state automatically; in warm state the warm indicator is bright, and “hot” is shown on the display screen You can also in standby perform the warm function by pressing the “Keep/Warm/Cancel” key. The keep warm temperature is 140°F - 180°F. Optimal warm-keep is less than 8 hours. CARE & CLEANING 1. After each use, give timely cleaning of the product 2. Always disconnect the unit, turn of control to “off” then remove plug from wall outlet. Carry out cleaning and maintenance only after unit cools down completely. 3. Always unplug from outlet when not in use, before removing, and cleaning parts. Allow unit to cool before putting on, taking off, and cleaning parts. 4. Take out the cover and inner pot, wash them with detergent, rinse with fresh water and then wipe them dry with a safe cloth. 5. Using clear water, clean the cover, including the gasket, exhaust valve anti-block shield, exhaust valve core and float valve and wipe it clean with a rag. 6. Clean the cooker body with a rag. Do not immerse the cooker in water or wash with splashing www.fairwindglobal.com 9 MAINTENANCE Regular care and maintenance is essential in ensuring this product is safe for use. Wire diagram Maintenance Solutions Problem Solution Power cord or plug suffer from expansion, deformation, discoloration or damages etc. A portion of the power cord and the plug are hotter than usual. Unit heats abnormally, emitting a burning smell. When power is on, there is unusual sound or shock. There is dirt or dust in the plug socket Stop use immediately and contact the manufacturer. Remove dust or dirt with a dry brush www.fairwindglobal.com 10 TROUBLESHOOTING Before asking for a technician or sending your machine in for repair, please check the troubleshooting list below. Do not attempt to repair the machine yourself. Problem Difficult to close cover Possible Reason Gasket not positioned well Push rod jammed by float valve Float valve fails to fall after steam release Pressure exist inside cooker Leakage from cover No gasket Food leavings attached to gasket Gasket worn Cover not firmly closed Leakage from flat valve Food leavings attached to float valve gasket ring Float valve gasket ring worn Float valve unable to rise Excessively little food and water in pot Little leakage from cover or exhaust valve Discharge from exhaust Exhaust valve not in seated position valve does not stop Pressure control fails Difficult to open cover Lamp not bring after power Bad contact with socket on Solution Locate the gasket well Push the rode lightly with hand Press the float valve light Open the cover after the pressure lowers Place gasket as required Replace gasket ring Clean gasket ring Close the cover Clean the float valve gasket Replace the float valve gasket Put food and water according to the rule Send it to the service agency for inspection Slide the exhaust valve to the sealing position Send it to the service agency for maintenance Please Inspect socket All laps flash blue: Sensor failure Sensor failure Temperature too high because there is no water inside inner pot Temperature is too high because inner pot is not placed. Rice half cooked or too hard Too little water added Cover closed prematurely C1 appears on nixie blue C2 appears on nixie blue C5 appears on nixie blue C6 appears on nixie blue Rice too soft Too much water added Send it to service Send it to service Add water as required Put the inner pot properly Add more Water After time is up, release steam and open cover Reduce water level www.fairwindglobal.com 11 LIMITED MANUFACTURER’S WARRANTY This appliance is covered by a limited manufacturer’s warranty. For one year from the original date of purchase, the manufacturer will repair or replace any parts of this appliance that prove to be defective in materials and workmanship, provided the appliance has been used under normal operating conditions as intended by the manufacturer. Warranty Terms: During the first year, any components of this appliance found to be defective due to materials or workmanship will be repaired or replaced, at the manufacturer’s discretion, at no charge to the original purchaser. The purchaser will be responsible for any removal or transportation costs. Warranty Exclusions: The warranty will not apply if damage is caused by any of the following: Power failure Damage in transit or when moving the appliance Improper power supply such as low voltage, defective household wiring or inadequate fuses Accident, alteration, misuse or abuse of the appliance such as using non-approved accessories, inadequate air circulation in the room or abnormal operating conditions (extreme temperatures) Use in commercial or industrial applications Fire, water damage, theft, war, riot, hostility or acts of God such as hurricanes, floods, etc. Use of force or damage caused by external influences Partially or completely dismantled appliances Obtaining Service: When making a warranty claim, please have the original bill of purchase with purchase date available. Once confirmed that your appliance is eligible for warranty service, all repairs will be performed by a FairWind authorized repair facility. The purchaser will be responsible for any removal or transportation costs. Replacement parts and/or units will be new, re-manufactured or refurbished and is subject to the manufacturer’s discretion. For technical support and warranty service, please email [email protected]. www.fairwindglobal.com 12