1
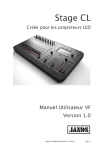
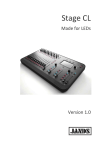
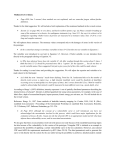
3D-GIS in the Cloud USER MANUAL August, 2014 3D GIS in the Cloud User Manual August, 2014 Table of Contents 1. 2. Quick Reference: Navigating and Exploring in the 3D GIS in the Cloud ...................... 2 1.1 Using the Mouse .....................................................................................................2 1.2 Using the Navigation Control ...................................................................................3 1.3 3D GIS Toolbars .......................................................................................................4 1.3.1 Using the Navigation Buttons ...................................................................................4 1.3.2 Using the Query & Analysis Buttons .........................................................................4 Working with 3D GIS in the Cloud ............................................................................................ 5 2.1 Getting Started .......................................................................................................5 2.1.1 3D GIS in the Cloud Interface – Explorer User..........................................................5 2.1.2 The Layer Legend ......................................................................................................6 2.2 Exploring and Navigating in a 3D GIS Scene .............................................................8 2.2.1 Navigation Using Toolbar .........................................................................................8 2.2.2 Navigation Using a Mouse & Keyboard ....................................................................8 2.2.3 Navigation Using the Navigation Control .................................................................9 2.2.4 Navigation Using Bookmarks ................................................................................. 10 2.3 Viewing, Querying and Analyzing the 3D Data ....................................................... 11 2.3.1 Identify................................................................................................................... 11 2.3.2 3D Buffer................................................................................................................ 12 2.3.3 3D Distance ............................................................................................................ 13 2.4 Layer Display’s Visibility ........................................................................................ 15 2.4.1 Illumination and Shading ....................................................................................... 15 2.4.2 Layer Opacity ......................................................................................................... 16 2.4.3 Terrain’s Underground Opacity ............................................................................. 17 www.sivandesign.com Page 1 of 17 www.3dgisonline.com 1. Quick Reference: Navigating and Exploring in the 3D GIS in the Cloud 1.1 Using the Mouse Motion Mouse Move Right / Left Left button & drag Right / Left Move Up / Down Left button & drag Up / Down Zoom In / Out Roll wheel Forward / Backward + - Gentle Zoom In / Out + - SHIFT & Right button & drag Down / Up Tilt the scene Up / Down ᐊ 1) Right button & drag Up / Down 2) SHIFT & left button & drag Up / Down 1) Right button & drag Right / Left 2) SHIFT & left button & drag Right / Left Rotate the scene Tilt the viewpoint Up / Down ᐊ Rotate the viewpoint CTRL & Left button & drag Up / Down CTRL & Left button & drag Right / Left Move the view Up / Down CTRL & Right button & drag Up / Down Zoom on target Double Left click Zoom from target Double Right click Center on target Single Right click www.sivandesign.com Page 2 of 17 www.3dgisonline.com 1.2 Using the Navigation Control Outer ring & North Button (1) 1 2 3 Rotate the view by dragging the North button on the outer ring clockwise or counterclockwise Outer circle (2): Look around from a single vantage point as turning your head. Click an arrow to look in that direction Inner circle (3): Move position from one place to another. Click an arrow to move at that direction (same as left button & drag with the mouse) 4 Zoom slider (4): Zoom in or out (+ to zoom in, - to zoom out), when dragging the slider or clicking the zoom in / out icons on the slider edges. Zoom in / out is faster when dragging the slider far from its center. www.sivandesign.com Page 3 of 17 www.3dgisonline.com 1.3 3D GIS Toolbars 1.3.1 Using the Navigation Buttons Navigation buttons Zoom In: Click the button to zoom in and center on target (Same as double left click) Zoom Out: click the button zoom out and center on target (Same as double right click) Zoom Extent: click to zoom the entire area covered by the 3D map Bookmarks: Click to create spatial bookmarks in the 3D scene Navigate: click and navigate using the mouse 1.3.2 Using the Query & Analysis Buttons Query & Analysis buttons Identify: Click on a feature to get its attributes 3D Buffer: Click on a feature to create 3D buffer shape at a specified distance around the feature and check for collided objects with this buffer Measure 3D Distance: Click to measure 3D distance between two points in the 3D map between two points in the 3D map Illumination and Shading: Click to open the view illumination and shading effect based on light source position in the 3D scene www.sivandesign.com Page 4 of 17 www.3dgisonline.com 2. Working with 3D GIS in the Cloud 2.1 Getting Started 2.1.1 3D GIS in the Cloud Interface – Explorer User Access through a link to a published project (created in 3D GIS Online): 1. Press the link for 3D GIS in the Cloud Explorer project 2. If needed, enter User name and Password in the web page that opens and press Login: Access through 3D GIS server License: Open a web browser and go to the server URL in order to open 3D GIS in the Cloud. Enter you user name and Password in the landing page that is opened (see above) and click login: The 3D GIS in the Cloud interface appears, while the particular 3D GIS in the Cloud project opens 3D GIS in the Cloud Project is a container of 3D data and maps created from 3D GIS in the Cloud application. It stores not only the 3D scene but also stores connections to files and databases, layers, the layer’s symbology, toolbars, menus and context menus and various windows and dialogs. The image below displays the 3D GIS in the Cloud interface www.sivandesign.com Page 5 of 17 www.3dgisonline.com 3D GIS toolbar Show/hide arrow Navigation control Left panel Opacity tool Status bar 2.1.2 The Layer Legend 3D GIS in the Cloud’s Layer Legend is a container for the project’s layers. It contains all of the layers that are included in a project. Each layer has an icon based on its type. www.sivandesign.com Page 6 of 17 www.3dgisonline.com Within the Layer Legend you can do the following: Turn On / Off layers You can turn on / off layers in the 3D scene checking on/off the layer names in the Layer Legend View Layer Properties In order to view layer’s properties, hover with the mouse on the layer name in the Layer Legend. A popped up window displaying the layers properties is opened. Layer properties contain: The layer source name Layer Geometry (for vector layer only: Point, Polyline, Polygon and Multipatch) Layer data type (Manhole, Pipe, Building, Point, Polyline, Polygon, Elevation Map and 3D models) Data connection of the layer Status of Build (Build, In Progress, Not Build, Failed) www.sivandesign.com Page 7 of 17 www.3dgisonline.com 2.2 Exploring and Navigating in a 3D GIS Scene 2.2.1 Navigation Using Toolbar To Zoom In use Press the Zoom In button the Zoom window and then the location you want to zoom to. You can also use button by clicking it and then click and drag a box around the area you want to zoom to. To Zoom Out Press the Zoom Out button To Zoom Extent press the Zoom Extent 2.2.2 and then the location you want to zoom to button. To pan the view press the Navigation button and then position the mouse cursor on the viewer, press the LEFT mouse button, drag to the direction you want and release the mouse. Navigation Using a Mouse & Keyboard To get started navigating with your mouse, position the cursor inside the 3D view area. To Zoom In using mouse & Keyboard: Use the mouse scroll wheel to zoom in by scrolling away from you (forward motion) Press double left click anywhere in the 3D viewer to zoom in to that point For gentle Zoom In: press RIGHT mouse and drag down To Zoom Out using mouse & Keyboard: Use the mouse scroll wheel to zoom out by scrolling towards you Press double right click anywhere in the 3D viewer to out from that point For gentle Zoom Out: press RIGHT mouse and drag up To Pan using mouse & Keyboard: To Pan right / left: position the mouse cursor on the viewer, press LEFT mouse, drag right / left and release the mouse button To pan Up / Down: position the mouse cursor on the viewer, press LEFT mouse, drag Up / Down and release the mouse button To Tilt & Rotate using mouse & Keyboard: Tilt the view by pressing the SHIFT key and drag the view Up / Down Rotate the view by pressing the SHIFT key and drag the view Left / Right Tilt the view point by pressing the CTRL key and drag Up / Down (like 'Yes' head movement) Rotate the view point by pressing the CTRL key and drag Left / Right (like 'No' head movement) To Center on target click single mouse right click on the target www.sivandesign.com Page 8 of 17 www.3dgisonline.com 2.2.3 Navigation Using the Navigation Control The Navigation Control provides various ways to move around the map and control your viewing position. After opening a project, in order to view and use the Navigation Control, move the cursor over left corner of the 3D scene, above the half transparent Navigation controls. When moving the mouse above, it becomes non-transparent. If the navigation control does not appear when you move the cursor over the left corner of the 3D scene, click View Nav Control and try again. To Hide / Show the Navigation control, click View Nav Control North button Outer ring Outer circle Inner circle Zoom In button Slider Zoom Out button To Tilt & Rotate using the Navigation Control: Tilt the view point as turning your head by clicking the outer ring's top / bottom arrows Rotate the view point as turning your head by clicking the outer ring's right / left arrows Rotate the scene by dragging the North button clockwise or counterclockwise on the outer ring To Pan using the Navigation Control: Click one of the arrows in the inner circle to move at that direction To Zoom In / Out using the Navigation Control: In order to continuously Zoom In / Out, drag the slider towards the upper Zoom In / lower Zoom Out icon, respectively. Zoom in / out is faster when dragging the slider far from its center In order to discrete Zoom In / Out, click the Zoom In / Out icons in the Navigation Control's slider Note: When rotating the scene and changing the azimuth of the view, the North button in the outer ring is updated accordingly www.sivandesign.com Page 9 of 17 www.3dgisonline.com 2.2.4 Navigation Using Bookmarks Bookmarks are predefined spatial locations in the 3D scene that you can reference any time while navigating in the project. In order to navigate to a predefined Bookmark, click the Bookmarks icon in the toolbar. The Bookmark window is opened in the left panel. Click once on a Bookmarks name in order to navigate to its predefined spatial location. When clicking, the Bookmark's name highlights. You can keep clicking Bookmarks names in order to navigate between the predefined Bookmarks www.sivandesign.com Page 10 of 17 www.3dgisonline.com 2.3 2.3.1 Viewing, Querying and Analyzing the 3D Data Identify When you want to view attribute values for a feature in the 3D scene, use the Identify icon that can be accessed from the 3D GIS toolbar. Click on the feature you want to identify. The identified feature is selected and highlighted in yellow. You can see the feature attributes, connection and layer name in the Feature Properties window at the left panel. www.sivandesign.com Page 11 of 17 www.3dgisonline.com 2.3.2 3D Buffer 3D Buffer tool enables you to create a volumetric object around a pipe while detecting the collided feature. In order to create 3D Buffer, follow the steps below: Click on the 3D Buffer icon in the toolbar, or select Analyze 3D Buffer in the menu bar. The 3D Buffer window is opened in the left panel. 1. 2. Select the pipe you want to create a 3D Buffer around. The selected pipe is highlighted in red. 3. Enter the distance you want the 3D buffer to be created from the pipe (a safety distance) and click Create 3D Buffer button The volumetric object is created while its radius is the distance you set. The collided features are highlighted in yellow. www.sivandesign.com Page 12 of 17 www.3dgisonline.com You can create a report that contains the collided features and the penetration distance of each feature in the 3D Buffer. You can also export the report to Excel by clicking the Excel button in the bottom left corner. 2.3.3 3D Distance The 3D distance tool enables you to measure a 3D distance in the 3D scene. Click the 3D Distance icon in the toolbar. Note that the mouse cursor is changed and the 3D Distance window is opened in the left panel. Click two points in which you want to measure a 3D distance between them and release the mouse. A yellow line is drawn between the two points with a dynamic text notifies the measured distance www.sivandesign.com Page 13 of 17 www.3dgisonline.com The 3D Distance window in the left panel is updated according the measure and displays the length, the differences in X, Y and Z (elevation) difference between the two points and the slope of the measures line. www.sivandesign.com Page 14 of 17 www.3dgisonline.com 2.4 2.4.1 Layer Display’s Visibility Illumination and Shading The Illumination tool enables you to view the effect of an illuminated light source such as the sun on the 3D scene, based on its location, i.e. Azimuth and Altitude (degrees). Click the Illumination icon in the toolbar to be in Illumination mode. The Illumination control is opened in the upper right of the screen: Change Azimuth and Altitude of the light source by dragging its slider. To add Shading effect on the 3D scene, check the Shading effect check box. See examples for Illumination and Shading effects below. Azimuth = 150 degrees, Altitude = 80 degrees (the default); Shading effect is off www.sivandesign.com Page 15 of 17 www.3dgisonline.com Azimuth = 330 degrees, Altitude = 30 degrees; Shading effect is on Note: when you hove with the mouse on the Illumination control it is shown with zero transparency, otherwise it is half transparent. In order to leave Illumination mode and cancel Illumination and Shading effect, click the ‘X’ dialog button in the top right of the Illumination controller or press the Illumination icon once again. 2.4.2 Layer Opacity Layer Opacity (or transparency) can be used for several reasons and symbolization considerations in the 3D scene. It is especially useful when drawing a transparent layer on top of other layer. It allows you to see the features around and below while still viewing all layers. In order to set Layer Opacity follow the steps below: 1. Select the layer you want set opacity in the Layer Legend. Once the layer is selected, the Opacity button in the bottom of the left panel becomes enabled (see below). Disabled Opacity Enabled Opacity 2. Press the Opacity button. The Opacity Slider I displayed: 3. Drag the slider to change Opacity. Layer opacity is dynamically updated in the scene. Hover with the mouse out of the slider extent to close it. The Opacity values are given in percentages in the bottom of the slider: 100% Opacity (the default) means no transparency 0% Opacity ,means full transparency www.sivandesign.com Page 16 of 17 www.3dgisonline.com Parcel layer with 100% Opacity 2.4.3 Parcel layer with 35% Opacity Terrain’s Underground Opacity When you are navigating underground, the Terrain’s automatically gets 0% opacity, meaning it is full transparent. When you are navigating above ground, Terrain’s opacity gets the default opacity (100%) or the value you have defined in the Opacity slider (see 2.4.1 above). If you don’t want to use Terrain 0% opacity when navigating underground, use the Opacity slider (see ‘Layer Opacity’ above) when you are navigating underground and set an opacity value for the terrain (see below). 1 2 3 1. Terrain layer with 100% Opacity above ground 2. Terrain layer with 0% underground 3. Terrain layer with partial Opacity underground www.sivandesign.com Page 17 of 17 www.3dgisonline.com