1
(... CONTINUED FROM OTHER SIDE)
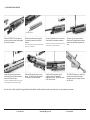
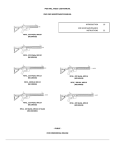
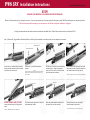
Opening Towards Front
Slide the PWS SRX Yoke into place by
moving over the barrel and sliding toward
the rear of the weapon.
Replace the bottom rail ensuring that
the opening is toward the front of the
weapon.
The barrel extension screw hole may need cleaned of excess
thread lock prior to reassembly.
Tighten the (4) rear barrel extension
screws and (2) forward barrel extension
screws to 62 in/lbs of torque.
Slide the SRX onto the barrel yoke as
shown. The QD Sling swivel points will
be toward the rear of the weapon.
There will be an audible/tactile signature from torque wrench
when barrel support screws reach proper torque setting.
Use the (2) supplied screws to secure rail
to the barrel yoke and barrel extension.
PWS does not recommend re-using the original screws. Save
and store them with your original barrel yoke.
Install the SRX by tightening the (4)
supplied screws in an alternating
sequence until snug. Tighten the screws
to 62 in/lbs of torque.
Tighten the (4) rear barrel extension
screws and (2) forward barrel extension
screws in an alternating sequence until
snug.
The PWS SRX allows you to install your
favorite rail covers and accessories
across the span of the original rails and
the SRX rails.
Once the rail is installed, reinstall the Trigger Module, Buttstock Module, and Moving Parts Assembly in accordance with your host weapon’s user manual.
t: (208) 344-5217
www.PrimaryWeapons.com
f: (208) 344-5395