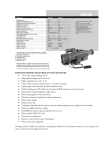
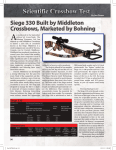
1
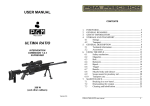
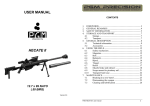
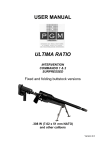
USER MANUAL CONTENTS 1. 2. 3. 4. FOREWORD............................................................................... 3 GENERAL REMARKS .............................................................. 5 SAFETY INFORMATION ......................................................... 6 STORAGE AND TRANSPORT................................................. 8 4.1 Storage ............................................................................. 8 4.2 Transport .......................................................................... 8 5. GENERAL DESCRIPTION ....................................................... 9 5.1 Technical information .................................................... 10 5.2 Accessories .................................................................... 12 6. USING THE RIFLE .................................................................. 13 6.1 Safety mechanism .......................................................... 13 6.2 Bolt................................................................................. 14 6.3 Buttstock ........................................................................ 17 6.4 Bipod .............................................................................. 19 6.5 Trigger ........................................................................... 20 6.6 Barrels ............................................................................ 21 6.7 Muzzle brake and silencer ............................................. 23 6.8 Scope mount for picatinny rail....................................... 25 6.9 Transport case ................................................................ 26 7. MAINTENANCE ...................................................................... 27 7.1 Breaking in a new barrel ................................................ 27 7.2 Disassembling the weapon............................................. 27 7.3 Cleaning and lubrification ............................................. 31 LUDIS .308 W (and other calibers) Version 1.0 PGM LUDIS user manual 2 PGM PRECISION BP 29 74334 POISY CEDEX FRANCE 1. FOREWORD PGM PRECISION thanks you for having chosen the model LUDIS. Greatest care was taken in the development of the rifle components and their assembly. This rifle has been tested by the National Proof House for Firearms and Ammunitions of Saint-Etienne, then inspected and tested by us in accordance to strict procedures. We hope that it will bring you complete satisfaction. Please read this manual carefully and completely before using your PGM LUDIS. Do not hesitate to read it regularly. Phone : +33 (0) 4 50 46 37 27 Fax : +33 (0) 4 50 46 36 49 mail : [email protected] http://www.pgmprecision.com The information provided in this handbook, the photos and the images are not contractual. PGM PRECISION reserves itself the right to change specifications without notice. To obtain further information, please contact your retailer or directly PGM PRECISION. PGM LUDIS user manual 3 PGM LUDIS user manual 4 2. GENERAL REMARKS 3. SAFETY INFORMATION Please respect the national and local laws which regulate possession, bearing, transportation and the use of firearms. The weapon must be handled in compliance with the safety requirements in force. Do not use this weapon under influence of alcohol or drugs. Always check first that the chamber is completely empty. Always handle the gun as if it was loaded. Keep the safety engaged until just before firing. Always check the barrel before firing to make sure it is free from obstruction. Never point any firearm at yourself or at any living being. Always shoot in direction of the target. Ensure that nobody is behind the target or in the line of fire. If there are people nearby, ensure they stay behind you. Never allow your rifle to be handled by a person who is not educated in firearm safety and safe weapon handling. Never leave the weapon unattended. Wear shooting glasses to protect your eyes from flying particles. Wear ear protectors. Unprotected, repeated exposure to gunfire can cause permanent hearing damage. Never use “accelerator” ammunition with a muzzle brake or sound suppressor. This carries a risk of serious injury. If you detect a change in sound or light recoil when a round is fired, do not load another round into the chamber. Fully unload the rifle and check the barrel for obstruction. If your weapon fails to fire, keep the muzzle pointed in a safe direction. Hold this position for a minimum of 30 seconds. Carefully open the bolt in order to eject the round. The round should be disposed of in a way that it cannot cause harm. Use only high quality manufactured ammunition. The calibre is engraved on the bolt receiver or on the barrel. A rifle, as any weapon, can be dangerous. PGM PRECISION and its retailers disclaim any responsibility for the consequences resulting in whole or partly from : - Criminal intent or through negligence, - Careless handling, - Use of defective, incorrect, damaged, unsafe ammunition, - Inadequate care of the rifle, - Resale in contradiction to the law. Please retain this manual. If you sell your weapon, please convey this manual to the new owner. PGM LUDIS user manual 5 PGM LUDIS user manual 6 The use of reloaded or not standard ammunition immediately voids the guarantee. Such use can potentially cause significant damage to the rifle and seriously injure the user or bystanders. Only use ammunitions manufactured according to CIP norms. You are not prevented from reloading your own ammunition. However, ensure you follow the reloading recommendations in the reloading handbook provided by the gunpowder manufacturer for the type of gunpowder and bullet you use. 4. STORAGE AND TRANSPORT 4.1 Storage Remove the bolt and ensure that the chamber is empty. Put the weapon in its case or in a carrying bag. Store it in a strong cabinet. Ensure that the rifle and its components are inaccessible to children and unauthorized people. Comply with current laws concerning the storage of firearms. 4.2 Transport Always transport the weapon unloaded. Put it in a carrying case or in a soft bag. Ammunitions and bolt should be separated from the weapon. Comply with current laws concerning the transport of firearms. PGM LUDIS user manual 7 PGM LUDIS user manual 8 5. GENERAL DESCRIPTION 5.1 Technical information LUDIS is a unique accurate rifle system for discriminating shooters. This single-shot manually operated bolt action rifle is composed of 3 main elements : - A rigid aircraft alloy frame, - A receiver with trigger assembly and the bolt, - A match grade fully floated barrel, All the barrels can be changed instantly, without adjustment. LUDIS range includes 5 barrels models : - Commando 1 Commando 2 Intervention Custom Supressed (for subsonic ammunition) - PGM LUDIS user manual 9 Heavy match grade fully-floated barrel griped into the receiver, Barrel quick change device. Can be changed in approximately 30 seconds with 5 mm hexagon spanner without further adjustment Thermal dissipation accelerated by : - cooler (Intervention barrel) - Fluted tapered profile (Commando 1 & 2 barrels) Muzzle brake (except on suppressed barrel) Rigid aircraft grade alloy girder-chassis Aircraft grade alloy bolt receiver Black matt finish High-strength steel bolt with 3 forward located lugs Ultra-fast travel firing pin Two-stage trigger, pull weight adjustable by gunsmith Trigger safety Forward and rearward-folding and detachable bipod with adjustable tilting brake Sling attachment points Ambidextrous pistol handgrip Length adjustable buttstock Height adjustable cheek piece Height adjustable recoil pad PGM LUDIS user manual 10 Supressed commando 2 Commando 1 Intervention Caliber Barrel length (mm) Number of grooves Twist (‘’) Range (m) Trigger pull weight (kg) Length (retracted buttstock) (mm) Length (extended buttstock) (mm) Height ground-barrel min/max (mm) Silencer length (mm) Bipod weight (kg) Silencer weight (kg) Weight (empty) (kg) (1) Barrel weight (kg) Pelicase 1750 dimension (mm) Pelicase 1750 weight (kg) 5.2 - 308 W (7.62x51 OTAN) 600 550 470 410 4 12 8 > 1000 > 800 < 200 0.6 – 1.5 1129 1169 1068 1108 988 1028 1183 1223 188 / 252 240 7.45 2.96 0.46 0.75 6.21 6.07 1.80 1.58 1286 x 343 x 127 10.3 x - Accessories Maintenance kit including : - Extractor replacement kit - Ejector replacement kit - Firing pin replacement kit - Cleaning kit - Standard tool kit Quick mount suppressor Aiming sights Tactical sling Tactical dragbag / mat Carrying plastic hard cases with custom foam Picatinny rails Scope mount with 30 and 34 mm rings Bore guide Brushes Cleaning rods Karl Nill ergonomic wooden handgrip … x 7.01 2.52 All specifications subject to changes without notice Specifications for .308 W calibre (1) Complete weapon with bipod and picatinny rail, without scope PGM LUDIS user manual 11 PGM LUDIS user manual 12 6.2 Bolt 6. USING THE RIFLE 6.1 - 6.2.1 Cocking / uncocking the bolt Bolt cocking tool is included into the buttstock. Safety mechanism Safety position : Safety is ON, when the safety lever is in its downward position. Cocking the bolt : Allows bolt introduction into the gun. - - Firing position : Safety is OFF, when the safety lever is pushed to its upward position. Place the rear of the bolt into the tool. Turn the bolt ¼ in the clockwise direction. Uncocking the bolt : Prevents firing pin spring wearing. - Place the rear of the bolt into the tool. Turn the bolt ¼ in the counter clockwise direction. Caution : OFF position allows the weapon to be fired. Bolt can be handled freely and percussion is possible. ON position blocks the firing pin and locks the bolt in the closed position. The safety lever can be set at the ON position with any bolt position. Remove your finger from the trigger while you are handling the safety. The safety lever should be set to either in the ON or OFF position but never left in between the two positions. PGM LUDIS user manual 13 PGM LUDIS user manual 14 6.2.2 Bolt introduction Ensure that the rifle is completely empty. Ensure the bolt is cocked. - 6.2.4 Bolt assembling and disassembling - Disassembling : - Place the rear of the bolt into the tool. - Turn the bolt ½ in the clockwise direction until disassembling. Remove the cheek piece. Push the bolt catch and hold it in that position. Introduce the bolt into the receiver. Push the bolt frontwards. Place the cheek piece. - 6.2.3 - Assembling : - Place the rear of the bolt into the tool. - Align the firing pin extension key between the bolt lever and the cam. - Push the firing pin assembly forcefully until it stops. - Then turn ¼ in the clockwise direction. - Cock the bolt if necessary. Bolt removal Remove the cheek piece. Push the bolt catch and hold it in that position. Introduce the bolt into the receiver. Remove the bolt. Place the cheek piece. PGM LUDIS user manual 15 PGM LUDIS user manual 16 6.3 6.3.3 - Buttstock The buttstock, the cheek piece and the recoil pad are fully adjustable for increased comfort. - 6.3.1 Hexagon spanner integrated into the cheek piece 5 mm hexagon spanner is integrated into the cheek piece to adjust the stock and to remove the barrel. 6.3.4 - 6.3.2 - - Removing and adjusting the cheek piece Length adjustment Remove the cheek piece. Loosen tightly the screw using 5 mm hexagon spanner. Change the length as desired. Tighten the screw. Place the cheek piece. Recoil pad adjustment Remove the cheek piece. Loosen tightly the screw using 5 mm hexagon spanner. Change the height as desired. Tighten the screw. Place the cheek piece. Loosen the knurled knob. Change the height as desired. Tighten the knurled knob. PGM LUDIS user manual 17 PGM LUDIS user manual 18 6.4 Bipod Bipod is forward and rearward-folding, detachable with height and axial adjustable brake. 6.4.3 Height adjustment - Length of the legs can be changed by pressing the catch and by pulling down or pressing the leg as far as desired. 6.4.1 Setting and removing the bipod - To set the bipod on the rifle, place the conic part into the female part in the front of the frame, pushing the button. - To remove the bipod, push the button. 6.4.4 6.4.2 Rotating the bipod legs - Pull the legs one by one. - Turn the legs frontwards or rearwards as desired. Height and axial brake adjustment Remove the bipod. Tighten or loosen the screw to increase or decrease the force. 6.5 Trigger Travel and weight are adjustable. Trigger is only adjustable by PGM or a qualified gunsmith. PGM LUDIS user manual 19 PGM LUDIS user manual 20 6.6 6.6.2 Barrel reinstallation Ensure the contact surfaces are perfectly clean. Barrels Before any intervention, ensure that the weapon is fully unloaded. 6.6.1 Barrel removal - Remove the cheek piece. - Remove the bolt. - Using 5 mm hexagonal spanner, loosen 1 turn the 4 hexagon socket head cap screws on the right of the weapon. Don’t loosen more than necessary. - Tighten the headless screw on the right of the weapon (maximum 1 turn) with same hexagon spanner. - Carefully remove the barrel out of the receiver. PGM LUDIS user manual 21 - Tighten the headless screw (1 turn). Push the barrel into the receiver. Introduce the bolt and close it. Tighten the 4 hexagon socket head cap screws, starting from the rear and apply a torque of 10 N.m. Loosen the headless screw keeping a contact with the spring inside. PGM LUDIS user manual 22 6.7 Muzzle brake and silencer 6.7.3 Quick mount silencer installation The muzzle brake can be removed only on the custom, commando 1 and 2 barrels which have a threaded muzzle brake. In order to preserve optimal shooting comfort, avoid firing without a muzzle brake or silencer. 6.7.1 Standard muzzle brake installation - Turn the muzzle brake clockwise by hand until it stops. - Loosen it (maximum 1 turn) and make it level. - Tighten the 2 screws with 3 mm hexagon spanner. 6.7.2 Quick mount silencer muzzle brake installation - Turn the muzzle brake clockwise by hand until it stops. - Loosen it (maximum 1 turn) and make it level. - Tighten the screw with 4 mm hexagon spanner. Subsonic and supersonic ammunitions can be used. 6.7.4 Suppressed barrel - The barrel is covered by the silencer. - Barrel twist is specially designed for subsonic ammunition. Screw the knurled protection ring on the muzzle brake when silencer is not used PGM LUDIS user manual Remove the knurled protection ring. Turn the silencer clockwise by hand until it stops. 23 6.7.5 Remarks about silencers - The silencer must be tightened (by hand but strongly) against the barrel. - The chicanes and the spacers are pressed by the knurled cap. They should not move. - Don’t remove the rear part of the silencer. - For cleaning, only unscrew the front cap and remove the chicanes and the spacers. - During shooting session, ensure regularly that nothing is loosening. PGM LUDIS user manual 24 6.8 Scope mount for picatinny rail 6.9 Transport case 6.8.1 Installation Ensure the 2 jaws are free and right oriented (catch downwards). - - Put the scope mount at the desired position and push it against a sleeper. Using a 4 mm hexagon spanner, tighten the 2 screws at torque of 6 N.m). 6.8.2 Scope rings - Tighten the 8 screws at torque of 4 N.m. The transport case contains the following items : - The rifle with its scope - the bolt - 1 spare barrel - 1 suppressor - 1 cleaning rod - the maintenance kit PGM LUDIS user manual 25 PGM LUDIS user manual 26 7.2.1 Standard tool set - 1 hexagon spanner set - 1 screw driver 7. MAINTENANCE Remove the bolt and ensure the rifle is fully unloaded. 7.1 Breaking in a new barrel To obtain an optimal precision, we advise you to break in a new barrel. This is not absolutely required but highly recommended. Let the barrel cool after each series. Use weapon oil when you brush the barrel. - Clean the barrel with a cleaning wick. Fire a first round and clean the barrel with a bronze bore brush and then with a cleaning wick. Repeat the previous step 10 times. Fire 10 series of 3 rounds and after each series, clean the barrel with a bronze brush and then with a cleaning wick. Finally, fire 10 series of 5 rounds and after each series, clean the barrel with a bronze brush and then with a cleaning wick. 7.2 7.2.2 Extractor replacement Disassembly : - Using the screw driver, push the button until it stops. - Tip up the extractor inside the bolt. - Remove the extractor, the button and the spring. - Clean and lubricate the housing. Disassembling the weapon The full disassembly of the weapon must only be performed by a qualified gunsmith or directly by PGM PRECISION. Before disassembly : - Unload the weapon. - Remove the bolt. - Remove the scope. PGM LUDIS user manual Reassembly : - Place the spring, the button in the housing. - Direct the flat part of the extractor to inside. - With the circular part of the extractor, push the button until it stop and up to the “click”. - Operate the extractor and lubricate. 27 PGM LUDIS user manual 28 7.2.3 Ejector replacement Reassembly : - Place the firing pin and the spring into the bolt. - Align the groove of the bolt with the one of the plug. - Push the plug to the bolt until it stops. Disassembly : - Place 2 mm hexagon spanner into the ejector. - Push the ejector until it stops then turn ½ cw or ccw. - Release the ejector, remove it and then the spring. - Clean and lubricate the housing. Reassembly : - To reassemble follow the above steps in reverse order. - Lubricate and operate the ejector. - 7.2.4 - Firing pin replacement - Keeping pressure, turn ½ cw to align the plug groove with the vertical slope of the cam. Using 2 mm hexagon spanner, direct the firing pin hole parallel to the plug groove. Place the firing pin holder into the plug until it stops against the cam. Tighten the screw using low strength locking. Lubricate the cam and operate cocking / uncocking. Disassembly : - Using the bolt cocking tool, remove the firing pin assembly from the bolt. - Unscrew headless screw. - Remove the firing pin holder, the plug and the spring. PGM LUDIS user manual 29 PGM LUDIS user manual 30 7.3 - Caution : Always clean the barrel from the bore to the muzzle. Use a bore guide. Never use a steel brush or abrasive materials. Only use spare parts made by PGM PRECISION. - At least once a year : The general condition of your rifle should be checked by a qualified gunsmith or directly by PGM PRECISION. Cleaning and lubrification Compliance with these guidelines ensures that even after years of harsh use your rifle will remain in excellent condition and always as accurate. Use a high quality oil which cleans, protect and lubricate your rifle. Please note that your rifle needs regular maintenance by a qualified gunsmith or directly by PGM PRECISION. 7.3.1 - Cleaning and lubrication before firing Clean the barrel with a cleaning wick. Ensure that the barrel is perfectly dry. Lubricate the bolt, the ejector and the extractor. © PGM Precision 2014 7.3.2 - - Cleaning and lubrication after firing Start cleaning by complete strokes with the bronze bore brush soaked in oil. Wipe it with a cleaning wick until the last remains clean. Lubricate the barrel with a soaked cleaning wick. Clean the interior of the bolt. Lubricate the bolt. With a rag soaked in oil, wipe the exterior of the weapon and the moving parts. Lubricate the legs of the bipod. If it has been used, remove the silencer and clean the chicanes and the spacers. Do not oil them, as they are made of stainless steel. Store the weapon in a dry and temperate room. PGM LUDIS user manual 31 PGM LUDIS user manual 32