1
Fusion Scan 250™ Operating Instructions
Fusion Scan 250™ Operating Instructions
CAUTION IMPORTANT! When installing this projector, make sure
that it is mounted in a manner that prevents the audience from
looking directly into the beam, and the beam from striking the
audience.
7.
For best results use fog or special effects smoke to enhance the
beams projections. The Fusion Scan 250™ comes with a protective
transportation cover. Be sure to remove it before attempting any
operation!
Note: The remote control only operates in Stand-Alone and Master/
Slave modes. If the remote is connected in DMX mode it will not function. If the units do not receive an active DMX signal, the units will
automatically react to sound in the Master/Slave mode.
Stand Alone, Sound Active Mode:
DMX Mode:
This fixture will react with DMX operation. For best results use only
one motor function for each scene (or step), when programming
scenes into a DMX controller. This will give you faster mirror and faster gobo/color changes. For Example:
A. With the DMX controller move the mirror up then program the step.
B. Move the mirror down then program that step.
C. Change the gobo/color wheel then program that step.
D. Continue this pattern to achieve best results.
1. Operating through a DMX controller gives the user freedom to create his/her own programs tailored to their own individual needs. This function also allows you to use your fixtures as spots.
2. This operation will allow you to control each individual fixtures
traits with a standard DMX 512 controller such as the Elation® Show Designer™ or the Elation® DMX Operator.™
3. The Fusion Scan 250™ uses five DMX channels to operate; Channel 1 is Pan, channel 2 is Tilt, channel 3 is Color, channel 4 Gobos, and channel 5 controls the Green Laser.
4. To run your fixture in DMX mode, plug in the fixture via the XLR connections to any standard DMX controller. Set dipswitch #1 to the on position - Follow the set-up specifications that come with the controller.
1. To operate as a stand alone, sound active unit, set dipswitch #10 into the ‘On” position.
2. Adjust the sensitivity knob on the bottom of the unit so the unit will react to sound.
3. The Fusion Scan 250™ will now react to the bass sound of music via the internal microphone.
Master-Slave Operation (Sound Active):
This function will allow you to link units together to run a master/slave
configuration. The units will be sound activated. In Master-Slave operation one unit will act as the controlling unit and the others will react
to the controlling units programs. Any unit can act as a Master or as a
Slave.
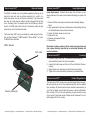
1. Daisy chain your units via the XLR connector on the bottom of the units.
2. Use standard XLR microphone cables to link your units together. Remember that the Male XLR connector is the input and the Female XLR connector is the output.
3. The first unit in the chain (master) will use the female XLR connec-
tor only - The last unit in the chain will use the male XLR connec
tor only.
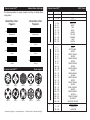
4. Please follow chart on page 13 for dipswitch settings, or to run a
synchronized light show set all the dipswitches on the slave fix-
tures to the ‘off’ position, and on the master unit set dipswitch
#10 to the “on” postion. All fixtures will now run in the same exact
pattern.
Note: Only one fixture may use the master units dipswitch settings.
5. After all the units settings have been set and are plugged in, adjust the sensitivity knob on the bottom of the master unit to ©American
DJ Supply® - www.americandj.com - Fusion Scan 250™ User Manual Page 9
make them react to sound.
You can also use the optional MINI/C Remote Control. If you want to use the optional remote control, connect the MINI/C controller to the first fixture in the line (master).
©American
DJ Supply® - www.americandj.com - Fusion Scan 250™ User Manual Page 10