1
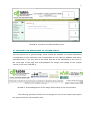
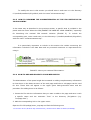
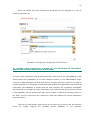
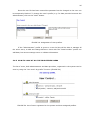
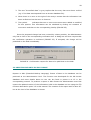
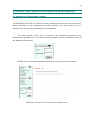
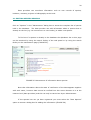
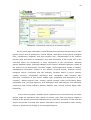
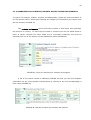
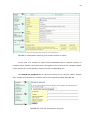
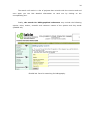
I3N DATA BASE ON INVASIVE ALIEN SPECIES WEB INTERFACE USER MANUAL Sergio M. Zalba Sílvia R. Ziller GEKKO Grupo de Estudios en Conservación y Manejo 2 I3N DATABASE ON INVASIVE ALIEN SPECIES WEB INTERFACE USER MANUAL This manual contains the information needed for administrating the web interface of the I3N database on invasive alien species. Basic instructions are provided for changing the appearance of the web site, managing the system of passwords for on-line data providers, entering, editing and removing records and other functions of the system. The installation, configuration and testing of the Internet interface at the web server level are described in the Web Interface Installation Manual. INDEX INDEX ..................................................................................................... 2 PROLOGUE .............................................................................................. 1 1 SYSTEM REQUIREMENTS...................................................................... 2 2 STRUCTURE OF THE WEB INTERFACE................................................... 3 3 WEB INTERFACE ADMINISTRATION..................................................... 4 3.1 ENTERING THE ADMINISTRATION LEVEL .............................................4 3.2 CHANGING THE APPEARANCE OF THE WEB PORTAL ...............................5 3.2.1 HOW TO CHANGE THE TEXTS SHOWN IN THE WEB PORTAL................................6 3.2.2 HOW TO EXPLAIN THE SCOPE AND DEFINITIONS OF THE DATABASE...............6 3.2.3 HOW TO DESCRIBE THE CHARACTERISTICS OF THE I3N INITIATIVE IN YOUR COUNTRY........................................................................................................................................7 3.2.4 HOW TO ADD SUB-PAGES TO YOUR WEB PORTAL .................................................7 3.2.5 HOW TO ADD BANNERS ...............................................................................................8 3.2.6 HOW TO MODIFY PREVIOUSLY ENTERED BANNERS............................................10 3.3 ADDING DATA PREVIOUSLY STORED IN THE DATABASE IN MICROSOFT ACCESS AND MAKING BACKUPS IN MDB FORMAT............................ 11 3.4 ADDING NEW DATA FROM THE ADMINISTRATION LEVEL ...................... 12 3.5 ADDING PHOTOGRAPHS OF SPECIES INCLUDED IN THE DATABASE ....... 12 3.6 MANAGING INTRANET USERS (DATA PROVIDERS) ............................... 13 3.6.1 HOW TO ADD A NEW USER (DATA PROVIDER) ......................................................13 3.6.2 HOW TO CHANGE AN USER OPTIONS .....................................................................15 3.6.3 HOW TO LOOK AT ALL THE REGISTERED USERS..................................................16 3.7 VALIDATING INFORMATION ENTERED BY DATA PROVIDERS.................. 17 3.8 CREATING REPORTS IN XML FORMAT................................................. 18 4 INTRANET LEVEL: HOW DATA PROVIDERS ENTER INFORMATION ..... 19 4.1 ENTERING THE INTRANET SYSTEM ................................................... 19 4.2 EDITING SPECIES RECORDS ............................................................ 20 4.3 EDITING INFORMATION ABOUT CONTACTS, PROJECTS AND BIBLIOGRAPHY ........................................................................... 23 3 5. PUBLIC USE OF THE WEB PORTAL..................................................... 28 5.1 CARRYING OUT SEARCHES THRU THE WEB PORTAL .............................. 28 5.1.1 SEARCHING FOR SPECIES ................................................................................................29 5.1.2 SEARCHING FOR CONTACTS/EXPERTS, PROJECTS AND BIBLIOGRAPHY ...............32 6. APPENDIX: UNDERSTANDING DATA FIELDS ..................................... 35 SPECIES – TAXONOMY ...............................................................................................................35 SPECIES – GENERAL CHARACTERISTICS................................................................................36 SPECIES – CHARACTERISTICS OF THE INVASION.................................................................36 SPECIES – MANAGEMENT..........................................................................................................37 SPECIES – OCCURRENCES ........................................................................................................37 CONTACTS/EXPERTS ..................................................................................................................38 PROJECTS .....................................................................................................................................39 REFERENCES ...............................................................................................................................39 7. AKNOWLEDGEMENTS ........................................................................ 40 1 PROLOGUE The tool described in this manual was designed under the framework of the I3N database which was initially developed by the Universidad Nacional del Sur, in Bahía Blanca, Argentina and improved by the Instituto Hórus de Desenvolvimento e Conservação Ambiental and The Nature Conservancy, with support from the Red Inter-Americana de Información sobre Especies Invasoras (I3N). This information system forms part of the I3N network and it is possible to participate in the regional network of institutions that share data concerning invasive exotic species by using this tool and other products created by the network. The web interface is perfectly compatible and complementary to the tools developed in this project for I3N (Access database and mechanism for the creation of reports in XML format). This new tool is designed with the idea of publishing information on Internet, promoting the participation of many data providers in each country and coordinating their work through a centralized data administration mechanism. At the same time this tool has the advantage of rapid publication of information on Internet for access by those who are interested in the invasive exotic species issue and it is a powerful mechanism for updating data included in our records. When this tool was developed care was taken to avoid informatic sophistications that might limit its use for users with limited access to information technology. The fields of information considered are the result of experience of the authors and the collaboration of key people in the management of biological invasions, such as Philip Thomas, of the Hawaiian Ecosystems at Risk project (www.hear.org), and Michael Browne, manager of the Global Invasive Species Database(www.issg.org/database), as well as many other people who are concerned about the problem of the advance of invasive exotic species in Central and South America. The people who created this product hope that it will help to avoid new negative introductions, identify species of potential risk in time and efficiently manage species that affect production and the environment, and social and cultural values. Please send any suggestions for making improvements to this manual in the future. The manual was written by Sergio Zalba1, Alejandro Moreno2, Mónica Sonaglioni3 y Sílvia R. Ziller4. For the optimum use of this facility it is important that the users read this manual before starting to record data. The authors contact addresses are found in item 7. 1 I3N Argentina Nacional Lead, responsible for the Nacional Data Basde on Biological Invasions (InBiAr) 2 Programmer, responsible for the designo f the web interface 3 Administrator of InBiAr Nacional Data Basde on Biological Invasions, I3N Argentina, 4 I3N Brazil Nacional Lead; President of Instituto Hórus de Desenvolvimento e Conservação Ambiental, Brasil; Coordinator of the Invasive Alien Species Program, The Nature Conservancy Soutj America. 2 1 SYSTEM REQUIREMENTS Client PC requirements (Software/Hardware) Hardware Network Operative System Browsers Pentium III Mhz, RAM 512 Mb, Disco Duro 20Gb Required Windows 95, 98, ME, NT*, NT Server 4.0*, NT Workstation 4.0*, 2000 Professional, 2000 Server or Windows XP or superior. Internet Explorer 5.0 or superior (recommended) or Netscape Navigator Web Server Requirements (Software/Hardware) Hardware Network Operative System Browsers Web Server Pentium III Mhz, RAM 1024 Mb, 40 UDMA Gb, Video 800x600 Required Windows NT Server 4.0 with Service Pack 4.0, Windows 2000 Professional, Windows 2000 Server, or Windows XP Professional or superior. Internet Explorer 5.0 or superior IIS 5.0 or superior 3 2 STRUCTURE OF THE WEB INTERFACE The web interface has three main utilities: 1- A web portal 2- An intranet system 3- An administration level The portal is the visible image of the database in the Internet as seen by the public. Basically it includes the search engine for the database, as well as institutional information and links to sites of interest (including the pages of IABIN and I3N). Searches for records of species, contacts, projects and bibliography can be made freely from Internet, using one or more criteria. The intranet system is designed for data providers so that they can enter new information into the database, including records of species not yet included, new localities for species already entered, new contacts, projects or bibliographical references. A username and password provided by the Administrator are necessary for entering the intranet. The Administrator of the portal has access to a register of users who are authorized to enter information, and can assign passwords to data providers or block them, as well as using the functions of the two previous levels (information searches and data entry). The Administrator also supervises the information entered by the data providers and decides if it should be published on the web portal. This verification is fundamental for ensuring that records are controlled and it should be carried out in continual consultation with specialists of different taxonomic groups. The Administrator also regulates the portal image through a system of entering banners. This manual describes the functions of the system starting with the administration (point 3), then the intranet, i.e. the data providers level (point 4), and finally the search engine for information from Internet at the level of the web portal (point 5). 4 3 WEB INTERFACE ADMINISTRATION 3.1 ENTERING THE ADMINISTRATION LEVEL As has already been stated, the administration level is the central area of the system. The portal appearance can be changed at this level and the register of data providers can be managed by assigning usernames and passwords. The Administrator can enter, edit and remove information from the database and also supervise information entered by the data providers before authorizing its publication on the web portal. Each of the functions in this level of the web interface is described in this section. A special username and password are needed (FIGURE 1) to access the administration level of the database (FIGURE 2). FIGURE 1. Fields of username and password for accessing the administration system. By default the web interface has two registered users at the administration level whose names are “admin” and “alejandro” and the corresponding password for both of them is “12345”. 5 FIGURE 2. Access to the administration level. 3.2 CHANGING THE APPEARANCE OF THE WEB PORTAL The web portal has a general design which should be modified to include information corresponding to the institution that is responsible for the national database and others associated with it. The only part of the portal that has to be maintained is the notice in the lower part of the page that acknowledges the design and funding of the original version of this tool (FIGURE 3). FIGURE 3. Acknowledgement of the design and funding of the web interface. The following procedure shows how to change the rest of the notices and replace the general texts for more specific ones: 6 3.2.1 HOW TO CHANGE THE TEXTS SHOWN IN THE WEB PORTAL The texts shown in the initial page of the web portal are saved in “asp” files which can be edited using the Notepad program. To modify the general sentences on the initial page, edit the file C:\intePub\wwwRoot\I3N\codigo\cuerpo.asp and save the changes using the same name. To change the institutional data (email, country, name of the institution, etc.) edit the file C:\intePub\wwwRoot\i3n\publico\valores_institucion.asp, making the necessary changes (e.g. replace “(NAME OF YOUR COUNTRY)” with “Argentina”), and save the changes with the same name. 3.2.2 HOW TO EXPLAIN THE SCOPE AND DEFINITIONS OF THE DATABASE One of the most critical issues at the moment of understanding the contents of a data base concerns the criteria used for the inclusion of a record. In the specific case of the invasive exotic species it is fundamental that the database Administrator states which parameters have been used to compile information. In particular it is important to define what is meant by exotic species and invasive exotic species, and whether the database is restricted to species that have been introduced into the country or whether, on the other hand, it also contains species that have been transported from one region to another within the boundaries of the countries, or whether opportunist native species are considered as well. A special area of the portal called “Scope and definitions of the database” was designed to describe the scope of the recording system (FIGURE 4). FIGURE 4. Scope and definitions of the database. 7 To modify the text in this section you should write it and save it in the directory C:\intePub\wwwRoot\i3n\publico\ with the name “alcancetexto.asp”. 3.2.3 HOW TO DESCRIBE THE CHARACTERISTICS OF THE I3N INITIATIVE IN YOUR COUNTRY In the same way as described in the previous section, a specific area is included in the portal with the name “About the I3N (INSERT THE NAME OF YOUR COUNTRY)” especially for describing the national I3N network initiative (FIGURE 5). To include the corresponding text, write it and save it in the directory C:\intePub\wwwRoot\i3n\publico\ with the name “contactenostexto.asp”. It is particularly important to include in this section the credits concerning the information included in the data base and any eventual restriction or requirements for using it. FIGURE 5. About your national I3N initiative. 3.2.4 HOW TO ADD SUB-PAGES TO YOUR WEB PORTAL The Administrator of the portal might be interested in adding complementary information to that shown in the basic structure of the web page and links to sub-pages can be used for this. These links will appear in the upper green back-grounded menu and the procedure for adding them is as follows: 1. Create the file with the information that you want to add to the page and save it with a specific name and the extension “htm” in the directory /i3n/publico (e.g. “newpage.htm”). 2. Add the corresponding link in the upper menu: Open the file I3n\codigo\menu_sup.asp and find the following text: <A id=menu href="/alcance.asp">Definiciones y alcances de la base de datos</A> 8 </DIV> Add a new line just before </DIV> with the following text: <A id=menu href="/publico/newpage.htm">New Page</A> “New Page” represents the name with which the access button to the recently created sub-page will appear and it must be replaced by a name of your choice. 3.2.5 HOW TO ADD BANNERS Enter the option ‘Add a Banner’ from the administration menu. FIGURE 5. Entering the system to add banners. The next step consists of selecting the graphic file to be added and deciding on its position on the page. Each position is referred to by a number (2, 3, 4, 5 and 6) as shown in FIGURE 6. The file must not be greater than 97kb and it is important that its dimensions are proportional to the space destined to each banner in the portal so that it does not become distorted. More than one banner can be entered to each position. In this case the banners reappear when the page is revisited, i.e. if two banners are added to a position, each one will appear every two times the page is revisited. 9 FIGURE 6. Selecting the position of the banners. After selecting the graphic file to be added and its position, click on the “next step” button to enter a preview of how the banner will look; its position can still be changed. Moreover, each banner can be associated with a web page, serving as a link when a click is made on it (FIGURE 7). Finally, with the “Next step” button, a final look can be taken at the banner. FIGURE 7. Assigning properties to the banners. 10 3.2.6 HOW TO MODIFY PREVIOUSLY ENTERED BANNERS To modify the banners that are already installed in your page you must select the “Modify Banners” option (FIGURE 8) and then select the banner which you want to modify according to its position on the page (FIGURE 9): FIGURE 8. Entering the option for modification of banners. FIGURE 9. Selecting the banner you wish to modify. 11 Once the banner has been selected its properties can be changed or it can be removed (FIGURE 10). FIGURE 10. Changing the properties of the banners. 3.3 ADDING DATA PREVIOUSLY STORED IN THE DATABASE IN MICROSOFT ACCESS AND MAKING BACKUPS IN MDB FORMAT In some cases information may already have been entered into the I3N database in MS Access before the installation of the web interface system, or the Administrator might continue to add information through this off-line program and then add it to the Web at regular intervals. It is important to note that both systems of organization and storage of information (the database in Access and the web interface) are completely compatible and therefore it is possible to enter information onto Internet that was previously stored in the database, as well as the other way round: create a mdb file from data entered in the Web. This file could serve as a backup or allow the addition of off-line information from MS Access. The entry of information from Access to the Web can be done from the Internet server by simply copying the updated Access database to the directory 12 c:\inetPub\wwwroot\I3N\tablas. Alternatively, the web interface Administrator could carry out the updating at distance using the FTP (file transfer protocol) function. In this case the web interface Administrator would have to obtain an ftp account and a password from the Web Server Administrator. Alternatively, the files held in the c:\inetPub\wwwroot\I3N\tablas directory could be down loaded to the Access database for their off-line management. 3.4 ADDING NEW DATA FROM THE ADMINISTRATION LEVEL As has already been stated the Administrator of the web interface can add, edit or remove information concerning the species, localities, experts or contacts, projects and bibliography by following the procedure described in point 4 for the entry of data by data providers (at the intranet level). 3.5 ADDING PHOTOGRAPHS OF SPECIES INCLUDED IN THE DATABASE To add a photograph to the file of each species or to change the available image, the Administrator must select the species of interest by entering via “Maintenance” “Species”. FIGURE 11. Adding or changing the photograph of a species. Then, to include a new photograph, click on the image. A dialog box will appear where the file name and the route that indicates how to find the photograph in your PC (FIGURE 12) must be completed. Finally press “Record”. 13 FIGURE 12. Showing the route for finding the photograph of the species. 3.6 MANAGING INTRANET USERS (DATA PROVIDERS) The addition of information on-line must be authorized by the administration by assigning usernames and passwords to the data providers. Enter the “Users” option: FIGURE 13. Entering the administration of users function. 3.6.1 HOW TO ADD A NEW USER (DATA PROVIDER) To add a new user, select “Users Management” FIGURE 14. Entering the users management function. 14 You will obtain a list of users who are registered in the web interface. Then select “Add a new user” at the bottom of the screen (FIGURE 15) FIGURE 15. Adding a new User. The following form must be completed for the new user, with a name as indicated on the screen (FIGURE 16): FIGURE 16. Registration form for new users. 15 Once the new user has been added to the system a password will be assigned, initially coinciding with his or her ID number (FIGURE 17). FIGURE 17. Password for the new user. Alter registering a new user, a profile (Administrator or data provider) and the associated operations must be assigned to him/her. For doing so you have to enter the “Users Management” option, as described in section 3.5.2. 3.6.2 HOW TO CHANGE AN USER OPTIONS Any user on the list can be selected by entering “Users Management” (FIGURE 14) and accessing the corresponding file (FIGURE 18). FIGURE 18. User file. 16 Once the user file has been entered the password can be changed or the user can be temporarily blocked. To change the user’s profile (e.g. if a data provider becomes the Administrator) click on the “Next” button. FIGURE 19. Assignation of User profiles. If the “Administrator” profile is given to a user he/she will be able to manage all the other users, to add and change banners. Users with the “Data Provider” profile can add data, but cannot manage users or validate information. 3.6.3 HOW TO LOOK AT ALL THE REGISTERED USERS The list of users, both administrators and data providers, registered in the system can be seen by using the “See user’s by profile” function (FIGURE 20). FIGURE 20. List of users registered in the system and their assigned profiles. 17 3.7 VALIDATING INFORMATION ENTERED BY DATA PROVIDERS For a register to be published in the Web it has to be previously validated by the Administrator. Any change in data (deletion, addition or edition) related to a species, its occurrences, a reference, a contact or a project, made by a data provider needs to be approved by the Administrator. When the Administrator accesses the list of species, localities of a species, experts, projects or bibliographical references using the “Maintenance” function, the state of verification of each item can be seen in a text to the right of its name (FIGURE 21). FIGURE 21. Verification of species data. For example, in the case of the verification of information of the species presented in the previous figure: 1. The text “Update Alejandro” in yellow shows that the data provider, who was assigned the username Alejandro by the Administrator, changed information referring to that species and that this change is waiting for verification by the Administrator before being published on the Web. The text dados_especies, indicates that the Access table with this name was changed. 2. The text “Remove Alejandro” in red signifies that the data provider Alejandro is recommending the removal of that species from the list. 18 3. The text “Unverified data” in grey implies that the entry has never been verified (e.g. if the data was imported from an Access database file). 4. When there is no text on the right of the entity it means that the information has been verified and can be seen on Internet. 5. The symbol indicates that one or more occurrences were added or modified for this species. This information can be validated by clicking on Locations of occurrence and then on the corresponding locality (FIGURE 22). Once the proposed change has been revised by a data provider, the Administrator only has to click on the corresponding verification box. A dialog box will then request that the verification operation is confirmed (FIGURE 22). If accepted, the change will be published on the Web immediately. FIGURE 22. Confirmation request for data to be published on the Web. 3.8 CREATING REPORTS IN XML FORMAT Reports in XML (Extended Markup Language) format of data in the database can be produced at the administration level. This function was developed for the MS Access database and more details about its use can be found in points 9 to 15 in the corresponding manual. To produce a report in XML format the Administrator must first import the updated version of the information held in the database on-line using the FTP function described in point 3.2 in this manual. The creation of the report itself is done offline at the level of the database in Access. 19 4 INTRANET LEVEL: HOW DATA PROVIDERS ENTER INFORMATION 4.1 ENTERING THE INTRANET SYSTEM As has already been said, the intranet system is designed for data entry via the Internet, taking advantage of the collaboration of data providers even when these are at a distance from the central administration of the database. The data provider must have a username and password provided by the Administrator (FIGURE 23) to access the intranet system and the maintenance level of the database (FIGURE 24). FIGURE 23. Username and password fields for accessing the intranet system. FIGURE 24. Access to the intranet level (maintenance). 20 Data providers can contribute information such as new records of species, localities, contacts, projects or bibliography at this level. 4.2 EDITING SPECIES RECORDS Click on “Species” in the “Maintenance” dialog box to access the complete list of species held in the database. The data provider can add information about a species that is already on the list (e.g. its occurrence in a new locality) or add a new species. To find out if a species is already in the database the alphabetic list on this page can be searched by using the search facility of the web portal or by using the search facility on the maintenance page (FIGURE 25). Unverified data Unverified data Unverified data Update Alejandro Remove Alejandro FIGURE 25. Maintenance of information about species. Note that information about the state of verification of the data appears together with each name, however data cannot be verified from this screen because it is at the intranet level (data providers) and this can only be carried out by an Administrator. If the species has not yet been registered you must select the “New Species” option to access a dialog box for adding the information (FIGURE 26). 21 FIGURE 26. Dialog box for registering new species. Once there you will be able to complete the information about the taxonomy of the species, from Kingdom down thru all the hierarchical classification (Kingdom, Phylum, Class etc.). If any taxon was already entered for another related species you have just to select it from the alphabetical list, and if not, you have to type it in. Once the taxonomy has been completed click on “Add Species”, and then a dialog box will appear for completing information about the new species. This dialog box is organized into categories according to the following schema: general characteristics (native area of distribution, natural habitats, description of the species, biological form, reproduction, dispersal, diet and economic use); characteristics of invasion process (type and cause of introduction, site, date and author of the record, title of the reference where the introduction is cited, description of the introduction, dispersal agents, dispersal routes, preferred habitats of the invasion, affected organisms, impact of the species on the biodiversity, economic impact, social impact and impact on health), management information (control of the species, physical control, chemical control, biological control, prevention and risk analysis), localities where it occurs (locality, contact, province, municipality, river catchment, coordinates, date when the record was entered in the database, date of the observation verification of the record, habitat type, population and 22 description of the invasion), related projects (title, contact, species studied, initial and finishing dates, geographic area, principal objective, brief description and observations) and references (Title, Author, Edited in, Edition, Editorial, Year, Journal, Volume, Pages, Web, Keywords) (FIGURE 27). FIGURE 27. Dialog box for completing information about a new species. Information about the classification and the common name of the species can be added or edited on this initial screen by clicking on the pencil which appears next to the corresponding box. In a similar way information about the categories described above can be added. It is advisable to read carefully the annex “Interpretation of the information fields” for a full understanding of the significance of each category of information, and the kind of data to be added. If a data provider has to add data referring to a species already recorded in the database (e.g. a new locality) they must start by selecting it from the list shown in FIGURE 21 to access the corresponding dialog boxes. 23 4.3 EDITING INFORMATION ABOUT CONTACTS, PROJECTS AND BIBLIOGRAPHY To access the system for adding information about contacts, projects or bibliography click on the appropriate option in a similar way as it was described for modifying species. To enter information on contacts, access a list of contacts already in the database and then add the information, or a person who is not already included in the database. In the first case select the person from the list (FIGURE 28), and in the second case select “Add contact”. The latter alternative will lead to the dialog box for adding information as shown in FIGURE 29. Unverified data Update Alejandro Remove Alejandro FIGURE 28. List of contacts or experts included in the database, to be modified. FIGURE 29. Dialog box for completing information about a new contact or expert. 24 To enter information on projects, proceed in the same way by accessing the table of projects from the “Maintenance” menu (FIGURE 30). FIGURE 30. List of projects included in the database to be modified. Select the project to be modified by pressing on the drawing of the pencil next to the corresponding name, or click on the “Add Project “ button which opens the dialog box for adding new projects (FIGURE 31). FIGURE 31. Dialog box for completing information about a new project. 25 Information can be written in the box and the contact can be selected from the alphabetical list. Finally information can be saved by clicking on the corresponding button. Alter adding a new Project you have to create a relationship between it and the related species. For doing so you have to click on the symbol located at the left of the projects name (FIGURE 30). A new screen will appear as shown in FIGURE 33 containing the list of species already related to this project, click on “Add species” and select the species from the folding list (FIGURE 34). FIGURE 33. List of species already related to a project. FIGURE 34. Holding list to select species to relate to the active project. Finally, information on bibliographical references can be added by selecting the appropriate option in the “Maintenance” box and so accessing the list of publications included in the database (FIGURE 35). 26 FIGURE 35. List of bibliographical references included in the database, for editing. A new reference can be entered by using the “Add Bibliography” function in the same way as in previous cases, by typing the data in the dialog box shown on the screen (FIGURE 36). FIGURE 36. Dialog box for completing information on a new bibliographical reference. 27 Alter adding a new Reference you have to create a relationship between it and the related species. For doing so you have to click on the symbol located at the left of the references name (FIGURE 35). A new screen will appear as shown in FIGURE 37 containing the list of species already related to this reference, click on “Add species” and select the species from the folding list (FIGURE 38). FIGURE 37. List of species already related to a reference. FIGURE 38. Holding list to select species to relate to the active reference. In all cases the data provider can use the mechanism found in the top part of each maintenance page to help find records that are to be modified (FIGURE 39). 28 FIGURE 39. Search facility for information to be modified. 5. PUBLIC USE OF THE WEB PORTAL 5.1 CARRYING OUT SEARCHES THRU THE WEB PORTAL Searching for information by accessing the web portal is free and does not need a password. The search menu is in the square at the top left hand side of the portal (FIGURE 40). FIGURE 40. Search Menu in the web portal. The search results in a list of species, contacts, projects and references that have been previously validated by the Administrator, all the information that has not been already validated will not be shown. The search facilities can be accessed by selecting the corresponding option for Species, Contacts/Specialists, Projects or Bibliography. To look at the tables used for recording data in the following categories; diet, economic use, dispersal route, reproduction, preferred habitats of the invasion, dispersal agents and biological form (FIGURE 41) use the Controlled Vocabulary option. FIGURE 41. Tables of controlled vocabulary. A complete list of categories will be shown when selecting any of these tables. 29 5.1.1 SEARCHING FOR SPECIES To search for species select the corresponding category in the box shown in FIGURE 40. A form will appear on the screen with the following fields: Scientific name, Common Name, Kingdom, Phylum; Class, Order, Family, Biological form, Diet, Dispersal, Dispersal agents, Dispersal routes, Type of introduction, Causes of introduction, Sites of introduction, Date of introduction and Provinces and Municipalities where found. It is recommended that you read the annex “Interpretation of the fields of information” to fully understand the scope of each category. To look at a complete list of species included in the database leave all the fields in blank and click on the “Search” button. If on the other hand you want to concentrate your search on a sub-group of information you must fill in the boxes that define your interest with the corresponding criteria. To look at the list of available alternatives in the fields of controlled vocabulary click on the corresponding button as illustrated in FIGURE 41. The boxes can be completed with the whole or part of a word, or with a string of words or part of them. For example if you complete the box of the scientific name with the letters “pin” you will be provided with a list of species registered in the database that have that combination of letters in some part of their name (genus or species epithet), e.g. Pinus, Lupinus and Undaria pinnatifida. If you also type “tree” in the “biological form” box, then you will be only be provided with tree species from that group (FIGURE 42). 30 FIGURE 42. Form for searching for species. The result of your search will be a list of species that conform to the selected criteria and will contain the common names as well as the Kingdom, Phylum, Class and Family of each species and the scientific name (FIGURE 43). FIGURE 43. Result of search for species. By clicking on a species in the list you will be able to access information corresponding to each species (FIGURE 44). 31 FIGURE 44. Information referring to a particular species. On this initial page information is provided about the general characteristics of each species (native area of distribution, natural habitat, description of the species, biological form, reproduction, dispersal, diet and economic use); characteristics of the invasion process (type and cause of introduction, site, date and author of the record, title of the reference where the introduction is cited, description of the introduction, dispersal agents, dispersal routes, preferred habitats of the invasion, affected organisms, impact of the species on the biodiversity, economic impact, social impact and impact on health), management information (control of the species, physical control, chemical control, biological control, prevention and risk analysis), localities where it occurs (locality, contact, province, municipality, catchment area, coordinates, date recorded, date observed, verification of the record, habitat type, population and description of the invasion), related projects (title, contact, species studied, initial and finishing dates, geographic area, principal objective, brief description and observations) and references references (Title, Author, Edited in, Edition, Editorial, Year, Journal, Volume, Pages, Web, Keywords). In the case of projects, localities where a species occurs and references, the same species might be associated with a group of records (more than one project related to studies of the species and several localities where it has been recorded). In that case the search will provide a list and then specific information can be accessed for each locality, project or references by clicking on the corresponding line. 32 5.1.2 SEARCHING FOR CONTACTS/EXPERTS, PROJECTS AND BIBLIOGRAPHY To search for contacts, experts, projects and bibliography, follow the same procedure as for the species search, starting by selecting the category of information you require from the box shown in FIGURE 35. The contacts and experts can be found by surname or first name, their specialty, the province or country. To search by first name or surname you can use whole words or parts of words, whereas the other fields are of controlled vocabulary and must be selected from one of the options on the alphabetical table (FIGURE 45). FIGURE 45. Form for searching for contacts and experts. A list of the search results is obtained (FIGURE 46) and you can find complete information on any of the people included there by clicking on the line corresponding to their name (FIGURE 47). FIGURE 46. Results of search for contacts and experts. 33 FIGURE 47. Information referring to a certain contact or expert. In the case of a contact or expert being associated with a research project on invasive exotic species, this information will appear in their file and the complete details of the project can be accessed by clicking on the corresponding line. The search for projects can be carried out using one or several criteria: project title, contact and scientific or common name of the species studied (FIGURE 48). FIGURE 48. Form for searching for projects. 34 The search will result in a list of projects that coincide with the criteria used and once again you can find detailed information on each one by clicking on the corresponding line. Finally, the search for bibliographical references may include the following criteria: titles, author, scientific and common names of the species and key words (FIGURE 49). FIGURE 49. Form for searching for bibliography. 35 6. APPENDIX: UNDERSTANDING DATA FIELDS SPECIES – TAXONOMY Latin Name Common name Idioma Kingdom Phylum Series Class Order Family Sub-family Genus Species Author Sub-species Author Synonyms Validated Refers to the scientific name of the species Refers to the common or popular name of the species. Relates each common name with the corresponding language. It is symbolized with a flag at the left of the name. Refers to the Kingdom to which a species belongs. It can be filled out or selected when a new species is appended. Refers to the Phylum to which a species belongs. It is filled out when a new species is appended. Refers to the series to which a species belongs. It is filled out when a new species is appended. This content is optional, since not all species belong to Series. Refers to the Class to which a species belongs. It is filled out when a new species is appended. Refers to the Order to which a species belongs. It is filled out when a new species is appended. Refers to the Family to which a species belongs. It is filled out when a new species is appended. Refers to the Sub-family to which a species belongs. It is filled out when a new species is appended. This content is optional. Refers to the genus to which a species belongs. It is filled out when a new species is appended. Refers to the name of the Species only (not to the binomial nomenclature used for the Latin name). It is filled out when a new species is appended. Refers to the author who named the species. It is filled out when a new species is appended. It is an optional field. Refers to the sub-species. It is filled out when a new species is appended. It is an optional field. Refers to the author who named the sub-species. It is filled out when a new species is appended. It is an optional field. Lists the synonyms most commonly used to designate the species. Confirms the validation of the Occurrence records for each species in the country. This option should be affirmative when the information is precise, usually when provided by experts. 36 SPECIES – GENERAL CHARACTERISTICS Native range Natural habitat Description of species Organism type Reproduction Dispersal Diet Economic uses Geographic region to where the species is native. For instance: South Asia; Mekong River Basin, in China. Varies according to the information available; therefore, it is a free-format field. Ecosystems / biomes to where the species is native. For instance: open prairies; mesic to dry habitats; tropical rainforest; river banks; marine habitat with shallow waters. The more detailed the description, the easier it will be to understand the species habits and define control strategies. Characterizes the species by its morphology, physiology and/or phenology so that it can aid other people in identification. The more detailed the description, the better. Characterizes the species by its biological form. Always use the more specific term you can, and choose all that apply to the active species. You may select one or more terms for each species. Refers to the species reproduction types. You may select one or more terms for each species. This field only relates to plants and fungi. You may select one or more terms for each species. It describes the different ways species are propagated. This field only relates to animals. You may select one or more terms for each species. It describes different feeding habits. Refers to the different ways that a species is used, and how that provides income to those who cultivate / produce / raise it. This data is divided in two folders: a drop-down list and a free format field for more detailed description. SPECIES – CHARACTERISTICS OF THE INVASION Characterizes the type of introduction (voluntary, accidental, unknown). Cause of Indicates the reason why a species was introduced introduction or if it was an accidental introduction. Indicates the location where the species was Place introduced. This should be as specific as possible. Indicates the year when the species was Date introduced. Indicates the author(s) of the reference in which the introduction is described. You must register the reference first. Indicates the title of the reference related to the introduction. You must register the reference first. Details regarding the introduction that describe the context and complement the information in this folder. Refers to the means of transportation through which the species are carried along a pathway. You may select one or more terms for each species. Refers to the routes through which species are transported. You may select one or more terms for each species. Describes the habitats where the species can successfully adapt, therefore having a higher potential to become invasive. Introduction Introduction Author Reference of introduction Description of introduction Vectors Pathways Preferred habitats for invasion 37 Organisms affected Ecological impacts Economic impacts Social impacts Impacts on health Refers to all species that suffer negative impact due to the invasion of one species. Describes the impacts caused by the species in natural habitats. Describes the impacts caused by the species to the economy. Describes the impacts caused by the species to the population’s way of life, altering their cultural values or causing social impact. Describes the potential and real impacts caused by the species to human health. SPECIES – MANAGEMENT Mechanical control Chemical control Biological control Prevention measures Risk assessment Control techniques based only on physical or mechanical methods. May refer to the country managing the database or to other countries, indicating geographic references of application. Control techniques using chemical products such as herbicides and others. May refer to the country managing the database or to other countries, indicating geographic references of application. Control techniques that utilize biological agents to control invasion. May refer to the country managing the database or to other countries, indicating geographic references of application. Methods and best practices to prevent or mitigate invasion processes. Information about the risk assessment process for the species in the country managing the database or in other countries. Specify geographic location for each case and methods used. SPECIES – OCCURRENCES Local reference State City Source contact River basin Datum Zone Longitude (x) Latitude (y) Reference to where the species is located within the city/district. For instance, a protected area, a specific kilometer on a road or highway, a rural property, a village, the name of a local area, etc. State/province where the occurrence was registered. City/district where the occurrence was registered. Name of the person who provided the occurrence record. This person must be registered as a contact before you enter the occurrence, so that he or she can be selected from the pull-down list of contacts and be linked to the information. Indicates the river basin related to the occurrence. This field is used for aquatic species and continental semi-aquatic species, being optional for terrestrial species. The projection in which the coordinates where collected. Quadrant where the coordinates are found. To be expressed in the follwing format: xx-D, for example, 27-S or 12-N. Longitude. In UTM, it is expressed as a numerical sequence, while in decimal degrees it must be expressed in the following format: 22° 35’. It is preferable to use UTM. Latitude. In UTM, it is expressed as a numerical sequence in decimal degrees it must be expressed in the following format: 22° 35’. It is preferable to use UTM. 38 Unit Date appended Date observed Invasiveness Habitat Validated Description of invasion It indicates if the geographical reference is measured in UTM or in degrees and minutes. Year when the record was added to the database. Use four digits. Year when the invasion was observed. Use four digits. The degree of the invasion in each occurrence may be: Contained – only present in laboratories or pet stores, with no records in natural habitats. Detected in nature – present in natural areas, even if it nos invading at the moment of register, or if it does not even reproduce successfully. The term is also used when the level of invasion is not known, but there are records of the species invasive potential in other places. Established – the species is found in natural habitats, producing offspring locally, but does not show wide-range spread. It refers to very early stages of invasion at the local level. Invasive – the process of invasion is clear and widespread, with dissemination going beyond the place of introduction, cultivation or initial occurrence. Habitat where the species is present. Covers terrestrial and aquatic terms. The record is validated when people with technical and scientific knowledge provide and guarantee the reliability of information. It is an indicator of the reliability of data. Provides a detailed description of the invasion and its impacts. You must describe the degree of invasion observed (in initial or advanced stages), as well as the habitat invaded and give any relevant details whenever possible. CONTACTS/EXPERTS Name Last name Title Position Area of expertise Institution Address City Zip Code State Country E-mail Telephone Number Website Fax number First name of the contact person. Last name of the contact person. Professional, academic or technical background. Position that the contact person holds within the institution. Area in which the professional has more specific knowledge. Institution where the contact person works. Mailing address(es): home or work address. City where the contact person lives or works. Zip code for mailing purposes. State/province where the contact person lives or works. Country where the contact person lives or works. E-mail(s) address for contact. Home or Office telephone number(s) for contact. Personal or professional Website Home or office fax number for contact. 39 PROJECTS Project title Contact Starting date Ending date Species related to active project Geographical range Main objectives Title of the project appended. Reference to the person registered in the “Contacts” for correspondence. The person’s data must be registered before you add the project, so that you can select it from the pull-down list. Date when the project started. Estimated date for the end of the project, month and year. List of all species related to the project. All species must be registered before adding the project, so they can be selected from the pull-down list. Area where the project takes place (cities, states, ecosystems, river basin, etc.). Add local geographic references, city/district and state/province whenever possible. Main objectives or goals of the project. REFERENCES Title Autor Edited in Editorial Year Journal Volume Page Web Keywords Title of the reference. Author or authors of the reference. City where it was published. Editorial. Year of publication. Name of the journal if the reference corresponds to a periodical. Volume of the journal if the reference corresponds to a periodical. Pages where the reference appears. Web page if the reference corresponds to an article in the Internet. Words defining the subjects covered by the reference. 40 7. AKNOWLEDGEMENTS Andrea Grosse, I3N – Inter-American Invasive Species Information Network, USA CNPq – National Research Council, Brazil CONICET - National Technical and Scientific Research Council, Argentina Enrique Zucchino, Universidad Nacional del Sur Danielle Kioshima Romais, Biology student, Tuiuti University of Parana, Brazil Franco Amato, Cartographic Engineering, IGPlan, Brazil Jerry Touval, Director of Conservation Programs, The Nature Conservancy, USA Joachim Graf Neto, Forestry Student – Federal University of Parana, Brazil João Scucato, Programmer and Database Developer, Brazil John Randall, Executive Director, Invasive Species Initiative, The Nature Conservancy Michael Browne, ISSG/IUCN, Manager, Global Invasive Species Database, New Zealand Miguel Calmon, Director, Atlantic Forest Program, The Nature Conservancy, Brazil Philip Thomas, www.hear.org, USGS – Hawaiian Ecosystems at Risk, USA Probio, National Biodiversity Program – Ministry of Environment, Brazil For questions, remarks, suggestions or more information, please contact: Sergio Zalba Universidad Nacional del Sur Bahía Blanca, Argentina e-mail [email protected] http://www.uns.edu.ar/inbiar/ Sílvia R. Ziller Instituto Hórus de Desenvolvimento e Conservação Ambiental Rua Dr. Manoel Pedro, 495/906 Cabral Curitiba – PR e-mail [email protected] http://www.institutohorus.org.br The Nature Conservancy Programa de Espécies Exóticas Invasoras da América do Sul Alameda Júlia da Costa, 1240 Bigorrilho Curitiba – PR 80.730-070 e-mail [email protected] http://www.nature.org - http://tncweeds.ucdavis.edu/