1
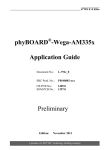
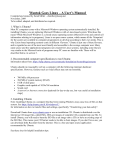
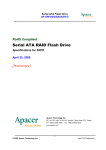
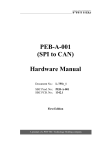
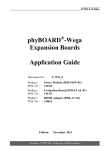
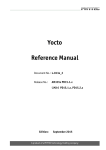
phyBOARD-RANA-AM335x Single Board Computer System Development User Manual for Linux Product No SOM PCB No CB PCB No Edition : PCL-051/PBA-CD-03 : 1397.0 : 1404.0 : March 10, 2014 In this manual copyrighted products are not explicitly indicated. The absence of the trademark (™) and copyright (©) symbols does not imply that a product is not protected. Additionally, registered patents and trademarks are similarly not expressly indicated in this manual. The information in this document has been carefully checked and is believed to be entirely reliable. However, PHYTEC Embedded Pvt. Ltd. assumes no responsibility for any inaccuracies. PHYTEC Embedded Pvt. Ltd neither gives any guarantee nor accepts any liability whatsoever for consequential damages resulting from the use of this manual or its associated product. PHYTEC Embedded Pvt. Ltd reserves the right to alter the information contained hereby without prior notification and accepts no responsibility for any damages that might result. Additionally, PHYTEC Embedded Pvt. Ltd offers no guarantee nor accepts any liability for damages arising from the improper usage or improper installation of the hardware or software. PHYTEC Embedded Pvt. Ltd further reserves the right to alter the layout and/or design of the hardware without prior notification and accepts no liability for doing so. © Copyright 2014 PHYTEC Embedded Pvt. Ltd, Koramangala Bangalore INDIA. Rights - including those of translation, reprint, broadcast, photomechanical or similar reproduction and storage or processing in computer systems, in whole or in part - are reserved. No reproduction may be made without the explicit written consent from PHYTEC Embedded Pvt. Ltd. EUROPE PHYTEC Technologie Holding AG Robert-Koch-Str. 39 55129 Mainz GERMANY NORTH AMERICA PHYTEC America LLC 203 Parfitt Way SW, Suite G100 Bainbridge Island, WA 98110 USA Ordering Information: INDIA Phytec Embedded Pvt. Ltd #16/9C 3rd Floor 3rd Main 8th Block Opp: Police Station Koramangala Bangalore-560095 +91-80-40867046 [email protected] +49 (800) 0749832 [email protected] 1 (800) 278-9913 [email protected] Web Site: http://www.phytec.in http://www.phytec.de http://www.phytec.com Address: © PHYTEC Embedded Pvt. Ltd 2014 2 Table of Contents: 1. Prepare Host Environment: ........................................................................................... 4 1.1 Configuring Services (TFTP, NFS) .......................................................................................... 4 1.1.1 Configuring TFTP .................................................................................................................................. 4 1.1.2 Configuring NFS Service ....................................................................................................................... 6 1.2 Partitioning Micro SD card in Ubuntu .................................................................................. 7 Method 1: Using Graphical User Interface .................................................................................................... 7 Method 2: Using Command line interface .................................................................................................... 8 1.3 Setting Serial Console (Minicom)......................................................................................... 8 1.4 Installing Toolchain ........................................................................................................... 10 1.4.1 Download the Toolchain ..................................................................................................................... 10 1.4.2 Export the Toolchain to Shell Path ..................................................................................................... 10 2 Download prebuilt images: .......................................................................................... 11 3 Flashing binaries: ......................................................................................................... 12 3.1 Using Barebox bootloader:................................................................................................ 13 3.1.1 Booting from Network: ...................................................................................................................... 13 3.1.2 Booting from Micro SD card: .............................................................................................................. 13 3.1.3 Booting from NAND: .......................................................................................................................... 13 4 Preparing phyBOARD-RANA-AM335x Bootloader & Kernel ........................................... 14 4.1 Preparing phyBOARD- RANA-AM335x Barebox bootloader: ............................................... 14 4.2 Preparing phyBOARD-RANA-AM335x Linux kernel: ............................................................ 15 5 Compiling User-application: ......................................................................................... 16 6 Compiling RFS with PTX-dist: ........................................................................................ 17 7 Compiling RFS with Buildroot: ...................................................................................... 18 8 Compiling RFS with Yocto: ............................................................................................ 19 9 Expansion Selection for phyBOARD-RANA-AM335x ...................................................... 20 10 Display Selection for phyBOARD-RANA-AM335x ......................................................... 23 © PHYTEC Embedded Pvt. Ltd 2014 3 1. Prepare Host Environment: In Order to follow this manual the host requires 32-bit Ubuntu, better go with LTS versions of Ubuntu. To install Ubuntu follow the link below. https://help.ubuntu.com/community/GraphicalInstall Ubuntu doesn’t come with all the pre-requisite archives for the development, to prepare the host for development download the bash shell script which can be available from the below link. Download and execution steps of the script are as follows. $wget ftp://ftp.phytec.de/pub/Products/India/phyBOARD-RANAAM335x/Linux/PD13.0.0/tools/scripts/elinux_pkg.sh $ chmod +x elinux_pkg.sh $ sh elinux_pkg.sh 1.1 Configuring Services (TFTP, NFS) 1.1.1 Configuring TFTP Installation of the TFTP Server is as follows; execute the command on Linux shell. $ sudo apt-get -y install xinetd tftpd tftp $ sudo mkdir /var/lib/tftpboot $ sudo vim /etc/xinetd.d/tftp Add the following structure in /etc/xinetd.d/tftp file if it is not there or edit if it exists. service tftp { protocol = udp port = 69 socket_type = dgram wait = yes user = nobody server = /usr/sbin/in.tftpd server_args = /var/lib/tftpboot -s disable = no } $ sudo service xinetd restart Testing TFTP Server: $ sudo cp <file_name> /var/lib/tftpboot $ sudo chmod +wr –R /var/lib/tftpboot $ tftp localhost $ get <file_name> Note : While copy the above command please take care of “-”. Better to type it manually. © PHYTEC Embedded Pvt. Ltd 2014 4 If the same file is received without any error from the tftp server then the tftp service is configured correctly. To transfer file through tftp between host and target follow steps listed below, configure the IP address for host by selecting the option Network Connection and modify the related option. The same can be done through command line interface by issuing the following command Host Side Setup : $ ifconfig eth0 192.168.1.12 up Note: This will be used as server IP address. Note that 192.168.1.12 is not mandatory you can give any IP but IP for server and target should not be same Targert Side Setup : On Target side issue the command with a different IP as below $ ifconfig eth0 192.168.1.11 up Configure the gateway address for target $ route add default gw 192.168.1.1 Check the default gateway by command $ route or $ /sbin/route -n Issue the tftp command to transfer the file $ tftp -r <file_name > -g <server_ip> © PHYTEC Embedded Pvt. Ltd 2014 5 1.1.2 Configuring NFS Service First step in NFS service configuration is to decide the path of a directory which is going to share the RFS. Here in this manual it has been taken as /nfsroot which is to be created by user by issuing the following command. $ sudo mkdir /nfsroot Edit the /etc/exports file and add the below line at the end of the file, save and close it /nfsroot *(rw, sync, no_subtree_check, no_root_squash) $ sudo gedit /etc/exports To restart the service with made changes issue the following commands on the terminal. $ sudo exportfs –ra $ sudo /etc/init.d/nfs-kernel-server restart © PHYTEC Embedded Pvt. Ltd 2014 6 1.2 Partitioning Micro SD card in Ubuntu Method 1: Using Graphical User Interface Use the application Disk Utility in Ubuntu. Select Mass storage device Unmounts the volume Delete the partition Create the two partition boot and rootfs with fat and ext3 support respectively Select the first fat partition and then select “edit partition” and mark it as bootable. Figure 2. 11 © PHYTEC Embedded Pvt. Ltd 2014 7 Method 2: Using Command line interface Download the script and follow the steps. $ wget ftp://ftp.phytec.de/pub/Products/India/phyBOARD-RANAAM335x/Linux/PD13.0.0/tools/scripts/mkcard.sh Change the mode of script $ chmod 777 mkcard.sh Insert the Micro SD card and issue the following command and check Micro SD card device interface $ dmesg | tail Execute the following script with that device interface like /dev/sda $ sudo ./mkcard.sh /dev/sdx /* /dev/sdx is device interface name */ 1.3 Setting Serial Console (Minicom) $ sudo minicom –s Select the option serial port setup from menu on terminal and press 'Enter' Figure 3.1 Using the options at left; make the setting as shown in the figure 3.2. For ex: Serial device - /dev/ttsyS0, first press ‘A’ the cursor blinks at the particular line then change the device name to /dev/ttyS0 and press ‘ENTER’. Note : The /dev/ttyS0 is not fixed it may vary depending upon the interface which You are using for example if you are using usb to serial converter then the node will be /dev/ttyUSB* Where * may be 0,1,... © PHYTEC Embedded Pvt. Ltd 2014 8 Figure 3.2 After making all required changes, like baud rate -115200, hardware control flow –No etc. Press ‘ENTER’ to come out from the screen, now the previous screen will appear. Figure 3.3 Now select the “Save setup as dfl” it saves the setting as default. Now select ‘Exit’ © PHYTEC Embedded Pvt. Ltd 2014 9 Figure 3.4 It will take into ‘minicom’ the serial terminal. 1.4 Installing Toolchain This section explains how to install prebuilt toolchain binaries on the Host. Whereas building of Toolchain is explained in build system section. 1.4.1 Download the Toolchain Download the prebuild toolchain from the public ftp of PHYTEC from the link below. $ wget ftp://ftp.phytec.de/pub/Products/India/phyBOARD-RANAAM335x/Linux/PD13.0.0/tools/toolchain/arm-cortexa8-linux-gnueabihf.tar.bz2 You can also download the OSELAS.Toolchain-2012.12.1 source code compile it and get the toolchain from the below link. $ wget ftp://ftp.phytec.de/pub/Products/India/phyBOARD-RANAAM335x/Linux/PD13.0.0/tools/toolchain/OSELAS.Toolchain-2012.12.1.tar.bz2 1.4.2 Export the Toolchain to Shell Path Extract the Toolchain that has downloaded in the above section to the HOME directory. For extracting the toolchain from GUI you can ‘right click’ on the oolchain and select ‘Extract’. Same can be done from terminal by issuing the below mentioned command $ tar –xvf arm-cortex8-linux-gnueabihf.tar.bz2 Now write a script that export the target Architecture and toolchain prefix as below. $ vim env.sh In the file add the following lines #!/bin/sh export PATH=$PATH:/home/<user_name>/<path to toolchain bin> export ARCH=arm export CROSS_COMPILE=arm-cortexa8-linux-gnueabihf- © PHYTEC Embedded Pvt. Ltd 2014 10 Save and exit from the editor. Execute the script by issuing $ . env.sh Note: The Command is “dot space env.sh”. Execute the above command for every new shell where you are trying to start compilation of Linux Kernel or Boot loader Check whether the toolchain path is set or not by issuing below command $ echo $PATH Above command displays the entire paths that are added to Shell PATH variable separated by colon ‘:’. See if your path is printed on the terminal. If you are not able to see your toolchain path repeat the steps from the beginning of this section. 2 Download prebuilt images: This section gives the links to all the required binaries to boot the phyBOARD-RANAAM335x using the simplest method using Micro SD card. Partition your Micro SD card. Follow the Partitioning Micro SD card in Ubuntu section. All the tested binaries are placed at the public PHYTEC ftp. Follow the links below to download the binaries. MLO: ftp://ftp.phytec.de/pub/Products/India/phyBOARD-RANAAM335x/Linux/PD13.0.0/images/MLO Barebox: ftp://ftp.phytec.de/pub/Products/India/phyBOARD-RANAAM335x/Linux/PD13.0.0/images/barebox-image Linux: ftp://ftp.phytec.de/pub/Products/India/phyBOARD-RANAAM335x/Linux/PD13.0.0/images/linuximage Root.tgz ftp://ftp.phytec.de/pub/Products/India/phyBOARD-RANAAM335x/Linux/PD13.0.0/images/root.tgz Root.ubi ftp://ftp.phytec.de/pub/Products/India/phyBOARD-RANAAM335x/Linux/PD13.0.0/images/root.ubi Note: Please change the barebox-image to barebox.bin $ mv barebox-image barebox.bin © PHYTEC Embedded Pvt. Ltd 2014 11 3 Flashing binaries: Figure 3.5 Figure shows two methods. The first method used to provide all needed components to run on the target itself. The Linux kernel image and the root file system image are persistent in the media the target features. This means the only connection needed is the serial cable to see what is happening on our target. This method is called standalone. This works after writing image into NAND which is explained later in the Document. The other method is to provide needed components via network. In this case the development host is connected to the phyBOARD-RANA-AM335x with a serial cable and via Ethernet. The embedded board boots into the bootloader, then issues a TFTP request on the network and boots the kernel from the TFTP server on the host. Then, after decompressing the kernel into the RAM and starting it, the kernel mounts its root file system at phyBOARD-RANA-AM335x Board /root directory. The latter one is especially for development purposes, as it provides a very quick turnaround while testing the kernel and the root file system. Other methods like Micro SD card and NAND have also been discussed. © PHYTEC Embedded Pvt. Ltd 2014 12 3.1 Using Barebox bootloader: 3.1.1 Booting from Network: Now flash Kernel image and rootfs with tftp & nfs. Before using this method make sure that tftp & nfs-server is working in host side. To test and configure refer section “Configuring Services (TFTP, NFS)”. Copy the uImage (kernel image) and root filesystem into /var/lib/tftpboot & /nfsroot respectively. On Host: $ sudo cp linuximage /var/lib/tftpboot $ sudo tar -xvf root.tgz -C /nfsroot Now switch to minicom terminal, reset the board & press ‘m’ for barebox menu or type exit in the shell & select option 3 to boot from network. 3.1.2 Booting from Micro SD card: For partitioning the Micro SD card refer section “Partitioning a Micro SD card in linux” Copy MLO, barebox.bin, linuximage, root.ubi in first partition (boot) and Root file system in second partition (rootfs). On HOST: Insert the Micro SD card. $ cp MLO /media/boot $ cp barebox.bin /media/boot $ cp linuximage /media/boot $ cp root.ubi /media/boot $ sudo tar -xvf root.tgz -C /media/rootfs On Target: Insert the Micro SD card and make sure that the pins 3+4 of JP5 is shorted, Power On the board, press ‘m’ for barebox menu & select option 2 to boot from SD Card. 3.1.3 Booting from NAND: If booting from SD Card start from here barebox@Phytec phyBOARD RANA barebox@Phytec phyBOARD RANA barebox@Phytec phyBOARD RANA barebox@Phytec phyBOARD RANA barebox@Phytec phyBOARD RANA AM335x:/ erase dev/nand0 AM335x:/ cp boot/MLO dev/nand0.xload.bb AM335x:/ cp boot/barebox.bin dev/nand0.barebox.bb AM335x:/ cp boot/linuximage dev/nand0.kernel.bb AM335x:/ cp boot/root.ubi dev/nand0.root.bb Remove the Micro SD card and make sure that JP5 is open, Power On the board, press ‘m’ © PHYTEC Embedded Pvt. Ltd 2014 13 for barebox menu & select option 1 to boot from NAND. 4 Preparing phyBOARD-RANA-AM335x Bootloader & Kernel This is required if board is not flashed with correct boot loader. Even you can skip to the flashing section if you want to use prebuilt images. 4.1 Preparing phyBOARD- RANA-AM335x Barebox bootloader: Note: Refer section 1.4 Installing Toolchain before going ahead. Download the source of barebox version 2013.07.0 from the following link. http://barebox.org/download/barebox-2013.07.0.tar.bz2 After getting the source copy it to working directory $ cp barebox-2013.07.0.tar.bz2 ~/work $ cd ~/work Extract the source here by following command $ tar -xvf barebox-2013.07.0.tar.bz2 Go to extracted folder and issue the following command $ cd ~/work/<directory path to source> Note: We had already applied the patches and uploaded the barebox source code on Phytec Ftp you can directly download it from the below link. $ wget ftp://ftp.phytec.de/pub/Products/India/phyBOARD-RANAAM335x/Linux/PD13.0.0/src/bootloaders/barebox/barebox-2013.07.0.tar.bz2 If you want to do it manually then download the patches for phyBOARD-RANAAM335x from the public ftp from the link below. Apply the patches. $wget ftp://ftp.phytec.de/pub/Products/India/phyBOARD-RANAAM335x/Linux/PD13.0.0/src/patches/barebox-2013.07.0/barebox/* Apply the patches one by one using following command. $ patch -p1 < <patch_file_name.patch> © PHYTEC Embedded Pvt. Ltd 2014 /* apply all patches one by one */ 14 Cleaning all the binaries and other configuration files $ make clean $ make distclean $ make rana_am335x_mlo_defconfig /*configuring the MLO for target */ $ make /*It will create MLO for target */ $ make rana_am335x_defconfig /* configuring the Barebox for target */ $ make /*It will create barebox.bin for target */ If the compilation goes well you will find the files MLO and barebox.bin in the source directory. If you experience any error act accordingly or post the errors at our forums you will get help accordingly. 4.2 Preparing phyBOARD-RANA-AM335x Linux kernel: Note: Refer section 1.4 Installing Toolchain before going ahead. Download the source of Linux kernel version 3.2 from the following link. ftp://ftp.kernel.org/pub/linux/kernel/v3.x/linux-3.2.tar.bz2 After getting the source copy it to working directory $ cp linux-3.2.tar.bz2 ~/work $ cd ~/work Extract the source here by following command $ tar -xvf linux-3.2.tar.bz2 Go to extracted folder and issue the following command $ cd ~/work/linux-3.2/ Note: We had already applied the patches and uploaded the linux source code on Phytec Ftp you can directly download it from the below link. $wget ftp://ftp.phytec.de/pub/Products/India/phyBOARD-RANAAM335x/Linux/PD13.0.0/src/linux/linux-3.2.tar.bz2 If you want to do it manually then download the patches for phyBOARD-RANAAM335x from the public ftp from the link below. Apply the patches. $wget ftp://ftp.phytec.de/pub/Products/India/phyBOARD-RANAAM335x/Linux/PD13.0.0/src/patches/linux-3.2/linux/* Apply the patches one by one using following command. © PHYTEC Embedded Pvt. Ltd 2014 15 $ patch -p1 < <patch_file_name.patch> /* apply all patches one by one */ Cleaning all the binaries and other configuration files $ make clean $ make distclean $ make rana_am335x_defconfig $ make uImage /* configuring the Kernel for target */ If the compilation goes well you will find the files zImage and uImage in arch/arm/boot directory. If you experience any error act accordingly or post the errors at our forums you will get help accordingly. 5 Compiling User-application: Note: Refer section 1.4 Installing Toolchain before going ahead. Make a helloworld program for target. Open file helloworld.c via command $ gedit helloworld.c Write a simple helloworld C program Compile it with toolchain $ arm-cortexa8-linux-gnueabihf-gcc helloworld.c -o helloworld Transfer it on target by tftp-server or USB or Micro SD card (Please make sure Micro SD card is inserted properly, while booting form mmc). Host Side: TFTP $ cp helloworld /val/lib/tftpboot/ SCP $ scp helloworld root@<target ip>:~ Target Side: TFTP $ tftp -r helloworld -g <host_ip> After the transfer is complete, you will be able to see your helloworld app in the current directory. $ ./helloworld <to run the application> SCP No need to do anything it will be there in home directory just run the application using below command. $ ./helloworld <to run the application> © PHYTEC Embedded Pvt. Ltd 2014 16 Insert the USB pendrive to target and switch to minicom terminal. The USB pendrive Will be detected & mounted in sdb :sdb1 .Use that following command to mount it. $ mount /dev/sdb1 /mnt $ cd /mnt $ ./helloworld /* (sdb1) is USB pendrive interface node /* execute the app (It is dot slash)*/ 6 Compiling RFS with PTX-dist: Download the PTX-dist packet from the following link: $wget ftp://ftp.phytec.de/pub/Products/India/phyBOARD-RANAAM335x/Linux/PD13.0.0/buildsystems/ptxdist/ptxdist-2013.01.0.tar.bz2 Extract the above downloaded source $ tar -xvf ptxdist-2013.01.0.tar.bz2 Go to downloaded folder $ cd ptxdist-2013.01 Configure the packet $ ./configure After the configure script is finished successfully, execute the below commands $ make $ sudo make install Download the toolchain from the public ftp of PHYTEC from the link below. $ wget ftp://ftp.phytec.de/pub/Products/India/phyBOARD-RANAAM335x/Linux/PD13.0.0/tools/toolchain/arm-cortexa8-linux-gnueabihf.tar.bz2 Extract the toolchain that has been downloaded. Issue following $ tar –xvf arm-cortexa8-linux-gnueabihf.tar.bz2 Download the PTX-dist BSP source from following link $ wget ftp://ftp.phytec.de/pub/Products/India/phyBOARD-RANAAM335x/Linux/PD13.0.0/buildsystems/ptxdist/RANA-AM335x-PD13.0.0.tar.bz2 © PHYTEC Embedded Pvt. Ltd 2014 17 Extract the source $ tar -xvf Rana-AM335x.PD13.0.0.tar.gz Go to extracted folder $ cd Rana-AM335x.PD13.0.0 Select the toolchain $ ptxdist toolchain <path_of_toolchain_bin> Start the build $ ptxdist go $ ptxdist images Check the images at platform-Rana-AM335x/images/ $ ls platform-Rana-AM335x/images/ 7 Compiling RFS with Buildroot: Download the Buildroot source from following link $ wget ftp://ftp.phytec.de/pub/Products/India/phyBOARD-RANAAM335x/Linux/PD13.0.0/buildsystems/buildroot/buildroot-2013.11.tar.bz2 Extract the source $ tar -xvf buildroot-2013.11.tar.bz2 Go to extracted folder $ cd buildroot-2013.11 Configure the buildroot by issuing following command $ make rana_am335x_defconfig Compile the buildroot $ make Check the output files at output/images $ ls output/images © PHYTEC Embedded Pvt. Ltd 2014 18 8 Compiling RFS with Yocto: Download the Yocto buidsystem source from following link $ wget ftp://ftp.phytec.de/pub/Products/India/phyBOARD-RANAAM335x/Linux/PD13.0.0/buildsystems/yocto/poky-dora-10.0.0.tar.bz2 Extract the source $ tar –xvf poky-dora-10.0.0.tar.bz2 Go to extracted folder $ cd poky-dora-10.0.0 Configure poky-dora-10.0.0 by issuing following command $ . ./oe-init-build-env Then type the following command to get hob GUI interface. $ hob Then under “select machine” option select RANA_AM335x to build images for phyBOARD-RANA-AM335x board. To use hob refer the link given below. https://www.yoctoproject.org/documentation/hob-manual Check the output files at tmp/deploy/images $ ls tmp/deploy/images © PHYTEC Embedded Pvt. Ltd 2014 19 9 Expansion Selection for phyBOARD-RANA-AM335x In the barebox we are providing a menu so that it is easy for the user to select what feature he want to provide on the expansion. For this power up the board and press “m” for the menu or type “exit” in the barebox shell. You will get the something like this. Type “m” or “exit” in the barebox shell you will get a menu like this. Here are a lot of options are provided to boot from different devices such as MMC, NAND, TFTP. You can select any one to boot but if you want to modify the default functionality on the expansion you have to go inside “Setting” option as shown in below diagram. © PHYTEC Embedded Pvt. Ltd 2014 20 As you had seen that in “Settings” a lot of options are there you can set the network related things such as IP address in Network settings, etc. You can modify the default Expansion functionality by changing the 3rd option “Expansion settings” as shown below. By default we are providing support for LCD, SPI0, UART1, UART2, UART3, CAN0, CAN1, 28 GPIO’s. As it is mention a lot of options you can pass whatever you want on the expansion just by passing: expansion=<Functionality> Eg. expansion=ALLGPIO (It will provide 70 gpio’s on the Expansion) Next if you need Max GPIO’s and 1 UART then you have to pass. expansion=ALLGPIO,UART1 (It will provide 68 gpio’s and UART1 tx, UART1 rx on the Expansion) Next if you need Max GPIO’s, 1 UART and 1 CAN then you have to pass. expansion=ALLGPIO,UART1,CAN0 (It will provide 66 GPIO’s and UART1 Tx, UART1 Rx, CAN0 Tx, CAN0 Rx on the Expansion) © PHYTEC Embedded Pvt. Ltd 2014 21 While booting the kernel you can see the devices which you have selected. As you had seen we had selected LCD, SPI0, UART1, UART2, UART3, CAN0, CAN1, 28 GPIO’s so these devices has been initialised and are available on the expansion. © PHYTEC Embedded Pvt. Ltd 2014 22 10 Display Selection for phyBOARD-RANA-AM335x As it is shown in the below diagram that we are supporting these many LCD’s so whatever LCD you want to connect with phyBOARD-RANA-AM335x Board just you have to uncomment the line such as display=ZQ_ZQ3506 (It will select 3.5” LCD which we are providing by default). You can change the LCD as your wish. © PHYTEC Embedded Pvt. Ltd 2014 23 Get the dialog going ... ... and stay in touch INDIA PHYTEC Embedded Pvt.Ltd. #16/9C, 3rd Floor, 3rd Main 8th Block, Opp. Police Station Kormangala, Bangalore-560095 Tel.: +91-80-40867046-49 www.phytec.in Germany PHYTEC Messtechnik GmbH Robert-Koch-Straße 39 D-55129 Mainz Tel.: +49 6131 9221-32 Fax: +49 6131 9221-33 www.phytec.de www.phytec.eu America PHYTEC America LLC 203 Parfitt Way SW, Suite G100 Bainbridge Island, WA 98110 Tel.: +1 206 780-9047 Fax: +1 206 780-9135 www.phytec.com France PHYTEC France SARL 17, place St. Etienne F-72140 Sillé le Guillaume Tel.: +33 2 43 29 22 33 Fax: +33 2 43 29 22 34 www.phytec.fr .................................We are looking forward to hear from you!.............................. © PHYTEC Embedded Pvt. Ltd 2014 24